Cartopy教学
Cartopy 教学
本章全部转载于‘微信公众号”气象科研猫“。
主要介绍了Cartopy的13个示例,如下。
1
import numpy as np
import matplotlib.pyplot as plt
import matplotlib.ticker as mticker
import cartopy.crs as ccrs
from cartopy.mpl.ticker import LongitudeFormatter, LatitudeFormatter

dlon, dlat = 60, 30   #设置步长
xticks = np.arange(0, 360.1, dlon)  #设置绘图范围
yticks = np.arange(-90, 90.1, dlat)

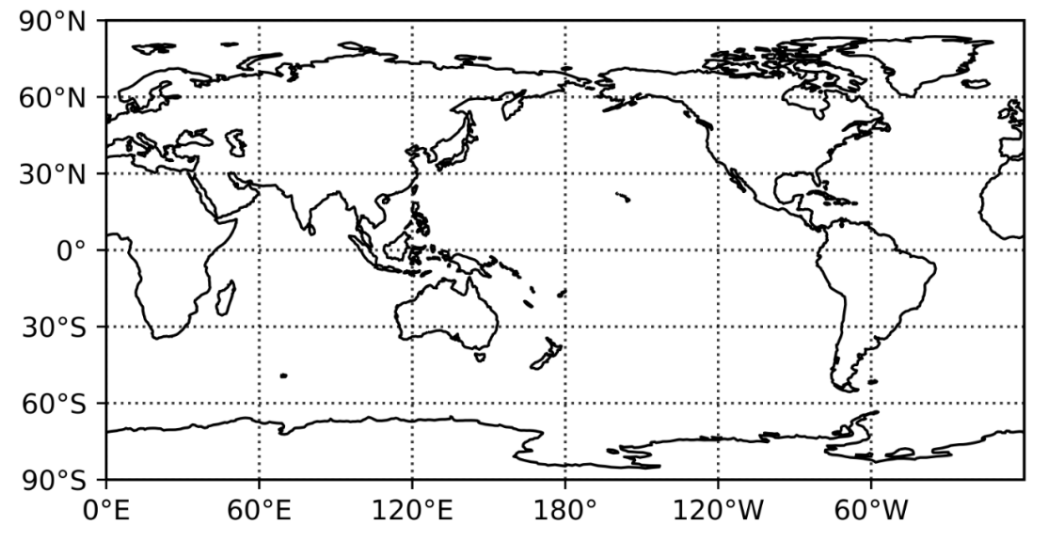
fig = plt.figure(figsize=(6,5)) #设置画布大小
ax = fig.add_subplot(1,1,1, projection=ccrs.PlateCarree(central_longitude=180)) #添加图幅本体
ax.coastlines() #海岸线

gl = ax.gridlines(crs=ccrs.PlateCarree(), draw_labels=False,linewidth=1, linestyle=':', color='k', alpha=0.8) #格网
gl.xlocator = mticker.FixedLocator(xticks)   #格网设置x轴刻度
gl.ylocator = mticker.FixedLocator(yticks)

ax.set_xticks(xticks, crs=ccrs.PlateCarree())  #图幅设置坐标轴刻度
ax.set_yticks(yticks, crs=ccrs.PlateCarree())

ax.xaxis.set_major_formatter(LongitudeFormatter(zero_direction_label=True))  #设置坐标轴刻度标签格式
ax.yaxis.set_major_formatter(LatitudeFormatter())
fig_fname = "全球地图.png"

#plt.savefig(fig_fname, dpi=500, bbox_inches='tight')
plt.savefig('F:/Rpython/lp11/plot2.png',dpi=1200)
plt.show()
2
import numpy as np
import matplotlib.pyplot as plt
import cartopy.crs as ccrs
import cartopy.feature as cfeature
from cartopy.mpl.gridliner import LONGITUDE_FORMATTER, LATITUDE_FORMATTER
plt.clf()
fig = plt.figure(dpi=200)
# set the projection to PlateCarree
proj = ccrs.PlateCarree()
ax = fig.add_subplot(1, 1, 1, projection = proj)
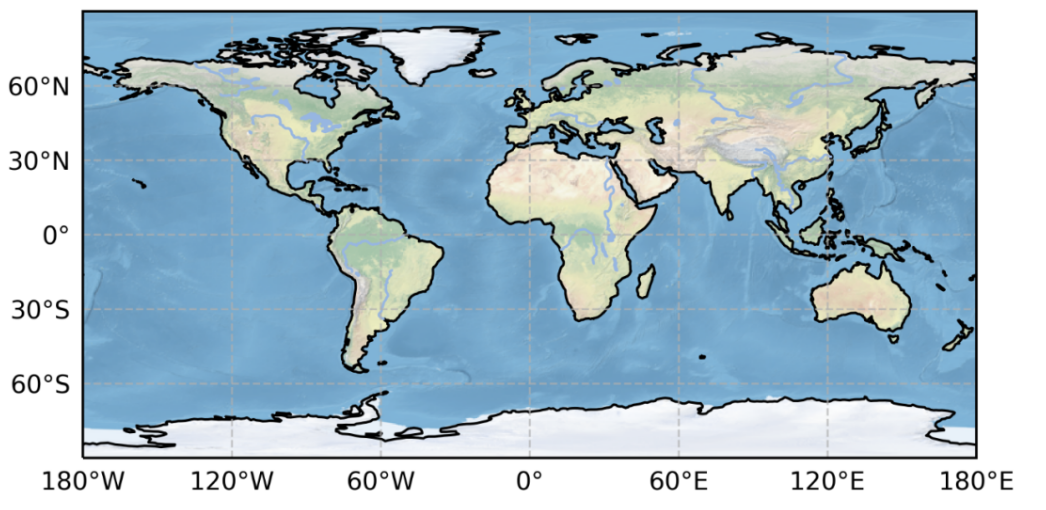
ax.set_global()
# set the gridlines to dashed line and the transparency to 0.7
gl = ax.gridlines(ylocs=np.arange(-90,90+30,30),xlocs=np.arange(-180,180+60,60),draw_labels=True,linestyle='--',alpha=0.7)
gl.xlabels_top = False
gl.ylabels_right = False
gl.xformatter = LONGITUDE_FORMATTER
gl.yformatter = LATITUDE_FORMATTER
# set background image to 50-natural-earth-1-downsampled.png
ax.stock_img()
ax.add_feature(cfeature.COASTLINE)
ax.add_feature(cfeature.RIVERS)
ax.add_feature(cfeature.LAKES)
plt.savefig('F:/Rpython/lp11/plot11.png',dpi=600)
plt.show()
3
import numpy as np
import matplotlib.pyplot as plt
import cartopy.crs as ccrs
import cartopy.feature as cfeature
from cartopy.mpl.gridliner import LONGITUDE_FORMATTER, LATITUDE_FORMATTER
# Define the interested area
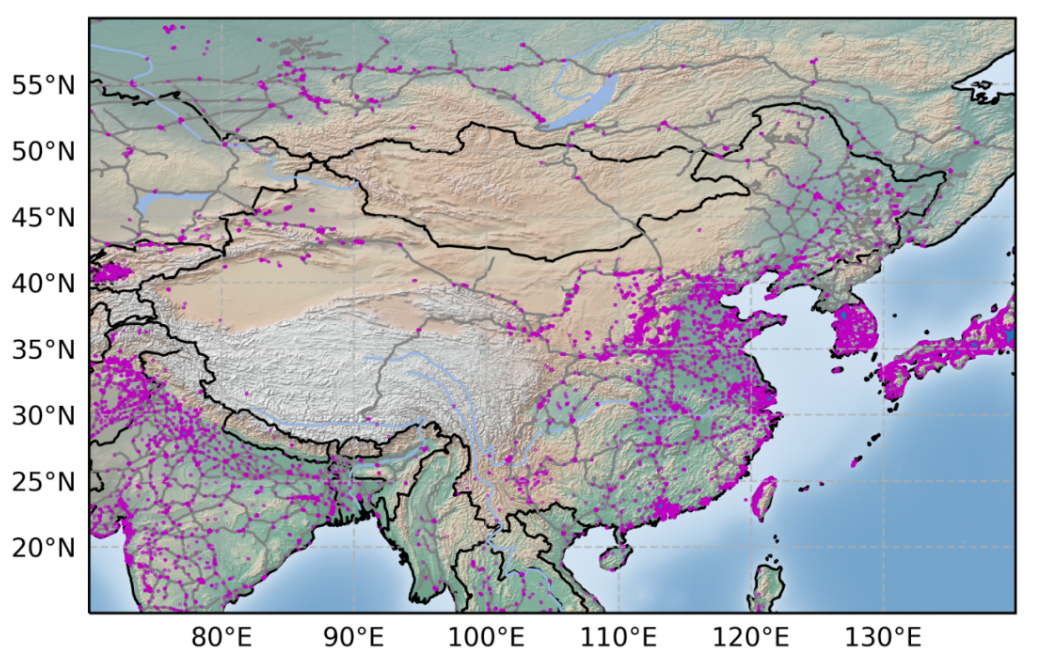
region = [70,140,15,60] # [west,east,south,north]
plt.clf()
fig = plt.figure(dpi=200)
# set the projection to PlateCarree
proj = ccrs.PlateCarree()
ax = fig.add_subplot(1, 1, 1,projection = proj)
# set the range of the interested area
ax.set_extent(region,crs = ccrs.PlateCarree())
# set the background image to the 1cm:500km raster
fname = 'F:/Rpython/lp3/HYP_50M_SR_W/HYP_50M_SR_W.tif'
ax.imshow(plt.imread(fname), origin='upper',transform=ccrs.PlateCarree(),extent=[-180, 180, -90, 90])
# set the gridlines to dashed line and the transparency to 0.7
gl = ax.gridlines(ylocs=np.arange(region[2],region[3]+5,5),xlocs=np.arange(region[0],region[1]+10,10),draw_labels=True,linestyle='--',alpha=0.7)
gl.xlabels_top = False
gl.ylabels_right = False
gl.xformatter = LONGITUDE_FORMATTER
gl.yformatter = LATITUDE_FORMATTER
railroads = cfeature.NaturalEarthFeature('cultural','railroads','10m',facecolor='None')
urban_areas = cfeature.NaturalEarthFeature('cultural','urban_areas','10m')
# add borders, coastline, rivers, lakes, railroads,and urban areas
ax.add_feature(cfeature.BORDERS.with_scale('50m')) # '50m' for mediate resolution and '10m' for high resolution
ax.add_feature(cfeature.COASTLINE.with_scale('50m'))
ax.add_feature(cfeature.RIVERS) # low resolution
ax.add_feature(cfeature.LAKES) # low resolution
ax.add_feature(railroads,edgecolor='gray')
ax.add_feature(urban_areas, edgecolor='m')
plt.savefig('F:/Rpython/lp11/plot12.png',dpi=600)
plt.show()
4
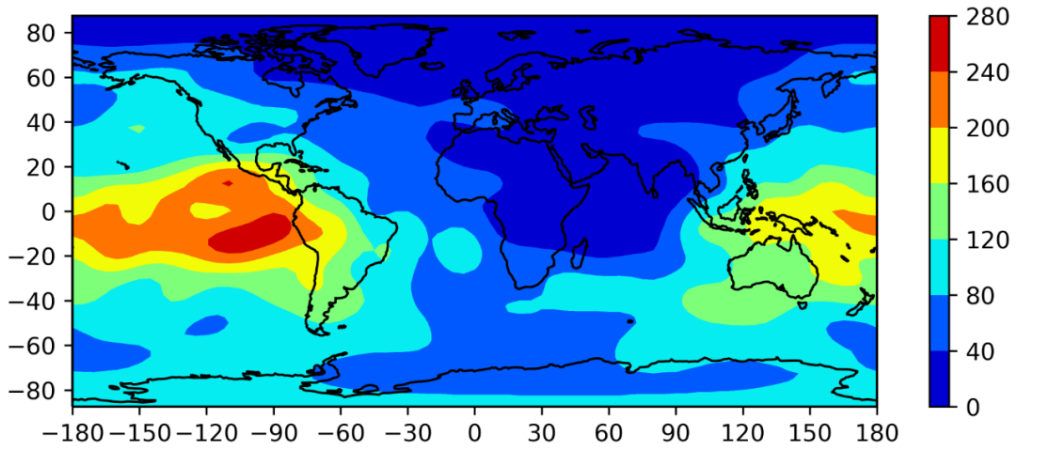
import numpy as np
import matplotlib.pyplot as plt
import cartopy.crs as ccrs
# Read VTEC data from a file
with open('F:/Rpython/lp5/1st-tecmap.dat') as src:
    data = [line for line in src if not line.endswith('LAT/LON1/LON2/DLON/H\n')]
    tec = np.fromstring(''.join(data), dtype=float, sep=' ')
# Generate a geodetic grid
nlats, nlons = 71, 73
lats = np.linspace(-87.5, 87.5, nlats)
lons = np.linspace(-180, 180, nlons)
lons, lats = np.meshgrid(lons, lats)
tec.shape = nlats, nlons
fig = plt.figure(figsize=(8, 3))
# Set projection
ax = plt.axes(projection=ccrs.PlateCarree())
# Plot contour
cp = plt.contourf(lons, lats, tec, transform=ccrs.PlateCarree(), cmap='jet')
ax.coastlines()
# Add a color bar
plt.colorbar(cp)
# Set figure extent & ticks
ax.set_extent([-180, 180, -87.5, 87.5])
ax.set_xticks([-180, -150, -120, -90, -60, -30, 0, 30, 60, 90, 120, 150, 180])
ax.set_yticks([-80, -60, -40, -20,   0,  20,  40,  60,  80])
plt.savefig('F:/Rpython/lp11/plot15.png',dpi=600)
plt.show()
5
import numpy as np
import cartopy.crs as ccrs
import cartopy.feature as cfeat
from cartopy.mpl.gridliner import LONGITUDE_FORMATTER, LATITUDE_FORMATTER
from cartopy.io.shapereader import Reader
import matplotlib.pyplot as plt
import matplotlib.ticker as mticker
import warnings
import os
from cartopy import config
from pylab import imread
#from cv2  import imread, imshow
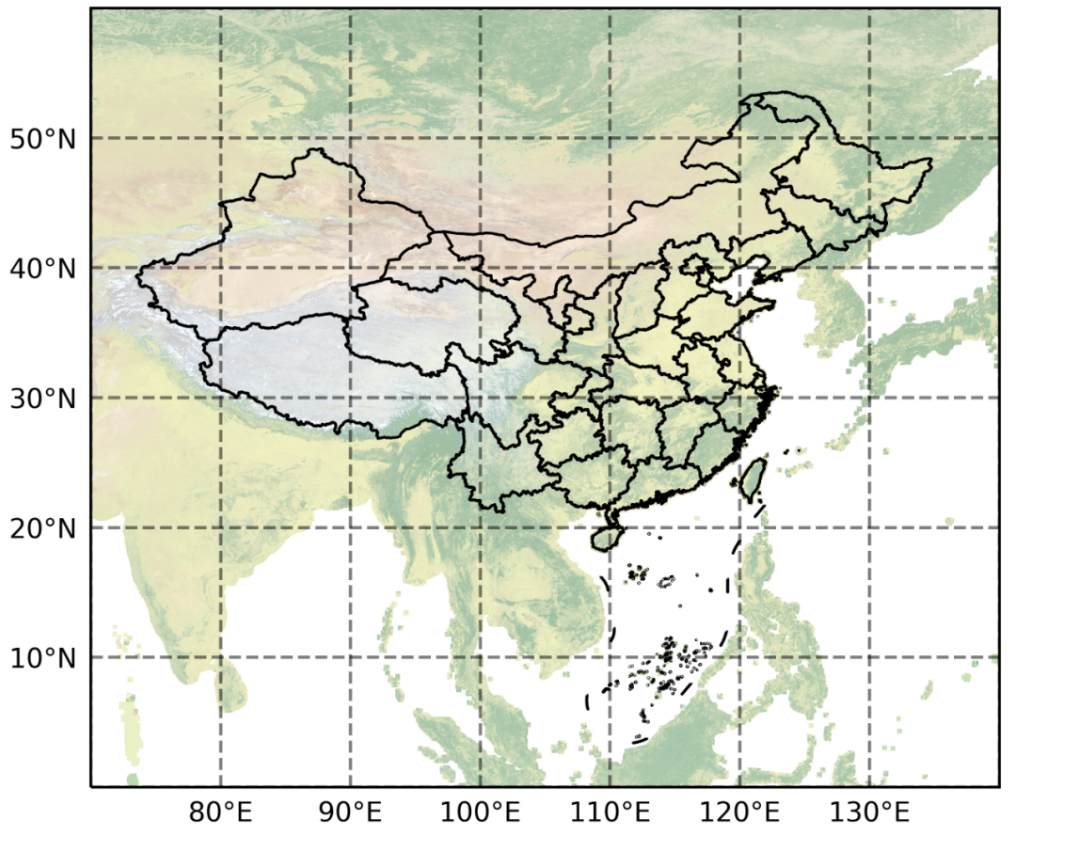
def create_map():
    extent = [70, 140, 0, 60]
    shp_path = 'F:/Rpython/lp11/'
    # --创建画图空间
    proj = ccrs.PlateCarree()  # 创建坐标系
    fig = plt.figure(figsize=(6, 8), dpi=350)  # 创建页面
    ax = fig.subplots(1, 1, subplot_kw={'projection': proj})  # 创建子图
    # --设置地图属性
    reader = Reader(shp_path  +  'shp/Province_9.shp')
    provinces = cfeat.ShapelyFeature(reader.geometries(), proj, edgecolor='k', facecolor='none')
    ax.add_feature(provinces, linewidth=1)
    ax.set_extent(extent, crs=proj)
    # --增加低分辨率地形图(cartopy自带)
    #ax.stock_img()  # 增加地形图
    # --增加高分辨率地形图(需自行下载)
    #https://www.naturalearthdata.com/downloads/10m-raster-data/10m-natural-earth-1/
    #fname = os.path.join(config["repo_data_dir"], 'raster', 'natural_earth', 'NE1_HR_LC.tif')
    fname='F:/Rpython/lp11/shp/NE1_LR_LC.tif'
    ax.imshow(imread(fname), origin='upper', transform=proj, extent=[-180, 180, -90, 90])
    # --设置网格点属性
    gl = ax.gridlines(crs=ccrs.PlateCarree(), draw_labels=True, linewidth=1.2, color='k', alpha=0.5, linestyle='--')
    gl.xlabels_top = False  # 关闭顶端的经纬度标签
    gl.ylabels_right = False  # 关闭右侧的经纬度标签
    gl.xformatter = LONGITUDE_FORMATTER  # x轴设为经度的格式
    gl.yformatter = LATITUDE_FORMATTER  # y轴设为纬度的格式
    gl.xlocator = mticker.FixedLocator(np.arange(extent[0], extent[1]+10, 10))
    gl.ylocator = mticker.FixedLocator(np.arange(extent[2], extent[3]+10, 10))
    return ax
if __name__ == '__main__':
    warnings.filterwarnings('ignore')
    ax = create_map()
    plt.savefig('F:/Rpython/lp11/plot17.png',dpi=600)
    plt.show()
6
import warnings
warnings.filterwarnings('ignore')
from mpl_toolkits.basemap import Basemap
import matplotlib.pyplot as plt
import numpy as np
fig = plt.figure(figsize=(6, 4))
plt.subplots_adjust(left=0.05, right=0.95, top=0.90, bottom=0.05, wspace=0.15, hspace=0.05)
ax = plt.subplot(111)
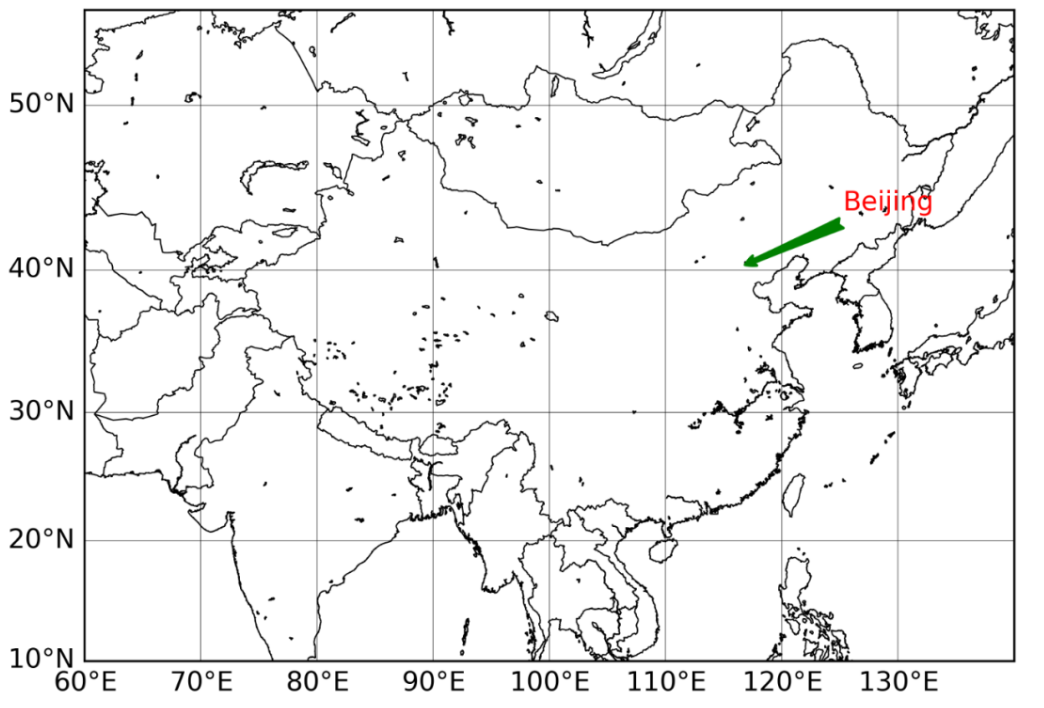
m = Basemap(resolution='i', projection='merc', llcrnrlat=10.0, urcrnrlat=55.0, llcrnrlon=60., urcrnrlon=140.0)
m.drawcountries(linewidth=0.5)
m.drawcoastlines(linewidth=0.5)
m.drawparallels(np.arange(10., 55., 10.), labels=[1, 0, 0, 0], color='black',linewidth=0.2,dashes=(None, None))  # draw parallels,dashes=[1,0],
m.drawmeridians(np.arange(60., 140., 10.), labels=[0, 0, 0, 1], color='black',linewidth=0.2,dashes=(None, None))  # draw meridians ,dashes=[1,0]
x, y = m(116.4204, 40.21244)  # Bejing
x2, y2 = m(125.27538, 43.83453)  # Changchun
plt.annotate('Beijing', xy=(x, y), xycoords='data',
              # xytext=(x2, y2), textcoords='offset points',
              xytext=(x2, y2), textcoords='data',
              color='r',arrowprops=dict(arrowstyle="fancy", color='g'))
plt.savefig('F:/Rpython/lp11/plot21.png',dpi=600)
plt.show()
7
from netCDF4 import Dataset
import numpy as np
import matplotlib.pyplot as plt
from mpl_toolkits.basemap import Basemap
import cmaps
meteo_file = r'F:/Rpython/lp3/hls/ECMWF.nc'
ds = Dataset(meteo_file, mode='r')
# 获取每个变量的值
lons = ds.variables['longitude'][:]
lats = ds.variables['latitude'][:]
# surface_air_pressure
sp = ds.variables['sp'][:]
sp_units = ds.variables['sp'].units
scale_factor = ds.variables['sp'].scale_factor
add_offset = ds.variables['sp'].add_offset
sp = scale_factor * sp + add_offset
# 2 metre temperature
t2m = ds.variables['t2m'][:]
t2m_units = ds.variables['t2m'].units
scale_factor = ds.variables['t2m'].scale_factor
add_offset = ds.variables['t2m'].add_offset
t2m = scale_factor * t2m + add_offset
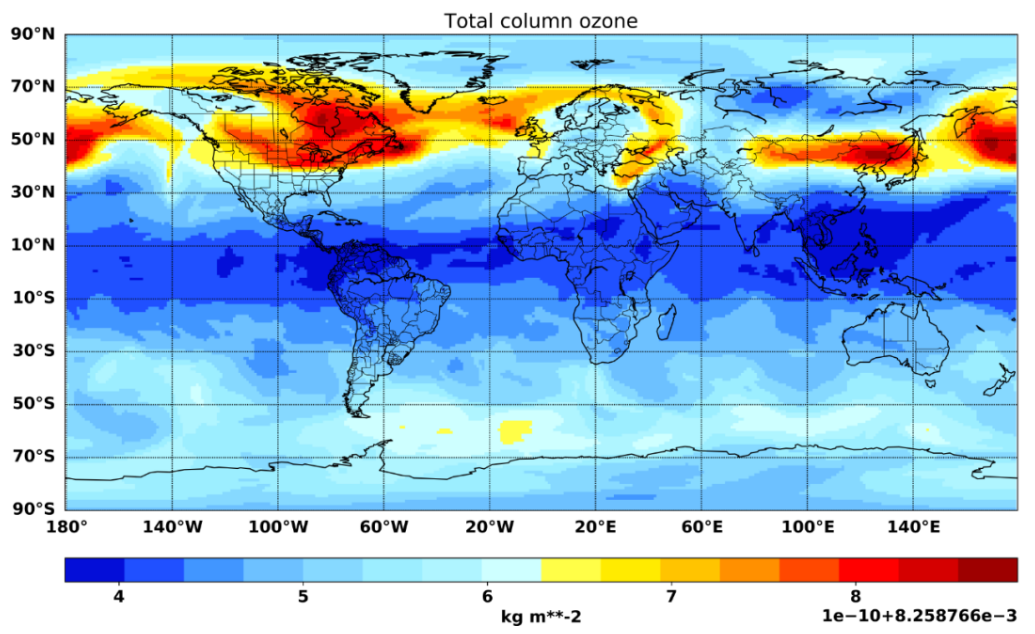
# Total column ozone
tco3 = ds.variables['tco3'][:]
tco3_units = ds.variables['tco3'].units
scale_factor = ds.variables['tco3'].scale_factor
add_offset = ds.variables['tco3'].add_offset
tco3 = scale_factor * tco3 + add_offset
# 经纬度平均值
lon_0 = lons.mean()
lat_0 = lats.mean()
# 画图大小设置
fig = plt.figure(figsize=(16, 9))
plt.rc('font', size=15, weight='bold')
ax = fig.add_subplot(111)
m = Basemap(lat_0=lat_0, lon_0=lon_0)
lon, lat = np.meshgrid(lons, lats)
xi, yi = m(lon, lat)
# 这里数据时间是UTC 00:00,2018年1月的日平均数据,只展示1月1号的数据
sp_01 = sp[0:1, :, :]
t2m_01 = t2m[0:1, :, :]
tco3_01 = tco3[0:1, :, :]
levels = m.pcolor(xi, yi, np.squeeze(tco3_01), cmap=cmaps.GMT_panoply)
# 添加格网与绘制经纬线
m.drawparallels(np.arange(-90., 91., 20.), labels=[1, 0, 0, 0], fontsize=15)
m.drawmeridians(np.arange(-180., 181., 40.), labels=[0, 0, 0, 1], fontsize=15)
# 添加海岸线,省州边界以及国家行政边界
m.drawcoastlines()
m.drawstates()
m.drawcountries()
# 添加colorbar
cbar = m.colorbar(levels, location='bottom', pad="10%")
cbar.set_label(tco3_units, fontsize=15, weight='bold')
# 添加图的标题
plt.title('Total column ozone')
#----------------------------------------------------------------------------------
plt.savefig('F:/Rpython/lp7/plot22.png',dpi=1200)
plt.show()
ds.close()
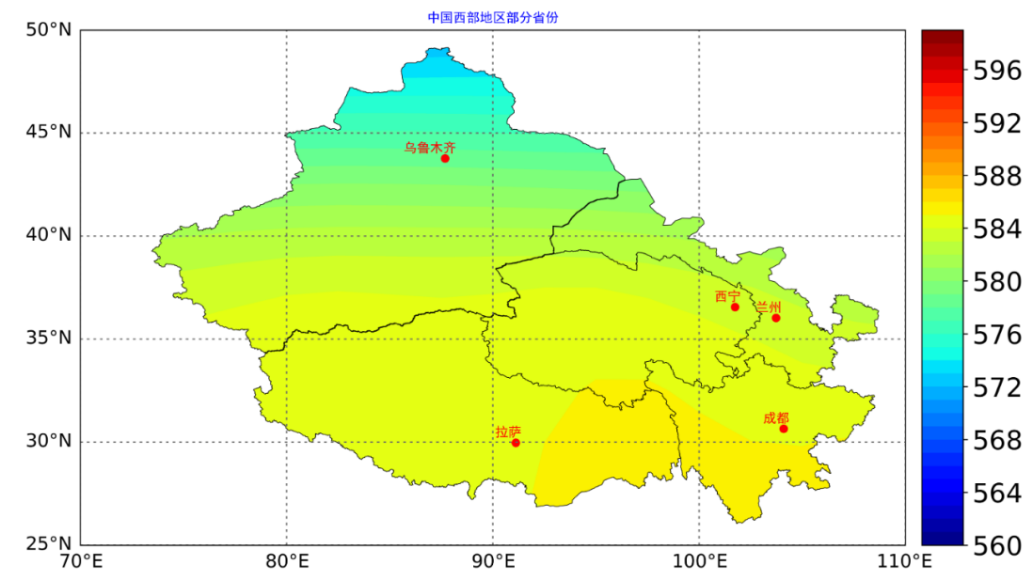
8
import numpy as np
import matplotlib.pyplot as plt
import maskout1
from mpl_toolkits.basemap import Basemap
from scipy.interpolate import griddata
from matplotlib.font_manager import FontProperties
font = FontProperties(fname=r'F:/Rpython/lp3/guangxi/SimHei/SimHei.ttf')
#创建三个列表用于存放点的数据
x=[]
y=[]
h=[]
#with open(r'F:/Rpython/lp3/guangxi/广西站点修正.csv','r') as f:
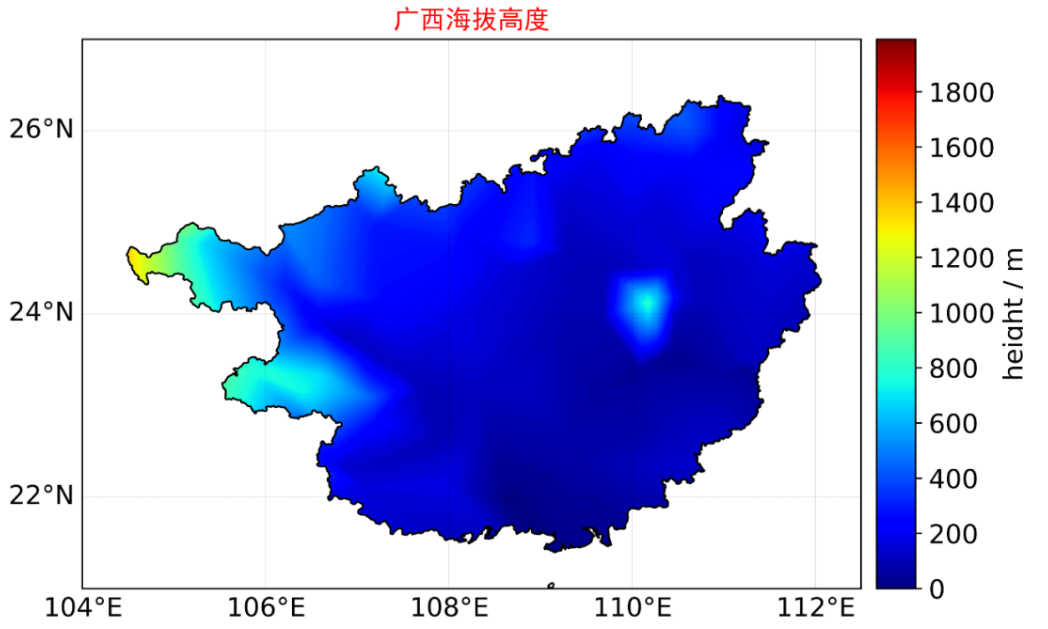
with open(r'F:/Rpython/lp3/guangxi/广西海拔高度.csv','r') as f:
    skip1=f.readline()
    datas=f.readlines()
for line in datas:
    p=line[:-1]                #去掉每行最后的换行符
    a=p.split(',')             #因为每行每个数据之间用","隔开,去掉逗号。
    x.append(float(a[2]))
    y.append(float(a[3]))
    h.append(float(a[4]))
points=[]
for i in range(len(x)):
    point=[]
    point.append(x[i])
    point.append(y[i])
    points.append(point)
points=np.array(points)
xi=np.linspace(min(x),max(x),200)
yi=np.linspace(min(y),max(y),200)
xi,yi=np.meshgrid(xi,yi)#网格化
#scipy.interpolate.griddata(points, values, xi, method=‘linear’, fill_value=nan, rescale=Fale)
#zi=griddata(points,h,(xi,yi),method='cubic')
zi=griddata(points,h,(xi,yi),method='linear')
fig = plt.figure(figsize=(8,6))
ax = fig.add_subplot(111)
# [west,east,south,north]
map = Basemap(
#    llcrnrlon=72,
#    llcrnrlat=0,
#    urcrnrlon=136,
#    urcrnrlat=55,
    llcrnrlon=104,
    llcrnrlat=21,
    urcrnrlon=112.5,
    urcrnrlat=27,
    resolution = None,
    projection = 'cyl')
#map.readshapefile('e:\python\map\world0','whatevername',color='black',linewidth=1.2)
#map.readshapefile('e:\python\map\china1','whatevername',color='black',linewidth=0.3)
map.readshapefile(r'F:/Rpython/lp3/guangxi/map/guangxi','whatevername',color='black',linewidth=1.0)
minval,maxval=int(np.amin(h)),int(np.amax(h))
print(minval,maxval)
#c2 = plt.contourf(xi,yi,zi,range(minval,maxval,1),cmap= 'jet')
#c2 = plt.contourf(xi,yi,zi,18,cmap= 'jet')
c2 = plt.contourf(xi,yi,zi,range(0,2000,10),cmap= 'jet')
clip=maskout1.shp2clip(c2,ax,r'F:/Rpython/lp3/guangxi/map/world0',r'F:/Rpython/lp3/guangxi/map/guangxi')
#plt.rcParams['font.family'] = 'Times New Roman'  #设置colorbar的label字体
plt.rcParams['font.family'] = 'DejaVu Sans'   #设置colorbar的label字体
plt.rcParams['font.size'] = 14                #设置colorbar的label字体大小
bar=map.colorbar(c2,label='height / m')
bar.ax.tick_params(labelsize=14)           #设置colorbar刻度字体大小。
# 以下标经纬度
map.drawparallels(np.arange(-90.,90.,2),labels=[1,0,0,0],fontsize=14,linewidth=0.1)
map.drawmeridians(np.arange(-180.,180.,2),labels=[0,0,0,1],fontsize=14,linewidth=0.1)
#u以下写汉字标题
plt.title(u'广西海拔高度',color='red',fontproperties=font,fontsize=14)
#plt.xlabel(u'经度',color='blue',fontproperties=font,fontsize=14)
#plt.ylabel(u'纬度',color='blue',fontproperties=font,fontsize=14)
plt.savefig(r'F:/Rpython/lp3/guangxi/gxfig.png',format='png',dpi=1200)
plt.show()
9
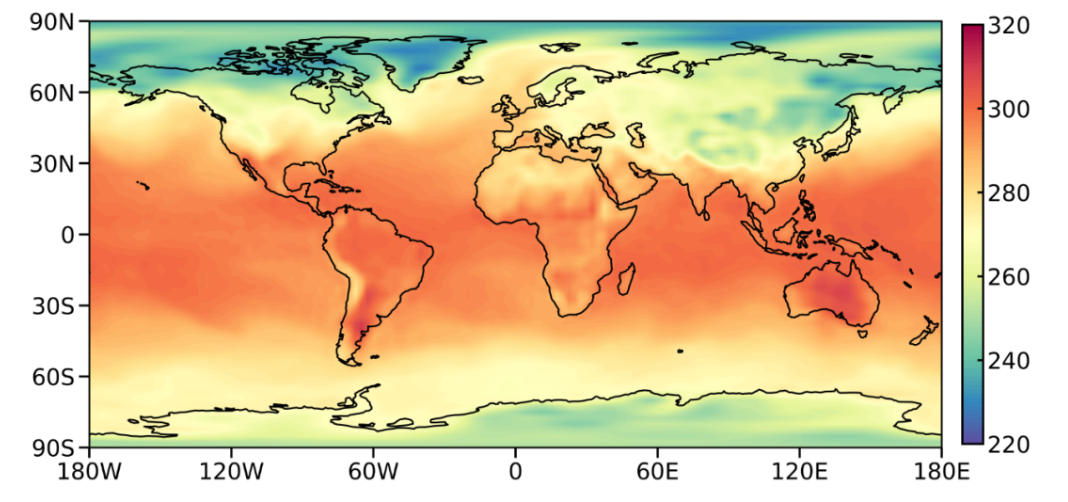
import numpy as np
import matplotlib.pyplot as plt
import seaborn as sns
import cartopy.crs as ccrs
from cartopy.mpl.ticker import LongitudeFormatter, LatitudeFormatter
from cartopy.util import add_cyclic_point
#from palettable.colorbrewer.diverging import RdBu_11_r
import netCDF4 as nc
sns.set_context('talk', font_scale=1.2) # 设置图形属性
# read NetCDF file
fn = 'F:/Rpython/lp11/shp/air.sig995.2012.nc'
data = nc.Dataset(fn, 'r') # 默认为读文件,此处 'r' 可省略
# 读取相关变量
lat = data.variables['lat'][:].data
lon = data.variables['lon'][:].data
time = data.variables['time'][:].data
air = data.variables['air'][:].data
# 添加数据循环,以防止在0和360时出现白色条状
# 添加数据循环和不添加数据循环的效果见后文两张图
cycle_air, cycle_lon = add_cyclic_point(air, coord=lon)
cycle_LON, cycle_LAT = np.meshgrid(cycle_lon, lat)
projection = ccrs.PlateCarree() # 设置投影
fig, ax = plt.subplots(figsize=(16, 9), subplot_kw=dict(projection=projection))
con = ax.contourf(cycle_LON, cycle_LAT, cycle_air[0, ...],np.arange(220, 321), cmap='Spectral_r')
ax.coastlines(linewidth=1.5) # 添加海岸线
ax.set_xticks(np.arange(-180, 181, 60), crs=projection)
ax.set_yticks(np.arange(-90, 91, 30), crs=projection)
# 设置 ticklabels 格式
lon_formatter = LongitudeFormatter(number_format='.0f',degree_symbol='',dateline_direction_label=True)
lat_formatter = LatitudeFormatter(number_format='.0f',degree_symbol='')
ax.xaxis.set_major_formatter(lon_formatter)
ax.yaxis.set_major_formatter(lat_formatter)
# shrink 控制 colorbar 长度,pad 控制colorbar和图的距离
cb = fig.colorbar(con, shrink=0.73, pad=0.02)
# 调整 ticklabels
cb.set_ticks(np.arange(220, 321, 20))
cb.set_ticklabels(np.arange(220, 321, 20))
cb.ax.tick_params(direction='in', length=5) # 控制 colorbar tick
# 保存文件, dpi用于设置图形分辨率, bbox_inches 尽量减小图形的白色区域
#fig.savefig(F:/Rpython/lp11/plot24.png', dpi=600, bbox_inches='tight')
plt.savefig('F:/Rpython/lp11/plot24.png',dpi=600)
plt.show()
10
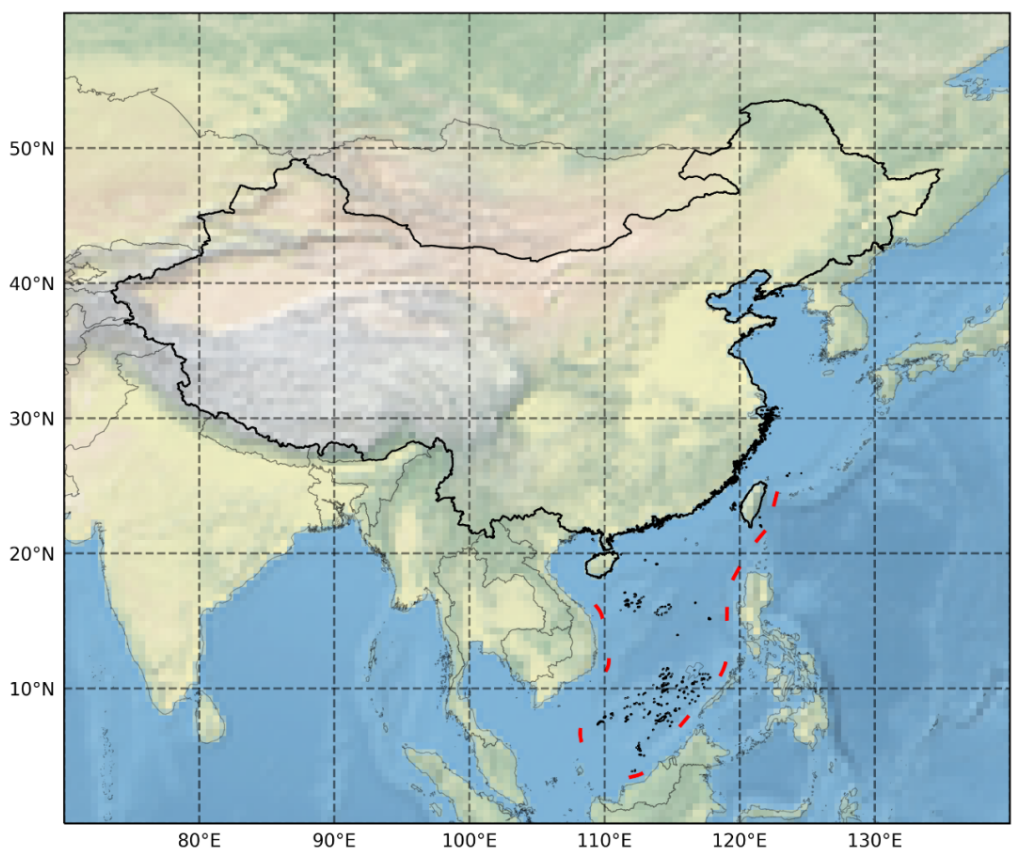
import numpy as np
import cartopy.crs as ccrs
import cartopy.feature as cfeat
from cartopy.mpl.gridliner import LONGITUDE_FORMATTER, LATITUDE_FORMATTER
from cartopy.io.shapereader import Reader
import matplotlib.pyplot as plt
import matplotlib.ticker as mticker
extent = [70, 140, 0, 60]
Chinese_land_territory_path = 'F:/Rpython/lp11/shp/China_land_territory'
Chinese_10dash_line_path = 'F:/Rpython/lp11/shp/China_10-dash_line'
world_countries_path = 'F:/Rpython/lp11/shp/world_countries'
# 创建坐标系
prj = ccrs.PlateCarree()
fig = plt.figure(figsize=(10, 8), dpi=350)
ax = fig.subplots(1, 1, subplot_kw={'projection': prj})
ax.set_extent(extent, crs=prj)
# 绘制中国陆地领土边界
    # reader = Reader(shp_path  +  'shp/Province_9.shp')
    # provinces = cfeat.ShapelyFeature(reader.geometries(), proj, edgecolor='k', facecolor='none')
    # ax.add_feature(provinces, linewidth=1)
Chinese_land_territory2 = Reader('F:/Rpython/lp11/shp/China_land_territory/China_land_territory.shp')
Chinese_land_territory = cfeat.ShapelyFeature(Chinese_land_territory2.geometries(),prj, edgecolor='k',facecolor='none')
ax.add_feature(Chinese_land_territory, linewidth=1)
# 绘制中国十段线
Chinese_10dash_line2 = Reader('F:/Rpython/lp11/shp/China_10-dash_line/China_10-dash_line.shp').geometries()
Chinese_10dash_line = cfeat.ShapelyFeature(Chinese_10dash_line2,prj, edgecolor='r')
ax.add_feature(Chinese_10dash_line, linewidth=2)
# 绘制世界各国领土边界
world_countries2 = Reader('F:/Rpython/lp11/shp/world_countries/world_countries.shp').geometries()
world_countries = cfeat.ShapelyFeature(world_countries2,prj, edgecolor='k', alpha=0.3,facecolor='none')
ax.add_feature(world_countries, linewidth=0.5)
# 添加自带地形数据
ax.stock_img()
# 绘制网格点
gl = ax.gridlines(crs=prj, draw_labels=True, linewidth=1.2, color='k',alpha=0.5, linestyle='--')
gl.xlabels_top = False  # 关闭顶端的经纬度标签
gl.ylabels_right = False  # 关闭右侧的经纬度标签
gl.xformatter = LONGITUDE_FORMATTER  # x轴设为经度的格式
gl.yformatter = LATITUDE_FORMATTER  # y轴设为纬度的格式
gl.xlocator = mticker.FixedLocator(np.arange(extent[0], extent[1]+10, 10))
gl.ylocator = mticker.FixedLocator(np.arange(extent[2], extent[3]+10, 10))
plt.savefig('F:/Rpython/lp11/plot25.png',dpi=600)
plt.show()
11
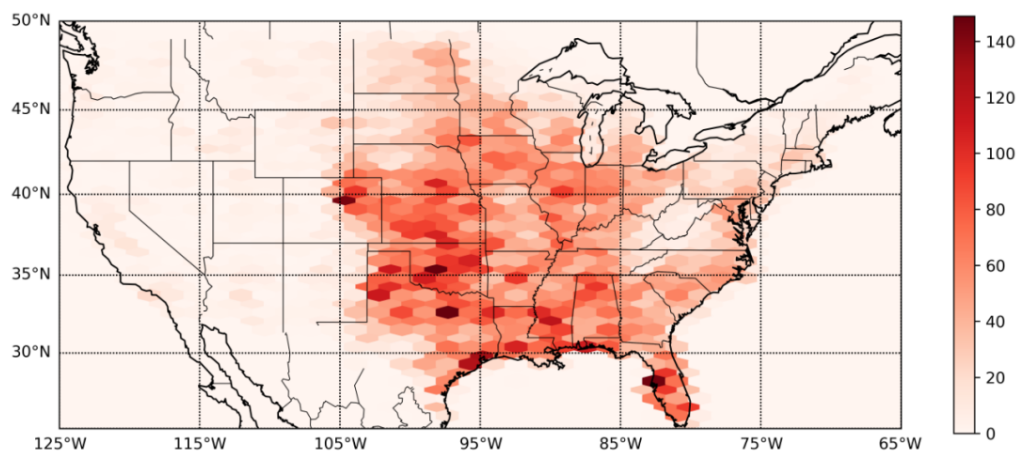
from mpl_toolkits.basemap import Basemap
import matplotlib.pyplot as plt
import pandas as pd
import numpy as np
data = pd.read_csv('F:/Rpython/lp11/shp/1950-2018_all_tornadoes.csv')
fig, ax = plt.subplots(figsize=(12,8))
m = Basemap(projection='mill',llcrnrlat=25,urcrnrlat=50,llcrnrlon=-125,urcrnrlon=-65,rsphere=6371200.,resolution='l',area_thresh=10000)
m.drawcoastlines()
m.drawstates()
parallels = np.arange(25,51,5.)
m.drawparallels(parallels,labels=[1,0,0,0],fontsize=10)
meridians = np.arange(-125.,-64.,10.)
m.drawmeridians(meridians,labels=[0,0,0,1],fontsize=10)
# 这里要转换坐标,否则可能无法显示图形
#  由于 data 为 DataFrame,所以要直接提取值,因为 basemap 在转换
# 坐标时只能是列表,元组或标量
x, y = m(data.slon.values, data.slat.values)
hex = m.hexbin(x, y, bins = 150, cmap = plt.get_cmap('Reds'))
fig.colorbar(hex, ax = ax, shrink = 0.6)
plt.savefig('F:/Rpython/lp11/plot28.png',dpi=600)
plt.show()
12
import numpy as np
import xarray as xr
import cartopy.crs as ccrs
import cartopy.feature as cfeat
from cartopy.mpl.gridliner import LONGITUDE_FORMATTER, LATITUDE_FORMATTER
import matplotlib.pyplot as plt
# 数据读取及时间平均处理
ds = xr.open_dataset('F:/Rpython/lp11/shp/EC-Interim_monthly_2018.nc')
temp = (ds['t2m'] - 273.15).mean(dim='time')  #把温度转换为℃并对其时间纬求平均
temp.attrs['units'] = 'deg C'  #温度单位转换为℃
# 创建画图空间
proj = ccrs.PlateCarree()  #创建投影
fig = plt.figure(figsize=(9,6))  #创建页面
ax = fig.subplots(1, 1, subplot_kw={'projection': proj})  #子图
# 设置地图属性:加载国界、海岸线、河流、湖泊
ax.add_feature(cfeat.BORDERS.with_scale('50m'), linewidth=0.8, zorder=1)
ax.add_feature(cfeat.COASTLINE.with_scale('50m'), linewidth=0.6, zorder=1)
ax.add_feature(cfeat.RIVERS.with_scale('50m'), zorder=1)
ax.add_feature(cfeat.LAKES.with_scale('50m'), zorder=1)
# 设置网格点属性
gl = ax.gridlines(crs=ccrs.PlateCarree(), draw_labels=True,linewidth=1.2, color='k', alpha=0.5, linestyle='--')
gl.xlabels_top = False  #关闭顶端标签
gl.ylabels_right = False  #关闭右侧标签
gl.xformatter = LONGITUDE_FORMATTER  #x轴设为经度格式
gl.yformatter = LATITUDE_FORMATTER  #y轴设为纬度格式
# 设置colorbar
cbar_kwargs = {'orientation': 'horizontal',
   'label': '2m temperature (℃)',
   'shrink': 0.8,
   'ticks': np.arange(-30,30+5,5)}
# 画图
levels = np.arange(-30,30+1,1)
temp.plot.contourf(ax=ax, levels=levels, cmap='Spectral_r',cbar_kwargs=cbar_kwargs, transform=ccrs.PlateCarree())
plt.savefig('F:/Rpython/lp11/plot26.png',dpi=600)
plt.show()
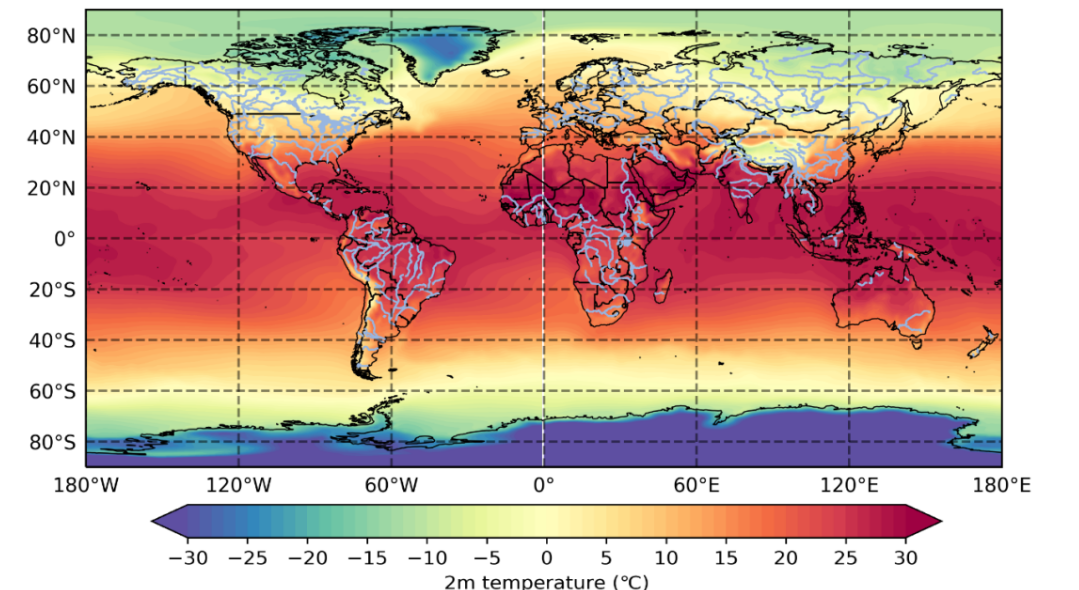
13
import os
import maskout
import numpy as np
import xarray as xr
from scipy.interpolate import Rbf
import matplotlib as mpl
import matplotlib.pyplot as plt
import cartopy.crs as ccrs
import cartopy.feature as cfeature
from cartopy.io.shapereader import Reader
from matplotlib.font_manager import FontProperties
SHP = 'F:/Rpython/lp1/wchina/china_shp'
# 数据处理
ds = xr.open_dataset('F:/Rpython/lp1/wchina/r160.nc')
da = ds.PRE.sel(month=slice(6, 8)).mean(dim='month').mean(dim='year')
# 插值
olon = np.linspace(72, 137, 260)
olat = np.linspace(15, 55, 120)
olon, olat = np.meshgrid(olon, olat)
func = Rbf(ds.station_lon, ds.station_lat, da, function='linear')
pre_grid = func(olon, olat)
# 字体
#mpl.rcParams['font.sans-serif'] = ['Times New Roman']
#mpl.rc('font', size=15, weight='normal')
#font = {'family': 'NSimSun','weight': 'normal','size': 15,}
font = FontProperties(fname=r"F:/Rpython/fonts/simsun.ttf")
# 颜色
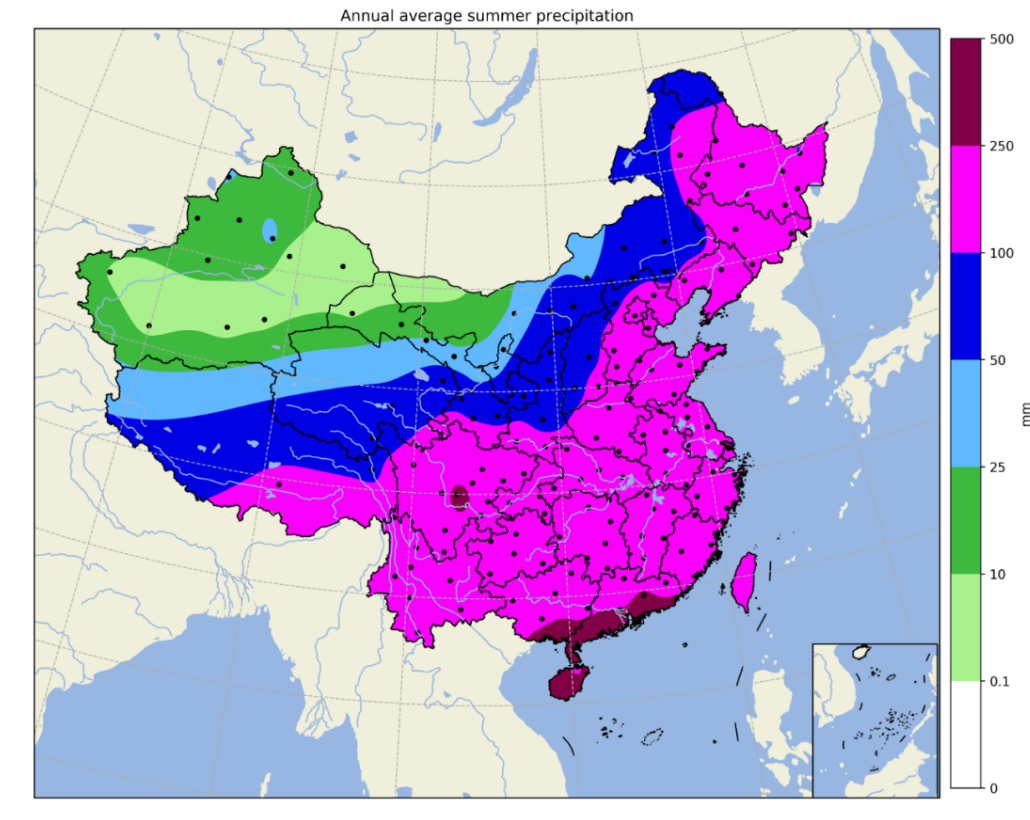
levels = [0, 0.1, 10, 25, 50, 100, 250, 500]
cmaps = mpl.colors.ListedColormap([ '#FFFFFF', '#A9F18D', '#3DB93D', '#60B8FF', '#0001E2', '#F900FA', '#810045'])
norm = mpl.colors.BoundaryNorm(levels, 7)
# 画图
proj = ccrs.LambertConformal(central_latitude=90, central_longitude=105)
fig, ax = plt.subplots(figsize=(15, 15), subplot_kw=dict(projection=proj))
ax.set_extent([80, 130, 13, 55], ccrs.PlateCarree())
ax.gridlines(linestyle='--')
ax.add_feature(cfeature.OCEAN.with_scale('50m'))
ax.add_feature(cfeature.LAND.with_scale('50m'))
ax.add_feature(cfeature.RIVERS.with_scale('50m'))
ax.add_feature(cfeature.LAKES.with_scale('50m'))
ax.add_geometries(Reader(os.path.join(SHP, 'cnhimap.shp')).geometries(),ccrs.PlateCarree(),facecolor='none',edgecolor='k', linewidth=1)
cf = ax.contourf(olon,olat,pre_grid,levels=levels, cmap=cmaps,norm=norm,zorder=1,transform=ccrs.PlateCarree())
ax.scatter(ds.station_lon, ds.station_lat,c='k',s=10,marker='o',transform=ccrs.PlateCarree())
cbar = fig.colorbar(cf, ax=ax,orientation="vertical",aspect=25,pad=0.01,shrink=0.7)
cbar.set_label('mm')
cbar.set_ticklabels(levels)
ax.set_title('Annual average summer precipitation')
#  南海
pos1 = ax.get_position()
pos2 = [pos1.x1 - ((pos1.x1 - pos1.x0) / 7), pos1.y0, pos1.width / 7,pos1.height / 5]
proj_n = ccrs.LambertConformal(central_latitude=90, central_longitude=115)
ax_n = fig.add_axes(pos2, projection=proj_n)
ax_n.set_extent([105, 120, 0, 20], ccrs.PlateCarree())
ax_n.add_geometries(Reader(os.path.join(SHP, 'cnhimap.shp')).geometries(),ccrs.PlateCarree(),facecolor='none',edgecolor='k',linewidth=1)
ax_n.add_feature(cfeature.OCEAN.with_scale('50m'))
ax_n.add_feature(cfeature.LAND.with_scale('50m'))
ax_n.add_feature(cfeature.RIVERS.with_scale('50m'))
ax_n.add_feature(cfeature.LAKES.with_scale('50m'))
# 白化
clip = maskout.shp2clip(cf,ax,shpfile=os.path.join(SHP, 'country1.shp'),region='China',proj=proj)
fig.savefig('F:/Rpython/lp11/plot.png', dpi=600, bbox_inches='tight')
plt.show()
