
【Taro】【微信小程序】在Taro中自定义custom导航栏TabBar时状态无法更新问题
最近小程序有一个新的需求,那就是对底部的TabBar进行各种的大小颜色等控制,没办法,默认的TabBar已经不够打了,只能查文档看看怎么自定义,果然是可以自定义的,小程序文档:https://developers.weixin.qq.com/miniprogram/dev/framework/ability/custom-tabbar.html
而且,文档还贴心的给出了示例代码,https://developers.weixin.qq.com/s/jiSARvmF7i55 ,点击就可以用微信的开发者工具打开,nice!原来是在src目录下新增一个custom-tab-bar的文件夹,同时在全局的配置文件中配置一下就可以了,哦呦,还挺简单的嘛,可是心里总感觉很虚,因为以我之前开发时对Taro尿性的了解,保不齐就出点什么小毛病
对示例着照猫画虎,总算是跑起来了,底部的tabbar也显示出来了,但是果然发现问题了!在页面DidShow时用Taro无法拿到TabBar的示例,进而无法刷新TabBar,切换TabBar时,颜色不会跟着改变,或者改变的是错的!
开始网上大量查找解决办法,https://www.jianshu.com/p/ec016dec7f9c ,最后借鉴了这篇文章的做法把问题解决了,我是通过Redux对tab的index状态进行管理,从而使得切换正常的,但是第一次切换的时候,仍然有一点闪烁,不过只能先忍了,下班了,如果有人看的话,有时间把代码整理整理贴上来,嘿嘿溜了溜了~
----------------------------------------------------------------------------------------------------------------------------------------------------
我来整理啦!
首先是主要结构:
- src
  - custom-tab-bar
    - index.jsx
    - index.scss
  - reducer
    - index.js
    - tabbar.js
  - store
    - index.js
  - pages
    - index
      - index.jsx
    - me
      - index.jsx
- app.config.js

代码:

1. src/custom-tab-bar/index.jsx
tabbar的主要文件,这里基本和小程序文档给的示例一致,主要区别在于引入的状态管理Redux,代码上区别在最后export的时候有一个connect写法。然后还要注意这里使用的是CoverView和CoverImage,这样Tabbar基本一直在最上方,就算打开手机的调试模式,vconsole那个按钮都会被盖住。。。,这里有需要的可以替换成View和Image,灵活控制层级~
1 import React, {Component} from 'react' 2 import Taro from '@tarojs/taro' 3 import {CoverView, CoverImage} from '@tarojs/components' 4 5 import {connect} from 'react-redux' 6 7 import './index.scss' 8 9 class CustomTabBar extends Component { 10 tabInfo = { 11 color: '#7A7E83', 12 selectedColor: '#149EFF', 13 list: [ 14 { 15 pagePath: '/pages/index/index', 16 text: '首页', 17 iconPath: '../asset/common/nav_index_normal.png', 18 selectedIconPath: '../asset/common/nav_index_selected.png', 19 }, 20 { 21 pagePath: '/pages/me/index', 22 text: '我的', 23 iconPath: '../asset/common/nav_my_normal.png', 24 selectedIconPath: '../asset/common/nav_my_selected.png', 25 }, 26 ], 27 } 28 29 switchTab = (e) => { 30 const data = e.currentTarget.dataset 31 Taro.switchTab({ 32 url: data.path, 33 }) 34 } 35 36 render() { 37 console.log('render', this.props.tabbar) 38 const activeTab = this.props.tabbar.index 39 return ( 40 <CoverView class="tab-bar"> 41 <CoverView class="tab-bar-border"></CoverView> 42 {this.tabInfo.list.map((item, index) => ( 43 <CoverView 44 class="tab-bar-item" 45 data-path={item.pagePath} 46 data-index={index} 47 onClick={(e) => this.switchTab(e)} 48 key={item.text} 49 > 50 <CoverImage 51 src={activeTab === index ? item.selectedIconPath : item.iconPath} 52 ></CoverImage> 53 <CoverView 54 style={`color: ${ 55 activeTab === index 56 ? this.tabInfo.selectedColor 57 : this.tabInfo.color 58 }`} 59 > 60 {item.text} 61 </CoverView> 62 </CoverView> 63 ))} 64 </CoverView> 65 ) 66 } 67 } 68 69 export default connect(({tabbar}) => ({ 70 tabbar, 71 }))(CustomTabBar)
2. src/custom-tab-bar/index.scss
tabbar的样式,可以根据需求自定义哦~
.tab-bar {
  position: fixed;
  bottom: 0;
  left: 0;
  right: 0;
  height: 54Px;
  background: white;
  display: flex;
  padding-bottom: env(safe-area-inset-bottom);
}

.tab-bar-border {
  background-color: #F3F4F9;
  position: absolute;
  left: 0;
  top: 0;
  width: 100%;
  height: 1Px;
  transform: scaleY(0.5);
}

.tab-bar-item {
  flex: 1;
  text-align: center;
  display: flex;
  justify-content: center;
  align-items: center;
  flex-direction: column;
}

.tab-bar-item cover-image {
  width: 33Px;
  height: 33Px;
}

.tab-bar-item cover-view {
  font-size: 11Px;
}
3. src/reducer/index.js
Redux的相关文件,主要是对当前的index进行一个全局的管理,以便在改变时让tabbar刷新,因为我也是现学现卖就不多说明了,大家可以去Redux的官网看使用方法或者去这里Taro文档
import {combineReducers} from 'redux'
import tabbar from './tabbar'

export default combineReducers({
  tabbar,
})
4. src/reducer/tabbar.js
Redux的相关文件const SETACTIVETAB = 'SETACTIVETAB' export const setActiveTab = (idx) => { return { type: SETACTIVETAB, meta: {idx}, } } const INITIAL_STATE = { index: 0, } export default function tabbarReducer(state = INITIAL_STATE, action) { switch (action.type) { case SETACTIVETAB: return { ...state, index: action.meta.idx, } default: return state } }
5. src/store/index.js
依然是Redux的相关文件import {createStore, applyMiddleware, compose} from 'redux'
import thunkMiddleware from 'redux-thunk'
import rootReducer from '../reducers'
const composeEnhancers =
typeof window === 'object' && window.__REDUX_DEVTOOLS_EXTENSION_COMPOSE__
? window.__REDUX_DEVTOOLS_EXTENSION_COMPOSE__({})
: compose
const middlewares = [thunkMiddleware]
// if (
// process.env.NODE_ENV === 'development' &&
// process.env.TARO_ENV !== 'quickapp'
// ) {
// middlewares.push(require('redux-logger').createLogger())
// }
const enhancer = composeEnhancers(
applyMiddleware(...middlewares)
// other store enhancers if any
)
export default function configStore() {
const store = createStore(rootReducer, enhancer)
return store
}
6. src/pages/index/index.js
差不多弄完了,接下来这两个就是我们tabbar所要导航到的两个页面,在DidShow生命周期更新全局变量index,这样Redux就会去刷新Tabbar的状态
...
import {connect} from 'react-redux'
import {setActiveTab} from '../../reducers/tabbar'

class Index extends Component {
  ...
  componentDidShow() {
    this.props.dispatch(setActiveTab(0))
  }
  ...
  render() {
      ...
  }
}

export default connect()(Index)
7. src/pages/me/index.js... import {connect} from 'react-redux' import {setActiveTab} from '../../reducers/tabbar' class Me extends Component { ... componentDidShow() { this.props.dispatch(setActiveTab(1)) } ... render() { ... } } export default connect()(Me)
8. src/app.config
偶对,别忘了全局配置文件中的改动,OK,完事儿
export default {
    ...

    tabBar: {
        custom: true,
        backgroundColor: '#fff',
        selectedColor: '#149EFF',
        list: [
          {
            pagePath: 'pages/index/index',
            text: '首页',
            iconPath: 'asset/common/nav_index_normal.png',
            selectedIconPath: 'asset/common/nav_index_selected.png',
          },
          {
            pagePath: 'pages/me/index',
            text: '我的',
            iconPath: 'asset/common/nav_my_normal.png',
            selectedIconPath: 'asset/common/nav_my_selected.png',
          },
        ],
      },

      usingComponents: {},
}
总结一下,主要坑的点在于微信原生可以在对应导航的页面中拿到Tabbar的实例,来setData
this.getTabBar().setData({
     selected: 1
})
可是Taro中你得这么干
this.$scope.getTabBar().$component.setState({
   ...
})
但是你却发现
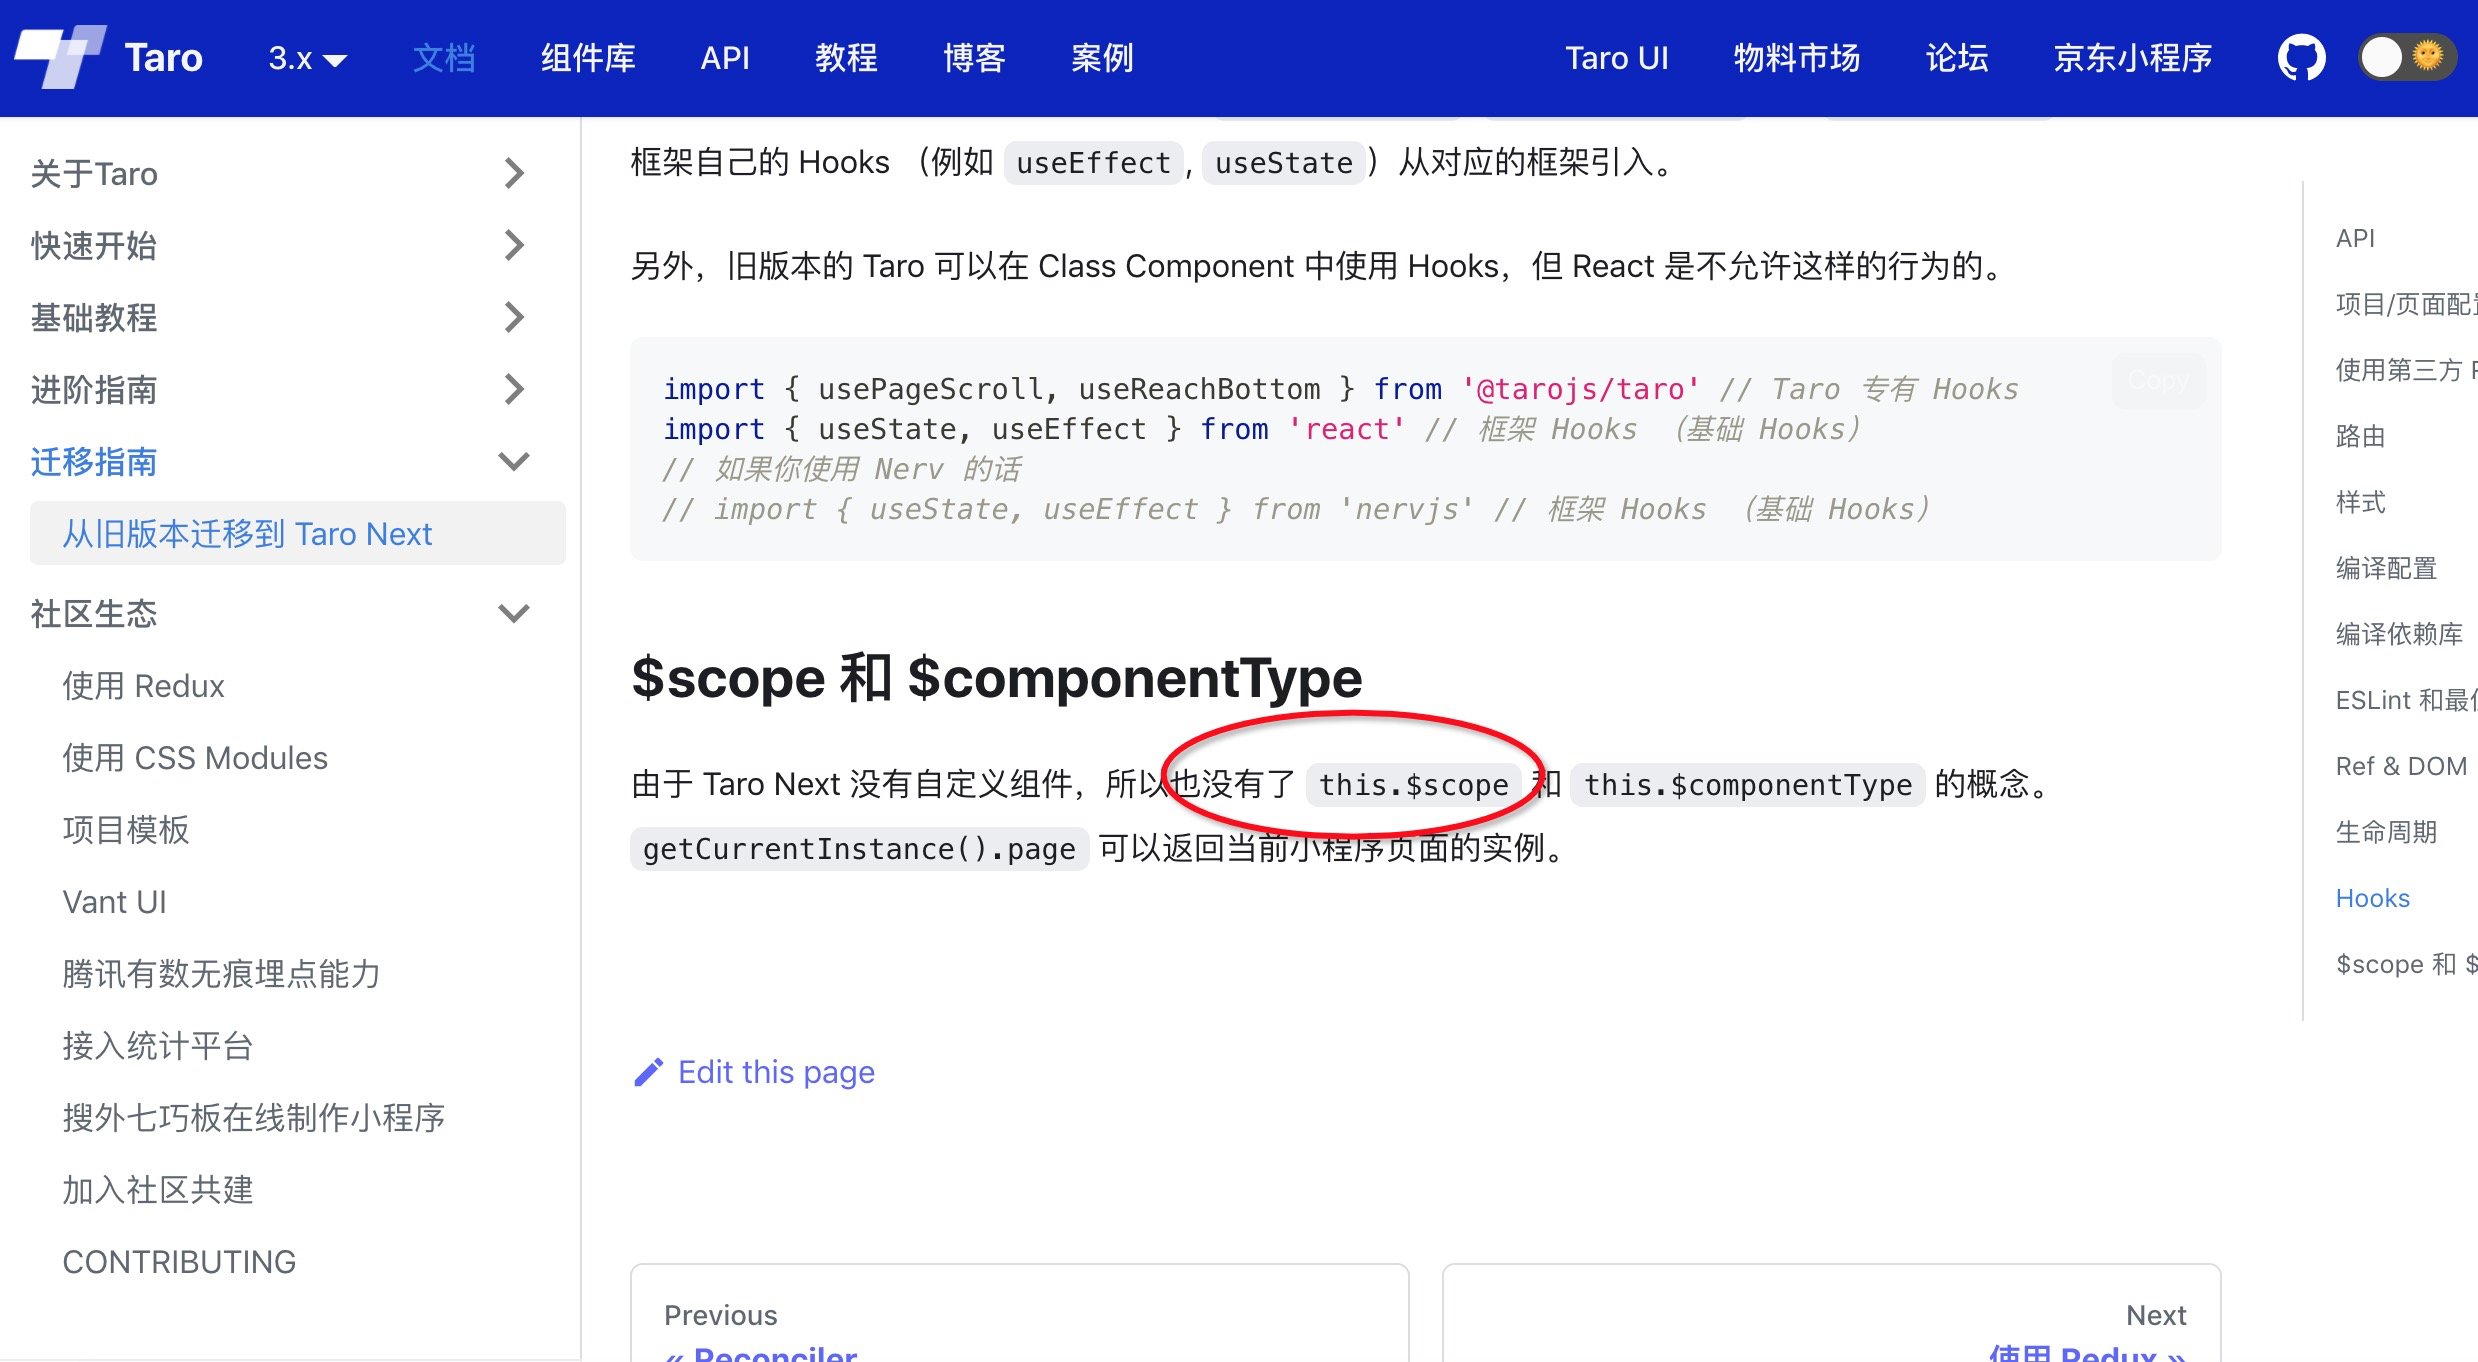
心里一顿mmp之后还是抱有一丝希望的使用getCurrentInstance().page,并把它的返回结果打印出来,但是怎么找也找不到实例的setState或者可以改变状态的可行办法(好像里面有个setData,但是不管用?),然后就¥%&¥&……*…………*¥
啊好了,好消息总算是可以解决这个问题了,不得不说小程序坑是真的多,Taro也是,我好苦啊~~呜呜,有时间再写一些其他的坑,好了,该休息了,晚安了


如果这篇文章帮到你,记得留言让我知道哦,让我知道我不是一个人,如果有更好的解决办法或者错误也请不吝赐教,溜了溜了

