使用wxpy模块了解微信好友
网上看了一篇python文章,内容简单有趣,正好可以练习一下。原文连接:http://mp.weixin.qq.com/s/oI2pH8uvq4kwYqc4kLMjuA
一、环境:Windows+python3+eclipse
二、用到的package:首先就是 wxpy ,cmd控制台使用 pip install wxpy 即可安装。
还需要安装几个后面统计数据和画图的package:jieba(中文分词),numpy,pandas,scipy(定义数据框架),matplotlib(画图),wordcloud(生成词云)。这些都可以使用 pip install *** 命令来安装,
但是有时候网速太慢,会超时报错,一是可以再试几次就好了;二是到网上下载打包好的 ***.whl 文件,在文件目录下打开cmd控制台,使用 pip install +"文件全名" 安装。(大文件推荐这种)
三、列几个常用的下载wheel文件的网址:
非官方:
https://www.lfd.uci.edu/~gohlke/pythonlibs/
官方:
四、开始
1、wxpy中有一个机器人对象,机器人 Bot 对象可被理解为一个 Web 微信客户端。Bot 在初始化时便会执行登陆操作,需要手机扫描登陆。
通过机器人对象 Bot 的 chats(), friends(),groups(), mps() 方法, 可分别获取到当前机器人的 所有聊天对象、好友、群聊,以及公众号列表。
#initialize the robot
bot = Bot()

# get all the friends
myFriends = bot.friends()
print(type(myFriends))
结果:
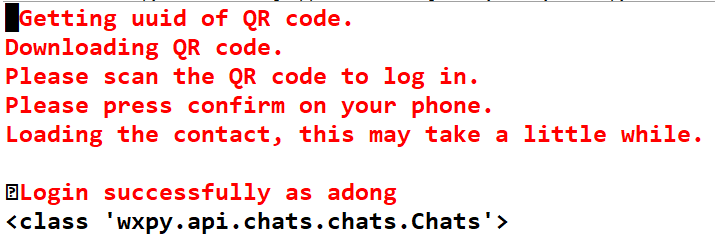
wxpy.api.chats.chats.Chats对象是多个聊天对象的合集,可用于搜索或统计,可以搜索和统计的信息包括sex(性别)、province(省份)、city(城市)和signature(个性签名)等。
2、使用一个字典sex_dict来统计好友中男性和女性的数量
sex_dict = {'male':0,'female':0}
for friend in myFriends:
    if friend.sex == 1:
        sex_dict['male'] +=1
    elif friend.sex ==2:
        sex_dict['female'] +=1
print(sex_dict)
结果:
3、数据处理
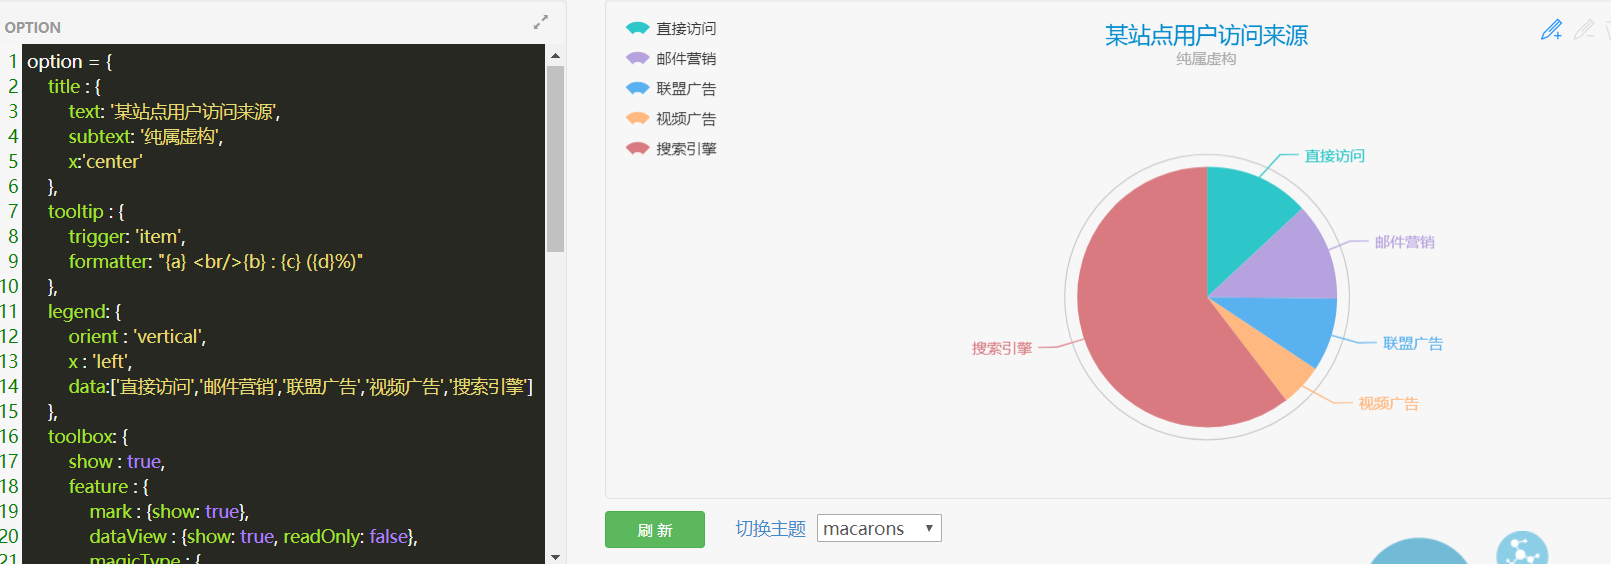
采用 ECharts饼图 进行数据的呈现,打开链接http://echarts.baidu.com/echarts2/doc/example/pie1.html ,可以看到左侧为数据,右侧为呈现的数据图,其他的形式的图也是这种左右结构。
看看我的:
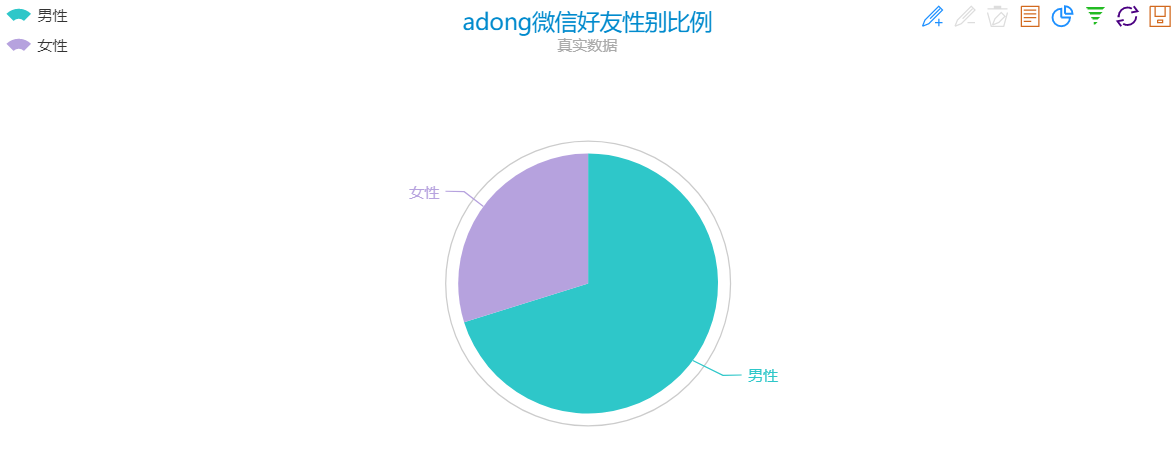
哈哈,人不多,微信用的少。女生少啊。。。
4.好友分布:
#统计省份
province_dict = {'北京': 0, '上海': 0, '天津': 0, '重庆': 0,
    '河北': 0, '山西': 0, '吉林': 0, '辽宁': 0, '黑龙江': 0,
    '陕西': 0, '甘肃': 0, '青海': 0, '山东': 0, '福建': 0,
    '浙江': 0, '台湾': 0, '河南': 0, '湖北': 0, '湖南': 0,
    '江西': 0, '江苏': 0, '安徽': 0, '广东': 0, '海南': 0,
    '四川': 0, '贵州': 0, '云南': 0,
    '内蒙古': 0, '新疆': 0, '宁夏': 0, '广西': 0, '西藏': 0,
    '香港': 0, '澳门': 0}
for friend in myFriends:
    if friend.province in province_dict.keys():
        province_dict[friend.province] +=1
data = []
for key,value in province_dict.items():
    data.append({'name':key,'value':value})
print(data)
打印出来的是全国分布,见下图:
![]()
打开Echarts,将数据写入左侧的代码中,刷新一下可以看到分布图:
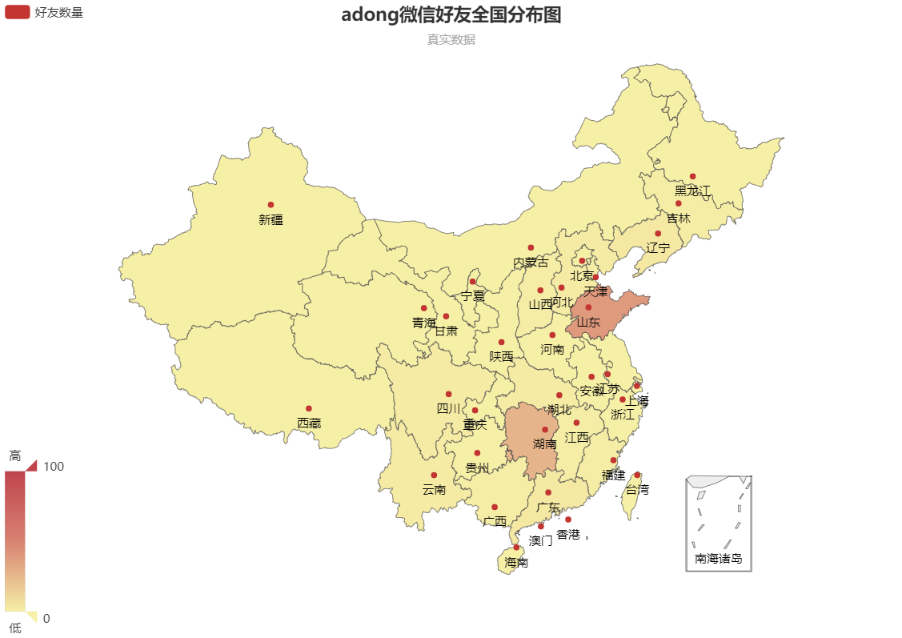
看一眼就暴露了,山东人在湖南系列(OR 湖南人在山东系列、、、)哈哈。。。
5.处理签名(signature),生成词云
(在一开始,我将所用到的package都 import 进来)

#signature
def writeFile(path,txt):
    #load txt
    with open(path,'a',newline='') as f:
        f.write(txt)
#statistics of signature
for friend in myFriends:
    pattern = re.compile(r'[一-龥]+') #'[一-龥]+'几乎可以代表所有汉字
    filterData = re.findall(pattern,friend.signature)
    writeFile("signatures.txt", ''.join(filterData))

#read_text_file
def readFile(path):
    with open(path,'r',newline='') as f:
        return f.read()

content = readFile("signatures.txt")
segment = jieba.lcut(content)
words_df = pd.DataFrame({'segment':segment})

stopwords = pd.read_csv("stop_words_zh.txt",index_col=False,quoting=3,names={'stopword'},encoding='utf-8')
words_df = words_df[~words_df.segment.isin(stopwords.stopword)]

words_stat = words_df.groupby(by=['segment'])['segment'].agg({"计数":numpy.size})
words_stat = words_stat.reset_index().sort_values(by=['计数'],ascending=False)

#set wordcloud
color_mask = imread('background.jpg')
wordcloud = WordCloud(font_path='simhei.ttf',background_color='white',max_words=100,mask=color_mask
                      ,max_font_size=100,random_state=42,width=1000,height=850,margin=2,)
#generate wordcloud
word_frequency = {x[0]:x[1]for x in words_stat.head(100).values}
print(word_frequency)
word_frequency_dict = {}
for key in word_frequency:
    word_frequency_dict[key] = word_frequency[key]

wordcloud.generate_from_frequencies(word_frequency_dict)
image_colors = ImageColorGenerator(color_mask)
wordcloud.recolor(color_func=image_colors)
#save the pic
wordcloud.to_file('output.png')
plt.imshow(wordcloud)
plt.axis('off')
plt.show()
(background.jpg是我找的一张python图标的照片做背景图)
看看结果:

五、总结
1.我这里是一步一步安装原文来的,原文结尾将各个部分写成函数,函数式编程,规范;
2.练习是多次用手机扫描程序运行生成的二维码,据说会被封,但是在我使用的过程中没有发生,哈哈。。。


