LNMP环境之编译安装mysql
环境:centos7
mysql版本:5.7.28
mysql下载地址:
链接:https://pan.baidu.com/s/1SQaSQ57SSkAh2all4YXAhQ
提取码:lz1p
1.首先查看系统是否自带mariadb
[root@localhost ~]# rpm -qa | grep mariadb
mariadb-libs-5.5.68-1.el7.x86_6
2.删除系统自带的mariadb
[root@localhost ~]# rpm -e --nodeps mariadb-libs-5.5.68-1.el7.x86_64
3.查看系统是否自带mysql,有则删除无则创建mysql用户和组
[root@localhost ~]# rpm -qa | grep mysql
4.创建mysql用户和组,并将mysql拥护赋予mysql组
[root@localhost ~]# groupadd mysql && useradd -g mysql mysql
5.更改mysql用户的密码
[root@localhost ~]# passwd mysql
Changing password for user mysql.
New password:
Retype new password:
passwd: all authentication tokens updated successfully.
6.将mysql压缩包上传至当前服务器目录
[root@localhost ~]# ll
total 707692
-rw-------. 1 root root      1259 Jan 29 22:30 anaconda-ks.cfg
-rw-r--r--. 1 root root 724672294 Feb  2 18:59 mysql-5.7.28-linux-glibc2.12-x86_64.tar.gz
7.解压mysql至根目录
[root@localhost ~]# tar -zxvf mysql-5.7.28-linux-glibc2.12-x86_64.tar.gz -C /
8.将mysql目录改名,创建/mysql/data目录,并赋予mysql用户和组
[root@localhost ~]# mv /mysql-5.7.28-linux-glibc2.12-x86_64/ /mysql && mkdir /mysql/data && chown -R mysql:mysql /mysql
9.进入mysql目录并创建一个my.cnf文件
[root@localhost /]# cd /mysql/ && vim my.cnf
10.将下列内容写入my.cnf,随后保存退出
[client]

port = 3306
socket = /mysql/data/mysql.sock
default-character-set = utf8mb4

[mysqld]
user= mysql
port= 3306
socket= /tmp/mysql.sock
server-id = 1
pid-file = /mysql/data/mysql.pid

basedir= /mysql

datadir= /mysql/data/
character_set_server = utf8mb4
collation_server = utf8mb4_bin
back_log = 1024
explicit_defaults_for_timestamp = ON
lower_case_table_names = 1
sql_mode = STRICT_TRANS_TABLES,NO_ZERO_IN_DATE,NO_ZERO_DATE,ERROR_FOR_DIVISION_BY_ZERO,NO_AUTO_CREATE_USER,NO_ENGINE_SUBSTITUTION

max_connections = 512
max_connect_errors = 1000000
table_open_cache = 1024
max_allowed_packet = 1024M
thread_stack = 256K
thread_cache_size = 384

skip-external-locking

interactive_timeout = 600
wait_timeout = 3600
log_timestamps = SYSTEM
log-error = /mysql/data/error.log

default_storage_engine = InnoDB
innodb_buffer_pool_size = 64M
innodb_purge_threads = 1
innodb_log_buffer_size = 2M
innodb_log_file_size = 128M
innodb_lock_wait_timeout = 120

bulk_insert_buffer_size = 32M
myisam_sort_buffer_size = 8M
myisam_max_sort_file_size = 1G
myisam_repair_threads = 1

[mysqldump]
quick
max_allowed_packet = 16M

[myisamchk]
key_buffer_size = 8M
sort_buffer_size = 8M
read_buffer = 4M
write_buffer = 4M
basedir=/mysql
datadir=/mysql/data
11.安装mysql
[root@localhost mysql]# bin/mysql_install_db --user=mysql --basedir=/mysql --datadir=/mysql/data
2021-02-02 19:20:55 [WARNING] mysql_install_db is deprecated. Please consider switching to mysqld --initialize
2021-02-02 19:20:58 [WARNING] The bootstrap log isn't empty:
2021-02-02 19:20:58 [WARNING] 2021-02-02T11:20:55.448665Z 0 [Warning] --bootstrap is deprecated. Please consider using --initialize instead
2021-02-02T11:20:55.449035Z 0 [Warning] Changed limits: max_open_files: 1024 (requested 5000)
2021-02-02T11:20:55.449039Z 0 [Warning] Changed limits: table_open_cache: 431 (requested 2000)
12.安装完毕后配置mysqld启动文件赋予执行权限,并赋予my.cnf目录权限
[root@localhost mysql]# cp ./support-files/mysql.server /etc/init.d/mysqld && chown 777 my.cnf && chmod +x /etc/init.d/mysqld
13.修改mysqld执行文件
[root@localhost mysql]# vim /etc/init.d/mysqld
14.从上到下将所有/usr/local/mysql的路径修改为/mysql 注:linux会默认将所有用户编译安装的软件安装在/usr/local目录下,类似于windows的c:/progrem files
mysqld_pid_file_path=
if test -z "$basedir"
then
  basedir=/usr/local/mysql
  bindir=/usr/local/mysql/bin
  if test -z "$datadir"
  then
    datadir=/usr/local/mysql/data
  fi
  sbindir=/usr/local/mysql/bin
  libexecdir=/usr/local/mysql/bin
else
  bindir="$basedir/bin"
  if test -z "$datadir"
  then
    datadir="$basedir/data"
  fi
  sbindir="$basedir/sbin"
  libexecdir="$basedir/libexec"
15.修改完毕保存退出后创建一个软链接用于启动停止mysql
[root@localhost mysql]# ln -s /mysql/bin/mysql /usr/bin/
16.创建完毕后启动mysql
[root@localhost mysql]# service mysqld start
Starting MySQL.Logging to '/mysql/data/error.log'.
SUCCESS!
17.此时输入用户名密码会报错,所以需先设置无密码登录
[root@localhost ~]# mysql -uroot -p
Enter password:
ERROR 1045 (28000): Access denied for user 'root'@'localhost' (using password: YES)
18.编辑my.cnf文件,加入 skip-grant-tables 至 [mysqld] 模块内
[client]

port = 3306
socket = /mysql/data/mysql.sock
default-character-set = utf8mb4

[mysqld]
skip-grant-tables
user= mysql
port= 3306
socket= /tmp/mysql.sock
server-id = 1
pid-file = /mysql/data/mysql.pid
19.保存退出后重启mysql
[root@localhost mysql]# service mysqld restart
Shutting down MySQL.. SUCCESS!
Starting MySQL. SUCCESS!
20.再次输入用户名,随后直接回车即可实现无密码登录
[root@localhost mysql]# mysql -uroot -p
Enter password:
Welcome to the MySQL monitor.  Commands end with ; or \g.
Your MySQL connection id is 2
Server version: 5.7.28 MySQL Community Server (GPL)

Copyright (c) 2000, 2019, Oracle and/or its affiliates. All rights reserved.

Oracle is a registered trademark of Oracle Corporation and/or its
affiliates. Other names may be trademarks of their respective
owners.

Type 'help;' or '\h' for help. Type '\c' to clear the current input statement.

mysql>
21.进入mysql后需先修改一次密码
首先编辑数据库
mysql> use mysql;
Reading table information for completion of table and column names
You can turn off this feature to get a quicker startup with -A

Database changed
随后修改root用户的密码
mysql> update user set authentication_string=password('123456') where user='root';
Query OK, 1 row affected, 1 warning (0.00 sec)
Rows matched: 1  Changed: 1  Warnings: 1
最后刷新权限推出数据库
mysql> flush privileges;
Query OK, 0 rows affected (0.01 sec)

mysql> quit
Bye
22.退出后将刚在my.cnf里加入的一行注释或删除,然后保存退出重启数据库
[root@localhost mysql]# vim my.cnf
[root@localhost mysql]# service mysqld restart
Shutting down MySQL.. SUCCESS!
Starting MySQL. SUCCESS!
23.用刚修改的用户名密码登录数据库,成功!
[root@localhost mysql]# mysql -uroot -p
Enter password:
Welcome to the MySQL monitor.  Commands end with ; or \g.
Your MySQL connection id is 2
Server version: 5.7.28

Copyright (c) 2000, 2019, Oracle and/or its affiliates. All rights reserved.

Oracle is a registered trademark of Oracle Corporation and/or its
affiliates. Other names may be trademarks of their respective
owners.

Type 'help;' or '\h' for help. Type '\c' to clear the current input statement.

mysql>
24.但此时操作数据库会提示
mysql> use mysql;
ERROR 1820 (HY000): You must reset your password using ALTER USER statement before executing this statement.
我们只需按提示重新alter一下密码,然后退出重新登陆即可
mysql> ALTER USER 'root'@'localhost' IDENTIFIED BY '123456' PASSWORD EXPIRE NEVER;
Query OK, 0 rows affected (0.00 sec)

mysql> flush privileges;
Query OK, 0 rows affected (0.00 sec)

mysql> quit
Bye
[root@localhost mysql]# mysql -uroot -p
Enter password:
Welcome to the MySQL monitor. Commands end with ; or \g.
Your MySQL connection id is 3
Server version: 5.7.28 MySQL Community Server (GPL)
Copyright (c) 2000, 2019, Oracle and/or its affiliates. All rights reserved.
Oracle is a registered trademark of Oracle Corporation and/or its
affiliates. Other names may be trademarks of their respective
owners.
Type 'help;' or '\h' for help. Type '\c' to clear the current input statement.
mysql> use mysql;
Reading table information for completion of table and column names
You can turn off this feature to get a quicker startup with -A
Database changed
25.此时如果想利用本地数据库工具如navicat等远程连接数据库,需开放数据库远程权限及数据库端口,否则会报1130和2003报错
首先开放远程权限
mysql> use mysql;
Reading table information for completion of table and column names
You can turn off this feature to get a quicker startup with -A

Database changed
mysql> update user set host='%' where user='root';         ##修改root用户的权限为所有
Query OK, 1 row affected (0.01 sec)
Rows matched: 1  Changed: 1  Warnings: 0

mysql> select host,user from user;                         ##查看用户的权限
+-----------+---------------+
| host      | user          |
+-----------+---------------+
| %         | root          |
| localhost | mysql.session |
| localhost | mysql.sys     |
+-----------+---------------+
3 rows in set (0.00 sec)

mysql> flush privileges;                                   ##刷新权限
Query OK, 0 rows affected (0.00 sec)

mysql> quit
Bye
退出后服务器防火墙开3306端口
[root@localhost mysql]# firewall-cmd --zone=public --add-port=3306/tcp --permanent && firewall-cmd --reload
success
success
随后重启数据库
[root@localhost mysql]# service mysqld restart
Shutting down MySQL.. SUCCESS!
Starting MySQL. SUCCESS!
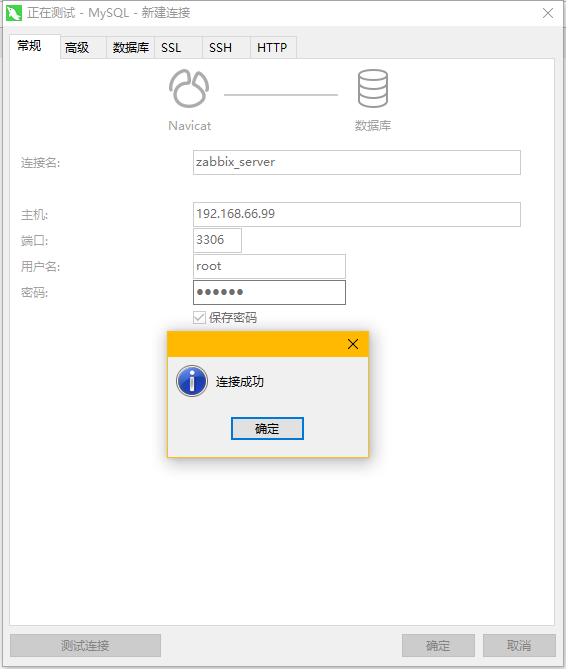
26.最后使用数据库工具远程连接数据库,成功!

这样我们的mysql数据库就安装好了!


