【kernel envirment】How to build and debug linux Kernel
1.Envirment:
1.VM-Envriment:windown 7, vmware-8(ubuntu-18.04.1-live-server-amd64.iso, if using at home, suggest use lubuntu with UI), ssh tool(see Appendix 3 ssh tool), data sharing(see Appendix 1 data sharing sulotion),gcc-32bit(see Appendix 2 gcc-32bit install , but maybe not need nessesary).
2.Destnation-machine: BOCHS(lastest version form official site), QEMU(lastest version form official site).
Bochs can debug assembly, but can't debug using gdb before recompile. Qemu can using gdb, but can't debug in assembly. So need to install both.
3.Debug-method: TDMGCC(Using its GDB in command line debug).
2.compile
source: linux-4.19 download form official site.
tar -xvf linux-4.19.tar.xz
Config Error maybe appear:
a. scripts/Makefile.lib:196: recipe for target 'scripts/kconfig/zconf.tab.c' failed
make[1]: *** [scripts/kconfig/zconf.tab.c] Error 127
Solution:sudo apt-get install bison
b. scripts/Makefile.lib:188: recipe for target 'scripts/kconfig/zconf.lex.c' failed
make[1]: *** [scripts/kconfig/zconf.lex.c] Error 127
Solution:sudo apt-get install flex
c. scripts/Makefile.host:90: recipe for target 'scripts/extract-cert' failed
Solution: sudo apt-get install libssl-dev
1."make help" to see varity of command rerate operation.
2."make mrproper" to remove last configure.
3."make i386_defconfig", may be need to install some lib.
If want to debug by gdb, should be add some iterms to the ".config" file
1)
CONFIG_DEBUG_INFO=y2)
Discompile KASLR module. (Must have "not set" keyword.)
# CONFIG_RANDOMIZE_BASE is not setAfter input "make bzImage", ".config" file would be change, so need check again.Bellow is change process;

Other method(not good, VFS can't launch.)
"C:\Program Files\qemu\qemu-system-i386.exe" -m 512M -smp 4 -kernel arch\x86\boot\bzImage -drive format=raw,file=./disk.raw -append "init=/linuxrc root=/dev/sda" -s -S -append nokaslr
NOTE: The nokasrl Linux command line parameter disables KASRL. But VFS can't launch.
This has been needed since v4.12, when KASLR was turned on by default
kaslr的全称是kernel address space layout randomization,主要是通过每次开机将kernel image 加载到不同的
的地址来增强安全性。
4."make bzImage -j4"
Error:
scripts/extract-cert.c:21:10: fatal error: openssl/bio.h: No such file or directory
#include <openssl/bio.h>
^~~~~~~~~~~~~~~
compilation terminated.
Solution:sudo apt-get install libssl-dev
5. "make modules". If using diable modules, don't need do this, such as use "make allnoconfig" before.
6.Windows command line input:
cd linux-4.19\arch\x86\boot
"C:\Program Files\qemu\qemu-system-i386.exe" -m 512M -smp 4 -kernel bzImage
Could be launch the kernel, without rootfs.
3. Create disk image
1. Create disk image file.
windows command: (cd ../linux-4.19 folder first)
"C:\Program Files\qemu\qemu-img.exe" create -f raw disk.raw 512Mlinux command:
sudo mkfs -t ext4 ./disk.raw2.mount disk image file.(cd in linux source folder first)
mkdir img
sudo mount -o loop ./disk.raw ./img
3.install kernel modules.(maybe no module.)
cd linux-4.19/
sudo make modules_install INSTALL_MOD_PATH=../img
then could go to ../img/lib/modules/ to see whethe modules were installed successful.
4. Prepare "init" program.
Move rootft system inot the directry "../img". There are 3 method as bellow:
a. sysv init.
b. systemd.
c. busybox init. (Now we used)
4. Compile busybox.
Download busybox source from official site.
Method reference: https://www.cnblogs.com/hellogc/p/7482066.html
1. "make help" to see detail.
2. "make defconfig".

Open .config file, ensure "static" and "no share libs", as bellow, can search keyword to find the place.

3."make".
Will gerate "busybox" file, that only a ELF file in the busybox project.
Error: (maybe appear)
/usr/include/limits.h:26:10: fatal error: bits/libc-header-start.h: No such file or directory
Solution: sudo apt install gcc-multilib
4.install busybox.
NOTE: Should mount img before.
cd busybox-1.29.3/
sudo make CONFIG_PREFIX=~/linux-all/img install
Comment: make CONFIG_PREFIX=<path_to_disk_img_mount_point> install
Run the machine:
"C:\Program Files\qemu\qemu-system-i386.exe" -m
 512M -smp 4 -kernel arch\x86\boot\bzImage -drive format=raw,file=../disk.raw -ap
pend "init=/linuxrc root=/dev/sda"
To now, can run but will have a error:

So you need setting more.
6. Configure "busybox init".
a.Must create the dirctory and file in linux envirment, include /etcinittab /etc/init.d/rcS
b.Maybe fill the file contain in windows envriment, as bellow:
busybox init accroding to the file "/etc/inittab", if without this file, will using default setting following:
::sysinit:/etc/init.d/rcS
::askfirst:/bin/sh
::ctrlaltdel:/sbin/reboot
::shutdown:/sbin/swapoff -a
::shutdown:/bin/umount -a -r
::restart:/sbin/init
tty2::askfirst:/bin/sh
tty3::askfirst:/bin/sh
tty4::askfirst:/bin/sh
reference the project document, we modify the /etc/inittab as bellow:
::sysinit:/etc/init.d/rcS
::askfirst:/bin/ash
::ctrlaltdel:/sbin/reboot
::shutdown:/sbin/swapoff -a
::shutdown:/bin/umount -a -r
::restart:/sbin/init
Then create /etc/init.d/rcS as bellow:
#!/bin/shNOTE:Sometimes need the input install busybox command
cd busybox-1.29.3/
sudo make CONFIG_PREFIX=~/linux-all/img install
to update etc derectry change.This maybe a bug.
So would see the console is runed successfully.

5. Mount /dev, /proc, /sys.
To now, if we input "df" command, will prombe:

NOTE: Ignore the gdb bug "Remote ‘g’ packet reply is too long".
So we need do more:
sudo mkdir dev proc sysmodify /etc/init.d/rcS
#!/bin/sh
mount -t proc proc /proc
mount -t sysfs sysfs /sys
NOTE:Sometimes need the input install busybox command
cd busybox-1.29.3/
sudo make CONFIG_PREFIX=~/linux-all/img install
to update etc derectry change.This maybe a bug.
then reboot.
Input "df" to test, will hint:

Maybe error: the last step is failed, can't run/linuxrc to activate the console.

sugetion:
6 debug
cd linux-4.19\
"C:\Program Files\qemu\qemu-system-i386.exe" -m 512M -smp 2 -kernel arch\x86\boot\bzImage -drive format=raw,file=../disk.raw -append "init=/linuxrc root=/dev/sda" -s -SOpen other cmd windows(or on linux mashine), then input:
F:\Linux-0.11-master>gdb vmlinux
(gdb) target remote localhost:1234
if using linux platform gdb, command as: (gdb) target remote 192.168.220.1:1234
Sometimes, TDMGCC GDB didn't able to debug, because libs maybe different.
(gdb) b start_kernel
(gdb) c
(gdb) n
(gdb) s
Then you would see the linux 0.11 is running successfully.


7 Using vscode to debug
1.press "F5" would general a "launch.json" file:
2.click "Add confiure..." to add "C/C++: (gdb) Bash on Windows Launch" iterm.
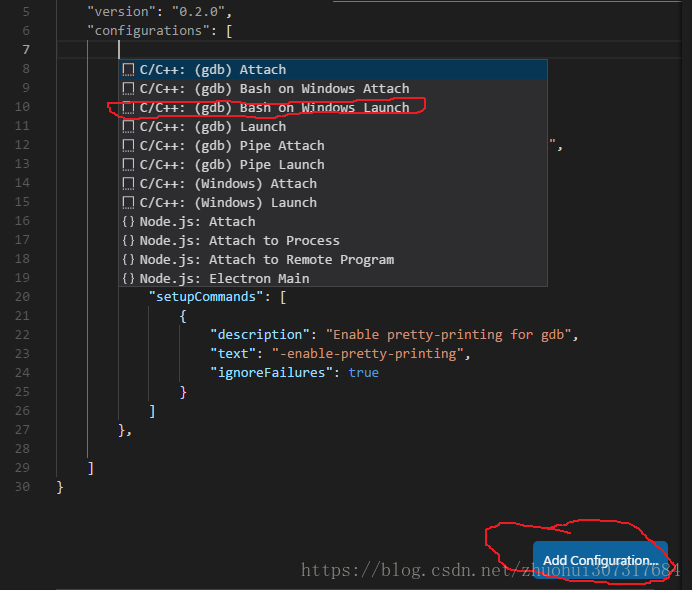
at lastet "launch.json" contain is :
{
    // Use IntelliSense to learn about possible attributes.
    // Hover to view descriptions of existing attributes.
    // For more information, visit: https://go.microsoft.com/fwlink/?linkid=830387
    "version": "0.2.0",
    "configurations": [

        {
            "name": "(gdb) Bash on Windows Launch",
            "type": "cppdbg",
            "request": "launch",
            "program": "Z:/home/hui/linux-all/linux-4.19/vmlinux",
            "args": [],
            "stopAtEntry": false,
            "cwd": "Z:/home/hui/linux-all/linux-4.19",
            "environment": [],
            "externalConsole": true,
            "miDebuggerPath": "C:/TDM-GCC-64/gdb64/bin/gdb.exe",
            "miDebuggerServerAddress": "192.168.220.1:1234",
            "setupCommands": [
                {
                    "description": "Enable pretty-printing for gdb",
                    "text": "-enable-pretty-printing",
                    "ignoreFailures": true
                }
            ]
        },

    ]
}
modify iterm is:
            "program": "Z:/home/hui/linux-all/linux-4.19/vmlinux",
            "cwd": "Z:/home/hui/linux-all/linux-4.19",
            "miDebuggerPath": "C:/TDM-GCC-64/gdb64/bin/gdb.exe",
            "miDebuggerServerAddress": "192.168.220.1:1234",
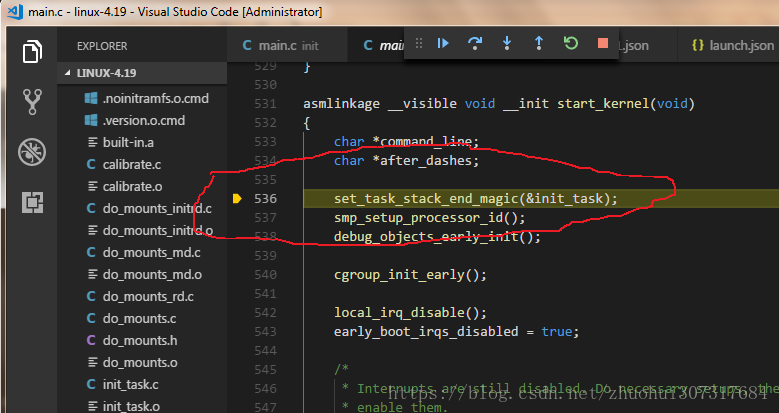
3.make a break point in start_kernel() function.

press "F5" will run in start_kernel() function.

Extern Function:
Ignore file setting:
1.New a "settings.json" file.

Click to add function:

Add function:
{
    "files.exclude": {
        "**/*.o": true,
        "**/*.dwo": true,
        "**/*.cmd": true,
    },
    "search.exclude": {
        "**/*.o": true,
        "**/*.dwo": true,
        "**/*.cmd": true,
    }
}
8 Analyze kerner code
start_kernel() is the first C language function. So everything is analyze from here.
Appendix 1 data sharing sulotion
samba-server create
1 首先确认网络可以相互ping通。
2 终端输入:apt-get install samba
3 先备份 smb.conf 编辑配置,终端输入:
cd /etc/samba/
ls
sudo cp smb.conf smb.conf-201x-xx-xx
4 nano /etc/samba/smb.conf 编辑配置文件
- 找到[homes]下 browseable = no, 把no 改成 yes, 因为只有这样,windows下才能通 过“计算机”看到“homes”共享目录。----至此,您已经能看到samba共享的目录了。
- 当然,以方便调试为目的,所以我们不需要共享homes文件,而是要共享整个根目录。 所以在[homes]这一段下加入一段,不要在[homes]这一段改,否则出错,一定要在下面加,如下:
[all]
comment = /
path = /
read only = no
接着在终端输入:testparm 此命令不但能检查参数是否正确,还能使配置立即生效, 不需要重启。
5 还要创建用户,不然只能看到有共享却无法登录。在终端输入:
sudo smbpasswd -a root 然后就会提示输入密码,其实这个名字可以任意,这里用root是为 了方便记忆,因为我会用最高权限。----到这一步,你就可以登录到samba共享文件里 了。
6 (可以不要这一步)重启samba,终端输入: /etc/init.d/smbd restart
7.(可选)


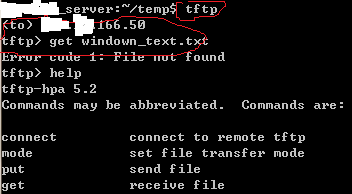
windown tftp
Download form official site, or from mini2440 disk(sugest this).

Usage:
删掉登录凭证:

就可以看到保存的凭证记录:

然后点开删掉即可。
Appendix 2 gcc-32bit install
If you system is 64-bit, you should add 32-bit lib support.
sudo apt-get install g++-multilib libc6-dev-i386
then
# gcc boot.o -o boot -m32
Appendix 3 ssh tool
Open SSH for wondows
Method 1:Download: https://www.mls-software.com/opensshd.html
NOTE: Suggest only install client, not install server for security.
Method 2: git include ssh command.So if you installed git in windows, could direct use 'ssh' command.
Can using in command line mode.
Usage:
"C:\Program Files\OpenSSH\bin\ssh.exe" hui@192.168.220.129And create a *.bat file to open avoid input the long command every time.
SecureCRT
SecureCRT download: https://download.csdn.net/download/bingfengshike/10671637

