【kernel envirment】embedded mini2440
NOTE:
First must create the kernel envriment, detail see 【kernel envirment】How to build and debug linux Kernel.
1.Hardware.
Connet the 5V power suply. And debug serial port.
2.boot compiler.
Go to offise site download: http://www.arm9.net/download.asp
Compiler download:

Compiler install:
cd ~/linux-all/tmp/
tar -xvf arm-linux-gcc-4.4.3-20100728.tar.gz
cd /usr/local/
sudo cp -rf ~/linux-all/tmp/usr/local/arm/ ./arm
Add envriment value:
/home/hui/.bashrc
PATH="/usr/local/arm/4.3.2/bin:$PATH"Note: must add envirment value, or not will meet error as below when use arm-linux-gcc
![]()
using installed Compiler to compile:
Change the compiler tools to absolute address. bellow is a example, not always change as bellow.
from:
arm-linux-gcc
arm-linux-ld
arm-linux-objcopy
to:
arm-linux-gcc = /usr/local/arm/4.3.2/bin/arm-linux-gcc-4.3.2
arm-linux-ld = /usr/local/arm/4.3.2/bin/arm-linux-ld
arm-linux-objcopy = /usr/local/arm/4.3.2/bin/arm-linux-objcopy

	$(arm-linux-gcc)
	$(arm-linux-ld)
	$(arm-linux-objcopy)
At laster, use "make" command to build.
3.boot code download
mini2440简易bootloader源码-CSDN下载
Only 3 sourse file, very simple, and output serial port message and boot the nand flash.
NOTE: only running in norfalsh.
source code: Go to offise site download: http://www.arm9.net/download.asp Can down a CD file
4.Download norflash through JTAGE interface.

segger-jlink interface as bellow: (see from button to segger-jlink)
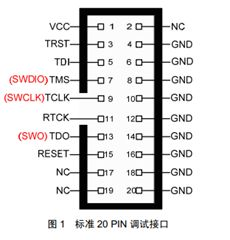
Header:
pin1: segger pin1 VCC pin2: NC
pin3: NC(or not can't hard reset) pin4:segger pin15 RESET
pin5: segger pin5 TDI pin6:segger pin13 TDO
pin7: segger pin7 TMS pin8: NC
pin9: segger pin9 TCLK pin10: segger pin4 6 8 10 12 14 16 20 GND
Connect the hareware, Turn to using Norflash(size:2M), not Nandflash,
reference from: 用jlink在mini2440上烧写uboot
NOTE: can direct without configure use Appendenx 1 mini244o.jflash.
Also can use in ubuntu envriment, detail see Appendenx 3 JLINK in ubuntu.
create a "jlink-downlaod.bat":
set JFlash_Exe="C:\Program Files (x86)\SEGGER\JLinkARM_V434\JFlashARM.exe"
%JFlash_Exe% -openprjmini2440.jflash -openboot.bin,0x00000000 -auto -exit
pause
then new a J-Flash project, set as bellow:

"Use flowing init sequenc" modify as bellow:
##-------Action-----Value0------Value1
Write 32bit 0x53000000 0x00000000 ; pWTCON , 看门狗定时器控制寄存器
Write 32bit 0x4A000008 0xFFFFFFFF ; INTMSK , 中断屏蔽寄存器
Write 32bit 0x4A00001C 0x000007FF ; INTSUBMSK , 针对INTMAK具体化的一个中断请求屏蔽寄存器
Write 32bit 0x53000000 0x00000000 ; pWTCON , 看门狗定时器控制寄存器
Write 32bit 0x56000050 0x000055AA ; rGPFCON , Port F control
Write 32bit 0x4C000014 0x00000007 ; CLKDIVN , CPU时钟分频控制寄存器
Write 32bit 0x4C000000 0x00FFFFFF ; LOCKTIME , 锁时计数寄存器
Write 32bit 0x4C000004 0x00061012 ; MPLLCON , MPLL寄存器
Write 32bit 0x4C000008 0x00040042 ; UPLLCON , UPLL寄存器
Write 32bit 0x48000000 0x22111120 ; Bus width & wait status
Write 32bit 0x48000004 0x00002F50 ; Boot ROM control
Write 32bit 0x48000008 0x00000700 ; BANK1 control
Write 32bit 0x4800000C 0x00000700 ; BANK2 control
Write 32bit 0x48000010 0x00000700 ; BANK3 control
Write 32bit 0x48000014 0x00000700 ; BANK4 control
Write 32bit 0x48000018 0x0007FFFC ; BANK5 control
Write 32bit 0x4800001C 0x00018005 ; BANK6 control
Write 32bit 0x48000020 0x00018005 ; BANK7 control
Write 32bit 0x48000024 0x008E0459 ; DRAM/SDRAM refresh
Write 32bit 0x48000028 0x00000032 ; Flexible Bank Size
Write 32bit 0x4800002C 0x00000030 ; Mode register set for SDRAM
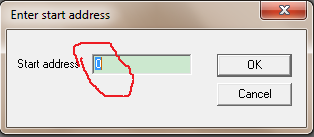
Write 32bit 0x48000030 0x00000030 ; Mode register set for SDRAMSo can read back or download the bin file. Downlaod address is 0, as bellow:
SDRAM 地址空间:0x30000000 ~ 0x34000000
Mini2440 使用了两片外接的32M bytes 总共64M bytes 的SDRAM 芯片(型号为:
HY57V561620FTP/MT48LC16M16A2),
1当引脚OM0跟OM1有一个是高电平时,这时地址0会映射到外部nGCS0片选的空间,也就是Norflash,程序就会从Norflash中启动,arm直接取Norflash中的指令运行。nor启动时,片内 sram 4K 内存的起始地址为 0x4000 0000
2当OM0跟OM1都为低电平,则0地址内部bootbuf(一段4k的SRAM)开始。
3.系统上电,arm会自动把NANDflash中的前4K内容考到bootbuf(也就是0地址),然后从0地址运行。
nand启动时,片内 sram 内存的起始地址为 0x0
4.Arm的启动都是从0地址开始。
5.Download sdram through J-Link.
source code: Go to offise site download: http://www.arm9.net/download.asp Can down a CD file, then find a vboot(vboot-src-20100727.tar.gz) to download to sdram(Note: size is only 4k). But need a patch(See Appendenx 2 vboot patch).
special pdf download: https://download.csdn.net/download/eee382642521/5197711
Download Step:
1.Add two files into the directory:
jlink-sdram-download.bat
"C:\Program Files (x86)\SEGGER\JLinkARM_V434\JLink.exe" jlink-sdram-script.txt
pause
jlink-sdram-script.txt
r
speed 12000
loadbin vboot.bin 0
setpc 0
g
exit
then click the jlink-sdram-download.bat, will be download *.bin file into the sdram and reset program.
If want to debug, must freeze at first, so jlink-sdram-script.txt as bellow:("exit" must remove, don't know why.)
r
speed 12000
loadbin vboot.bin 0
setpc 0
2.2 如果是Nor启动:
loadbin e:/init.bin 0x10000000
setpc 0x10000000
g
6.Debug through SEGGER J-Link GDB Server.
Can debug both norflash and sdram program.
NOTE: Makefile must at "-g", as bellow:
1.

2.
Open SEGGER J-Link GDB Server:
NOTE: Could use *.bat to download and open gdb server:
"C:\Program Files (x86)\SEGGER\JLinkARM_V434\JLinkGDBServer.exe" -if JTAG
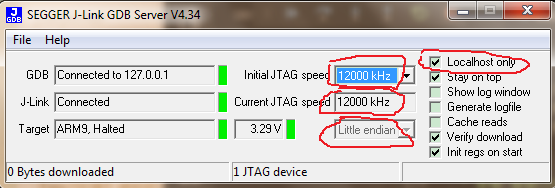
JTAG speed: more high, connet more quickly. But best parameter is 100kHz.Because more hight, will not stable.
localhost only: see gdb run in localhost or others.
Then using TDM-GCC to debug: (NOTE: Only using arm-linux-gdb, not special gdb for PC)
If want to debug in window, using the gdb, download link: window 平台用的gdb,远程调试arm-CSDN下载
When run in windows envriment:

When run in linux computer:
/usr/local/arm/4.3.2/bin/arm-linux-gdb boot.elf
7.Using vscode to debug.
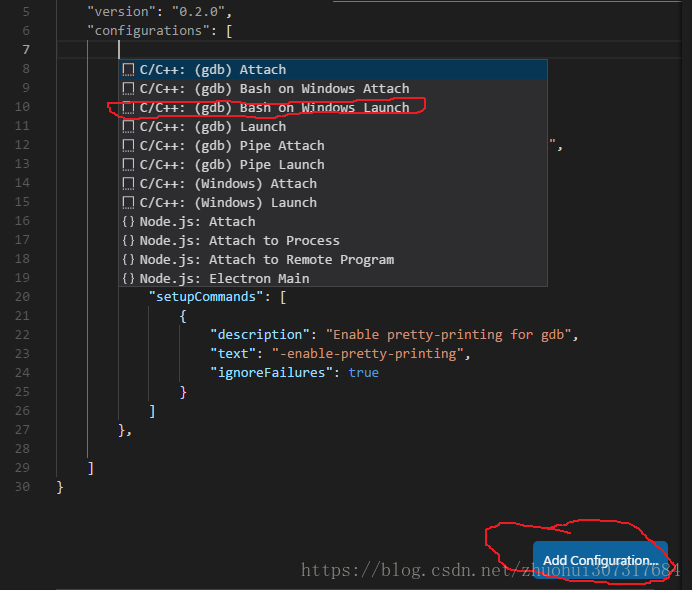
1.press "F5" would general a "launch.json" file:
2.click "Add confiure..." to add "C/C++: (gdb) Bash on Windows Launch" iterm.
at lastet "launch.json" contain is :
{
    // Use IntelliSense to learn about possible attributes.
    // Hover to view descriptions of existing attributes.
    // For more information, visit: https://go.microsoft.com/fwlink/?linkid=830387
    "version": "0.2.0",
    "configurations": [

        {
            "name": "(gdb) Bash on Windows Launch",
            "type": "cppdbg",
            "request": "launch",
            "program": "Z:/home/hui/linux-all/tmp/my_bootloader/boot.elf",
            "args": [],
            "stopAtEntry": false,
            "cwd": "Z:/home/hui/linux-all/tmp/my_bootloader",
            "environment": [],
            "externalConsole": true,
            "miDebuggerPath": "C:/TDM-GCC-64/gdb64/bin/gdb-arm-32.exe",
            "miDebuggerServerAddress": "localhost:2331",
            "setupCommands": [
                {
                    "description": "Enable pretty-printing for gdb",
                    "text": "-enable-pretty-printing",
                    "ignoreFailures": true
                }
            ]
        },

    ]
}
modify iterm is:
            "program": "Z:/home/hui/linux-all/tmp/my_bootloader/boot.elf",
            "cwd": "Z:/home/hui/linux-all/tmp/my_bootloader",
            "miDebuggerPath": "C:/TDM-GCC-64/gdb64/bin/gdb-arm-32.exe",
            "miDebuggerServerAddress": "localhost:2331",
3.make a break point in function.
press "F5" will run in function, as below:

8 u-boot
source code: Go to offise site download: http://www.arm9.net/download.asp Can down a CD file, then find the souce code : u-boot-1.1.6-FA24x0.tar.gz
compiler:
If Error "has EABI version 5, but target u-boot has EABI version 0", so the gcc version is two hight, so need to using crosstools-3.4.5.tar.bz2 (https://download.csdn.net/download/lile777/9518832)
Install method:
tar -xvf crosstools-3.4.5.tar.bz2.rar
sudo cp -rf ~/linux-all/uboot/opt/EmbedSky/ ./
compile:
1.search keyword "s3c" in Makefile, will find the config,then config the project:make open24x0_config
2.Modify compiler path:
CROSS_COMPILE = /opt/EmbedSky/crosstools_3.4.5_softfloat/gcc-3.4.5-glibc-2.3.6/arm-linux/bin/arm-linux-
3.make
cpu/arm920t/start.S is the first asm file, then call the c language function start_armboot.
PLL clock setting:
The code is in cpu/arm920t/start.S.
Default is 120MHz, as below:
	/* FCLK:HCLK:PCLK = 1:2:4 */
	/* default FCLK is 120 MHz ! */
	ldr	r0, =CLKDIVN
	mov	r1, #3
	str	r1, [r0]
we setting run fast, as below:
#define MPLLCON   0x4C000004
#define UPLLCON   0x4C000008
        ldr  r0, =CLKDIVN
        mov  r1, #5
        str  r1, [r0]


        ldr  r0, =MPLLCON
        ldr  r1, =0x7F021
        str  r1, [r0]

        ldr  r0, =UPLLCON
        ldr  r1, =0x38022
        str  r1, [r0]
9.Download kernel fs
1).Download uboot first at norflash first.
2.) Using uboot network to download kernel fs.
1.Input "help" will list all command, and will file "tftpboot" command.
More usage see orther article.
Appendenx 1 mini244o.jflash
  AppVersion = 43400
[GENERAL]
  ConnectMode = 0
  CurrentFile = "D:\Users\Administrator\Downloads\my_bootloader\boot.bin"
  DataFileSAddr = 0x00000000
  GUIMode = 0
  HostName = ""
  TargetIF = 0
  USBPort = 0
  USBSerialNo = 0x00000000
[JTAG]
  IRLen = 0
  MultipleTargets = 0
  NumDevices = 0
  Speed0 = 5
  Speed1 = 12000
  TAP_Number = 0
  UseAdaptive0 = 0
  UseAdaptive1 = 0
  UseMaxSpeed0 = 1
  UseMaxSpeed1 = 1
[CPU]
  CheckCoreID = 0
  ChipName = "Analog AD7160"
  ClockSpeed = 0x00000000
  Core = 0x09FFFFFF
  CoreID = 0x3F0F0F0F
  CoreIDMask = 0xFFFFFFFF
  DeviceFamily = 0x00000009
  EndianMode = 0
  HasInternalFlash = 0
  InitStep0_Action = "Reset"
  InitStep0_Comment = "Reset and halt target"
  InitStep0_Value0 = 0x00000000
  InitStep0_Value1 = 0x00000000
  InitStep10_Action = "Write 32bit"
  InitStep10_Comment = "Bus width & wait status"
  InitStep10_Value0 = 0x48000000
  InitStep10_Value1 = 0x22111120
  InitStep11_Action = "Write 32bit"
  InitStep11_Comment = "Boot ROM control"
  InitStep11_Value0 = 0x48000004
  InitStep11_Value1 = 0x00002F50
  InitStep12_Action = "Write 32bit"
  InitStep12_Comment = "BANK1 contro"
  InitStep12_Value0 = 0x48000008
  InitStep12_Value1 = 0x00000700
  InitStep13_Action = "Write 32bit"
  InitStep13_Comment = "BANK2 control"
  InitStep13_Value0 = 0x4800000C
  InitStep13_Value1 = 0x00000700
  InitStep14_Action = "Write 32bit"
  InitStep14_Comment = "BANK3 control"
  InitStep14_Value0 = 0x48000010
  InitStep14_Value1 = 0x00000700
  InitStep15_Action = "Write 32bit"
  InitStep15_Comment = "BANK4 control"
  InitStep15_Value0 = 0x48000014
  InitStep15_Value1 = 0x00000700
  InitStep16_Action = "Write 32bit"
  InitStep16_Comment = "BANK5 control"
  InitStep16_Value0 = 0x48000018
  InitStep16_Value1 = 0x0007FFFC
  InitStep17_Action = "Write 32bit"
  InitStep17_Comment = "BANK6 control"
  InitStep17_Value0 = 0x4800001C
  InitStep17_Value1 = 0x00018005
  InitStep18_Action = "Write 32bit"
  InitStep18_Comment = "BANK7 control"
  InitStep18_Value0 = 0x48000020
  InitStep18_Value1 = 0x00018005
  InitStep19_Action = "Write 32bit"
  InitStep19_Comment = "DRAM/SDRAM refresh"
  InitStep19_Value0 = 0x48000024
  InitStep19_Value1 = 0x008E0459
  InitStep1_Action = "Write 32bit"
  InitStep1_Comment = "pWTCON "
  InitStep1_Value0 = 0x53000000
  InitStep1_Value1 = 0x00000000
  InitStep20_Action = "Write 32bit"
  InitStep20_Comment = " Flexible Bank Size"
  InitStep20_Value0 = 0x48000028
  InitStep20_Value1 = 0x00000032
  InitStep21_Action = "Write 32bit"
  InitStep21_Comment = "Mode register set for SDRAM"
  InitStep21_Value0 = 0x4800002C
  InitStep21_Value1 = 0x00000030
  InitStep22_Action = "Write 32bit"
  InitStep22_Comment = "Mode register set for SDRAM"
  InitStep22_Value0 = 0x48000030
  InitStep22_Value1 = 0x00000030
  InitStep2_Action = "Write 32bit"
  InitStep2_Comment = "INTMSK "
  InitStep2_Value0 = 0x4A000008
  InitStep2_Value1 = 0xFFFFFFFF
  InitStep3_Action = "Write 32bit"
  InitStep3_Comment = "INTSUBMSK "
  InitStep3_Value0 = 0x4A00001C
  InitStep3_Value1 = 0x000007FF
  InitStep4_Action = "Write 32bit"
  InitStep4_Comment = "pWTCON "
  InitStep4_Value0 = 0x53000000
  InitStep4_Value1 = 0x00000000
  InitStep5_Action = "Write 32bit"
  InitStep5_Comment = "rGPFCON "
  InitStep5_Value0 = 0x56000050
  InitStep5_Value1 = 0x000055AA
  InitStep6_Action = "Write 32bit"
  InitStep6_Comment = "CLKDIVN "
  InitStep6_Value0 = 0x4C000014
  InitStep6_Value1 = 0x00000007
  InitStep7_Action = "Write 32bit"
  InitStep7_Comment = "LOCKTIME "
  InitStep7_Value0 = 0x4C000000
  InitStep7_Value1 = 0x00FFFFFF
  InitStep8_Action = "Write 32bit"
  InitStep8_Comment = "MPLLCON "
  InitStep8_Value0 = 0x4C000004
  InitStep8_Value1 = 0x00061012
  InitStep9_Action = "Write 32bit"
  InitStep9_Comment = "UPLLCON "
  InitStep9_Value0 = 0x4C000008
  InitStep9_Value1 = 0x00040042
  NumInitSteps = 23
  RAMAddr = 0x40000000
  RAMSize = 0x00001000
  ScriptFile = ""
  UseAutoSpeed = 0x00000001
  UseRAM = 1
  UseScriptFile = 0
[FLASH]
  aSectorSel[0] =
  AutoDetect = 1
  BankName = ""
  BankSelMode = 1
  BaseAddr = 0x00000000
  CheckId = 3
  CustomRAMCode = ""
  DeviceName = "Auto detected flash memory"
  EndBank = 8191
  NumBanks = 1
  OrgNumBits = 16
  OrgNumChips = 1
  StartBank = 0
  UseCustomRAMCode = 0
[PRODUCTION]
  AutoPerformsErase = 1
  AutoPerformsHardLock = 0
  AutoPerformsHardUnlock = 0
  AutoPerformsProgram = 1
  AutoPerformsSecure = 0
  AutoPerformsSoftLock = 0
  AutoPerformsSoftUnlock = 1
  AutoPerformsStartApp = 0
  AutoPerformsUnsecure = 0
  AutoPerformsVerify = 1
  Delay = 0x000001F4
  EraseType = 2
  ProgramSN = 0
  SNAddr = 0x00000000
  SNInc = 0x00000001
  Threshold = 0x00000BB8
  VerifyType = 1
Appendenx 2 vboot patch:
Generate patch command: diff vboot-oringin/ vboot > vboot-patch.txt -r
diff -r vboot-oringin/head.S vboot/head.S
91a92
> 	.align 1
155c156
< 	bl	Main
---
> 	bl	main
diff -r vboot-oringin/Makefile vboot/Makefile
2c2,5
<
---
> arm-linux-gcc = /usr/local/arm/4.3.2/bin/arm-linux-gcc-4.3.2
> arm-linux-ld = /usr/local/arm/4.3.2/bin/arm-linux-ld
> arm-linux-objcopy = /usr/local/arm/4.3.2/bin/arm-linux-objcopy
>
4,7c7,11
< 	arm-linux-gcc -mabi=aapcs-linux -mno-thumb-interwork -Os -Wall -c head.S 244x_lib.c nand.c main.c
< 	arm-linux-ld -T mem.lds -Bstatic head.o 244x_lib.o nand.o main.o
< 	arm-linux-objcopy -O binary -S a.out vboot.bin -R .comment -R .stab -R .stabstr
< 	rm *.o a.out
---
> 	$(arm-linux-gcc) -mabi=aapcs-linux -mno-thumb-interwork -Os -Wall -c head.S -g
> 	$(arm-linux-gcc) -mabi=aapcs-linux -mno-thumb-interwork -Os -Wall -c 244x_lib.c nand.c Main.c -g
> 	$(arm-linux-ld) -T mem.lds -Bstatic head.o 244x_lib.o nand.o Main.o
> 	$(arm-linux-objcopy) -O binary -S a.out vboot.bin -R .comment -R .stab -R .stabstr
> 	#rm *.o a.out
Appendenx 3 JLINK in ubuntu
download from official site:https://www.segger.com/downloads/jlink/#J-LinkSoftwareAndDocumentationPackBeta

install command : sudo dpkg -i JLink_Linux_V635g_x86_64.deb
test command: JLinkExe
All command can find in /usr/bin
(end)

