
Mongo集群搭建
1.集群角色及架构
在搭建集群之前,需要首先了解几个概念:路由,分片、副本集、配置服务器等
mongos,数据库集群请求的入口,所有的请求都通过mongos进行协调,不需要在应用程序添加一个路由选择器,mongos自己就是一个请求分发中心,它负责把对应的数据请求请求转发到对应的shard服务器上。在生产环境通常有多mongos作为请求的入口,防止其中一个挂掉所有的mongodb请求都没有办法操作。
config server,顾名思义为配置服务器,存储所有数据库元信息(路由、分片)的配置。mongos本身没有物理存储分片服务器和数据路由信息,只是缓存在内存里,配置服务器则实际存储这些数据。mongos第一次启动或者关掉重启就会从 config server 加载配置信息,以后如果配置服务器信息变化会通知到所有的 mongos 更新自己的状态,这样 mongos 就能继续准确路由。在生产环境通常有多个 config server 配置服务器,因为它存储了分片路由的元数据,防止数据丢失!
shard,分片(sharding)是指将数据库拆分,将其分散在不同的机器上的过程。将数据分散到不同的机器上,不需要功能强大的服务器就可以存储更多的数据和处理更大的负载。基本思想就是将集合切成小块,这些块分散到若干片里,每个片只负责总数据的一部分,最后通过一个均衡器来对各个分片进行均衡(数据迁移)。
replica set,中文翻译副本集,其实就是shard的备份,防止shard挂掉之后数据丢失。复制提供了数据的冗余备份,并在多个服务器上存储数据副本,提高了数据的可用性, 并可以保证数据的安全性。仲裁者(Arbiter),是复制集中的一个MongoDB实例,它并不保存数据。仲裁节点使用最小的资源并且不要求硬件设备,不能将Arbiter部署在同一个数据集节点中,可以部署在其他应用服务器或者监视服务器中,也可部署在单独的虚拟机中。为了确保复制集中有奇数的投票成员(包括primary),需要添加仲裁节点做为投票,否则primary不能运行时不会自动切换primary。
简单了解之后,我们可以这样总结一下,应用请求mongos来操作mongodb的增删改查,配置服务器存储数据库元信息,并且和mongos做同步,数据最终存入在shard(分片)上,为了防止数据丢失同步在副本集中存储了一份,仲裁在数据存储到分片的时候决定存储到哪个节点。
- IP端口规划
| ip | 角色 | 端口 |
| 192.168.9.34 | Shard01 | 27018 |
| config | 27019 | |
| mongos | 27017 | |
| 192.168.9.44 | Shard02 | 27118 |
| config | 27019 | |
| mongos | 27017 | |
| 192.168.9.54 | Shard03 | 27218 |
| config | 27019 | |
| mongos | 27017 |
- Shard 主备关系表
| Shard01 | 34 PRIMARY | 44 SECONDARY | 54 ARBITER |
| Shard02 | 34 ARBITER | 44 PRIMARY | 54 SECONDARY |
| Shard03 | 34 SECONDARY | 44 ARBITER | 54 PRIMARY |
config 节点配置为replicaSet,一主两从
mongos 分别在34,44,54上配置一个mongos,分担负载
- 架构图如下

2.配置
2.1 目录结构
由于shard,config,mongs三个角色,所以这里把三个角色的目录分离处理,使用如下命令创建目录。
首先进入到mongod目录。
mkdir instance/{config,shard01,shard02,shard03,mongos}/{data,log} –p
目录树结构大致如下:
├── config

│   ├── config.yaml

│   ├── data

│   └── log

├── shard01

│   ├── data

│   ├── log

│   └── shard01.yaml

├── shard02

│   ├── data

│   ├── log

│   └── shard02.yaml

├── shard03

│   ├── data

│   ├── log

│   └── shard03.yaml

└── mongos

    ├── log

    └── mongos.yaml
2.2 shard配置
由于要在每个节点上保存数据,所以以下配置需要在三个节点上全部配置。
2.2.1 配置文件
需要在三个节点下全部配置,配置都相同。
- Shard01.yaml(拷贝至/mongod/instance/shard01/下)
[root@sql01 mongodb]# cat instance/shard01/shard01.yaml
systemLog:
  destination: file
  logAppend: true
  path: /data/mongodb/instance/shard01/log/shard01.log
storage:
  dbPath: /data/mongodb/instance/shard01/data/
  journal:
    enabled: true
processManagement:
  fork: true  # fork and run in background
net:
  port: 27018
  bindIp: 0.0.0.0  # Listen to local interface only, comment to listen on all interfaces.
replication:
  replSetName: "shard01"
sharding:
  clusterRole: shardsvr
- Shard02.yaml
[root@sql01 mongodb]# cat instance/shard02/shard02.yaml
systemLog:
  destination: file
  logAppend: true
  path: /data/mongodb/instance/shard02/log/shard02.log
storage:
  dbPath: /data/mongodb/instance/shard02/data/
  journal:
    enabled: true
processManagement:
  fork: true  # fork and run in background
net:
  port: 27118
  bindIp: 0.0.0.0  # Listen to local interface only, comment to listen on all interfaces.
replication:
  replSetName: "shard02"
sharding:
  clusterRole: shardsvr
- Shard03.yaml
[root@sql01 mongodb]# cat instance/shard03/shard03.yaml
systemLog:
  destination: file
  logAppend: true
  path: /data/mongodb/instance/shard03/log/shard03.log
storage:
  dbPath: /data/mongodb/instance/shard03/data/
  journal:
    enabled: true
processManagement:
  fork: true  # fork and run in background
net:
  port: 27218
  bindIp: 0.0.0.0  # Listen to local interface only, comment to listen on all interfaces.
replication:
  replSetName: "shard03"
sharding:
  clusterRole: shardsvr
- 启动
在三台机器上全部启动
mongod -f /data/mongodb/instance/shard01/shard01.yaml
mongod -f /data/mongodb/instance/shard02/shard02.yaml
mongod -f /data/mongodb/instance/shard03/shard03.yaml
2.2.2 配置shard01,shard02,shard03的replica set
注意每个机器这里的配置不同,登陆的端口也不同
- 登陆192.168.9.34
mongo --port 27018
Shard01
cfg = {
 _id: "shard01",
 members:[
 {
  _id: 0,
  host: "192.168.9.34:27018",
  priority: 3
 },
 {
  _id: 1,
  host: "192.168.9.44:27018",
  priority: 2
 },
 {
  _id: 2,
  host: "192.168.9.54:27018",
  arbiterOnly: true
 }
 ]
}
rs.initiate(cfg)
- 登陆192.168.9.44
mongo --port 27118
Shard02
cfg = {
 _id: "shard02",
 members:[
 {
  _id: 0,
  host: "192.168.9.34:27118",
  arbiterOnly: true
 },
 {
  _id: 1,
  host: "192.168.9.44:27118",
  priority: 3
 },
 {
  _id: 2,
  host: "192.168.9.54:27118",
  priority: 2
 }
 ]
}
rs.initiate(cfg)
- 登陆192.168.9.54
mongo --port 27218
Shard03
cfg = {
 _id: "shard03",
 members:[
 {
  _id: 0,
  host: "192.168.9.34:27218",
  priority: 2
 },
 {
  _id: 1,
  host: "192.168.9.44:27218",
  arbiterOnly: true
 },
 {
  _id: 2,
  host: "192.168.9.54:27218",
  priority: 3
 }
 ]
}
rs.initiate(cfg)
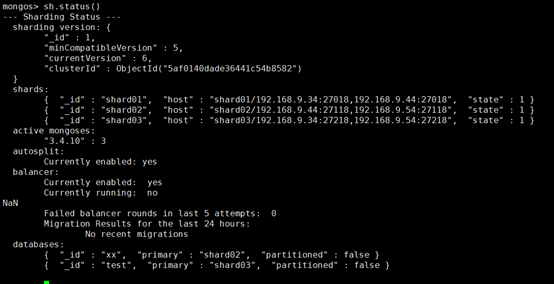
- 使用rs.status()查看状态
到此,每台机器上应该会有三个进程
[root@sql01 mongodb]# ps -ef | grep mongo
root      2126     1  0 10:42 ?        00:00:23 /data/mongodb/bin/mongod -f /data/mongodb/instance/shard01/shard01.yaml
root      2159     1  0 10:42 ?        00:00:14 /data/mongodb/bin/mongod -f /data/mongodb/instance/shard02/shard02.yaml
root      2231     1  0 10:42 ?        00:00:22 /data/mongodb/bin/mongod -f /data/mongodb/instance/shard03/shard03.yaml
2.3 config 配置
2.3.1 配置文件
config配置文件三台机器相同,所以只列出一个样例。
[root@sql01 mongodb]# cat instance/config/config.yaml
systemLog:
  destination: file
  path: "/data/mongodb/instance/config/log/config.log"
storage:
  dbPath: "/data/mongodb/instance/config/data"
net:
  port: 27019
bindIp: 0.0.0.0
processManagement:
  fork: true
sharding:
  clusterRole: configsvr
replication:
  replSetName: cfgSet
启动config,三台机器都要启动
mongod -f /data/mongodb/instance/config/config.yaml
2.3.2 配置config的replicaSet,config的replicaSet为一主两从(仅登陆9.34配置)
mongo –port 27019

cfg =
{
 _id: "cfgSet",
 configsvr: true,
 members:[
 {
  _id: 0,
  host: "192.168.9.34:27019",
  priority: 3
 },
 {
  _id: 1,
  host: "192.168.9.44:27019",
  priority: 2
 },
 {
  _id: 2,
  host: "192.168.9.54:27019",
  priority: 1
 }
 ]
}
> rs.initiate(cfg)
> rs.status() 显示详细配置信息即config的replicaSet配置完成!
至此,每台机器上应该有4个mongod进程
[root@sql01 mongodb]# ps -ef | grep mongo
root      2126     1  0 10:42 ?        00:00:24 /data/mongodb/bin/mongod -f /data/mongodb/instance/shard01/shard01.yaml
root      2159     1  0 10:42 ?        00:00:14 /data/mongodb/bin/mongod -f /data/mongodb/instance/shard02/shard02.yaml
root      2231     1  0 10:42 ?        00:00:24 /data/mongodb/bin/mongod -f /data/mongodb/instance/shard03/shard03.yaml
root      2323     1  0 10:43 ?        00:00:30 /data/mongodb/bin/mongod -f /data/mongodb/instance/config/config.yaml
2.4 mongos配置
2.4.1 配置文件
- 三台服务器相同,故仅贴出一台服务器样例
[root@sql01 mongodb]# cat instance/mongos/mongos.yaml
systemLog:
  destination: file
  path: "/data/mongodb/instance/mongos/log/mongos.log"
net:
  port: 27017
processManagement:
  fork: true
sharding:
  configDB: cfgSet/192.168.9.34:27019,192.168.9.44:27019,192.168.9.54:27019
- 分别启动三台机器上的mongos进程
mongos -f /data/mongodb/instance/mongos/mongos.yaml
- 至此,每台机器上会有5个mongo进程
[root@sql01 mongodb]# ps -ef | grep mongo
root      2126     1  0 10:42 ?        00:00:25 /data/mongodb/bin/mongod -f /data/mongodb/instance/shard01/shard01.yaml
root      2159     1  0 10:42 ?        00:00:15 /data/mongodb/bin/mongod -f /data/mongodb/instance/shard02/shard02.yaml
root      2231     1  0 10:42 ?        00:00:24 /data/mongodb/bin/mongod -f /data/mongodb/instance/shard03/shard03.yaml
root      2323     1  0 10:43 ?        00:00:31 /data/mongodb/bin/mongod -f /data/mongodb/instance/config/config.yaml
root      2413     1  0 10:43 ?        00:00:03 /data/mongodb/bin/mongos -f /data/mongodb/instance/mongos/mongos.yaml
2.4.2 添加路由信息
- 一般在第一台机器上配置
mongo --port 27017
> use admin
switched to db admin
>db.runCommand({addshard:"shard01/192.168.9.34:27018,192.168.9.44:27018,192.168.9.54:27018"})
>db.runCommand({addshard:"shard02/192.168.9.34:27118,192.168.9.44:27118,192.168.9.54:27118"})
>db.runCommand({addshard:"shard03/192.168.9.34:27218,192.168.9.44:27218,192.168.9.54:27218"})
出现以下代表配置成功
到此客户端随便访问哪个mongos即可。
3.启动注意事项
这里mongo集群启动一定要按照 shard → config → mongos来严格控制,否则可能会造成mongo集群故障。
[root@sql01 redis]# cat /scripts/shard.sh /scripts/config.sh /scripts/mongos.sh
#!/bin/bash


mongod_path="/data/mongodb/bin"

$mongod_path/mongod -f /data/mongodb/instance/shard01/shard01.yaml
$mongod_path/mongod -f /data/mongodb/instance/shard02/shard02.yaml
$mongod_path/mongod -f /data/mongodb/instance/shard03/shard03.yaml

#!/bin/bash

mongod_path="/data/mongodb/bin"

$mongod_path/mongod -f /data/mongodb/instance/config/config.yaml

#!/bin/bash

mongod_path="/data/mongodb/bin"


$mongod_path/mongos -f /data/mongodb/instance/mongos/mongos.yaml
4.后期排错及优化
4.1 mongodb 复制集主节点切换方法
1.冻结其中的一个从节点,使其不参与到与primary 的内部选举工作
进入客户端,执行(单位:秒)
rs.freeze(30);
2.对原主节点进行降级
进入客户端,执行下面代码 (单位:秒)
rs.stepDown(15);
3.经过冻结和降级之后查看复制集状态
rs.status();
复制集顺利切换
4.2 mongodb副本集的常用操作及原理
参考链接:https://www.cnblogs.com/ivictor/p/6804408.html
本文是对MongoDB副本集常用操作的一个汇总,同时也穿插着介绍了操作背后的原理及注意点。
下面的操作主要分为两个部分:
1. 修改节点状态
主要包括:
1> 将Primary节点降级为Secondary节点
2> 冻结Secondary节点
3> 强制Secondary节点进入维护模式
2. 修改副本集的配置
1> 添加节点
2> 删除节点
3> 将Secondary节点设置为延迟备份节点
4> 将Secondary节点设置为隐藏节点
5> 替换当前的副本集成员
6> 设置副本集节点的优先级
7> 阻止Secondary节点升级为Primary节点
8> 如何设置没有投票权的Secondary节点
9> 禁用chainingAllowed
10> 为Secondary节点显式指定复制源
11> 禁止Secondary节点创建索引
- 首先查看MongoDB副本集支持的所有操作
> rs.help()
    rs.status()                                { replSetGetStatus : 1 } checks repl set status
    rs.initiate()                              { replSetInitiate : null } initiates set with default settings
    rs.initiate(cfg)                           { replSetInitiate : cfg } initiates set with configuration cfg
    rs.conf()                                  get the current configuration object from local.system.replset
    rs.reconfig(cfg)                           updates the configuration of a running replica set with cfg (disconnects)
    rs.add(hostportstr)                        add a new member to the set with default attributes (disconnects)
    rs.add(membercfgobj)                       add a new member to the set with extra attributes (disconnects)
    rs.addArb(hostportstr)                     add a new member which is arbiterOnly:true (disconnects)
    rs.stepDown([stepdownSecs, catchUpSecs])   step down as primary (disconnects)
    rs.syncFrom(hostportstr)                   make a secondary sync from the given member
    rs.freeze(secs)                            make a node ineligible to become primary for the time specified
    rs.remove(hostportstr)                     remove a host from the replica set (disconnects)
    rs.slaveOk()                               allow queries on secondary nodes

    rs.printReplicationInfo()                  check oplog size and time range
    rs.printSlaveReplicationInfo()             check replica set members and replication lag
    db.isMaster()                              check who is primary

    reconfiguration helpers disconnect from the database so the shell will display
    an error, even if the command succeeds.
- 修改节点状态
将Primary节点降级为Secondary节点
myapp:PRIMARY> rs.stepDown()
这个命令会让primary降级为Secondary节点,并维持60s,如果这段时间内没有新的primary被选举出来,这个节点可以要求重新进行选举。
也可手动指定时间
myapp:PRIMARY> rs.stepDown(30)
在执行完该命令后,原Secondary node3:27017升级为Primary。
其日志输出为:


2017-05-03T22:24:21.009+0800 I COMMAND  [conn8] Attempting to step down in response to replSetStepDown command
2017-05-03T22:24:25.967+0800 I -        [conn8] end connection 127.0.0.1:45976 (3 connections now open)
2017-05-03T22:24:37.643+0800 I REPL     [ReplicationExecutor] Member node3:27018 is now in state SECONDARY
2017-05-03T22:24:41.123+0800 I REPL     [replication-40] Restarting oplog query due to error: InterruptedDueToReplStateChange: operat
ion was interrupted. Last fetched optime (with hash): { ts: Timestamp 1493821475000|1, t: 2 }[-6379771952742605801]. Restarts remaining: 32017-05-03T22:24:41.167+0800 I REPL     [replication-40] Scheduled new oplog query Fetcher source: node3:27018 database: local query:
 { find: "oplog.rs", filter: { ts: { $gte: Timestamp 1493821475000|1 } }, tailable: true, oplogReplay: true, awaitData: true, maxTimeMS: 60000, term: 2 } query metadata: { $replData: 1, $ssm: { $secondaryOk: true } } active: 1 timeout: 10000ms shutting down?: 0 first: 1 firstCommandScheduler: RemoteCommandRetryScheduler request: RemoteCommand 11695 -- target:node3:27018 db:local cmd:{ find: "oplog.rs", filter: { ts: { $gte: Timestamp 1493821475000|1 } }, tailable: true, oplogReplay: true, awaitData: true, maxTimeMS: 60000, term: 2 } active: 1 callbackHandle.valid: 1 callbackHandle.cancelled: 0 attempt: 1 retryPolicy: RetryPolicyImpl maxAttempts: 1 maxTimeMillis: -1ms2017-05-03T22:24:41.265+0800 I REPL     [replication-39] Choosing new sync source because our current sync source, node3:27018, has a
n OpTime ({ ts: Timestamp 1493821475000|1, t: 2 }) which is not ahead of ours ({ ts: Timestamp 1493821475000|1, t: 2 }), it does not have a sync source, and it's not the primary (sync source does not know the primary)2017-05-03T22:24:41.266+0800 I REPL     [replication-39] Canceling oplog query because we have to choose a new sync source. Current s
ource: node3:27018, OpTime { ts: Timestamp 0|0, t: -1 }, its sync source index:-12017-05-03T22:24:41.266+0800 W REPL     [rsBackgroundSync] Fetcher stopped querying remote oplog with error: InvalidSyncSource: sync
source node3:27018 (last visible optime: { ts: Timestamp 0|0, t: -1 }; config version: 1; sync source index: -1; primary index: -1) is no longer valid2017-05-03T22:24:41.266+0800 I REPL     [rsBackgroundSync] could not find member to sync from
2017-05-03T22:24:46.021+0800 I REPL     [SyncSourceFeedback] SyncSourceFeedback error sending update to node3:27018: InvalidSyncSourc
e: Sync source was cleared. Was node3:270182017-05-03T22:24:46.775+0800 I REPL     [ReplicationExecutor] Starting an election, since we've seen no PRIMARY in the past 10000ms
2017-05-03T22:24:46.775+0800 I REPL     [ReplicationExecutor] conducting a dry run election to see if we could be elected
2017-05-03T22:24:46.857+0800 I REPL     [ReplicationExecutor] VoteRequester(term 2 dry run) received a yes vote from node3:27019; res
ponse message: { term: 2, voteGranted: true, reason: "", ok: 1.0 }2017-05-03T22:24:46.858+0800 I REPL     [ReplicationExecutor] dry election run succeeded, running for election
2017-05-03T22:24:46.891+0800 I REPL     [ReplicationExecutor] VoteRequester(term 3) received a yes vote from node3:27018; response me
ssage: { term: 3, voteGranted: true, reason: "", ok: 1.0 }2017-05-03T22:24:46.891+0800 I REPL     [ReplicationExecutor] election succeeded, assuming primary role in term 3
2017-05-03T22:24:46.891+0800 I REPL     [ReplicationExecutor] transition to PRIMARY
2017-05-03T22:24:46.892+0800 I ASIO     [NetworkInterfaceASIO-Replication-0] Connecting to node3:27019
2017-05-03T22:24:46.894+0800 I ASIO     [NetworkInterfaceASIO-Replication-0] Connecting to node3:27019
2017-05-03T22:24:46.894+0800 I ASIO     [NetworkInterfaceASIO-Replication-0] Successfully connected to node3:27019
2017-05-03T22:24:46.895+0800 I REPL     [ReplicationExecutor] My optime is most up-to-date, skipping catch-up and completing transiti
on to primary.2017-05-03T22:24:46.895+0800 I ASIO     [NetworkInterfaceASIO-Replication-0] Successfully connected to node3:27019
2017-05-03T22:24:47.348+0800 I REPL     [rsSync] transition to primary complete; database writes are now permitted
2017-05-03T22:24:49.231+0800 I NETWORK  [thread1] connection accepted from 192.168.244.30:35837 #9 (3 connections now open)
2017-05-03T22:24:49.236+0800 I NETWORK  [conn9] received client metadata from 192.168.244.30:35837 conn9: { driver: { name: "NetworkI
nterfaceASIO-RS", version: "3.4.2" }, os: { type: "Linux", name: "Red Hat Enterprise Linux Server release 6.7 (Santiago)", architecture: "x86_64", version: "Kernel 2.6.32-573.el6.x86_64" } }2017-05-03T22:24:49.317+0800 I NETWORK  [thread1] connection accepted from 192.168.244.30:35838 #10 (4 connections now open)
2017-05-03T22:24:49.318+0800 I NETWORK  [conn10] received client metadata from 192.168.244.30:35838 conn10: { driver: { name: "Networ
kInterfaceASIO-RS", version: "3.4.2" }, os: { type: "Linux", name: "Red Hat Enterprise Linux Server release 6.7 (Santiago)", architecture: "x86_64", version: "Kernel 2.6.32-573.el6.x86_64" } }
原Primary node3:27018降低为Secondary
2017-05-03T22:24:36.262+0800 I COMMAND  [conn7] Attempting to step down in response to replSetStepDown command
2017-05-03T22:24:36.303+0800 I REPL     [conn7] transition to SECONDARY
2017-05-03T22:24:36.315+0800 I NETWORK  [conn7] legacy transport layer closing all connections
2017-05-03T22:24:36.316+0800 I NETWORK  [conn7] Skip closing connection for connection # 5
2017-05-03T22:24:36.316+0800 I NETWORK  [conn7] Skip closing connection for connection # 4
2017-05-03T22:24:36.316+0800 I NETWORK  [conn7] Skip closing connection for connection # 4
2017-05-03T22:24:36.316+0800 I NETWORK  [conn7] Skip closing connection for connection # 3
2017-05-03T22:24:36.316+0800 I NETWORK  [conn7] Skip closing connection for connection # 1
2017-05-03T22:24:36.316+0800 I NETWORK  [conn7] Skip closing connection for connection # 1
2017-05-03T22:24:36.382+0800 I NETWORK  [thread1] connection accepted from 127.0.0.1:43359 #8 (5 connections now open)
2017-05-03T22:24:36.383+0800 I NETWORK  [conn8] received client metadata from 127.0.0.1:43359 conn8: { application: { name: "MongoDB
Shell" }, driver: { name: "MongoDB Internal Client", version: "3.4.2" }, os: { type: "Linux", name: "Red Hat Enterprise Linux Server release 6.7 (Santiago)", architecture: "x86_64", version: "Kernel 2.6.32-573.el6.x86_64" } }2017-05-03T22:24:36.408+0800 I -        [conn7] AssertionException handling request, closing client connection: 172 Operation attempt
ed on a closed transport Session.2017-05-03T22:24:36.408+0800 I -        [conn7] end connection 127.0.0.1:43355 (6 connections now open)
2017-05-03T22:24:41.262+0800 I COMMAND  [conn5] command local.oplog.rs command: find { find: "oplog.rs", filter: { ts: { $gte: Timest
amp 1493821475000|1 } }, tailable: true, oplogReplay: true, awaitData: true, maxTimeMS: 60000, term: 2 } planSummary: COLLSCAN cursorid:12906944372 keysExamined:0 docsExamined:1 writeConflicts:1 numYields:1 nreturned:1 reslen:392 locks:{ Global: { acquireCount: { r: 4 } }, Database: { acquireCount: { r: 2 } }, oplog: { acquireCount: { r: 2 } } } protocol:op_command 100ms2017-05-03T22:24:48.311+0800 I REPL     [ReplicationExecutor] Member node3:27017 is now in state PRIMARY
2017-05-03T22:24:49.163+0800 I REPL     [rsBackgroundSync] sync source candidate: node3:27017
2017-05-03T22:24:49.164+0800 I ASIO     [NetworkInterfaceASIO-RS-0] Connecting to node3:27017
2017-05-03T22:24:49.236+0800 I ASIO     [NetworkInterfaceASIO-RS-0] Successfully connected to node3:27017
2017-05-03T22:24:49.316+0800 I ASIO     [NetworkInterfaceASIO-RS-0] Connecting to node3:27017
2017-05-03T22:24:49.318+0800 I ASIO     [NetworkInterfaceASIO-RS-0] Successfully connected to node3:27017
2017-05-03T22:25:41.020+0800 I -        [conn4] end connection 192.168.244.30:36940 (5 connections now open)
2017-05-03T22:29:02.653+0800 I ASIO     [NetworkInterfaceASIO-RS-0] Connecting to node3:27017
2017-05-03T22:29:02.669+0800 I ASIO     [NetworkInterfaceASIO-RS-0] Successfully connected to node3:27017
2017-05-03T22:29:41.442+0800 I -        [conn5] end connection 192.168.244.30:36941 (4 connections now open)
冻结Secondary节点
如果需要对Primary做一下维护,但是不希望在维护的这段时间内将其它Secondary节点选举为Primary节点,可以在每次Secondary节点上执行freeze命令,强制使它们始终处于Secondary节点状态。
myapp:SECONDARY> rs.freeze(100)
注:只能在Secondary节点上执行
myapp:PRIMARY> rs.freeze(100)
{
    "ok" : 0,
    "errmsg" : "cannot freeze node when primary or running for election. state: Primary",
    "code" : 95,
    "codeName" : "NotSecondary"
}
如果要解冻Secondary节点,只需执行
yapp:SECONDARY> rs.freeze()
强制Secondary节点进入维护模式
当Secondary节点进入到维护模式后,它的状态即转化为“RECOVERING”,在这个状态的节点,客户端不会发送读请求给它,同时它也不能作为复制源。
进入维护模式有两种触发方式:
1. 自动触发
譬如Secondary上执行压缩
2. 手动触发
myapp:SECONDARY> db.adminCommand({"replSetMaintenance":true})
- 副本集的配置
添加节点
myapp:PRIMARY> rs.add("node3:27017")
myapp:PRIMARY> rs.add({_id: 3, host: "node3:27017", priority: 0, hidden: true})
也可通过配置文件的方式
> cfg={
    "_id" : 3,
    "host" : "node3:27017",
    "arbiterOnly" : false,
    "buildIndexes" : true,
    "hidden" : true,
    "priority" : 0,
    "tags" : {

    },
    "slaveDelay" : NumberLong(0),
    "votes" : 1
}
> rs.add(cfg)
删除节点
第一种方式
myapp:PRIMARY> rs.remove("node3:27017")
第二种方式
myapp:PRIMARY> cfg = rs.conf()
myapp:PRIMARY> cfg.members.splice(2,1)
myapp:PRIMARY> rs.reconfig(cfg)
注:执行rs.reconfig并不必然带来副本集的重新选举,加force参数同样如此。
- The rs.reconfig() shell method can trigger the current primary to step down in some situations.
修改节点的配置
Secondary节点设置为延迟备份节点
fg = rs.conf()
cfg.members[1].priority = 0
cfg.members[1].hidden = true
cfg.members[1].slaveDelay = 3600
rs.reconfig(cfg)
将Secondary节点设置为隐藏节点
cfg = rs.conf()
cfg.members[0].priority = 0
cfg.members[0].hidden = true
rs.reconfig(cfg)
替换当前的副本集成员
cfg = rs.conf()
cfg.members[0].host = "mongo2.example.net"
rs.reconfig(cfg)
设置副本集节点的优先级
cfg = rs.conf()
cfg.members[0].priority = 0.5
cfg.members[1].priority = 2
cfg.members[2].priority = 2
rs.reconfig(cfg)
优先级的有效取值是0~1000,可为小数,默认为1
从MongoDB 3.2开始
Non-voting members must have priority of 0.
Members with priority greater than 0 cannot have 0 votes.
注:如果将当前Secondary节点的优先级设置的大于Primary节点的优先级,会导致当前Primary节点的退位。
阻止Secondary节点升级为Primary节点
将priority设置为0
fg = rs.conf()
cfg.members[2].priority = 0
rs.reconfig(cfg)
如何设置没有投票权的Secondary节点
MongoDB限制一个副本集最多只能拥有50个成员节点,其中,最多只有7个成员节点拥有投票权。
之所以作此限制,主要是考虑到心跳请求导致的网络流量,毕竟每个成员都要向其它所有成员发送心跳请求,和选举花费的时间。
从MongoDB 3.2开始,任何priority大于0的节点都不可将votes设置为0
所以,对于没有投票权的Secondary节点,votes和priority必须同时设置为0
cfg = rs.conf()
cfg.members[3].votes = 0
cfg.members[3].priority = 0
cfg.members[4].votes = 0
cfg.members[4].priority = 0
rs.reconfig(cfg)
禁用chainingAllowed
默认情况下,允许级联复制。
即备份集中如果新添加了一个节点,这个节点很可能是从其中一个Secondary节点处进行复制,而不是从Primary节点处复制。
MongoDB根据ping时间选择同步源,一个节点向另一个节点发送心跳请求,就可以得知心跳请求所耗费的时间。MongoDB维护着不同节点间心跳请求的平均花费时间,选择同步源时,会选择一个离自己比较近而且数据比自己新的节点。
如何判断节点是从哪个节点处进行复制的呢?
myapp:PRIMARY> rs.status().members[1].syncingTo
node3:27018
当然,级联复制也有显而易见的缺点:复制链越长,将写操作复制到所有Secondary节点所花费的时间就越长。
可通过如下方式禁用
cfg=rs.conf()
cfg.settings.chainingAllowed=false
rs.reconfig(cfg)
将chainingAllowed设置为false后,所有Secondary节点都会从Primary节点复制数据。
为Secondary节点显式指定复制源
rs.syncFrom("node3:27019")
禁止Secondary节点创建索引
有时,并不需要Secondary节点拥有和Primary节点相同的索引,譬如这个节点只是用来处理数据备份或者离线的批量任务。这个时候,就可以阻止Secondary节点创建索引。
在MongoDB 3.4版本中,不允许直接修改,只能在添加节点时显式指定
myapp:PRIMARY> cfg=rs.conf()
myapp:PRIMARY> cfg.members[2].buildIndexes=false
false
myapp:PRIMARY> rs.reconfig(cfg)
{
    "ok" : 0,
    "errmsg" : "priority must be 0 when buildIndexes=false",
    "code" : 103,
    "codeName" : "NewReplicaSetConfigurationIncompatible"
}
myapp:PRIMARY> cfg.members[2].buildIndexes=false
false
myapp:PRIMARY> cfg.members[2].priority=0
0
myapp:PRIMARY> rs.reconfig(cfg)
{
    "ok" : 0,
    "errmsg" : "New and old configurations differ in the setting of the buildIndexes field for member node3:27017; to make this c
hange, remove then re-add the member",    "code" : 103,
    "codeName" : "NewReplicaSetConfigurationIncompatible"
}
myapp:PRIMARY> rs.remove("node3:27017")
{ "ok" : 1 }
myapp:PRIMARY> rs.add({_id: 2, host: "node3:27017", priority: 0, buildIndexes:false})
{ "ok" : 1 }
从上述测试中可以看出,如果要将节点的buildIndexes设置为false,必须同时将priority设置为0。

