
day12-SpringBoot数据库操作
SpringBoot数据库操作
1.JDBC+HikariDataSource
在SpringBoot 2.x项目中,默认使用Hikari连接池管理数据源。相比于传统的 C3P0 、DBCP、Tomcat jdbc 等连接池更加优秀。
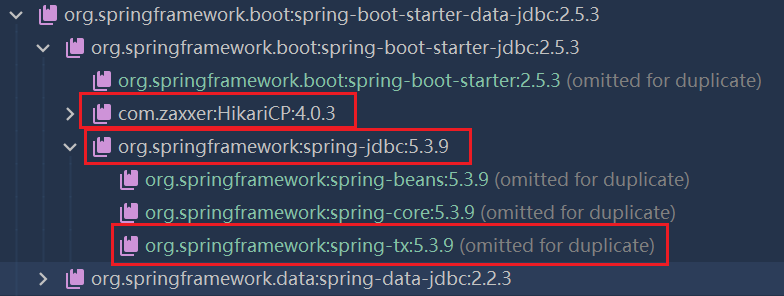
当项目pom.xml引入spring-boot-starter-jdbc启动器依赖后,即可自动导入Hikari,该启动器不但依赖它,还会对其自动配置并创建数据源。我们以MySQL数据库为例,介绍如何使用Hikari。
1.1应用实例
演示SpringBoot如何通过 JDBC+HikariDataSource 完成对Mysql操作。
(1)数据库和表
-- 创建数据库 DROP DATABASE IF EXISTS spring_boot; CREATE DATABASE spring_boot; USE spring_boot; -- 创建表 CREATE TABLE furn( `id` INT(11) PRIMARY KEY AUTO_INCREMENT, #id `name` VARCHAR(64) NOT NULL, #家居名 `maker` VARCHAR(64) NOT NULL, #厂商 `price` DECIMAL(11,2) NOT NULL, #价格 `sales` INT(11) NOT NULL, #销量 `stock` INT(11) NOT NULL, #库存 `img_path` VARCHAR(256) NOT NULL #照片路径 ); -- 初始化家居数据 INSERT INTO furn(`id` , `name` , `maker` , `price` , `sales` , `stock` , `img_path`) VALUES(NULL , '北欧风格小桌子' , '熊猫家居' , 180 , 666 , 7 , 'assets/images/product-image/6.jpg'); INSERT INTO furn(`id` , `name` , `maker` , `price` , `sales` , `stock` , `img_path`) VALUES(NULL , '简约风格小椅子' , '熊猫家居' , 180 , 666 , 7 , 'assets/images/product-image/4.jpg'); INSERT INTO furn(`id` , `name` , `maker` , `price` , `sales` , `stock` , `img_path`) VALUES(NULL , '典雅风格小台灯' , '蚂蚁家居' , 180 , 666 , 7 , 'assets/images/product-image/14.jpg'); INSERT INTO furn(`id` , `name` , `maker` , `price` , `sales` , `stock` , `img_path`) VALUES(NULL , '温馨风格盆景架' , '蚂蚁家居' , 180 , 666 , 7 , 'assets/images/product-image/16.jpg'); SELECT * FROM furn;

(2)进行数据库开发,首先要在pom.xml文件中引入spring-boot-starter-data-jdbc。SpringBoot不知道项目要操作Mysql还是Oracle,因此还需要导入数据库驱动,并指定对应版本。
<!--进行数据库开发,引入data-jdbc starter--> <dependency> <groupId>org.springframework.boot</groupId> <artifactId>spring-boot-starter-data-jdbc</artifactId> </dependency> <!--导入mysql驱动,如果使用版本仲裁,SpringBoot默认的版本为8.0.26--> <dependency> <groupId>mysql</groupId> <artifactId>mysql-connector-java</artifactId> <version>5.1.49</version> </dependency>
(3)在application.yml配置操作数据源的信息
spring: datasource: #配置数据源 #说明:如果没有配置useSSL=true,启动项目会报红警告,但不影响使用 url: jdbc:mysql://localhost:3306/spring_boot?useSSL=true&useUnicode=true&characterEncoding=UTF-8 username: root password: 123456 driver-class-name: com.mysql.jdbc.Driver
(4)创建Javabean--Furn.java
package com.li.thymeleaf.bean; import lombok.AllArgsConstructor; import lombok.Data; import lombok.NoArgsConstructor; import java.math.BigDecimal; /** * @author 李 * @version 1.0 */ @Data @NoArgsConstructor @AllArgsConstructor public class Furn { private Integer id; private String name; private String maker; private BigDecimal price; private Integer sales; private Integer stock; private String imgPath; }
(5)测试类ApplicationTests.java
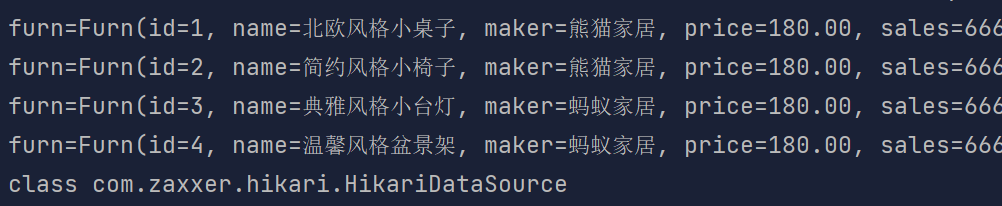
package com.li.thymeleaf; import com.li.thymeleaf.bean.Furn; import org.junit.jupiter.api.Test; import org.springframework.boot.test.context.SpringBootTest; import org.springframework.jdbc.core.BeanPropertyRowMapper; import org.springframework.jdbc.core.JdbcTemplate; import javax.annotation.Resource; import java.util.List; /** * @author 李 * @version 1.0 * 演示如何在SpringBoot中开发测试类 */ @SpringBootTest public class ApplicationTests { //这里使用spring的JDBCTemplate @Resource private JdbcTemplate jdbcTemplate; @Test public void contextLoads() { //使用RowMapper接口来对返回的数据进行封装(底层是反射->setter) BeanPropertyRowMapper<Furn> rowMapper = new BeanPropertyRowMapper<>(Furn.class); List<Furn> furns = jdbcTemplate.query("select * from furn", rowMapper); for (Furn furn : furns) { System.out.println("furn=" + furn); } //查看底层使用的是什么数据源 System.out.println(jdbcTemplate.getDataSource().getClass()); } }
测试结果:
<!--要开发SpringBoot测试类,需要引入test starter--> <dependency> <groupId>org.springframework.boot</groupId> <artifactId>spring-boot-starter-test</artifactId> </dependency>
2.整合Druid到SpringBoot
2.1Druid介绍
Druid数据库连接池性能优秀,它除了提供性能卓越的数据池功能外,还继承了SQL监控,黑名单拦截等功能。强大的监控特性,通过Druid提供的监控功能,可以清楚知道连接池和SQL的工作情况,所以根据项目需要,我们也要掌握Druid和SpringBoot的整合。
整合Druid到SpringBoot的方式:
- 自定义方式
- 引入starter
2.2Druid基本使用
(1)修改pom.xml,引入druid依赖
<!--引入druid依赖--> <dependency> <groupId>com.alibaba</groupId> <artifactId>druid</artifactId> <version>1.1.17</version> </dependency>
(2)创建配置类 DruidDataSourceConfig.java,将DruidDataSource注入容器
package com.li.thymeleaf.config; import com.alibaba.druid.pool.DruidDataSource; import org.springframework.boot.context.properties.ConfigurationProperties; import org.springframework.context.annotation.Bean; import org.springframework.context.annotation.Configuration; import javax.sql.DataSource; /** * @author 李 * @version 1.0 * 配置类 */ @Configuration public class DruidDataSourceConfig { //注入DruidDataSource //通过@ConfigurationProperties指定读取application.yml文件的数据 //我们就不需要调用DruidDataSource的setXxx方法来配置(不推荐) @ConfigurationProperties("spring.datasource") @Bean public DataSource dataSource() { return new DruidDataSource(); } }
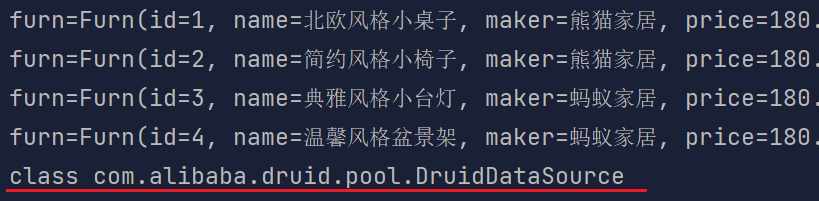
(3)测试类ApplicationTests.java(略,同上)
测试结果:
2.2.1一个问题
问题:为什么我们注入了自己的数据源,默认的HikariDataSource就失效了?
先来弄明白,默认的HikariDataSource 是如何配置的:
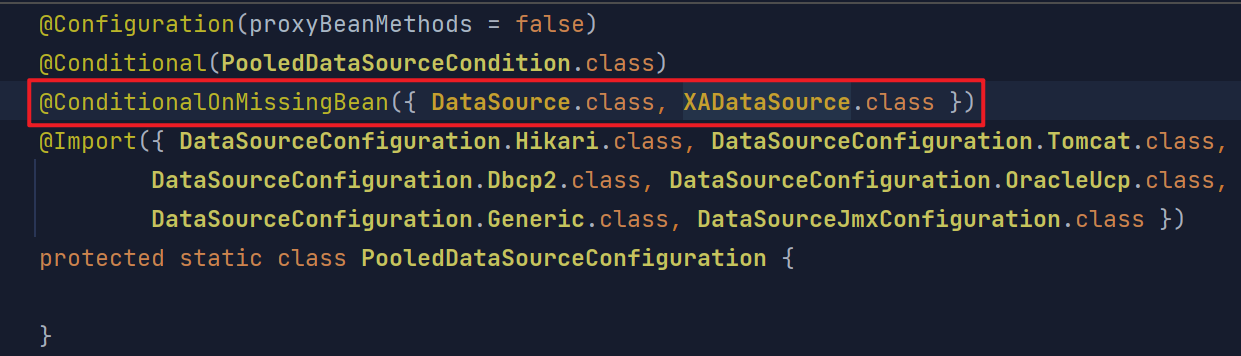
SpringBoot通过DataSourceAutoConfiguration.java来进行数据源的配置,在进行默认的配置之前,如果检测到容器中已经有DataSource Bean,就不会注入默认的HikariDataSource。
因此,如果你注入了自己的数据源,就不会注入默认的HikariDataSource。
DataSourceAutoConfiguration.java:
2.3Druid监控功能
2.3.1开启内置监控页
怎样使用Druid的内置监控页面:内置监控页面是一个Servlet,具体配置看这里
(1)在配置类中,启用druid的监控页功能:
在web项目中使用web.xml配置,若在SpringBoot中,有两种方法注入Servlet---注解和RegistrationBean,这里使用RegistrationBean
DruidDataSourceConfig.java:
package com.li.thymeleaf.config; import com.alibaba.druid.pool.DruidDataSource; import com.alibaba.druid.support.http.StatViewServlet; import org.springframework.boot.context.properties.ConfigurationProperties; import org.springframework.boot.web.servlet.ServletRegistrationBean; import org.springframework.context.annotation.Bean; import org.springframework.context.annotation.Configuration; import javax.sql.DataSource; /** * @author 李 * @version 1.0 * 配置类 */ @Configuration public class DruidDataSourceConfig { //注入DruidDataSource //通过@ConfigurationProperties指定读取yml文件的前缀的数据 @ConfigurationProperties("spring.datasource") @Bean public DataSource dataSource() { return new DruidDataSource(); } //配置Druid的监控页功能 @Bean public ServletRegistrationBean statViewServlet() { //创建StatViewServlet ServletRegistrationBean<StatViewServlet> registrationBean = new ServletRegistrationBean<>(new StatViewServlet(), "/druid/*"); //设置初始化参数-用户名和密码-根据官方配置文件设置 registrationBean.addInitParameter("loginUsername", "olien"); registrationBean.addInitParameter("loginPassword", "123456"); return registrationBean; } }
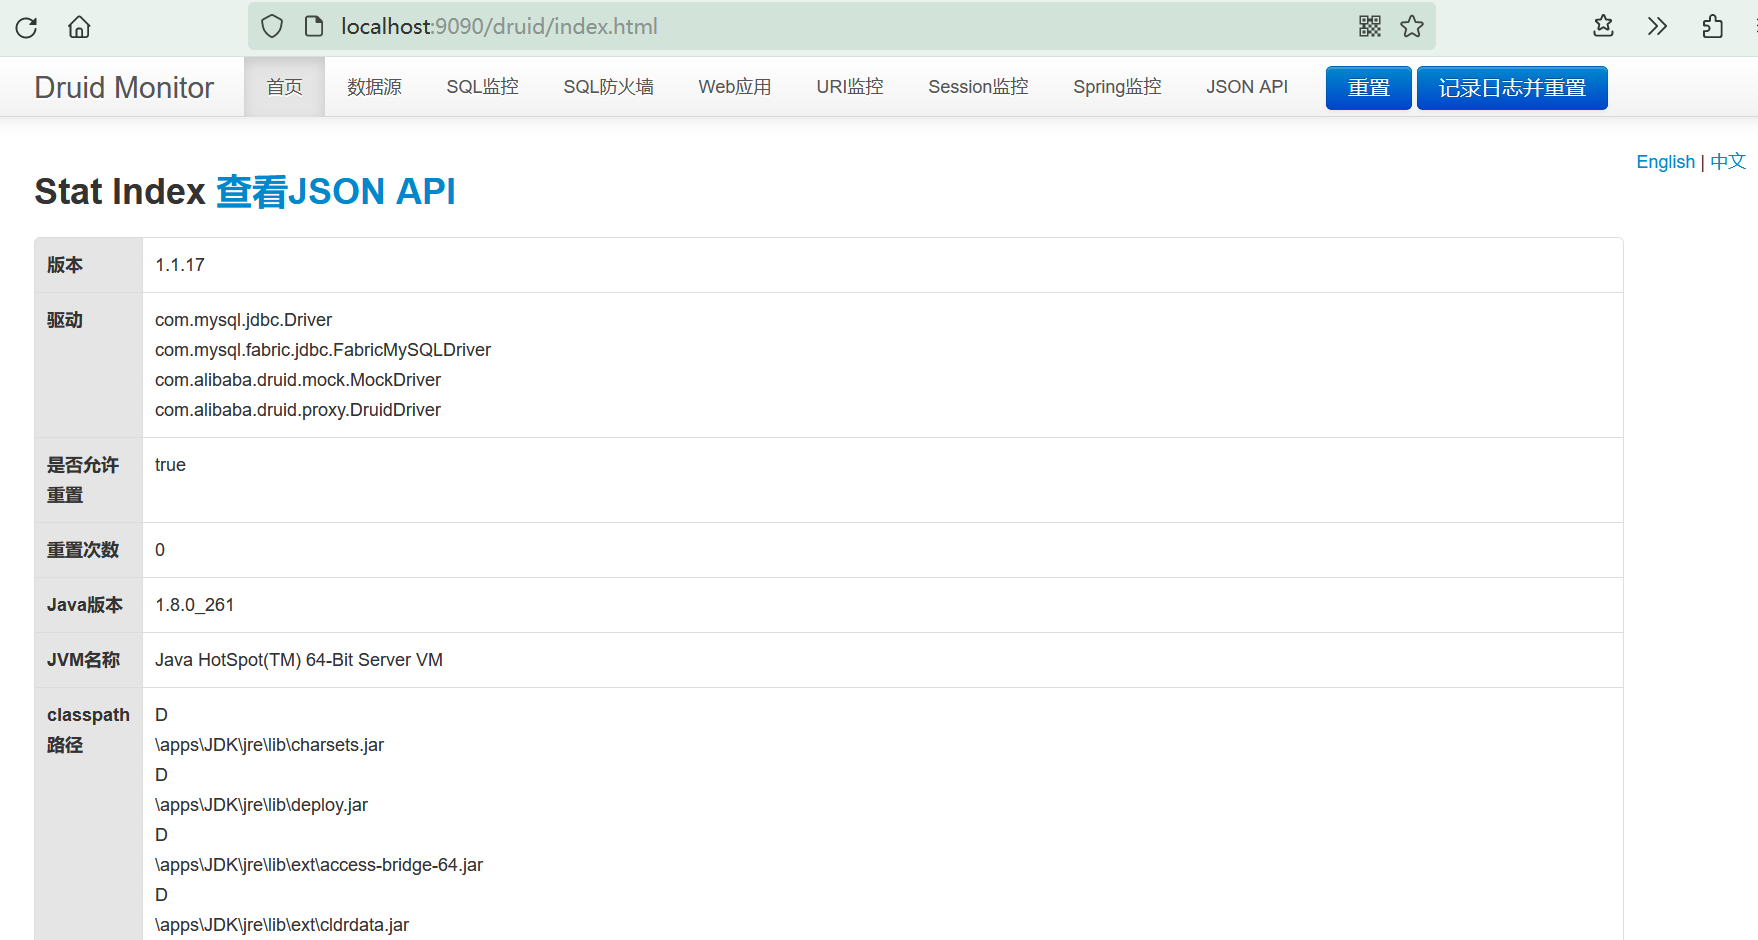
(2)启动项目,浏览器中访问http://项目ip:项目端口/项目名称/druid/index.html,输入配置的用户名和密码,即可访问到内置的监控页面:
2.3.2SQL监控
配置_StatFilter · alibaba/druid Wiki (github.com)
除了文档中的配置方式,也可在配置类中直接对数据源进行设置。
修改DruidDataSourceConfig.java:
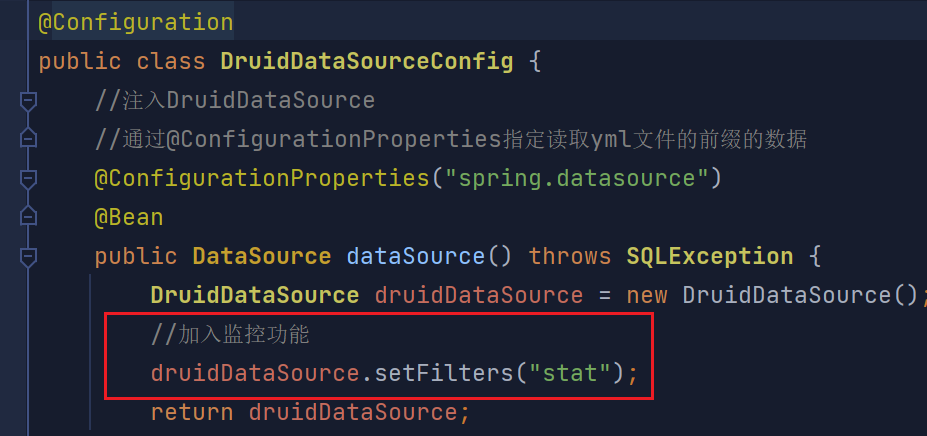
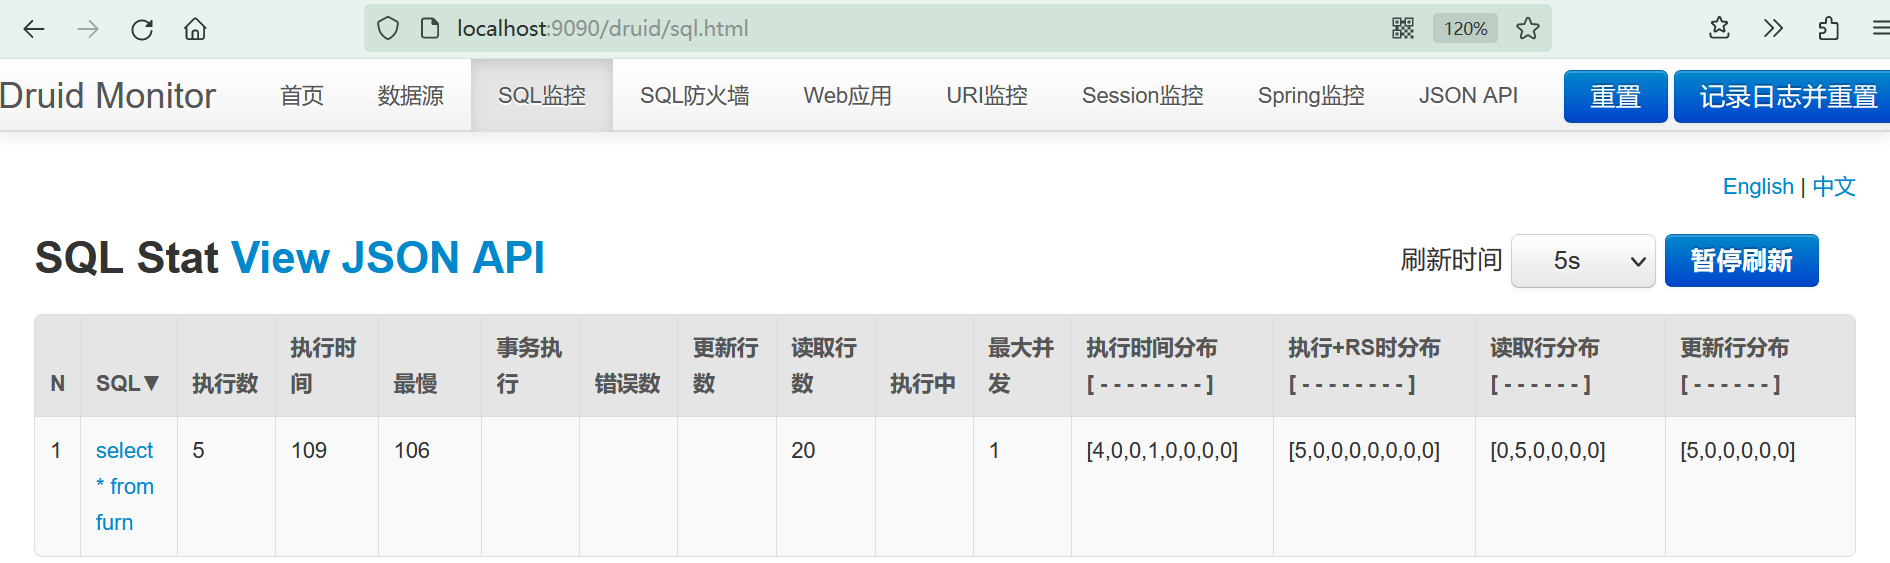
启用SQL监控功能之后,在监控页中可以查看到所有对数据库发出的SQL语句:
2.3.3-Web关联监控
修改DruidDataSourceConfig.java:注入webStatFilter
//配置WebStatFilter,用于采集web-jdbc关联的监控数据 @Bean public FilterRegistrationBean webStatFilter() { //创建过滤器webStatFilter WebStatFilter webStatFilter = new WebStatFilter(); FilterRegistrationBean<WebStatFilter> filterRegistrationBean = new FilterRegistrationBean<>(webStatFilter); //设置webStatFilter的监控url filterRegistrationBean.setUrlPatterns(Arrays.asList("/*")); //根据官方文档设置webStatFilter排除的url filterRegistrationBean.addInitParameter("exclusions", "*.js,*.gif,*.jpg,*.png,*.css,*.ico,/druid/*"); return filterRegistrationBean; }
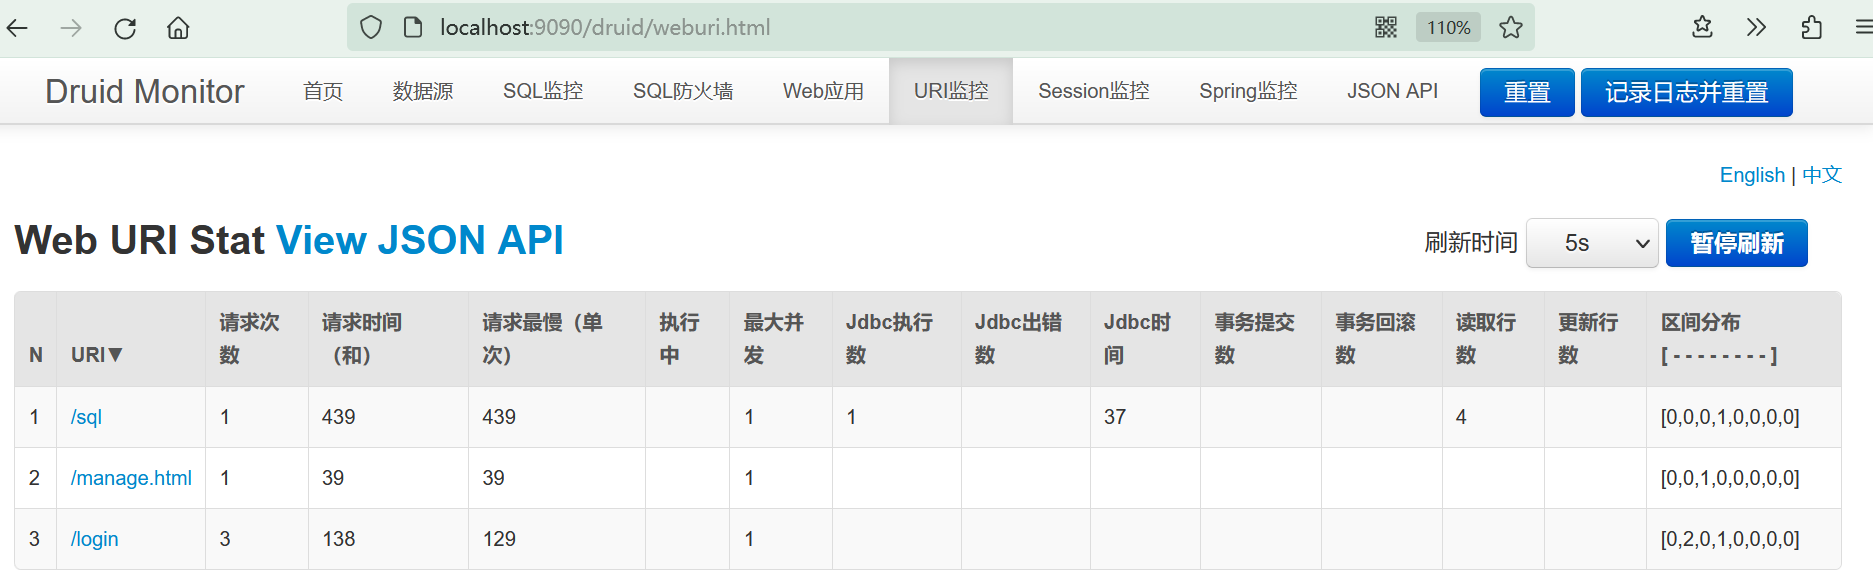
启用URI监控功能之后,在监控页中可以查看到所有的Web应用情况和URI请求情况:

2.3.4SQL防火墙
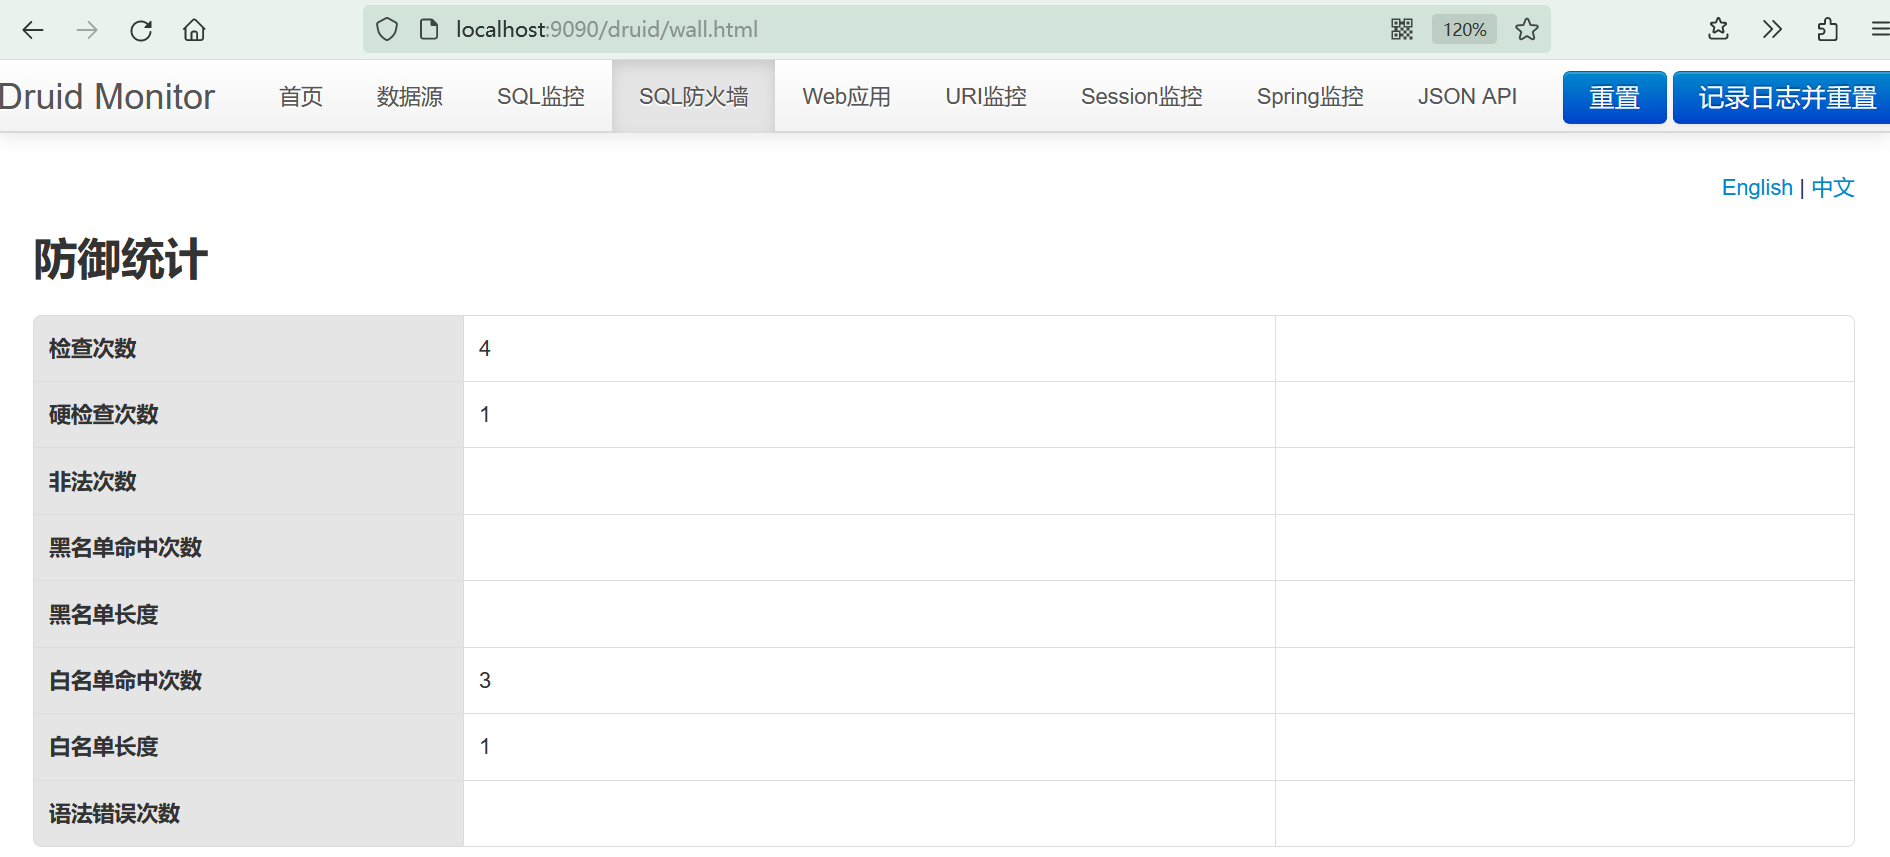
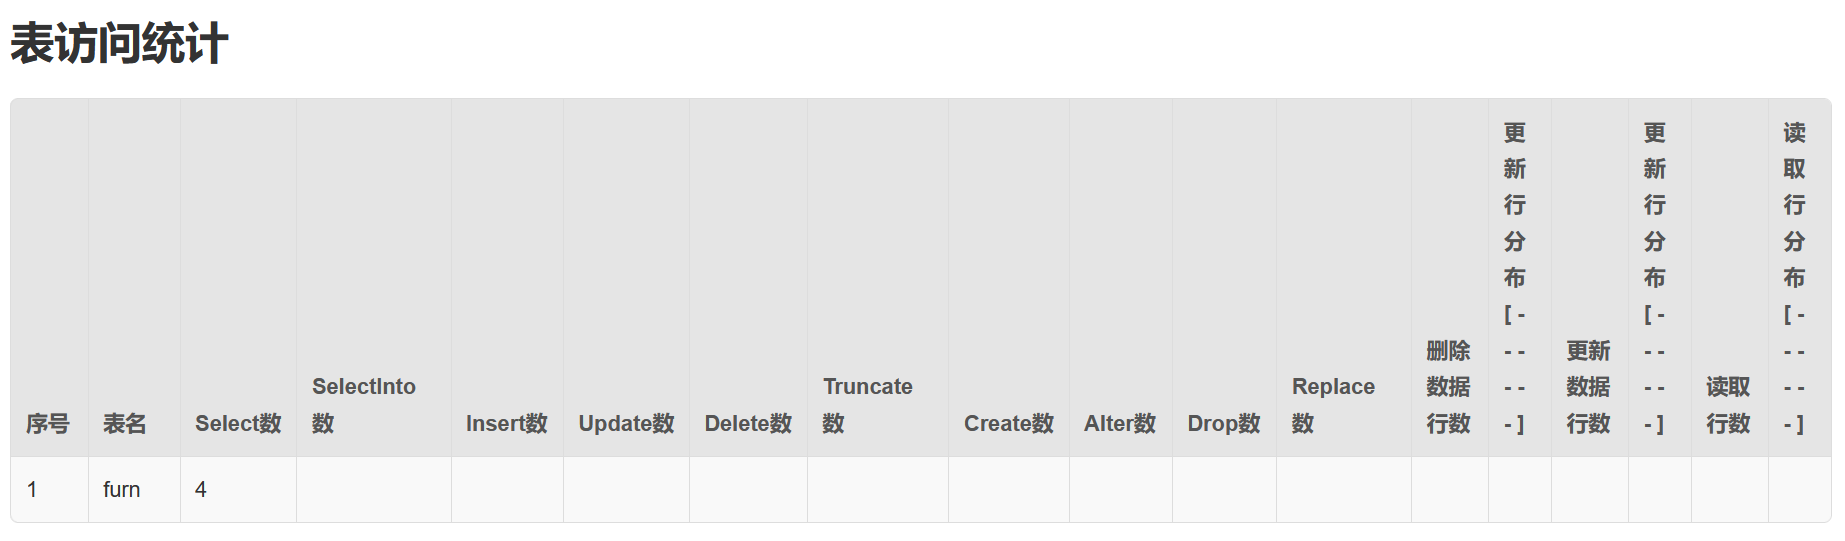
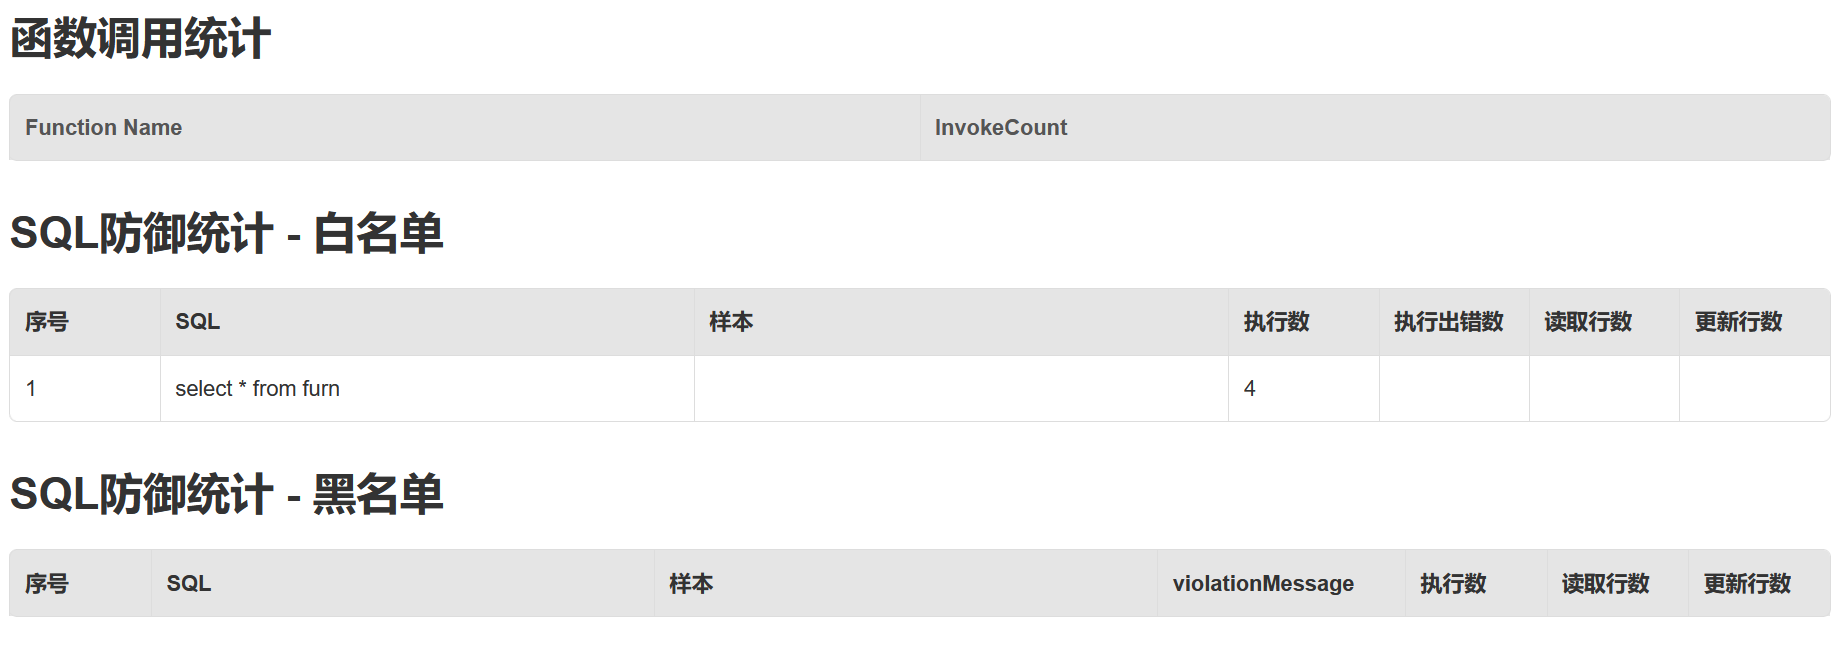
Druid提供了WallFilter,它是基于SQL语义分析来实现防御SQL注入攻击的。具体配置看这里
修改DruidDataSourceConfig.java:
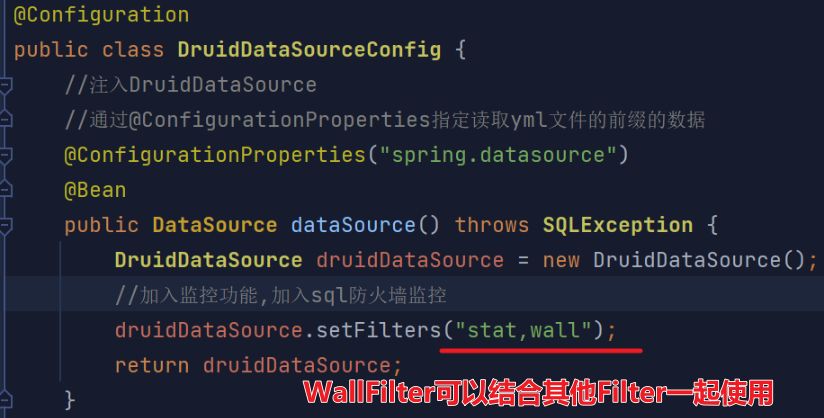
启用SQL防火墙之后,在监控页中可以查看到所有的SQL情况:
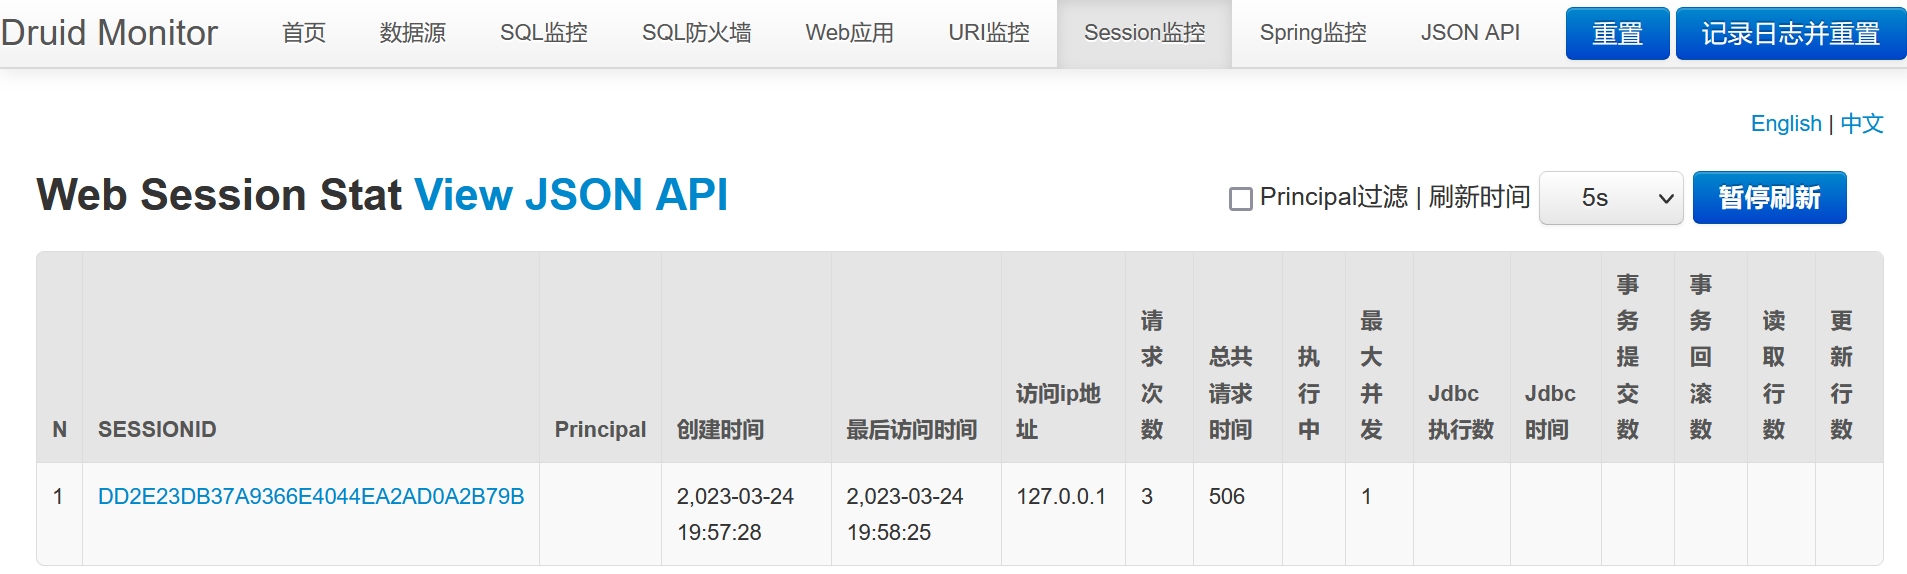
2.3.5Session监控
注意:这里的Session不包括Druid后台监控系统产生的Session
Druid的Session监控不需要配置,在开启了内置监控功能后就可以使用了。
2.4Druid-Starter
整合Druid到SpringBoot的方式有两种:自定义方式和引入starter。
2.3中的所有例子中我们使用的是自己引入druid+配置类方式整合druid和监控。此外,还可以引入Druid Srping Boot Starter,让程序员在SpringBoot项目中更加轻松集成Druid和监控。
演示使用Druid-Starter(演示之前,删除之前所有的自定义方式操作)
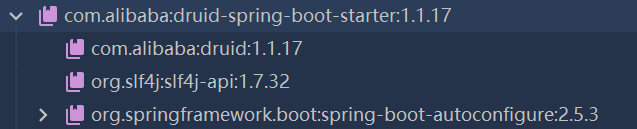
(1)pom.xml引入druid-spring-boot-starter
<!--引入druid的starter--> <dependency> <groupId>com.alibaba</groupId> <artifactId>druid-spring-boot-starter</artifactId> <version>1.1.17</version> </dependency>
(2)在application.yml文件中配置druid和监控功能
spring: datasource: #配置数据源 #如果没有配置useSSL=true,启动项目会报红警告,但不影响使用 url: jdbc:mysql://localhost:3306/spring_boot?useSSL=true&useUnicode=true&characterEncoding=UTF-8 username: root password: 123456 driver-class-name: com.mysql.jdbc.Driver #配置druid和监控功能 druid: stat-view-servlet: #(1)开启监控页 enabled: true login-username: jack login-password: 1234 reset-enable: false web-stat-filter: #(2)启用web监控功能 enabled: true url-pattern: /* exclusions: "*.js,*.gif,*.jpg,*.png,*.css,*.ico,/druid/*" filter: stat: #(3)启用sql监控功能 slow-sql-millis: 1000 #单位ms log-slow-sql: true #启用慢查询的sql日志 enabled: true wall: #(4)启用sql防火墙功能 enabled: true config: drop-table-allow: false #是否允许进行删除表的操作 select-all-column-allow: false #是否允许查询所有字段的操作
3.练习
将异常处理、注入Servlet、Filter、Listener,Tomcat切换,数据库操作(HikariDataSource&DruidDataSource)相关代码和案例写一遍


【推荐】编程新体验,更懂你的AI,立即体验豆包MarsCode编程助手
【推荐】凌霞软件回馈社区,博客园 & 1Panel & Halo 联合会员上线
【推荐】抖音旗下AI助手豆包,你的智能百科全书,全免费不限次数
【推荐】博客园社区专享云产品让利特惠,阿里云新客6.5折上折
【推荐】轻量又高性能的 SSH 工具 IShell:AI 加持,快人一步
· 微软正式发布.NET 10 Preview 1:开启下一代开发框架新篇章
· 没有源码,如何修改代码逻辑?
· PowerShell开发游戏 · 打蜜蜂
· 在鹅厂做java开发是什么体验
· WPF到Web的无缝过渡:英雄联盟客户端的OpenSilver迁移实战