Ocelot + IdentityServer4 构建 GateWay
上一篇已经构建好了例子,接下来将IdentityServer4添加到Ocelot中去实现
配置一个客户端配置,可以构建一个简单的客户端信息,这里我用的混合模式,配置比较多,对于客户端模式而言实际很多都不需要设置
只需要构如下即可
  ClientId="liyouming",
   ClientName="ChinaNetCore",
   ClientSecrets={new Secret("liyouming".Sha256()) },
   AllowedGrantTypes= GrantTypes.ClientCredentials,
  AccessTokenType= AccessTokenType.Jwt,
  AllowedScopes={
                       "openid",
                       "profile",
                       "UserServicesApi"
                    }
对于Ocelot而言你只需要在之前的配置中添加AuthenticationOptions节点参数配置

{
  "ReRoutes": [
    {
      "DownstreamPathTemplate": "/api/values/getuser",
      "DownstreamScheme": "http",
      "DownstreamHostAndPorts": [
        {
          "Host": "localhost",
          "Port": 20001
        },
        {
          "Host": "localhost",
          "Port": 20001
        }
      ],
      "UpstreamPathTemplate": "/test",
      "UpstreamHttpMethod": [ "Get" ],
      "LoadBalancer": "LeastConnection",
      "ServiceName": "userservices",
      "UseServiceDiscovery": true,

      "AuthenticationOptions": {
        "AuthenticationProviderKey": "usergateway",
        "AllowScopes": [ "UserServicesApi" ]
      }
    }
  ],

  "GlobalConfiguration": {
    "BaseUrl": "http://localhost:20000",
    "ServiceDiscoveryProvider": {
      "Host": "localhost",
      "Port": 8500

    }

  }
}
 "AuthenticationOptions": {
        "AuthenticationProviderKey": "usergateway",
        "AllowScopes": [ "UserServicesApi" ]
      }
AuthenticationProviderKey 其实就是授权的authenticationscheme
allscopes 就是 apiresource中配置的授权访问范围,这里配置的即 ApiName
同时还需要在网关添加授权验证服务,配置好授权地址 ApiName(scope),以及对renefrence or jwt or both 和 secret 如果没有使用https 需要设置RequireHttpsMetadata =false
 services.AddAuthentication()
                .AddIdentityServerAuthentication("usergateway", options => {
                    options.Authority = "http://localhost:30000";
                    options.ApiName = "UserServicesApi";
                    options.SupportedTokens = IdentityServer4.AccessTokenValidation.SupportedTokens.Both;
                    options.ApiSecret = "liyouming";
                    options.RequireHttpsMetadata = false;


            });
使用PostMan 来测试下功能
不清楚获取Token地址可以访问配置文件查看
http://localhost:30000/.well-known/openid-configuration
{
    "issuer": "http://localhost:30000",
    "jwks_uri": "http://localhost:30000/.well-known/openid-configuration/jwks",
    "authorization_endpoint": "http://localhost:30000/connect/authorize",
    "token_endpoint": "http://localhost:30000/connect/token",
    "userinfo_endpoint": "http://localhost:30000/connect/userinfo",
    "end_session_endpoint": "http://localhost:30000/connect/endsession",
    "check_session_iframe": "http://localhost:30000/connect/checksession",
    "revocation_endpoint": "http://localhost:30000/connect/revocation",
    "introspection_endpoint": "http://localhost:30000/connect/introspect",
    "frontchannel_logout_supported": true,
    "frontchannel_logout_session_supported": true,
    "backchannel_logout_supported": true,
    "backchannel_logout_session_supported": true,
    "scopes_supported": ["openid", "profile", "UserServicesApi", "offline_access"],
    "claims_supported": [],
    "grant_types_supported": ["authorization_code", "client_credentials", "refresh_token", "implicit"],
    "response_types_supported": ["code", "token", "id_token", "id_token token", "code id_token", "code token", "code id_token token"],
    "response_modes_supported": ["form_post", "query", "fragment"],
    "token_endpoint_auth_methods_supported": ["client_secret_basic", "client_secret_post"],
    "subject_types_supported": ["public"],
    "id_token_signing_alg_values_supported": ["RS256"],
    "code_challenge_methods_supported": ["plain", "S256"]
}
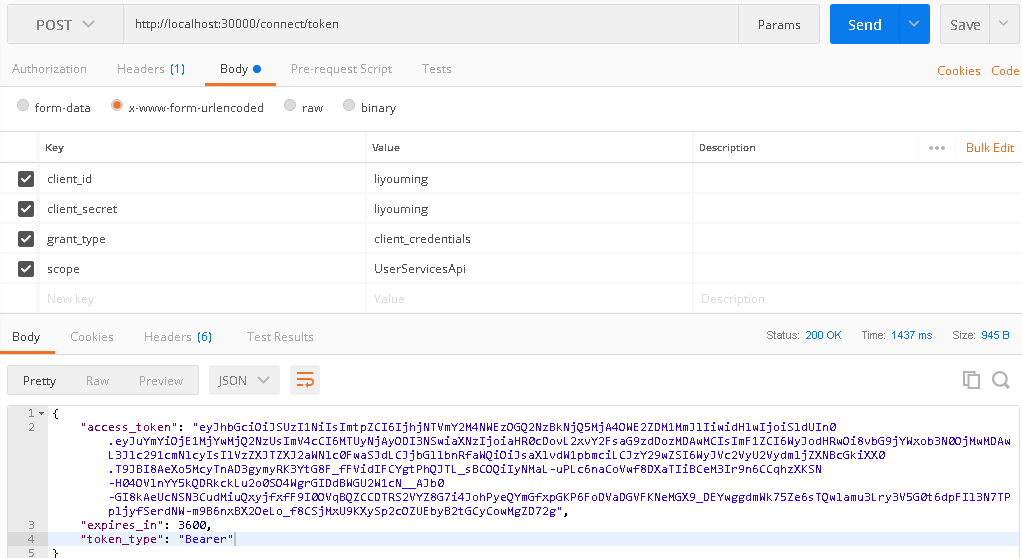
1、通过 http://localhost:30000/connect/token获取token

客户端模式需要四个参数
client_id
client_secret
grant_type
scope

直接访问test提示401没授权

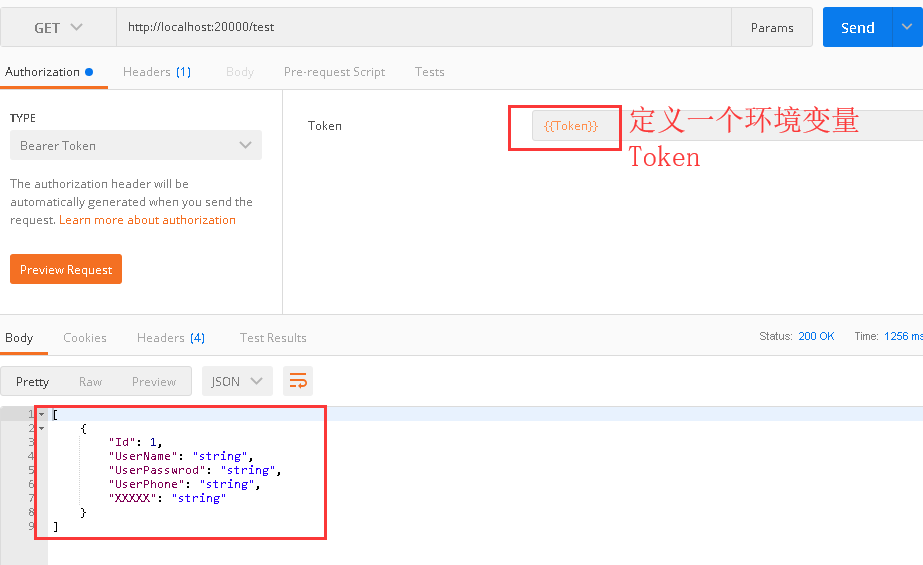
这里拿到了 access_token,接下来通过access_token访问GateWay中的test

如果您觉得阅读本文对您有帮助,请点一下“推荐”按钮,您的“推荐”将是我最大的写作动力!
本文版权归作者和博客园共有,来源网址:http://www.cnblogs.com/liyouming欢迎各位转载,但是未经作者本人同意,转载文章之后必须在文章页面明显位置给出作者和原文连接。


