SpringBoot项目多个启动类模块之间相互调用
1. 项目整体结构
1.2 先创建 spring-server 模块,在 spring-client 模块引用 spring-server 模块的依赖
2. 搭建 spring-server 模块
2.1 创建一个 springboot 工程模块
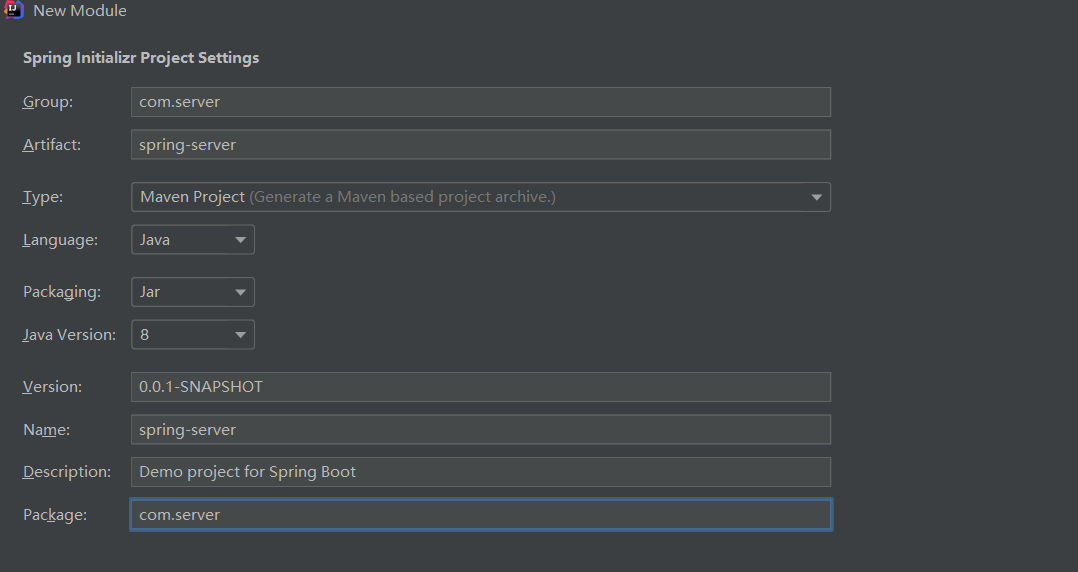
2.2 修改 pom 文件
<dependencies>
        <dependency>
            <groupId>org.springframework.boot</groupId>
            <artifactId>spring-boot-starter</artifactId>
        </dependency>

        <dependency>
            <groupId>org.springframework.boot</groupId>
            <artifactId>spring-boot-starter-test</artifactId>
            <scope>test</scope>
        </dependency>

        <dependency>
            <groupId>org.springframework.boot</groupId>
            <artifactId>spring-boot-starter-web</artifactId>
        </dependency>
    </dependencies>
2.3 修改 application.properties 文件
server.port=90922.4 创建 ServerController
package com.server.controller;

import com.server.service.ServerService;
import org.springframework.beans.factory.annotation.Autowired;
import org.springframework.web.bind.annotation.GetMapping;
import org.springframework.web.bind.annotation.RequestMapping;
import org.springframework.web.bind.annotation.RestController;

@RestController
@RequestMapping("/server")
public class ServerController {

    @Autowired
    private ServerService serverService;

    @GetMapping("/selectServerName")
    public String selectServerName(String name) {
        String result = serverService.selectName(name);
        return result;
    }

}
2.5 创建 ServerService 接口和实现类 ServerServiceImpl
package com.server.service;

public interface ServerService {

    String selectName(String name);

}
package com.server.service.impl;
import com.server.service.ServerService;
import org.springframework.stereotype.Service;
@Service
public class ServerServiceImpl implements ServerService {
@Override
public String selectName(String name) {
return name;
}
}2.6 spring-server 模块结构
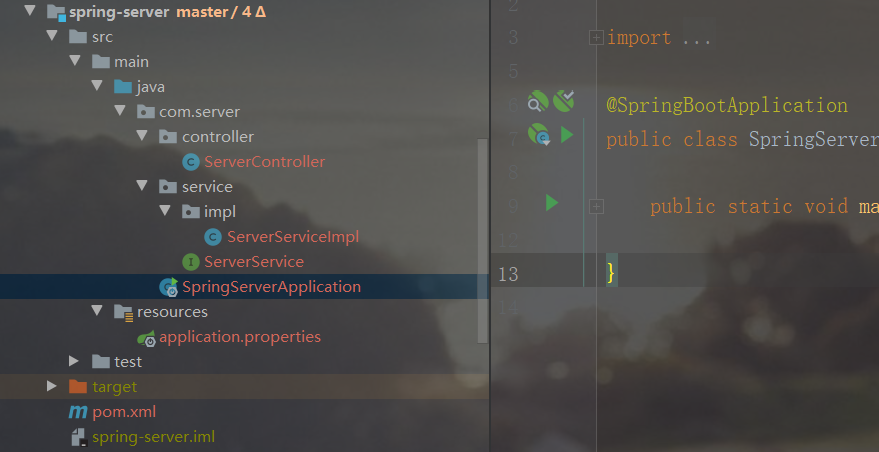
3. 搭建 spring-client 模块
3.1 创建一个 springboot 工程模块
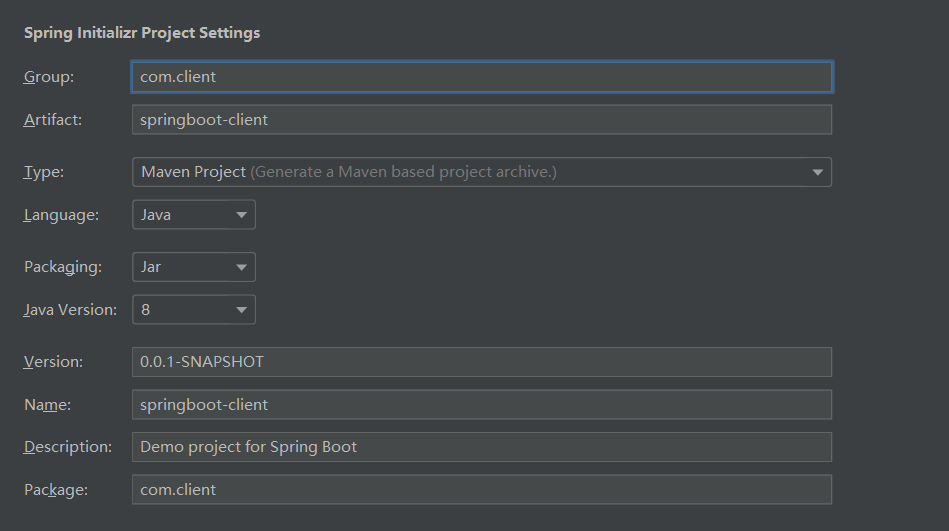
3.2 修改 pom 文件,添加 spring-server 模块的依赖
<dependencies>
    <dependency>
        <groupId>org.springframework.boot</groupId>
        <artifactId>spring-boot-starter</artifactId>
    </dependency>

    <dependency>
        <groupId>org.springframework.boot</groupId>
        <artifactId>spring-boot-starter-test</artifactId>
        <scope>test</scope>
    </dependency>

    <dependency>
        <groupId>org.springframework.boot</groupId>
        <artifactId>spring-boot-starter-web</artifactId>
    </dependency>

    <dependency>
        <groupId>com.server</groupId>
        <artifactId>spring-server</artifactId>
        <version>0.0.1-SNAPSHOT</version>
    </dependency>
</dependencies>
3.3 修改 application.properties 文件
server.port=90913.4 创建 ClientController
package com.client.controller;

import com.client.service.ClientService;
import com.server.service.ServerService;
import org.springframework.beans.factory.annotation.Autowired;
import org.springframework.web.bind.annotation.GetMapping;
import org.springframework.web.bind.annotation.RequestMapping;
import org.springframework.web.bind.annotation.RestController;

@RestController
@RequestMapping("/client")
public class ClientController {

    @Autowired
    private ClientService clientService;

    @Autowired
    private ServerService serverService;

    @GetMapping("/selectClientName")
    public String selectClientName(String name) {
        String result = clientService.selectName(name);
        return result;
    }

    @GetMapping("/selectServerName")
    public String selectServerName(String name) {
        String result = serverService.selectName(name);
        return result;
    }

}
3.5 创建 ClientService 接口和实现类 ClientServiceImpl
package com.client.service;

public interface ClientService {

    String selectName(String name);

}
package com.client.service.impl;
import com.client.service.ClientService;
import org.springframework.stereotype.Service;
@Service
public class ClientServiceImpl implements ClientService {
@Override
public String selectName(String name) {
return name;
}
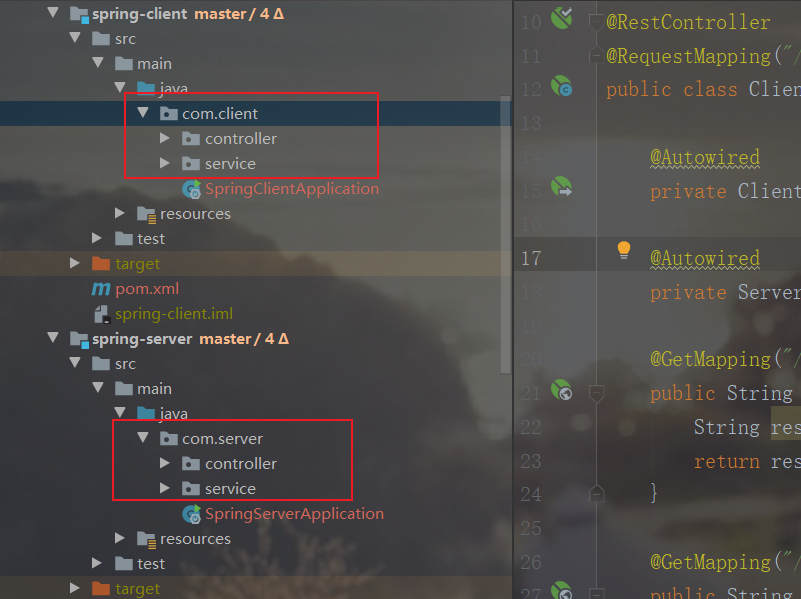
}3.6 注入 ServerService 之后发现注入失败了,原因是 spring-client 和 spring-server 下面的包结构不同
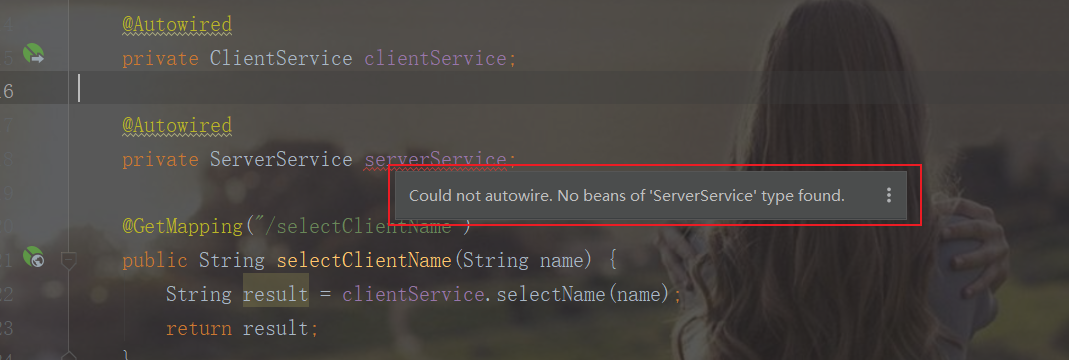
3.7 修改 spring-client 启动类,加入扫描包的注解
@ComponentScan(basePackages = {"com.client", "com.server"})package com.client;
import org.springframework.boot.SpringApplication;
import org.springframework.boot.autoconfigure.SpringBootApplication;
import org.springframework.context.annotation.ComponentScan;
@SpringBootApplication
@ComponentScan(basePackages = {"com.client", "com.server"})
public class SpringClientApplication {
public static void main(String[] args) {
SpringApplication.run(SpringClientApplication.class, args);
}
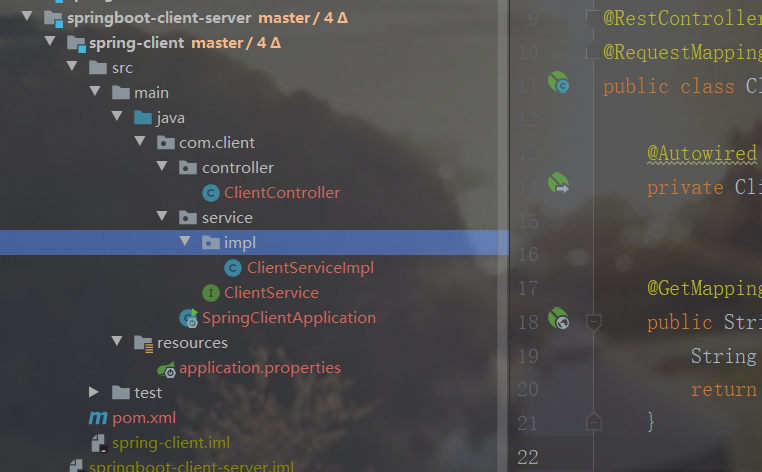
}3.8 spring-client 模块结构
4. 测试接口功能
4.1 测试 spring-client 模块接口 /client/selectClientName
http://localhost:9091/client/selectClientName?name=呵呵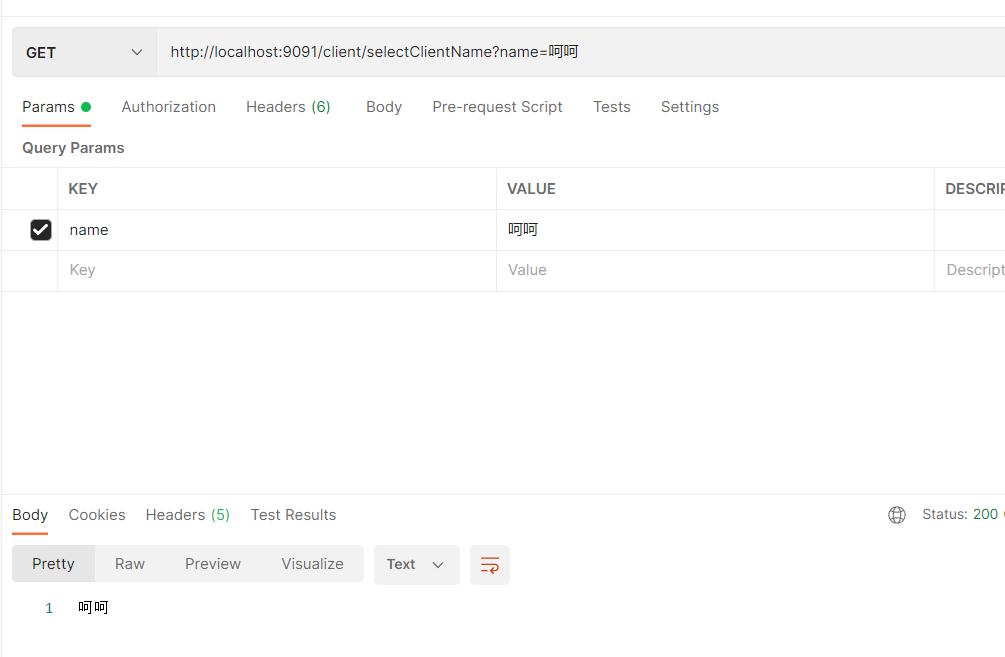
4.2 测试 spring-client 模块接口 /client/selectServerName
http://localhost:9091/client/selectServerName?name=嘻嘻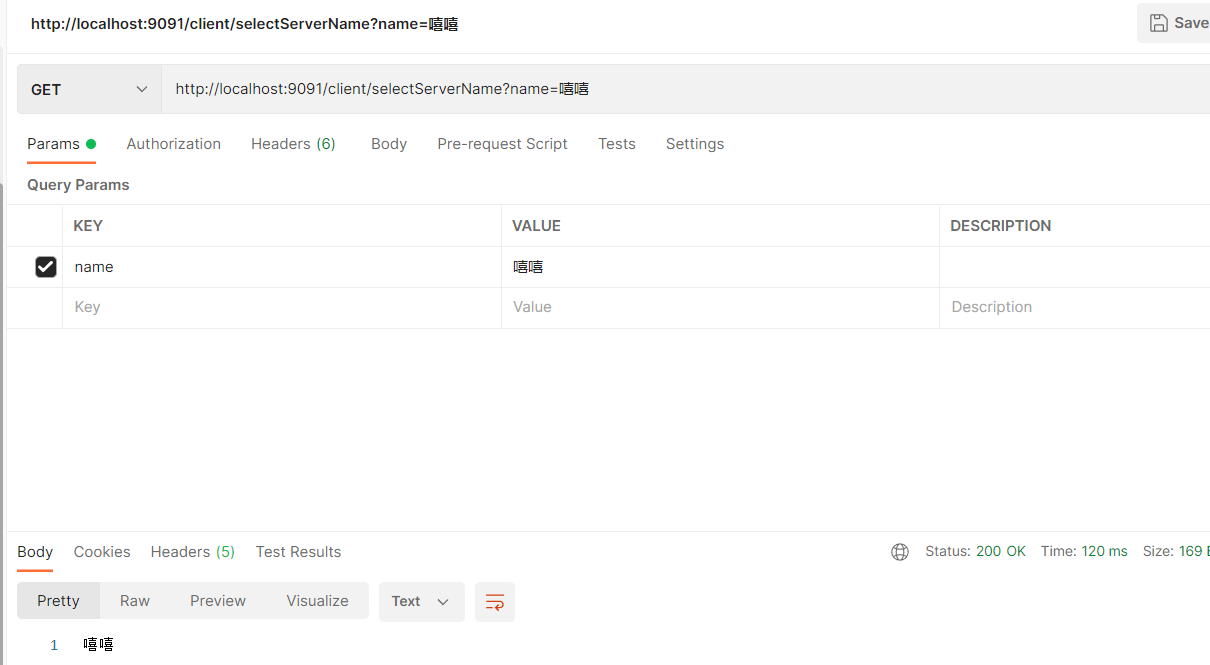
4.3 测试 spring-server 模块接口 /server/selectServerName
http://localhost:9092/server/selectServerName?name=哈哈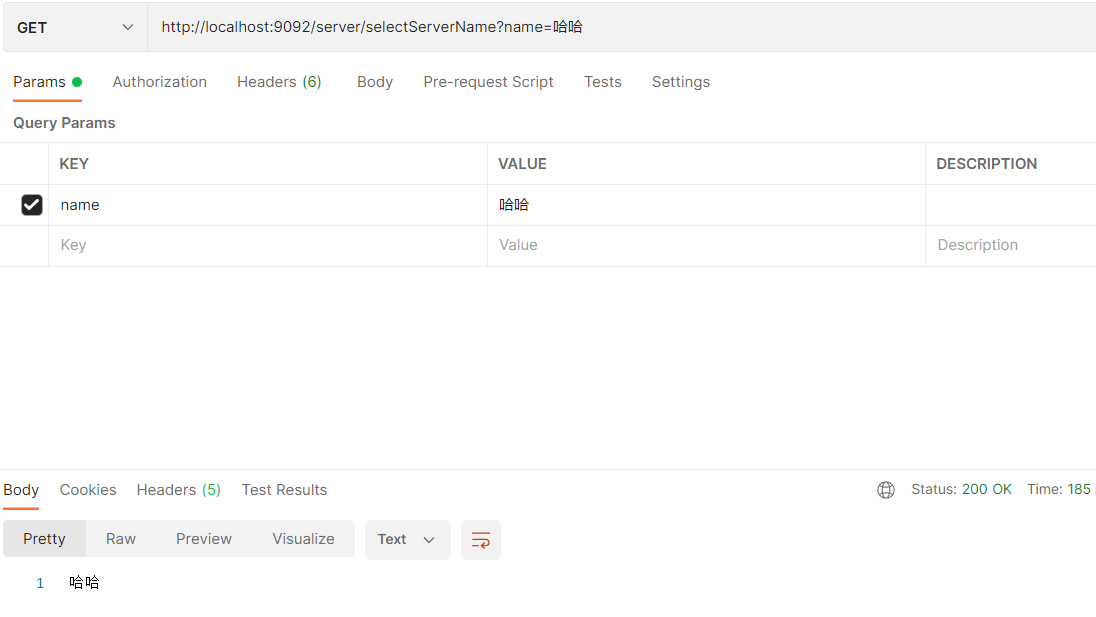
4.4 完整项目地址:springboot-client-server
分类:
SpringBoot
, java


【推荐】国内首个AI IDE,深度理解中文开发场景,立即下载体验Trae
【推荐】编程新体验,更懂你的AI,立即体验豆包MarsCode编程助手
【推荐】抖音旗下AI助手豆包,你的智能百科全书,全免费不限次数
【推荐】轻量又高性能的 SSH 工具 IShell:AI 加持,快人一步
· 无需6万激活码!GitHub神秘组织3小时极速复刻Manus,手把手教你使用OpenManus搭建本
· C#/.NET/.NET Core优秀项目和框架2025年2月简报
· Manus爆火,是硬核还是营销?
· 一文读懂知识蒸馏
· 终于写完轮子一部分:tcp代理 了,记录一下