latex使用笔记
1:空一行代表分节
2:让图片在指定位置插入
使用包 \usepackage{float}
插入图片代码
\begin{figure}[H]  //图片标签
    \centerline{\includegraphics[width=\columnwidth]{fig1.jpg}} // 加载图片
    \caption{Magnetization as a function of applied field.   //标注
        It is good practice to explain the significance of the figure in the caption.}
    \label{fig1}    //标签
\end{figure}
3:\par 图表内换行
4: _下标 ^上标
5:\mathit 数学斜体 \textit{$ 文本 $}文本斜体,$B$ 数学中的B变量,
6: \tag{} 公式标号
7:数学符号对照表 http://blog.csdn.net/caiandyong/article/details/53351737
8:\qquad 大空格 ,\quad 小空格 \ \后面几个空格就是几个空格,可以用于数学公式中
9:$$ 里面加数学公式,单独占一行,$里面放数学公式,不占一行。
10:使多行公式左对齐 http://blog.sina.com.cn/s/blog_629f79b1010190r3.html
%多行左对齐,带编号
\begin{equation}\label{eq:12}
\begin{split}
& \mathit{R_i}=1 \\
& \mathit{R_j}=2 \\
\end{split}
\end{equation}
\begin{align*}  //每行前面会有空格 ,不可以用mathit
& \textit{$N$}_\textit{$n$}=number\ of\ elements\ in\ ring\ n; \\
& \textit{$H$}= number\ of\ rings; \\
\end{align*}


\begin{flushleft}  //自定义前面的空格
$\qquad\mathit{N}_\mathit{n}=number\ of \ elements \ in\ ring\ n;$
\end{flushleft}
11:矩阵公式
% 矩阵公式
$$X=\left(
\begin{matrix}
x_{11} & x_{12} & \cdots & x_{1d}\\
x_{21} & x_{22} & \cdots & x_{2d}\\
\vdots & \vdots & \ddots & \vdots\\
x_{m1} & x_{m2} & \cdots & x_{md}\\
\end{matrix}
\right)
=\left(
\begin{matrix}
x_1^T \\
x_2^T \\
\vdots\\
x_m^T \\
\end{matrix}
\right)
$$
12:大括号公式:
$$  %不产生标号
\left\{
\begin{array}{c}
    a_1x+b_1y+c_1z=d_1 \\
    a_2x+b_2y+c_2z=d_2 \\
    a_3x+b_3y+c_3z=d_3
\end{array}
\right.
$$
% 大括号公式
\begin{equation}   %产生标号
%$$
\left\{
\begin{array}{c}
Min \{PSLL(\mathit{r_0,r_1,r_2,...,r_n,r_H}) \} \\

\mathit{N_n}=\left \lfloor \frac{2\pi\mathit{r_n}}{\mathit{d_n}} \right \rfloor, 0<\mathit{d_c}\leqslant \mathit{d_n},n=1,2,...,\mathit{H} \\

\sum_{\mathit{n}=0}^\mathit{H}=\mathit{N}

\end{array}
\right.
\tag{3} %自定义标号
%$$
\end{equation}
13:大括号 要用\{ \}标记
14:横除号表示:\frac 横除号,第一个大括号是上面的部分,第二个大括号是下面的部分。
\frac{2\pi\mathit{r_n}}{\mathit{d_n}}
15:latex中各种括号的表示:http://blog.csdn.net/han____shuai/article/details/49679335
16: 当下标是公式时,要用{} 括起来
r_{n-1}
17:出现错误提示:Missing $ inserted. where \xi
是因为 \xi 在数学公式中才能使用,需要在 $$ 数学公式中使用
18 表格的操作:http://blog.csdn.net/JueChenYi/article/details/77116011
\begin{table}[!htbp]
{table}有若干可选参数 [!htbp] h代表here,将表格排在当前文字位置 t 表示将表格放在下一页的 top (页首) b 表示将表格放在当前页的 bottom (底部) !表示忽略美观因素,尽可能按照参数指定的方式来处理表格浮动位置。
表格将会按照所给参数,依次尝试按照每个参数进行排版,当无法排版时,将会按照下一个参数
\centering %整个表格居中
\caption{Units for Magnetic Properties}  %标题
\label{table}
\setlength{\tabcolsep}{3pt}
\begin{tabular}{|p{25pt}|p{75pt}|p{115pt}|}  %表格  ,| 列线,c居中,75pt指定大小等

\hline  横线
 \cline{2-4}是指在第2-4列上面插入框线

\multicolumn{3}{|c|}{学生信息}\\ % 用\multicolumn{3}表示横向合并三列
                        % |c|表示居中并且单元格两侧添加竖线 最后是文本

    \end{tabular}
\caption{这是一张三线表}    %放在表格下面的标题
    \label{tab1}
\end{table}
19:
表格横排:使用 \usepackage{rotating} %使表格横排整个页面
\iffalse %表格横排
\begin{sidewaystable}
\centering
\begin{threeparttable}[b]
\caption{Survey of bond lengths.tnote{a}}
\label{Tab:bondleng}
\begin{tabular}{ccccccccccc}
hello,hdjsklagnkdjkgksjdfffffffffffffffffffffffffffffffffffff
\end{tabular}
\begin{tablenotes}
\item [a] { }
\end{tablenotes}
\end{threeparttable}
\end{sidewaystable}
\clearpage
\fi
20:& 格式对齐符号
21:表格占据两栏格式下整个页面,
环境可用在双栏版式中插入通栏的浮动的表格啊
\begin{table*}
\end{table*}
22:表格多行合并
TABLE 1
\begin{table*}[!htbp]

    \centering
    \caption{ HYBRID GENETIC ALGORITHM
        (HGA), PEAK SIDELOBEL LEVEL (PSLL),MODIFIED REAL GENETIC ALGORITHM(MGA), NUMBER OF ELEMENTS(N), RUN TIME(RT), RING
        RADII( ), AND NUMBER OF ELEMENTS IN THE RINGS ( )
    }
    \label{table}
    \setlength{\tabcolsep}{3pt} %列间距
    \begin{tabular}{p{25pt}p{75pt}p{15pt}p{25pt}p{25pt}p{25pt}p{25pt}p{25pt}p{25pt}p{25pt}p{25pt}p{25pt}}
        \hline
        method& PSLL(dB)& RT&N&n&1&2&3&4&5&6&7  \\
        \hline
%        \multicolumn{4}{c}{te}
        \multirow{2}*{HGA}&\multirow{2}*{HGA}&\multirow{2}*{HGA}&\multirow{2}*{bHGA}
        &r&1.00&1.59&1.59&1.59&1.59&1.59&1.59\\
        \cline{5-12}
        & & & &n&1.59&1.59&1.59&1.59&1.59&1.59&1.59 \\
        \hline
    \end{tabular}
    \label{tab1}
\end{table*}
TABLE2
\begin{table*}
\centering
\caption{Parameters of SROI}
\label{tab2}
\begin{tabular}{cccccccc}
     \hline
     \multicolumn{1}{c}{\multirow{2}{1.2cm}{Number}}
     &\multicolumn{5}{c}{(Frequency, Scale)}  &\multicolumn{1}{c}{\multirow{2}{1.6cm}{Direction Number}} &\multicolumn{1}{c}{\multirow{2}{1.6cm}{Direction Increment}} \\
     \cline{2-6}  \multicolumn{1}{c}{}  &\multicolumn{1}{c}{1} & {2} & {3} & {4} & {5} &\multicolumn{1}{c}{} \\ \hline  Filter bank1 &(0.50,61)&(0.50,67)&(0.55,61)&(0.55,66)&(0.60,51)&8&$\pi/8$ \\
     \hline
   \end{tabular}
 \end{table*}

23:在新的一页最上方,将文字或图片 ,跨双栏,居中,置顶 ,的方法
\clearpage  %新的一页
\usepackage{stfloats}  %置顶
\newcounter{TempEqCnt}
\begin{figure*}[ht]    %[hb置地]
        \caption{Diagram of a concentric ring array.}
            \label{fig1}
\end{figure*}
\clearpage
不带图片标题,只含文字的居中
\clearpage
\newcounter{TempEqCnt}
\begin{figure*}[ht]
\centering\fontsize{16}{18}\selectfont
             Front page
\end{figure*}
\clearpage
24:图片排列
\usepackage{graphicx}
\usepackage{subcaption}  %图片%图片,多个图方便的放在一起
%图片
\begin{figure*}[htb]
    \centering
    \begin{subfigure}[b]{.22\linewidth}   %下面文字标注的长度
        \centering
        \includegraphics[width=4.5cm,height=3.5cm]{fig2.png}
        %\caption{A subfigure}\label{fig:1a}
        Fig. 2. Convergence characteristics
    \end{subfigure}
    \begin{subfigure}[b]{.23\linewidth}
    \centering
    \includegraphics[width=4.5cm,height=3.5cm]{fig3.png}
    Fig. 3.Radiation pattern of the
    best optimal result.
\end{subfigure}
    \begin{subfigure}[b]{.28\linewidth}
    \centering
    \includegraphics[width=4.5cm,height=3.5cm]{fig4.png}
    Fig. 4. Cross section of radiation pattern
    in $\mathit{u=0}$   and $\mathit{v=0}$
\end{subfigure}
    \begin{subfigure}[b]{.25\linewidth}
    \centering
    \includegraphics[width=4.5cm,height=3.5cm]{fig5.png}
    Fig. 5. The layout of the best sparse concentric ring array
\end{subfigure}  \\     %换行
     \begin{subfigure}[b]{.23\linewidth}
     \centering
     \includegraphics[width=4.5cm,height=3.5cm]{fig6.png}
Fig. 6. Convergence characteristics of simulation B
 \end{subfigure}
 \begin{subfigure}[b]{.23\linewidth}
     \centering
     \includegraphics[width=4.5cm,height=3.5cm]{fig7.png}
    Fig. 7.Radiation pattern of the
best optimal result in simulation B.
 \end{subfigure}
 \begin{subfigure}[b]{.26\linewidth}
     \centering
     \includegraphics[width=4.5cm,height=3.5cm]{fig8.png}
    Fig. 8. Cross section of radiation pattern
in $\mathit{u=0}$ and $\mathit{v=0}$  in simulation B.
 \end{subfigure}
 \begin{subfigure}[b]{.24\linewidth}
     \centering
     \includegraphics[width=4.5cm,height=3.5cm]{fig9.png}
 Fig. 9. The layout of the best sparse array in simulation B
 \end{subfigure}
\end{figure*}
25:最后一页底部对齐
a: 直接使用 :\usepackage{flushend} %底部对齐
b:使用\newpage 可以手动调整右栏内容从哪里开始,可以用在\clearpage命令里面

3:\balance 可以放在一页末尾,系统自动对齐,需要引入\usepackage{balance}

26: 分栏
%方法1
\documentclass[UTF8]{ctexart}
\usepackage{multicol}
\usepackage{mwe}
\begin{document}
\begin{abstract}
  这里是摘要。\blindtext
\end{abstract}
\begin{multicols}{2}  %指定两行
这里是正文。\lipsum[1-5]
\end{multicols}
\end{document}

%方法2
\documentclass[UTF8, twocolumn]{ctexart} %在开头指定两行
\usepackage{mwe}
\usepackage{abstract}
\begin{document}
\twocolumn[
  \begin{onecolabstract}  %摘要一行
    这里是摘要。\blindtext
  \end{onecolabstract}
]

这里是正文。\lipsum[1-5]
\end{document}
27 设置页边距:加入
\usepackage{anysize}
\marginsize{2cm}{2cm}{2cm}{2cm}  %设置页边距
28:设置小标题 \section 居左,使用:
\usepackage[raggedright]{titlesec}%设置section标题居左显示
29:向量,矩阵的表示方法 https://jingyan.baidu.com/article/f3e34a128c53aef5ea653542.html
\begin{equation}
U=\vec{R}+j\vec{N}  %\vec向量
\begin{bmatrix}  %矩阵
r_1+jN_1 \\
r_2+jN_2 \\
......   \\
r_n+jN_n \\
......   \\
r_H+jN_H \\
\end{bmatrix}
\label{eq}\tag{7}
\end{equation}

29:加入链接
\documentclass{report}
\usepackage[explicit]{titlesec}
\usepackage{hyperref}

\titleformat{\chapter}[display]
  {\normalfont\huge\bfseries}{\chaptertitlename\ \thechapter}{20pt}
  {\Huge\hyperlink{chap\thechapter}{#1}}
\titleformat{name=\chapter,numberless}[display]
  {\normalfont\huge\bfseries}{}{-22pt}
  {\Huge#1}

\makeatletter
\def\@chapter[#1]#2{\ifnum \c@secnumdepth >\m@ne
  \refstepcounter{chapter}%
  \typeout{\@chapapp\space\thechapter.}%
  \addcontentsline{toc}{chapter}%
    {\protect\numberline{\thechapter}\string\hypertarget{chap\thechapter}{#1}}%
\else
  \addcontentsline{toc}{chapter}{#1}%
\fi
\chaptermark{#1}%
\addtocontents{lof}{\protect\addvspace{10\p@}}%
\addtocontents{lot}{\protect\addvspace{10\p@}}%
\if@twocolumn
  \@topnewpage[\@makechapterhead{#2}]%
\else
  \@makechapterhead{#2}%
  \@afterheading
\fi}
\makeatother

\begin{document}

\tableofcontents
\chapter{Test Chapter One}
\chapter{Test Chapter Two}
\chapter{Test Chapter Three}

\end{document}
30:latex设置字体颜色
1.组合red、green和blue的值合成我们想要的颜色
\usepackage{color}
\textcolor[rgb]{r,g,b}{text}
其中{r,g,b}代表red、green和blue三种颜色的组合,取值范围为[0-1]
31:使整篇文章标题caption 居中用:
\usepackage[justification=centering]{caption}
32:在cls文件中自定义环境,例如:
\documentclass{article}
\usepackage{xeCJK}
\setCJKmainfont{SimSun}
\newenvironment{mytest}{\begin{equation}}{\end{equation}}
\begin{document}
    \begin{mytest}
        1+1=2;
    \end{mytest}
\end{document}
33: 给中文加粗:\bf
\begin{bf}
摘要
\end{bf}
34:公式中含有\lable{} 时,latex转word,此公式将转化不了
\begin{equation}
\mathit{F(X)}=a(\sin(X-\pi))+b((X-10)^2)+c \\
\label{eq} 需要去掉
\end{equation}
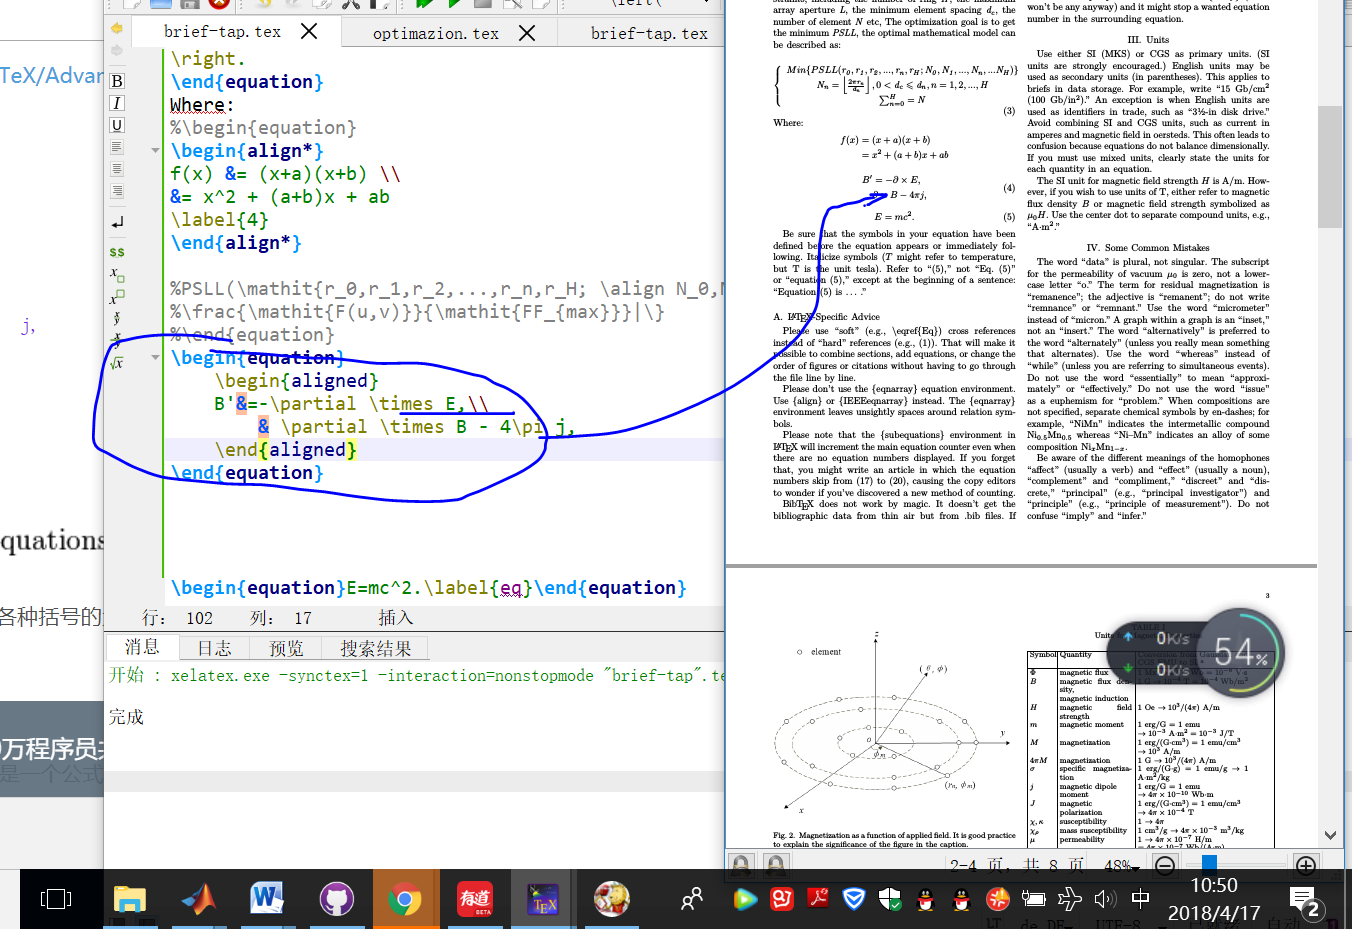
35:latex中使用换行符:
\begin{equation}
    \begin{aligned}
    B'&=-\partial \times E,\\
        & \partial \times B - 4\pi j,
    \end{aligned}
\end{equation}

36 :latex中输入罗马数字:
\uppercase\expandafter{\romannumeral20}
将输入大写罗马数字20,
\romannumeral20
将输入小写罗马数字20。
37: 在Latex中插入eps图片或者表格时有时想控制图片或表格的位置,只需要在\begin{figure}后加入[!htbp],但是当表格或者图片占用双栏模板的两栏时(即在\begin{table*}时),这些位置控制选项就失效了。例如:
\begin{figure}[!htbp]
其中htbp是可选的,它们分别代表
!-忽略“美学”标准
h-here
t-top
b-bottom
p-page-of-its-own
38:latex中制作斜线头
加入包diagbox
\diagbox[width=5em,trim=l]{Time}{Day}
39:表格换行:https://zhidao.baidu.com/question/556615887760105052.html

