react+mobx脚手架搭建多页面开发
本篇主要讲一些干货,便于正在搭建框架的人使用,从搭建到配置跨域,到打包配置 ,
1、使用脚手架搭建项目,并运行下看是否安装成功,详细内容查看官网 https://reactjs.bootcss.com/tutorial/tutorial.html#setup-for-the-tutorial 里的
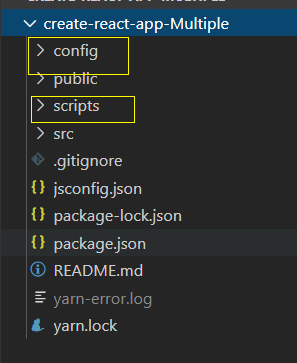
2、npm run eject 暴露webpack,便于后面引入新的东西进行配置,就不用手动写webpack配置了,框架都给配置好了。
3、npm run eject之后会多出来两个文件夹:config里主要的是webpack.config.js文件,用于进行配置。scripts主要是项目运行及打包依赖的文件,一般不做改动。如需涉及改动下面会提及。
3、因为要使用mobx所以需要下载mobx和装饰器
 "babel": {
    "presets": [
      "react-app"
    ],
    "plugins": [
      ["@babel/plugin-proposal-decorators", { "legacy": true }]
      ]
  },
5、安装依赖,这条命令安装上面 npm run eject改动文件之后的依赖
npm install
6、如何需要使用antd-mobile ,先用安装按需加载的插件
npm install babel-plugin-import --save-dev
7、安装antd-mobile
npm install antd-mobile --save
8、在package.json 里的babel里进行配置: [
 "import",
        {
          "libraryName": "antd-mobile",
          "style": "css"
        }
      ]
9、使用css-module不用改变任何配置,直接参考css-module文章
新增less配置变量
const cssRegex = /\.css$/;
const cssModuleRegex = /\.module\.css$/;
const sassRegex = /\.(scss|sass)$/;
const sassModuleRegex = /\.module\.(scss|sass)$/;
const lessRegex = /\.less$/;  // 新增less配置
const lessModuleRegex = /\.module\.less$/; // 新增less配置,这个其实不配置也行
增加module下面rule规则,可以copy cssRegex或者sassRegex的配置。
{
    test: sassModuleRegex,
    use: getStyleLoaders({
            importLoaders: 2,
            sourceMap: isEnvProduction && shouldUseSourceMap,
            modules: true,
            getLocalIdent: getCSSModuleLocalIdent
        },
        "sass-loader"
    )},
{
    test: lessRegex,
    exclude: lessModuleRegex,
    use: getStyleLoaders({
            importLoaders: 1,// 值是1
            modules: true, // 增加这个可以通过模块方式来访问css
            sourceMap: isEnvProduction && shouldUseSourceMap
        },
        "less-loader"
    ),
    sideEffects: true},
// 这个测试删了也不影响{
    test: lessModuleRegex,
    use: getStyleLoaders({
            importLoaders: 1,
            sourceMap: isEnvProduction && shouldUseSourceMap,
            modules: true,
            getLocalIdent: getCSSModuleLocalIdent
        },
        "less-loader"
    )},
12、使用vscode编辑器写mobx是会报红色波浪线,进行如下操作:操作完关闭编辑器再打开就可以了。
在根目录下创建一个jsconfig.json文件,写上
{
    "compilerOptions": {
      "module": "commonjs",
      "target": "es6",
      "experimentalDecorators": true
    },
    "include": ["src/**/*"]
  }
13、配置跨域
yarn add http-poxy-middleware -S

在src/根目录下新建 setupProxy.js文件 进行如下配置:
const {createProxyMiddleware} = require("http-proxy-middleware");
    module.exports = function(app){
        app.use(
            createProxyMiddleware("/api",{
                target:"http://47.96.0.211:9000",
                changeOrigin:true,
                pathRewrite:{
                "^/api":""
                }
            })
        )
    }
如果跨域报错,就把createProxyMiddleware改成proxy;
14、安装axios
npm install axios --save-dev


在star.js中增加
  const devServer = new WebpackDevServer(compiler, serverConfig);
  require('../src/setupProxy')(devServer);
15、书写axios请求方法,已经封装好,可以直接套用,可根据自己需要更改
function request( configObj) {
    return new Promise(function (resolve, reject) {
        axios({
            url:'*************',
            method:"post",
            // params: params,
            data:configObj ,
            // timeout: timeout,
            headers: {
                'Content-Type': 'application/json',
                // 'token': window.sessionStorage.getItem('token') || ''
            }
        }).then(function (response) {
            if(response){
                if (response.data && response.data.code) {
                    resolve(response);
                }else {
                    resolve(response);
                }
            }else {
                resolve(response);
            }
        }).catch(function (error) {
            Toast.fail(
                '网络异常,请稍后重试'
            );
            reject(error);
        })
    })
}
16、到这整个项目算是很完善了,为适应多项目开发,下面是配置多入口多出口。总结出两种办法,这里介绍第一种。
17、配置\config\webpack.config.js文件,修改入口和出口;在module.exports外配置就可以
入口参数配置,出口为 【入口的key】.html
 const entryParams = {   pageOne: [     paths.appSrc + "/pageOne/index.js",   ],   pageTwo: [     paths.appSrc + "/pageTwo/index.js",  ] };
18、在module.exports内找个位置放入如下代码:
let enterObjKeys = Object.keys(entryParams) || [];
 // 入口参数组装  出口参数组装
    let outParams = [];
    enterObjKeys.forEach(item => {
     entryParams[item].unshift(require.resolve('react-dev-utils/webpackHotDevClient'));
   outParams.push(isEnvProduction && new HtmlWebpackPlugin({
        inject: true,
       template: paths.appHtml,
      chunks: [item],
       filename: item + '.html',
       minify: {
          removeComments: true,
          collapseWhitespace: true,
          removeRedundantAttributes: true,
         useShortDoctype: true,
          removeEmptyAttributes: true,
          removeStyleLinkTypeAttributes: true,
          keepClosingSlash: true,
          minifyJS: true,
         minifyCSS: true,
          minifyURLs: true,
        }
      }));
    });
19、配置entry出口
 Object.assign({}, !isEnvProduction ? {
        index: [
          require.resolve('react-dev-utils/webpackHotDevClient'),
          paths.appIndexJs,
        ]
      } : entryParams),
20、配置 new HtmlWebpackPlugin,对照看下之前的直接加入下面的代码
 isEnvDevelopment &&
       new HtmlWebpackPlugin(
        {
           inject: true,
           template: paths.appHtml,
          chunks: ["index"],
           filename: 'index.html',
         }),
       ...outParams,
      isEnvProduction &&
        shouldInlineRuntimeChunk &&
        new InlineChunkHtmlPlugin(HtmlWebpackPlugin, [/runtime-.+[.]js/]),
21、在src下创建两个文件夹,代表两个不同的项目
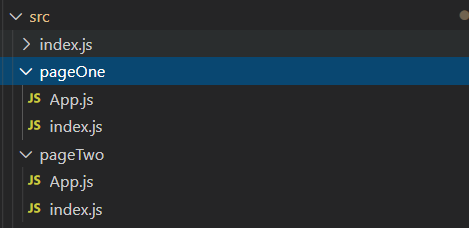
22、pageOne和pageTwo下面的两个js文件跟src目录下自带的App.js和index.js内容是一样的。
23、修改src下面的index.js引入方式,每次只能运行一个
import './pageOne'
// import './pageTwo'
全部完成,可以试下效果了,超级好用!
------------恢复内容结束------------

 浙公网安备 33010602011771号