

三、springMVC之处理模型数据
概述:
Spring MVC 提供了以下几种途径输出模型数据:
- ModelAndView: 处理方法返回值类型为 ModelAndView 时, 方法体即可通过该对象添加模型数据
- Map 及 Model: 入参为org.springframework.ui.Model、org.springframework.ui.ModelMap 或 java.uti.Map 时,处理方法返回时,Map 中的数据会自动添加到模型中。
- @SessionAttributes: 将模型中的某个属性暂存到HttpSession 中,以便多个请求之间可以共享这个属性
- @ModelAttribute: 方法入参标注该注解后, 入参的对象就会放到数据模型中
目录结构和配置方式:
同HelloWord的配置方式;
目录结构如下:
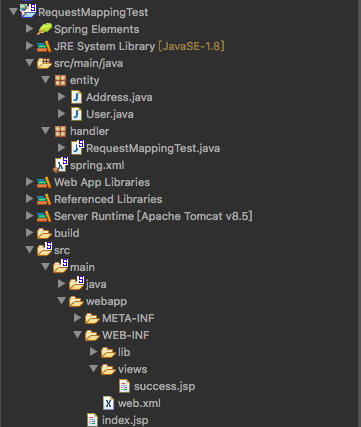
其中:User.java和Address.java
Address.java


 1 package entity;
 2
 3 public class Address {
 4     private String province;
 5     private String city;
 6
 7     public String getProvince() {
 8         return province;
 9     }
10
11     public void setProvince(String province) {
12         this.province = province;
13     }
14
15     public String getCity() {
16         return city;
17     }
18
19     public void setCity(String city) {
20         this.city = city;
21     }
22
23     @Override
24     public String toString() {
25         return "Address [province=" + province + ", city=" + city + "]";
26     }
27
28 }
User.java
 1 package entity;
 2
 3 public class User {
 4     private String userName;
 5     private int age;
 6     private Address address;
 7
 8     public String getUserName() {
 9         return userName;
10     }
11
12     public void setUserName(String userName) {
13         this.userName = userName;
14     }
15
16     public int getAge() {
17         return age;
18     }
19
20     public void setAge(int age) {
21         this.age = age;
22     }
23
24     public Address getAddress() {
25         return address;
26     }
27
28     public void setAddress(Address address) {
29         this.address = address;
30     }
31
32     @Override
33     public String toString() {
34         return "User [userName=" + userName + ", age=" + age + ", address=" + address + "]";
35     }
36
37 }
ModelAndView方式:
控制器处理方法的返回值如果是ModelAndView ,则该返回值 可以包含视图信息 和 模型数据信息;springmvc会把ModelAndView 的model中的数据放入到request的域对象中
验证实例:
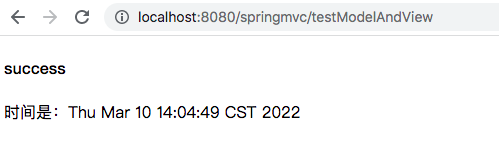
ModelAndView 对象中放入名称为time的数据,显示到视图名称为success 页面上;
RequestMappingTest:
 1 package handler;
 2
 3 import java.util.Date;
 4
 5 import org.springframework.stereotype.Controller;
 6 import org.springframework.web.bind.annotation.RequestMapping;
 7 import org.springframework.web.servlet.ModelAndView;
 8
 9 @RequestMapping("/springmvc")
10 @Controller
11 public class RequestMappingTest {
12     private static final String SUCCESS = "success";
13
14     @RequestMapping("/testModelAndView")
15     public ModelAndView testModelAndView() {
16         String viewName = SUCCESS;
17         ModelAndView modelAndView = new ModelAndView(viewName);
18         modelAndView.addObject("time", new Date());
19         return modelAndView;
20     }
21 }
index.jsp:
 1 <%@ page language="java" contentType="text/html; charset=UTF-8"
 2     pageEncoding="UTF-8" isErrorPage="false"%>
 3 <!DOCTYPE html>
 4 <html>
 5 <head>
 6 <meta http-equiv="Content-type" content="text/html;charset=UTF-8">
 7 <title>Insert title here</title>
 8 </head>
 9 <body>
10     <a href="/springmvc/testModelAndView">testModelAndView</a>
11 </body>
12 </html>
success.jsp:
 1 <%@ page language="java" contentType="text/html; charset=UTF-8"
 2     pageEncoding="UTF-8" isErrorPage="true"%>
 3 <!DOCTYPE html>
 4 <html>
 5 <head>
 6 <meta charset="UTF-8">
 7 <title>Insert title here</title>
 8 </head>
 9 <body>
10 <h4>success</h4>
11 <p>时间是:${time}</p>
12 </body>
13 </html>
运行结果:
index.jsp页面 效果如下,点击testModelAndView后,跳转到success.jsp页面,并且显示模型视图的time参数的值

Map 及 Model方式:
标方法可以添加Map 类型(也可以是Model类型or ModelType类型)的参数,该参数中放入对应的key和value即可;
验证实例:
RequestMappingTest:
 1 package handler;
 2
 3 import java.util.Arrays;
 4 import java.util.Map;
 5
 6 import org.springframework.stereotype.Controller;
 7 import org.springframework.web.bind.annotation.RequestMapping;
 8
 9 @RequestMapping("/springmvc")
10 @Controller
11 public class RequestMappingTest {
12     private static final String SUCCESS = "success";
13
14     @RequestMapping("/testMap")
15     public String testMap(Map<String, Object> map) {
16         map.put("names", Arrays.asList("tom", "jack", "mike"));
17         return SUCCESS;
18     }
19 }
index.jsp:
 1 <%@ page language="java" contentType="text/html; charset=UTF-8"
 2     pageEncoding="UTF-8" isErrorPage="false"%>
 3 <!DOCTYPE html>
 4 <html>
 5 <head>
 6 <meta http-equiv="Content-type" content="text/html;charset=UTF-8">
 7 <title>Insert title here</title>
 8 </head>
 9 <body>
10     <a href="/springmvc/testMap">testMap</a>
11 </body>
12 </html>
success.jsp:
 1 <%@ page language="java" contentType="text/html; charset=UTF-8"
 2     pageEncoding="UTF-8" isErrorPage="true"%>
 3 <!DOCTYPE html>
 4 <html>
 5 <head>
 6 <meta charset="UTF-8">
 7 <title>Insert title here</title>
 8 </head>
 9 <body>
10 <h4>success</h4>
11 <p>名称有:${names}</p>
12 </body>
13 </html>
运行结果:
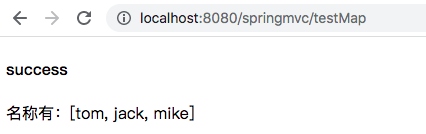
ndex.jsp页面 效果如下,点击testMap后,跳转到success.jsp页面,并且显示map中key 为names的 value值;

@SessionAttributes 方式
若希望在多个请求之间共用某个模型属性数据,则可以在控制器类上标注一个 @SessionAttributes, Spring MVC 将在模型中对应的属性暂存到 HttpSession 中。
- @SessionAttributes 除了可以通过属性名指定需要放到会话中的属性外,还可以通过模型属性的对象类型指定哪些模型属性需要放到会话中
- @SessionAttributes(types=User.class) 会将隐含模型中所有类型为 User.class 的属性添加到会话中。
- @SessionAttributes(value={“user1”, “user2”}) 会将user1 和user2中的属性添加到会话中。
- @SessionAttributes(types={User.class, Dept.class})
- @SessionAttributes(value={“user1”, “user2”}, types={Dept.class})
实例验证:
RequestMappingTest:
 1 package handler;
 2
 3 import java.util.Map;
 4
 5 import org.springframework.stereotype.Controller;
 6 import org.springframework.web.bind.annotation.RequestMapping;
 7 import org.springframework.web.bind.annotation.SessionAttributes;
 8
 9 import entity.Address;
10 import entity.User;
11
12 @SessionAttributes(value = { "user", "address" })
13 @RequestMapping("/springmvc")
14 @Controller
15 public class RequestMappingTest {
16     private static final String SUCCESS = "success";
17
18     @RequestMapping("/SessionAttributes")
19     public String testSessionAttributes(Map<String, Object> map) {
20         User user = new User();
21         user.setUserName("李秀明");
22         user.setAge(29);
23         map.put("user", user);
24         Address address = new Address();
25         address.setCity("嘉兴");
26         address.setProvince("浙江");
27         map.put("address", address);
28         map.put("ocupation", "coder");
29         return SUCCESS;
30     }
31 }
index.jsp:
 1 <%@ page language="java" contentType="text/html; charset=UTF-8"
 2     pageEncoding="UTF-8" isErrorPage="false"%>
 3 <!DOCTYPE html>
 4 <html>
 5 <head>
 6 <meta http-equiv="Content-type" content="text/html;charset=UTF-8">
 7 <title>Insert title here</title>
 8 </head>
 9 <body>
10     <a href="/springmvc/SessionAttributes">SessionAttributes</a>
11 </body>
12 </html>
success.jsp:
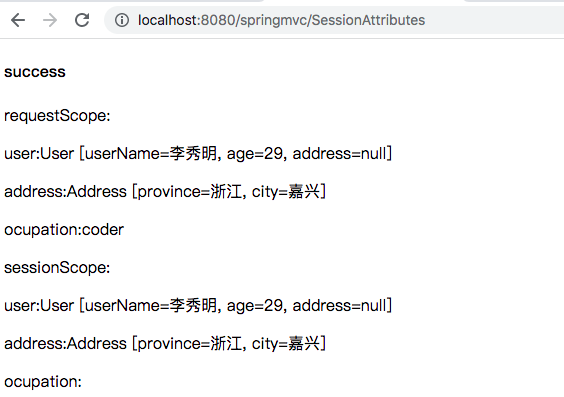
 1 <%@ page language="java" contentType="text/html; charset=UTF-8"
 2     pageEncoding="UTF-8" isErrorPage="true"%>
 3 <!DOCTYPE html>
 4 <html>
 5 <head>
 6 <meta charset="UTF-8">
 7 <title>Insert title here</title>
 8 </head>
 9 <body>
10 <h4>success</h4>
11 <p>requestScope: </p>
12 <p>user:${requestScope.user}</p>
13
14 <p>address:${requestScope.address}</p>
15
16 <p>ocupation:${requestScope.ocupation}</p>
17 <p>sessionScope: </p>
18 <p>user:${sessionScope.user}</p>
19 <p>address:${sessionScope.address}</p>
20 <p>ocupation:${sessionScope.ocupation}</p>
21
22 </body>
23 </html>
运行结果:
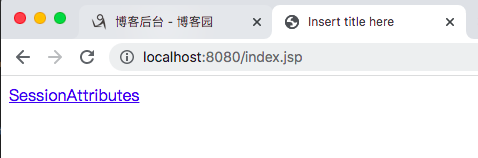
index.jsp 运行效果如下;点击SessionAttributes跳转到success.jsp页面,效果如图;success.jsp页面中 sessionScop 中没有显示occupation ,原因是occupation 属性没有放入session中;
@ModelAttribute 方式(谨慎使用):
在方法定义上使用@ModelAttribute注解:
springMVC在调用目标方法前,会先逐个调用在方法上标注了@ModelAttribute的方法;
在方法入参前使用@ModelAttribute注解:
可以从隐含对象中获取隐含的模型数据中获取对象,再将请求参数绑定到对象中再入参;
将方法入参对象添加到模型中;
实例验证:
RequestMappingTest:
 1 package handler;
 2
 3 import java.util.Map;
 4
 5 import org.springframework.stereotype.Controller;
 6 import org.springframework.web.bind.annotation.ModelAttribute;
 7 import org.springframework.web.bind.annotation.RequestMapping;
 8
 9 import entity.User;
10
11 @RequestMapping("/springmvc")
12 @Controller
13 public class RequestMappingTest {
14     private static final String SUCCESS = "success";
15
16     /**
17      * 有@ModelAttribute标记的方法,会在每个目标方法执行之前被Springmvc调用; 运行流程:
18      * 1。从数据库去除对象,把对象放入Map中,键为:user; 2.Springmvc 从Map 中取出user对象,并把表单请求参数赋值给user;
19      * 3.Springmvc 把上述对象传入目标方法的参数;
20      * 注意:在ModelAttribute修饰的方法中,放入map的键必须和目标方法入参类型的第一个字母小写的字符串一致
21      *
22      * @param map
23      */
24     @ModelAttribute
25     public void getUser(Map<String, Object> map) {
26         User user = new User();
27         user.setUserName("李秀明");
28         user.setAge(29);
29         map.put("user", user);
30     }
31
32     @RequestMapping("/testModelAttribute")
33     public String testModelAttribute(User user) {
34         System.out.println(user);
35         return SUCCESS;
36     }
37 }
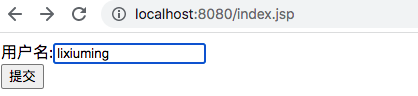
index.jsp:
 1 <%@ page language="java" contentType="text/html; charset=UTF-8"
 2     pageEncoding="UTF-8" isErrorPage="false"%>
 3 <!DOCTYPE html>
 4 <html>
 5 <head>
 6 <meta http-equiv="Content-type" content="text/html;charset=UTF-8">
 7 <title>Insert title here</title>
 8 </head>
 9 <body>
10 <form action="/springmvc/testModelAttribute" method="POST">
11     用户名:<input type="text" name="userName" value="lixiuming"/>
12     <br>
13     <input type="submit" value='提交'>
14 </form>
15 </body>
16 </html>
success.jsp:
 1 <%@ page language="java" contentType="text/html; charset=UTF-8"
 2     pageEncoding="UTF-8" isErrorPage="true"%>
 3 <!DOCTYPE html>
 4 <html>
 5 <head>
 6 <meta charset="UTF-8">
 7 <title>Insert title here</title>
 8 </head>
 9 <body>
10 <h4>success</h4>
11 <p>user:${user}</p>
12
13 </body>
14 </html>
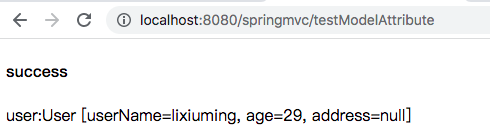
运行结果:
index.jsp运行效果如下图,点击提交后,跳转到success页面;提交数据只有一个username,但是显示结果有 age;
运行流程:
- 从数据库取对象,把对象放入Map中,键为:user;
- Springmvc 从Map 中取出user对象,并把表单请求参数赋值给user;
- Springmvc 把上述对象传入目标方法的参数;
在方法定义上使用@ModelAttribute注解(有返回值):
-
@ModelAttribute不设value值;
 1 @ModelAttribute
 2 public String myModel(@RequestParam(required = false) String abc) {
 3     return abc;
 4 }
 5
 6 @ModelAttribute
 7 public Student myModel(@RequestParam(required = false) String abc) {
 8     Student student = new Student(abc);
 9     return student;
10 }
11
12 @ModelAttribute
13 public int myModel(@RequestParam(required = false) int number) {
14     return number;
15 }
即等同于:
1 model.addAttribute("string", abc);
2 model.addAttribute("int", number);
3 model.addAttribute("student", student);
-
设置value值
1 @ModelAttribute(value = "num")
2 public int myModel(@RequestParam(required = false) int number) {
3     return number;
4 }
即等同于:
model.addAttribute("num", number);
在方法入参前使用@ModelAttribute
使用@ModelAttribute注解的参数,意思是从前面的Model中提取对应名称的属性
 1 @ModelAttribute
 2     public void myModel3(Model model) {
 3         model.addAttribute("name", "zong");
 4         model.addAttribute("age", 20);
 5     }
 6
 7     @RequestMapping(value = "/param")
 8     public String param(@ModelAttribute("attributeName") String str,
 9                        @ModelAttribute("name") String str2,
10                        @ModelAttribute("age") int str3) {
11         return "param";
12     }
应用在方法上使用了@MmodelAttribute,并且方法上也使用了@RequestMapping
 1 @Controller
 2 @RequestMapping(value = "/modelattribute")
 3 public class ModelAttributeController {
 4
 5     @RequestMapping(value = "/test")
 6     @ModelAttribute("name")
 7     public String test(@RequestParam(required = false) String name) {
 8         return name;
 9     }
10 }
视图为:
返回值放入model中,key为string,value为name;/modelattribute/test.jsp
参考地址;https://www.jianshu.com/p/0ec4e7afb7ed


【推荐】国内首个AI IDE,深度理解中文开发场景,立即下载体验Trae
【推荐】编程新体验,更懂你的AI,立即体验豆包MarsCode编程助手
【推荐】抖音旗下AI助手豆包,你的智能百科全书,全免费不限次数
【推荐】轻量又高性能的 SSH 工具 IShell:AI 加持,快人一步
· 使用C#创建一个MCP客户端
· 分享一个免费、快速、无限量使用的满血 DeepSeek R1 模型,支持深度思考和联网搜索!
· ollama系列1:轻松3步本地部署deepseek,普通电脑可用
· 基于 Docker 搭建 FRP 内网穿透开源项目(很简单哒)
· 按钮权限的设计及实现
2017-03-10 cvc-complex-type.2.4.c: The matching wildcard is strict, but no declaration can be found for element 'mongo:mongo-client'.