

mysql5.7 标准化源码编译并做keepalived 高可用架构
规划
- 两台服务器分别安装mysql,并做成主从
- 安装keepalived,将主库连接地址改为虚ip,并用域名完成解析
- 从库允许写,以防止主库服务器宕机后虚ip 飘至从库服务器,从库不允许写的问题,所以从库要保证是可以写入的

keepalived 安装
两台服务器均要安装依赖包,两台服务器已配置bond4,10.147.1.1 配置
shell>yum install keepalived -y
shell> cat /etc/keepalived/keepalived.conf
global_defs {
     notification_email {
     xinliang_li@moviebook.cn
     }
     notification_email_from root@kubernetes1.yp14.cn
                 smtp_server exmail.qq.com
                 smtp_connect_timeout 30
                 router_id master01_11
}

vrrp_script check_svr {
    script "/moviebook/scripts/chk_server.sh"
    interval 20
    weight 5
 }

vrrp_instance VI_1 {
    state MASTER
    interface bond4
    virtual_router_id 98
    priority 100
    advert_int 2
    authentication {
        auth_type PASS
        auth_pass 1111
    }
    unicast_src_ip 10.147.1.1 label bond4:0
    unicast_peer {
        10.147.1.3
    }

    virtual_ipaddress {         ##主节点上的vip
        10.147.1.100 dev bond4 label bond4:0
        #vip2 dev eth0 label eth0:1    ##如果每个节点上有多个vip,一个一行填上,只填单个节点上的vip
    }

    track_script {
        check_svr
    }
}

vrrp_instance VI_2 {
    state BACKUP
    interface bond4
    virtual_router_id 99
    priority 80
    advert_int 2
    authentication {
        auth_type PASS
        auth_pass 1111
    }
    unicast_src_ip 10.147.1.1 label bond4:0
    unicast_peer {
        10.147.1.3
    }
    virtual_ipaddress {         ##备节点上的vip
        10.147.1.101 dev bond4 label bond4:1
        #vip2 dev eth0 label eth0:3   ##如果每个节点上有多个vip,一个一行填上,只填单个节点上的vip
    }

    track_script {
        check_svr
    }
}

shell>cat /moviebook/scripts/chk_server.sh
#!/bin/bash
MSTATUS=$(netstat -anltp|grep -w "LISTEN"|grep -w mysqld|wc -l)
IPADD=$(ip a|grep -i "inet .* brd"|awk '{print $2}'|awk -F'/' '{print $1}')
HOSTNAME=$(hostname)
DATET=$(date +%Y-%m-%d\ %H:%M:%S)
LOGDIR=/export/logs/keepalived
LOGFILE=$LOGDIR/keepalived.log
ERRLOG="IP: ${IPADD}\nHOSTNAME: ${HOSTNAME}\nFatal error: Mysql servers maybe down, please check."
if [ $MSTATUS -eq 0 ];then
        pkill keepalived
        echo -e "${DATET}\n${ERRLOG}" >> $LOGFILE
fi


10.147.1.3 配置
shell>cat /etc/keepalived/keepalived.conf
global_defs {
     notification_email {
     xinliang_li@moviebook.cn
     }
     notification_email_from root@kubernetes1.yp14.cn
                 smtp_server exmail.qq.com
                 smtp_connect_timeout 30
                 router_id master01_12
}

vrrp_script check_svr {
    script "/moviebook/scripts/chk_server.sh"
    interval 20
    weight 5
 }

vrrp_instance VI_1 {
    state BACKUP
    interface bond4
    virtual_router_id 98
    priority 80
    advert_int 2
    authentication {
        auth_type PASS
        auth_pass 1111
    }
    unicast_src_ip 10.147.1.3 label bond4:0
    unicast_peer {
        10.147.1.1
    }

    virtual_ipaddress {         ##主节点上的vip
        10.147.1.100 dev bond4 label bond4:1
        #vip2 dev eth0 label eth0:1    ##如果每个节点上有多个vip,一个一行填上,只填单个节点上的vip
    }

    track_script {
        check_svr
    }
}
vrrp_instance VI_2 {
    state MASTER
    interface bond4
    virtual_router_id 99
    priority 100
    advert_int 2
    authentication {
        auth_type PASS
        auth_pass 1111
    }
    unicast_src_ip 10.147.1.3 label bond4:0
    unicast_peer {
        10.147.1.1
    }
    virtual_ipaddress {         ##备节点上的vip
        10.147.1.101 dev bond4 label bond4:0
        #vip2 dev eth0 label eth0:3   ##如果每个节点上有多个vip,一个一行填上,只填单个节点上的vip
    }

    track_script {
        check_svr
    }
}

shell>cat /moviebook/scripts/chk_server.sh
#!/bin/bash
MSTATUS=$(netstat -anltp|grep -w "LISTEN"|grep -w mysqld|wc -l)
IPADD=$(ip a|grep -i "inet .* brd"|awk '{print $2}'|awk -F'/' '{print $1}')
HOSTNAME=$(hostname)
DATET=$(date +%Y-%m-%d\ %H:%M:%S)
LOGDIR=/export/logs/keepalived
LOGFILE=$LOGDIR/keepalived.log
ERRLOG="IP: ${IPADD}\nHOSTNAME: ${HOSTNAME}\nFatal error: Mysql servers maybe down, please check."
if [ $MSTATUS -eq 0 ];then
        pkill keepalived
        echo -e "${DATET}\n${ERRLOG}" >> $LOGFILE
fi

shell> chmod 777 /moviebook/scripts/chk_server.sh
启动keepalived
以10.147.1.1 安装数据库为例
安装依赖包
shell>yum -y install gcc-* bison* libaio* ncurses-* cmake
shell>yum install -y openssl openssl-devel ncurses ncurses-devel autoconf
下载源码包
http://ftp.ntu.edu.tw/MySQL/Downloads/
下载最近的带boost的版本
或者
https://dev.mysql.com/downloads/

#下载地址
wget  https://downloads.mysql.com/archives/get/p/23/file/mysql-boost-5.7.34.tar.gz
如:下载mysql-boost-5.7.34.tar.gz上传到/usr/local/src/下
解压
shell>cd /usr/local/src && tar zxf mysql-boost-5.7.34.tar.gz

#创建mysql 用户
useradd  mysql -s /sbin/nologin
安装
shell>cd /usr/local/src/mysql-boost-5.7.34
shell>cmake -DCMAKE_INSTALL_PREFIX=/opt/mysql -DDEFAULT_CHARSET=utf8mb4 -DDEFAULT_COLLATION=utf8mb4_general_ci -DMYSQL_USER=mysql -DWITH_BOOST=boost
shell>gmake -j 4 && make install
配置环境变量
shell>echo "export PATH=\$PATH:/opt/mysql/bin" >>/etc/profile
shell>source /etc/profile
初始化数据库,请根据实际情况修改目录
准备数据库配置文件
shell> cat my3350.cnf
[client]
port=3350

max_allowed_packet=48M

[mysql]
port=3350

max_allowed_packet=64M

[mysqld]
port=3350
user=mysql
server_id=13350
character-set-server=utf8mb4

#####dir#####
basedir=/opt/mysql
datadir=/export/mysql3350
socket=/export/mysql3350/mysql.sock
pid_file=/export/mysql3350/mysql.pid
log_error=/export/mysql3350/mysql-error.log
tmpdir=/export/mysql3350
log_bin=/export/mysql3350/mysql-bin
slow_query_log_file=/export/mysql3350/mysql-slow.log
relay_log=/export/mysql3350/relay-bin
slave_load_tmpdir=/export/mysql3350

#####undo#####
innodb_undo_log_truncate=1
innodb_undo_tablespaces=3
innodb_max_undo_log_size=256M
innodb_purge_rseg_truncate_frequency=32
innodb_undo_directory=/export/mysql3350


#####innodb setting######
#innodb = force
innodb_data_home_dir = /export/mysql3350
innodb_data_file_path = ibdata1:128M;ibdata2:128M:autoextend
innodb_temp_data_file_path = ibtmp1:12M:autoextend:max:5G
innodb_autoinc_lock_mode = 1
innodb_log_group_home_dir = /export/mysql3350
innodb_log_files_in_group = 3
innodb_buffer_pool_size = 8G  #可动态修改,实例分配的总内存
innodb_log_file_size = 1024M
innodb_log_buffer_size = 16M
innodb_flush_log_at_trx_commit = 1
innodb_file_per_table = 1
innodb_lock_wait_timeout = 10
innodb_buffer_pool_instances = 1
innodb_read_io_threads = 16
innodb_write_io_threads = 8
innodb_io_capacity = 2000
innodb_io_capacity_max = 4000
innodb_max_dirty_pages_pct = 70
innodb_sync_spin_loops = 10
innodb_flush_method = O_DIRECT
innodb_file_format = Barracuda
innodb_file_format_max = Barracuda
innodb_stats_on_metadata = OFF

#####log setting#####
slow_query_log=1
long_query_time=1
log_timestamps=SYSTEM
log_error_verbosity=2
log_queries_not_using_indexes=OFF
binlog_rows_query_log_events=ON
binlog_format=row
binlog_cache_size=4M
binlog_checksum=none
expire_logs_days=31
relay_log_purge=1
log_slave_updates=1
sync_binlog=1
back_log=500

#####common settings#####
sysdate_is_now=1

lower_case_table_names=1
thread_handling=one-thread-per-connection
max_connections=1024
max_user_connections=1024
max_connect_errors=999999999
thread_cache_size=50
table_open_cache=2048
open_files_limit=65535
#table_definition_cache=5120
interactive_timeout=3600
wait_timeout=3600
query_cache_type=0
query_cache_size=0
sort_buffer_size=16M
read_buffer_size=8M
join_buffer_size=16M
read_rnd_buffer_size=4M
group_concat_max_len=64K
max_tmp_tables=128
tmp_table_size=1024M
max_heap_table_size=512M
max_allowed_packet=128M
skip_external_locking
skip_name_resolve=1

#symbolic_links=0

skip_symbolic_links=1

sql_mode = 'NO_ENGINE_SUBSTITUTION'
default_storage_engine=INNODB

default_time_zone = '+8:00'

show_compatibility_56=ON

#####replication#####
gtid_mode=on
enforce_gtid_consistency=1
slave_parallel_type=LOGICAL_CLOCK
slave_parallel_workers=16
master_info_repository=TABLE
relay_log_info_repository=TABLE
relay_log_recovery=ON
slave_skip_errors=1032,1062
skip_slave_start=1
replicate_same_server_id=0
#slave_pending_jobs_size_max=128M

report_host='10.147.1.1'      ##如果有主从关系的,主从节点均配置,配置为本节点的实IP

[myisamchk]
key_buffer = 64M
sort_buffer_size = 32M
read_buffer = 16M
write_buffer = 16M

[mysqlhotcopy]

interactive-timeout=1800

[mysqld_safe]

open-files-limit = 65535

创建对应目录
shell> mkdir /export/mysql3350  &&  mkdir /export/etc && mkdir /export/logs


进行初始化操作
shell>mysqld --defaults-file=/export/etc/my3350.cnf --initialize-insecure

注: --initialize-insecure表示初始化的时候root密码为空,可以后面再修改成自己的密码
启动数据库
shell>mysqld_safe --defaults-file=/export/etc/my3350.cnf &
设置admindba 权限
shell>mysql -u root -S  /export/mysql3350/mysql.sock  -p
mysql>use mysql;
mysql>update user set authentication_string=password('新密码') where user='root' and Host='localhost';
mysql>create user 'admindba'@'%' IDENTIFIED by 'xxxxxxxxxx';
mysql>grant all privileges on *.* to 'admindba'@'%';
mysql>GRANT ALL PRIVILEGES ON *.* TO 'admindba'@'%' WITH GRANT OPTION;
mysql>flush privileges;
10.147.1.1 数据库配置完成
10.147.1.3 数据库安装类似
数据库主从配置省略
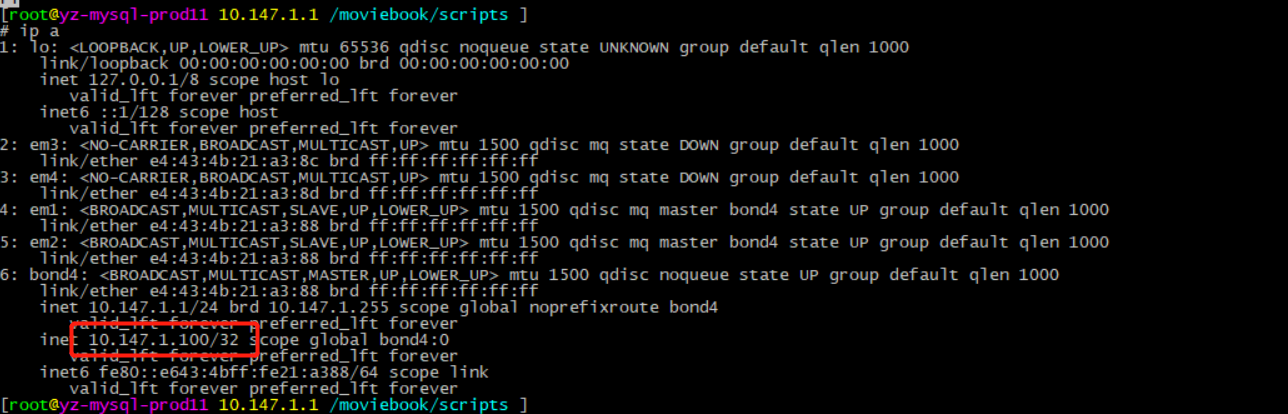
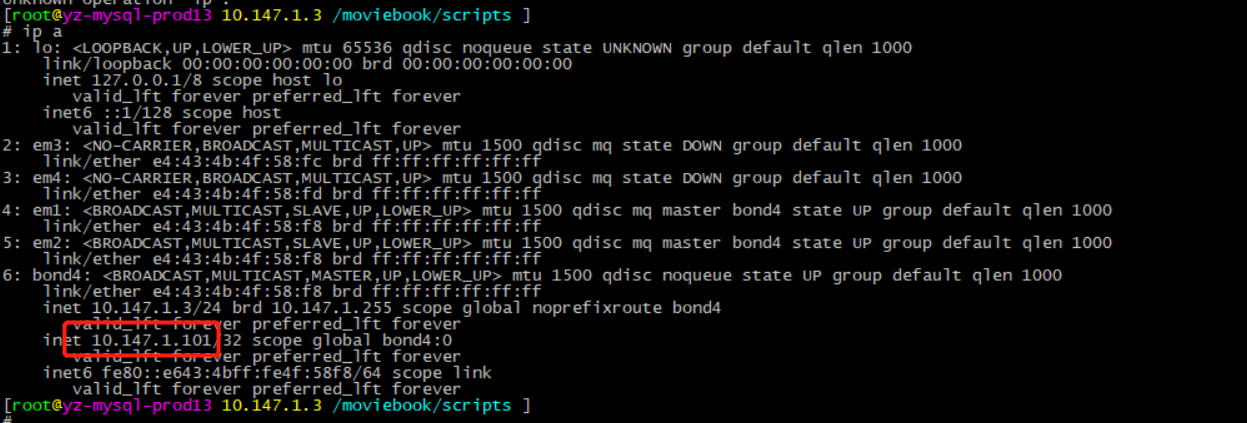
网卡配置如下:
10.147.1.1
10.147.1.3


【推荐】国内首个AI IDE,深度理解中文开发场景,立即下载体验Trae
【推荐】编程新体验,更懂你的AI,立即体验豆包MarsCode编程助手
【推荐】抖音旗下AI助手豆包,你的智能百科全书,全免费不限次数
【推荐】轻量又高性能的 SSH 工具 IShell:AI 加持,快人一步
· 25岁的心里话
· 闲置电脑爆改个人服务器(超详细) #公网映射 #Vmware虚拟网络编辑器
· 零经验选手,Compose 一天开发一款小游戏!
· 通过 API 将Deepseek响应流式内容输出到前端
· 因为Apifox不支持离线,我果断选择了Apipost!