一、Linux下Docker安装SonarQube(PostgreSQL)
一、概述:
SonarQube是一种自动代码审查工具,用于检测代码中的错误、漏洞和代码异味。 它可以与现有的工作流程集成,以支持跨项目分支和拉取请求的持续代码检查。
本文基于Linux操作系统,在Docker容器中部署SonarQube服务,并进行简单的配置和使用。SonarQube在7.8版本之后不再支持Mysql数据库,教程选用的是最新版本的Postgresql数据库,SonarQube使用的版本是8.8-community。
二、部署步骤:
环境描述:
| 主机 | OS | IP地址 | 软件 | 说明概述 |
| sonarqube | CentOS 7.9 | 192.168.8.30 |
postgres,sonarqube:8.8-community,java-11-openjdk |
扫描服务端 |
| sonar-scanner | CentOS 7.9 | 192.168.8.32 | sonar-scanner(docker版),java-11-openjdk | 扫描客户端 |
第一步:
docker安装Postgresql
docker run -d --name postgres \
--restart=always \
-p 5432:5432 \
-v /opt/postgres:/var/lib/postgresql/data \
-e POSTGRES_PASSWORD=123456 \
-e ALLOW_IP_RANGE=0.0.0.0/0 \
postgres
参数说明:
POSTGRES_PASSWORD 是数据库初始密码
ALLOW_IP_RANGE=0.0.0.0/0 允许任何主机访问
第二步:
使用默认用户postgres创建SonarQube数据库
[root@sonarqube ~]# docker exec -it 377dd1ea5 /bin/bash
root@377dd1ea529e:/# su postgres
postgres@377dd1ea529e:/$ psql
psql (13.4 (Debian 13.4-1.pgdg110+1))
Type "help" for help.

postgres=# CREATE DATABASE sonar;
CREATE DATABASE
postgres=# exit
postgres@377dd1ea529e:/$ exit
exit
root@377dd1ea529e:/# read escape sequence
第三步:
部署SonarQube
docker pull sonarqube:8.8-community
docker run -d --name sonarqube \
    --restart=always \
    -p 9000:9000 \
    -e SONAR_JDBC_URL=jdbc:postgresql://192.168.8.30:5432/sonar \
    -e SONAR_JDBC_USERNAME=postgres \
    -e SONAR_JDBC_PASSWORD=123456 \
    -v sonarqube_data:/opt/sonarqube/data \
    -v sonarqube_extensions:/opt/sonarqube/extensions \
    -v sonarqube_logs:/opt/sonarqube/logs \
    -v sonarqube_conf:/opt/sonarqube/conf \
    sonarqube:8.8-community
第四步:
报错解决docker logs -f sonarqube 查看日志发现报错
vim /etc/sysctl.conf

最后一行添加:
vm.max_map_count=262144
vm.max_map_count=524288

sysctl -p       加载生效

重新启动容器
docker start sonarqube

vi /etc/security/ limit.conf
sonarqube   -   nofile   131072
sonarqube   -   nproc    8192
浏览器访问http://主机IP:9000,使用默认账号(admin)密码(xxx)登录,根据提示修改原始密码
三、优化步骤:
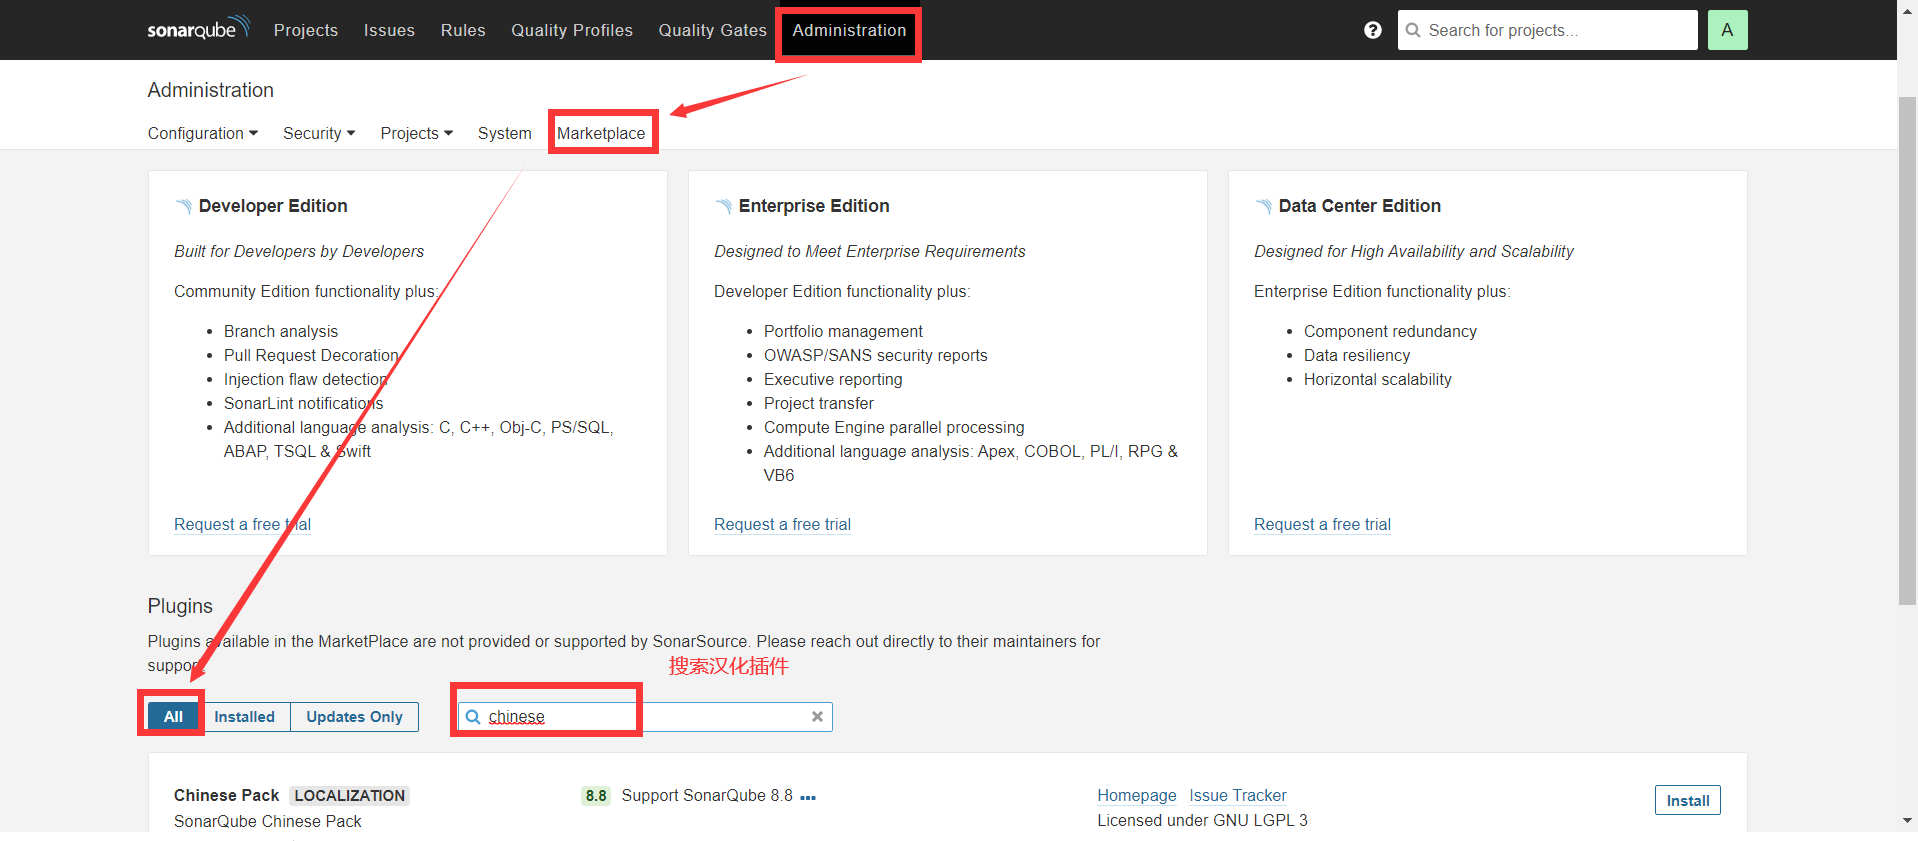
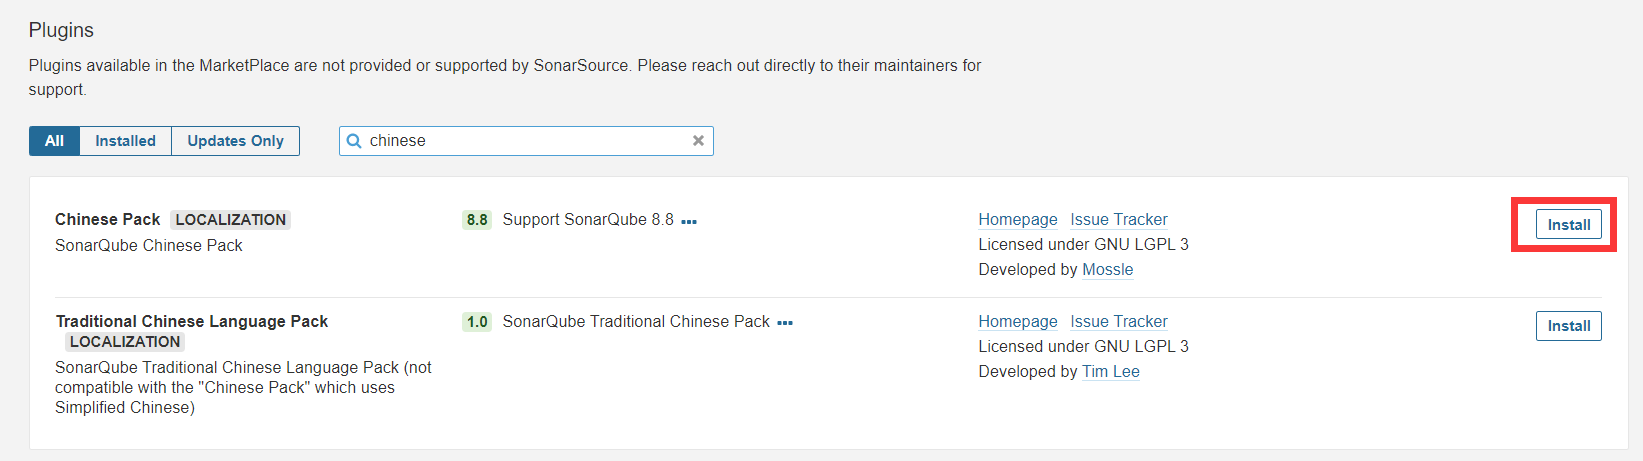
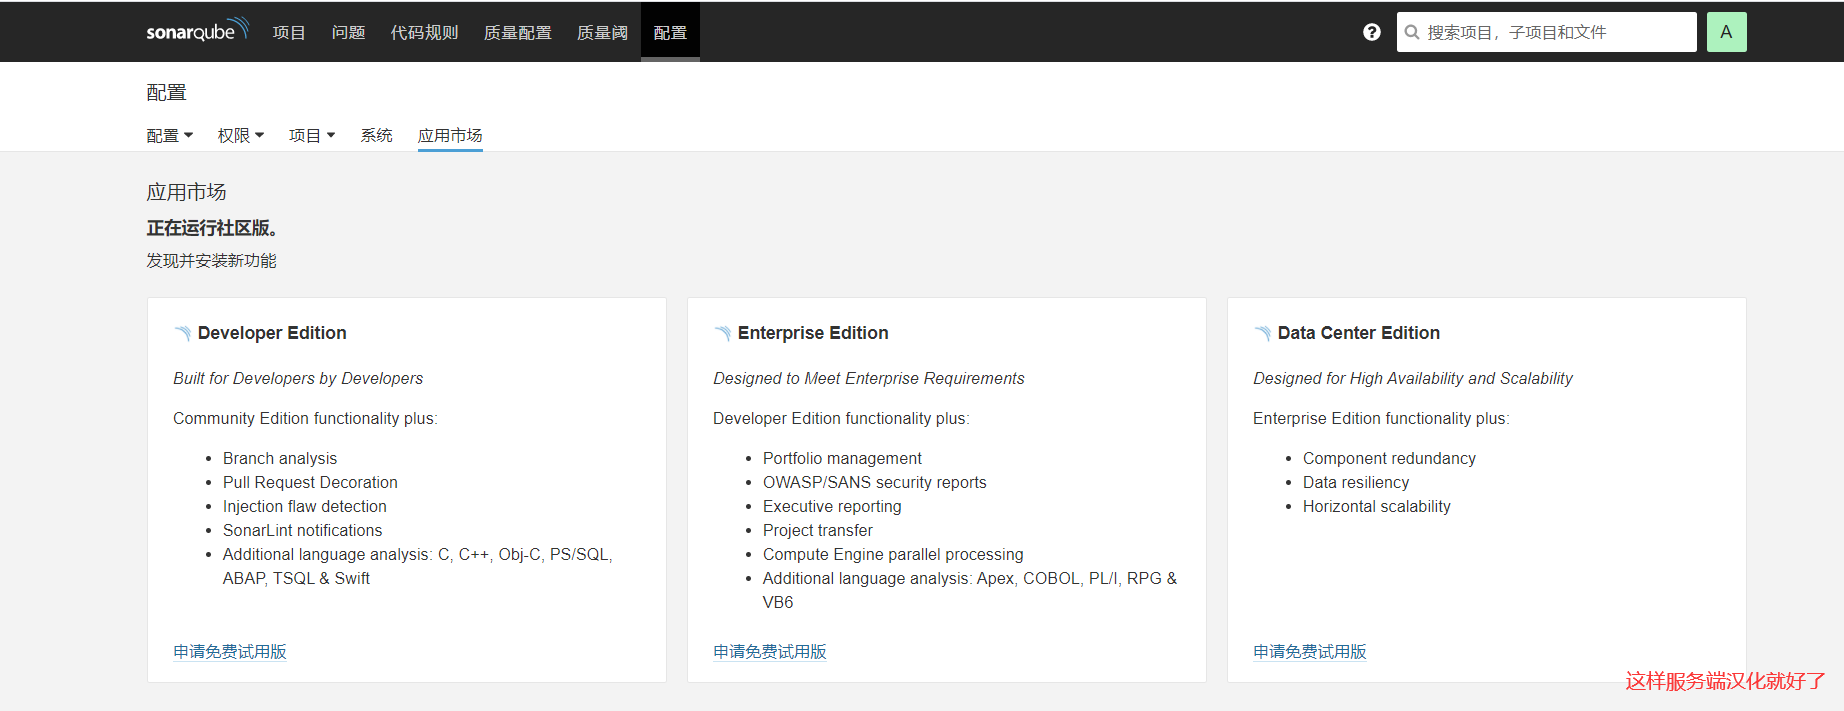
案例一:汉化sonarqube
汉化方法一:
方法二:
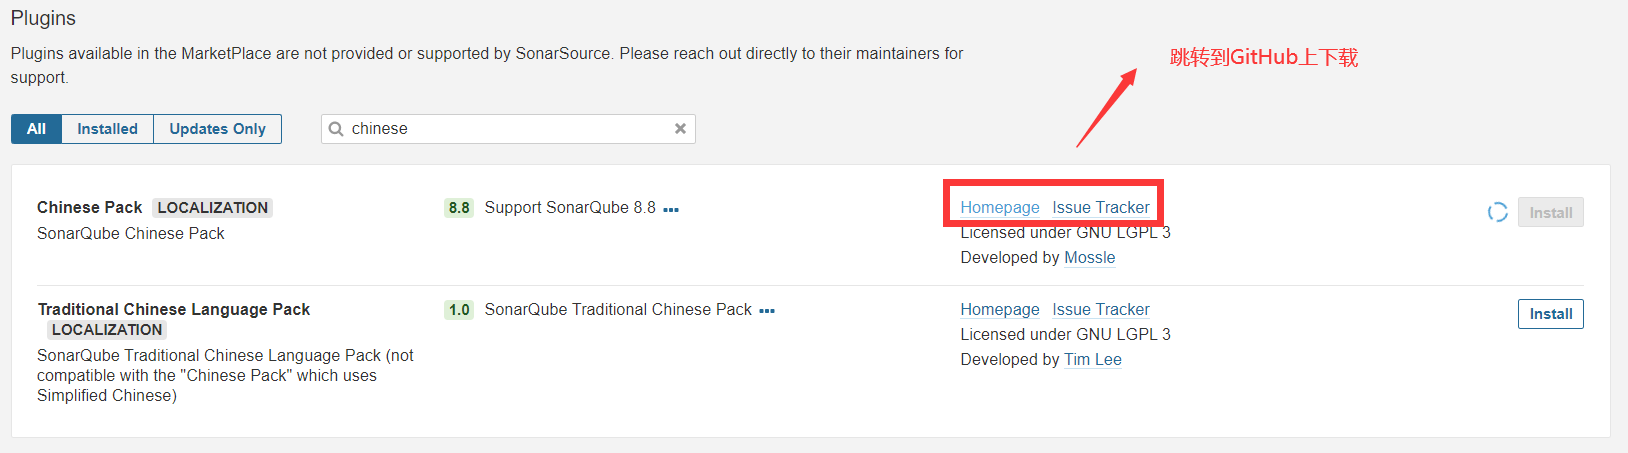
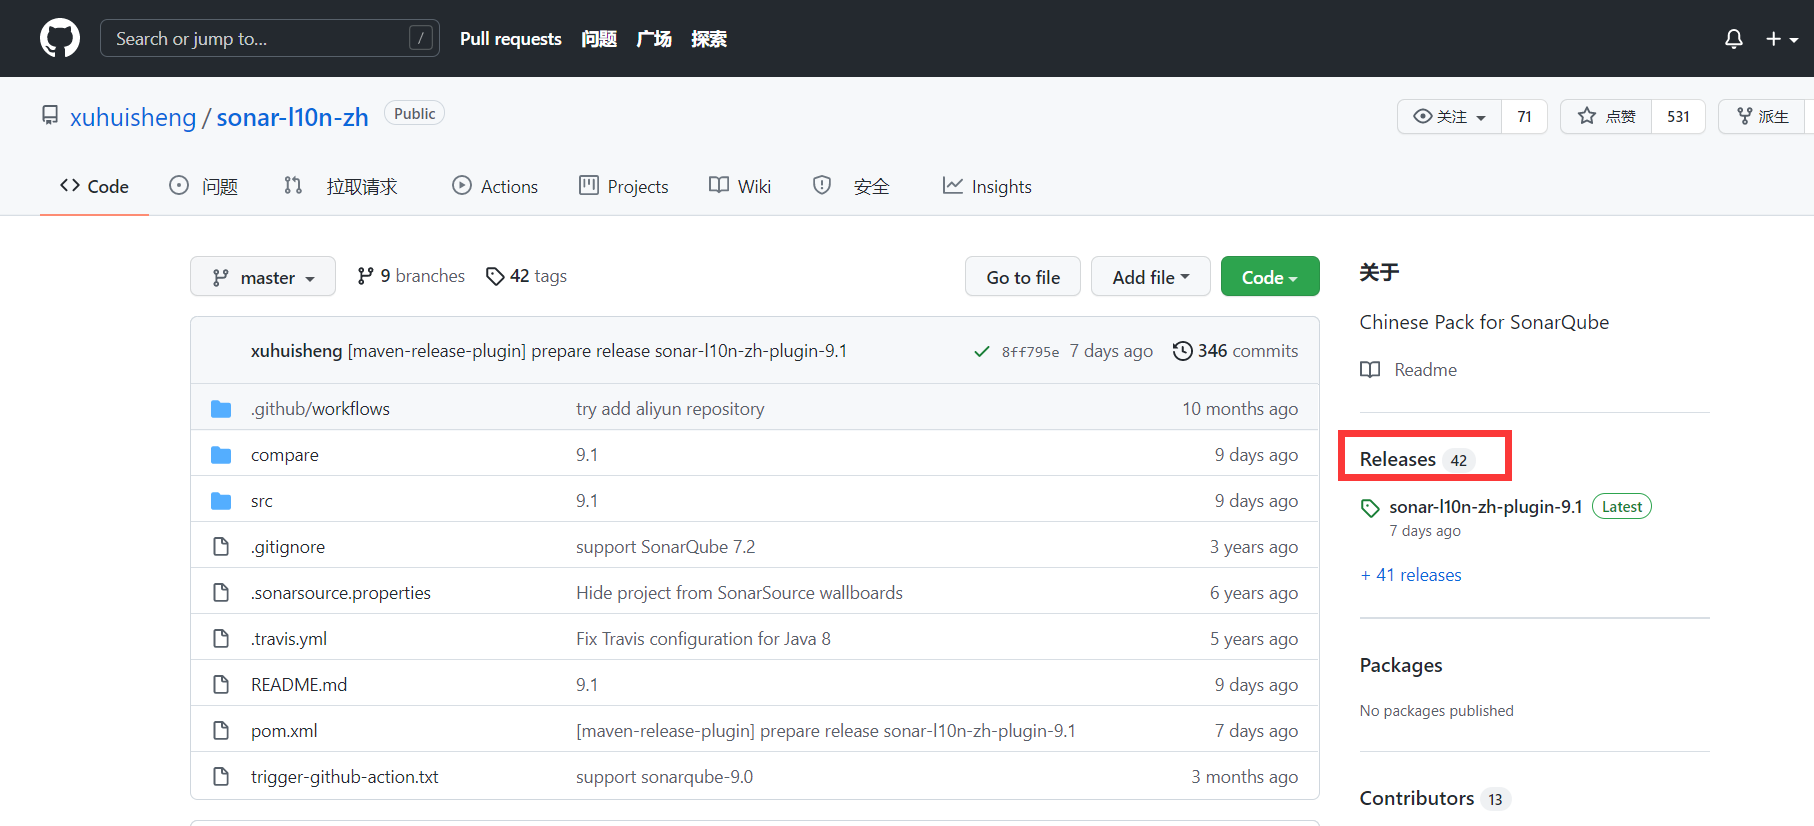
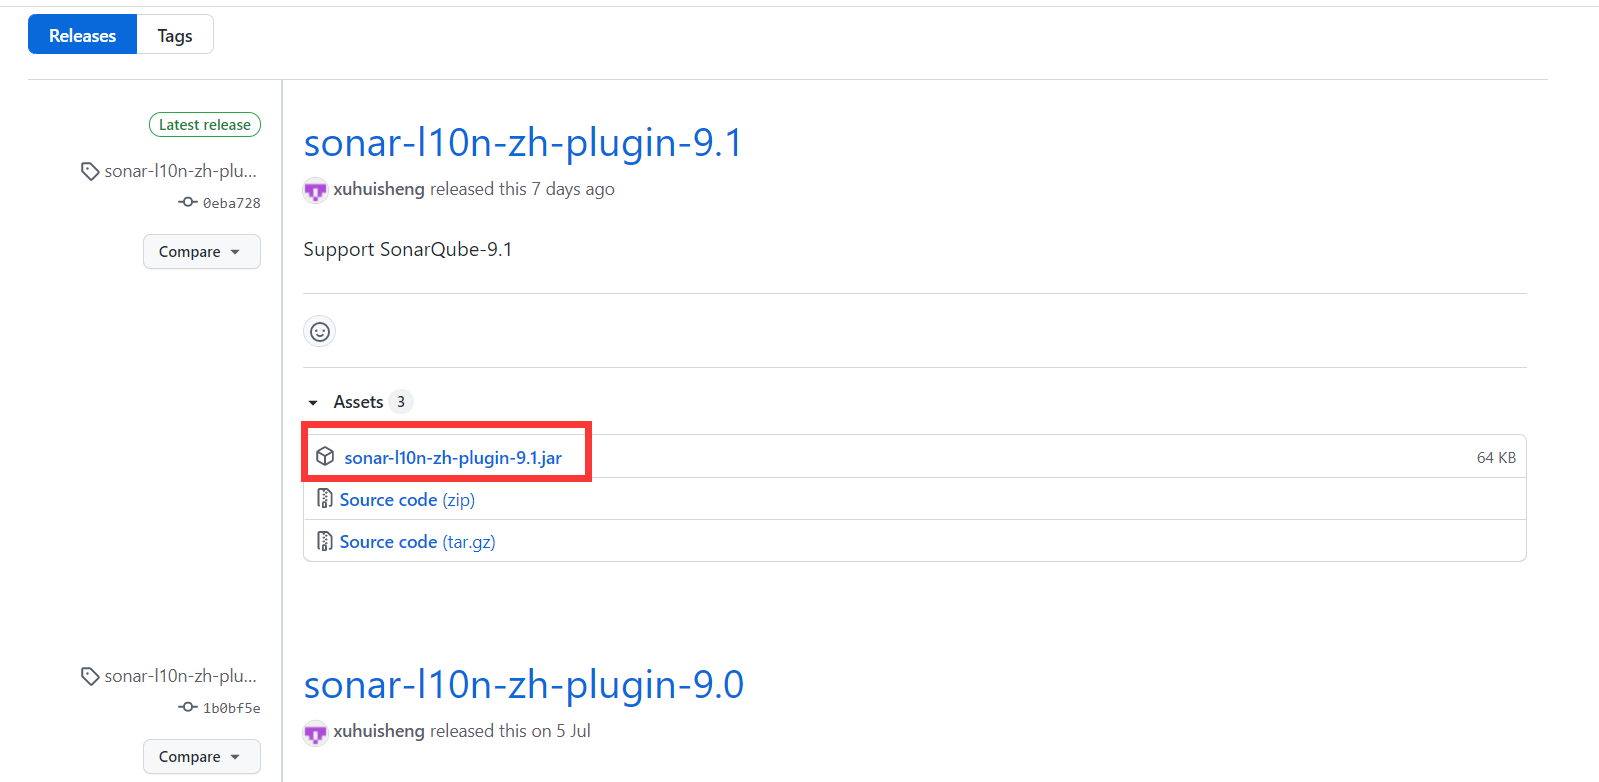
讲下载好的jar包放到以下的路径
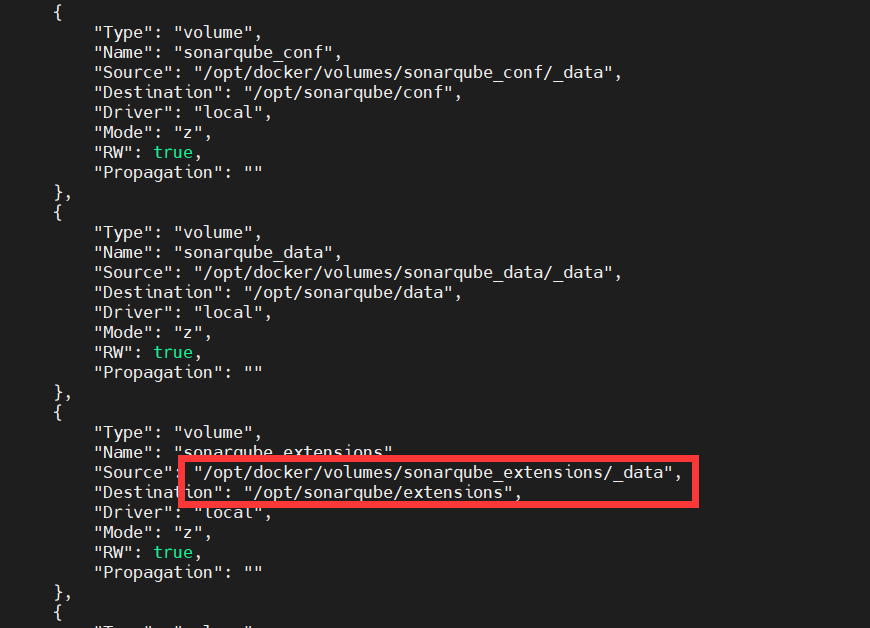

移动到以上的路径,将sonarqube重新启动,这里需要注意安装sonarqube和汉化插件的版本要一致。
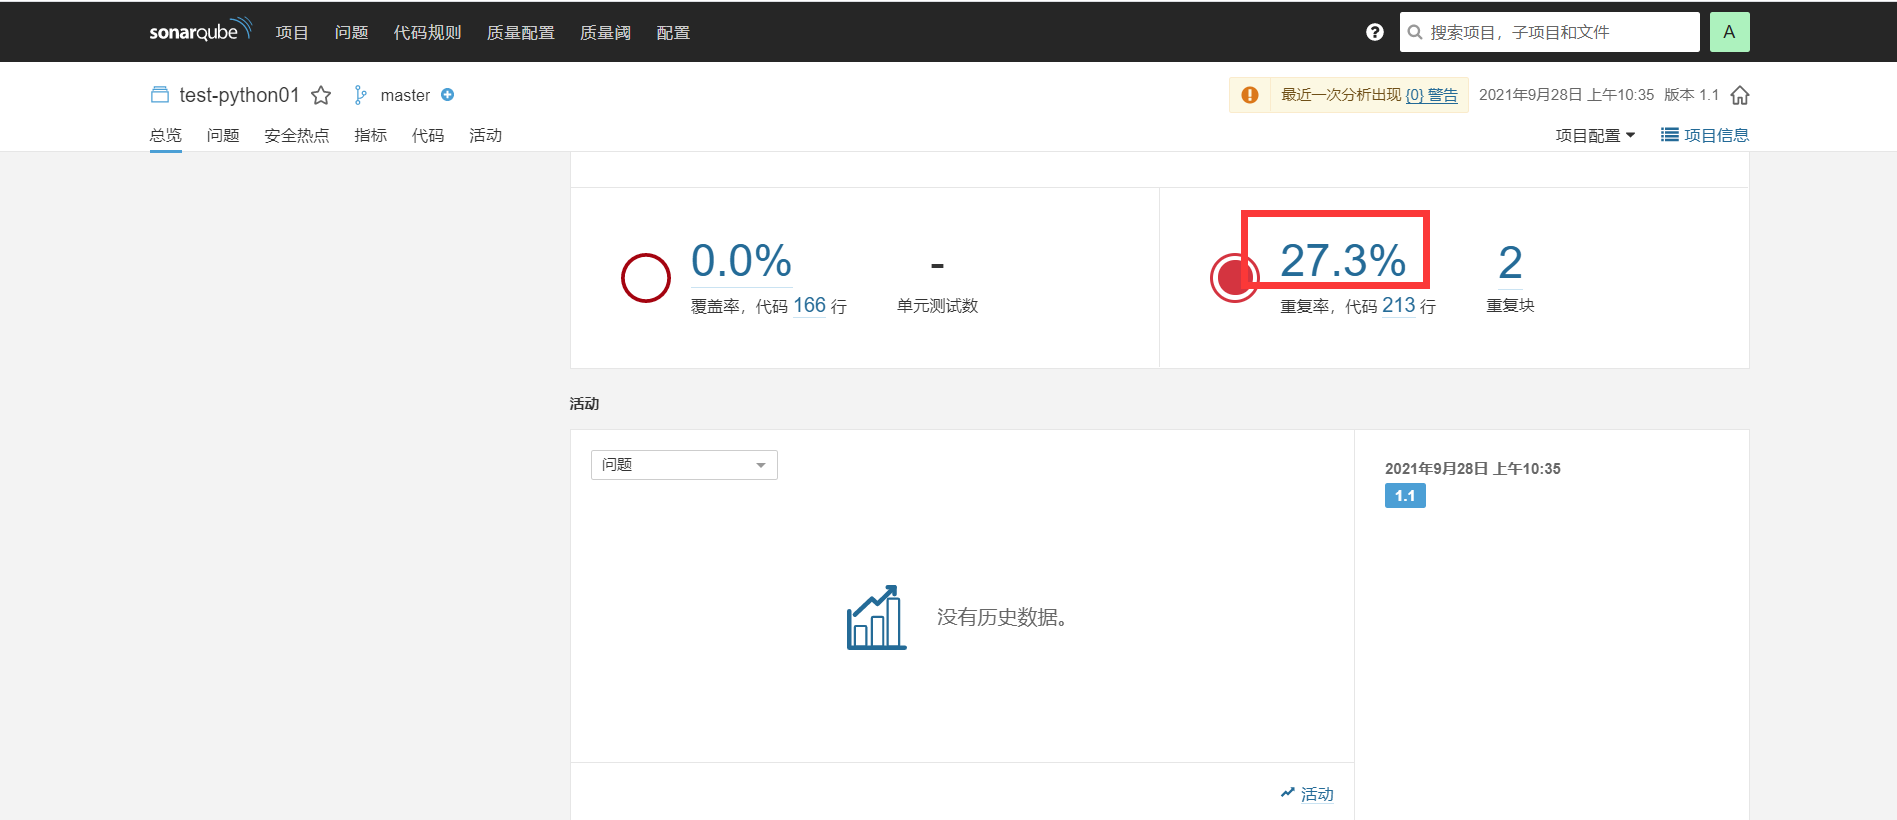
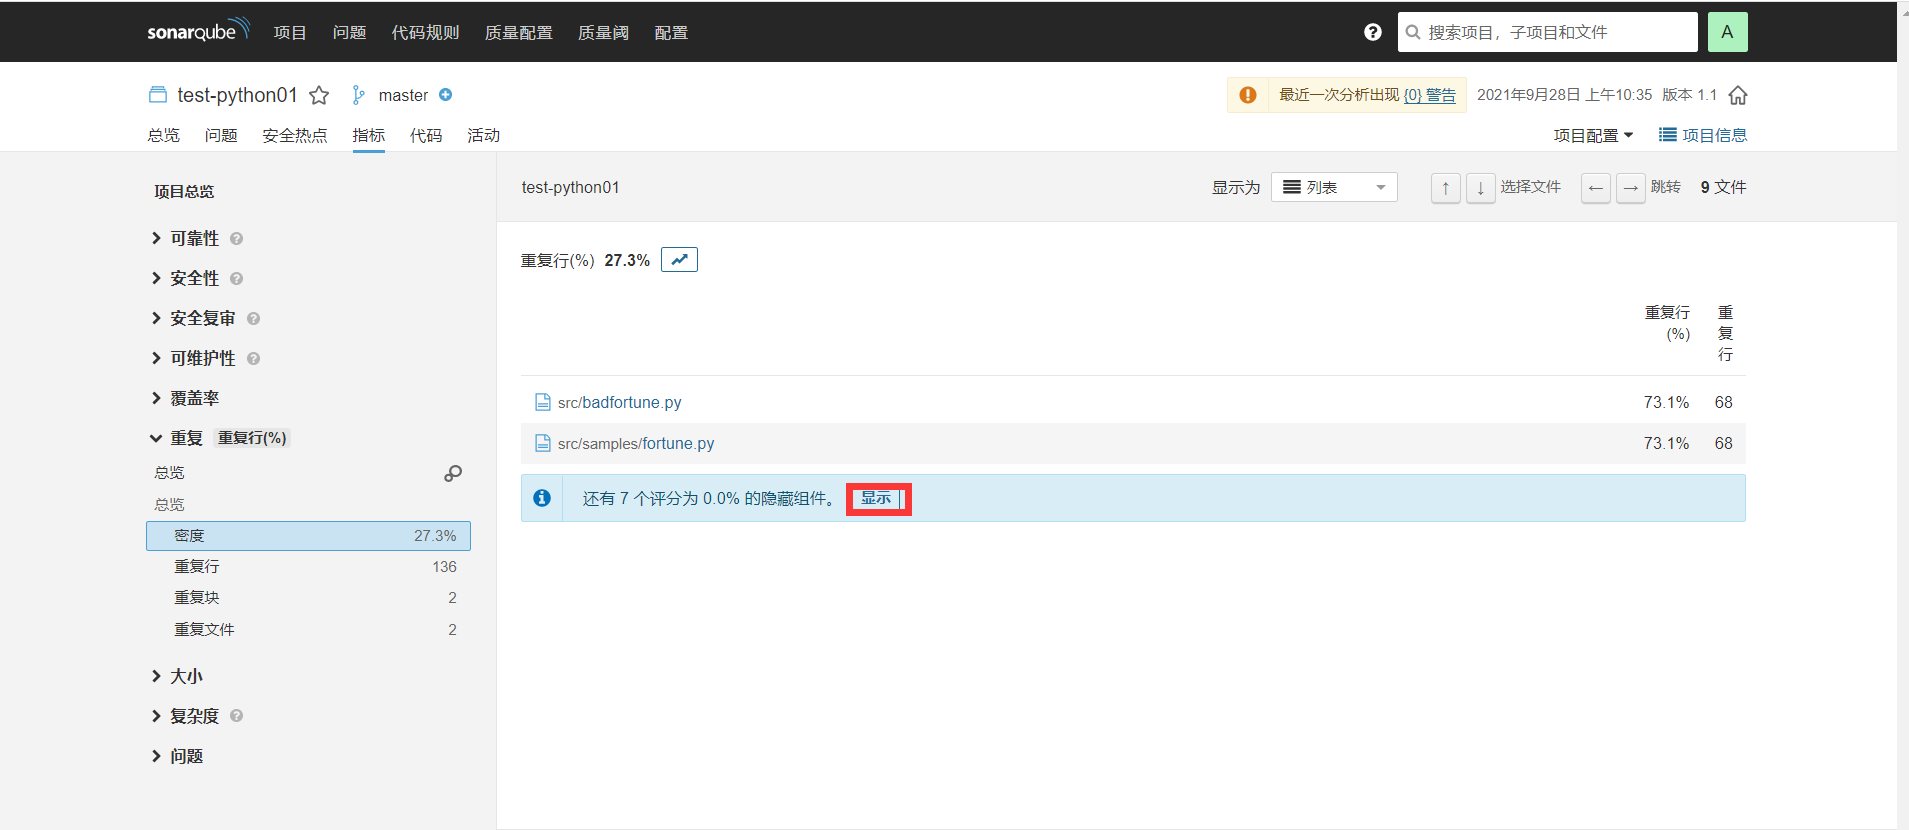
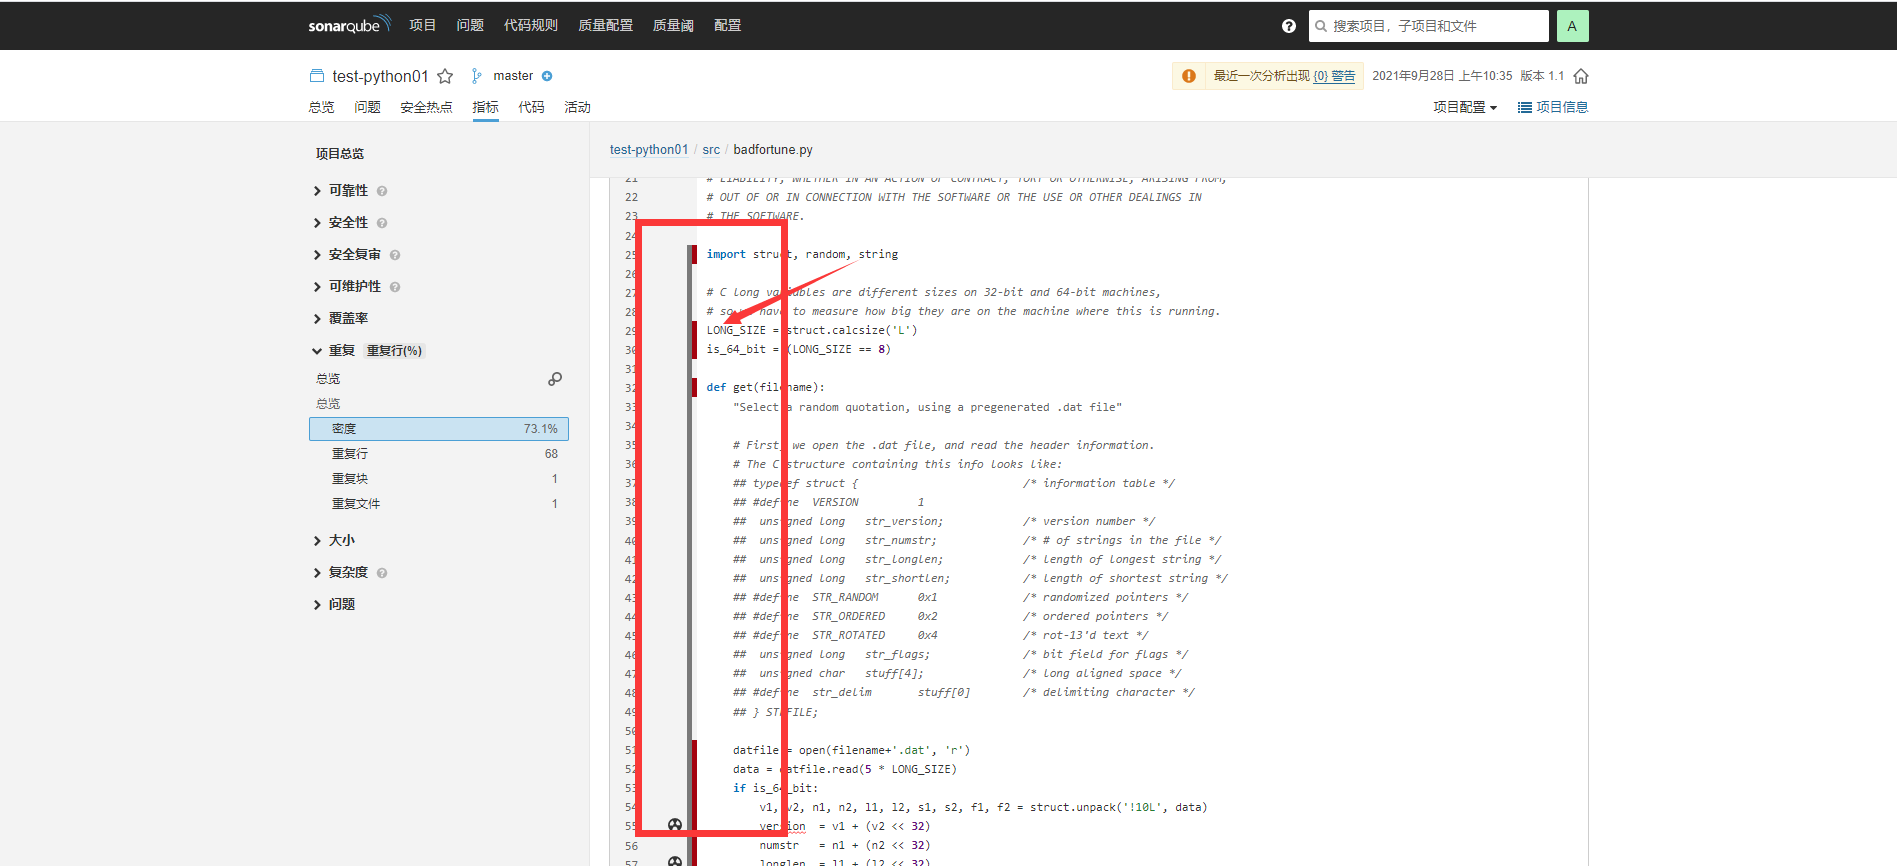
SonarQube的使用
案例二:jenkins服务器部署扫描器sonar-scanner
第一步:
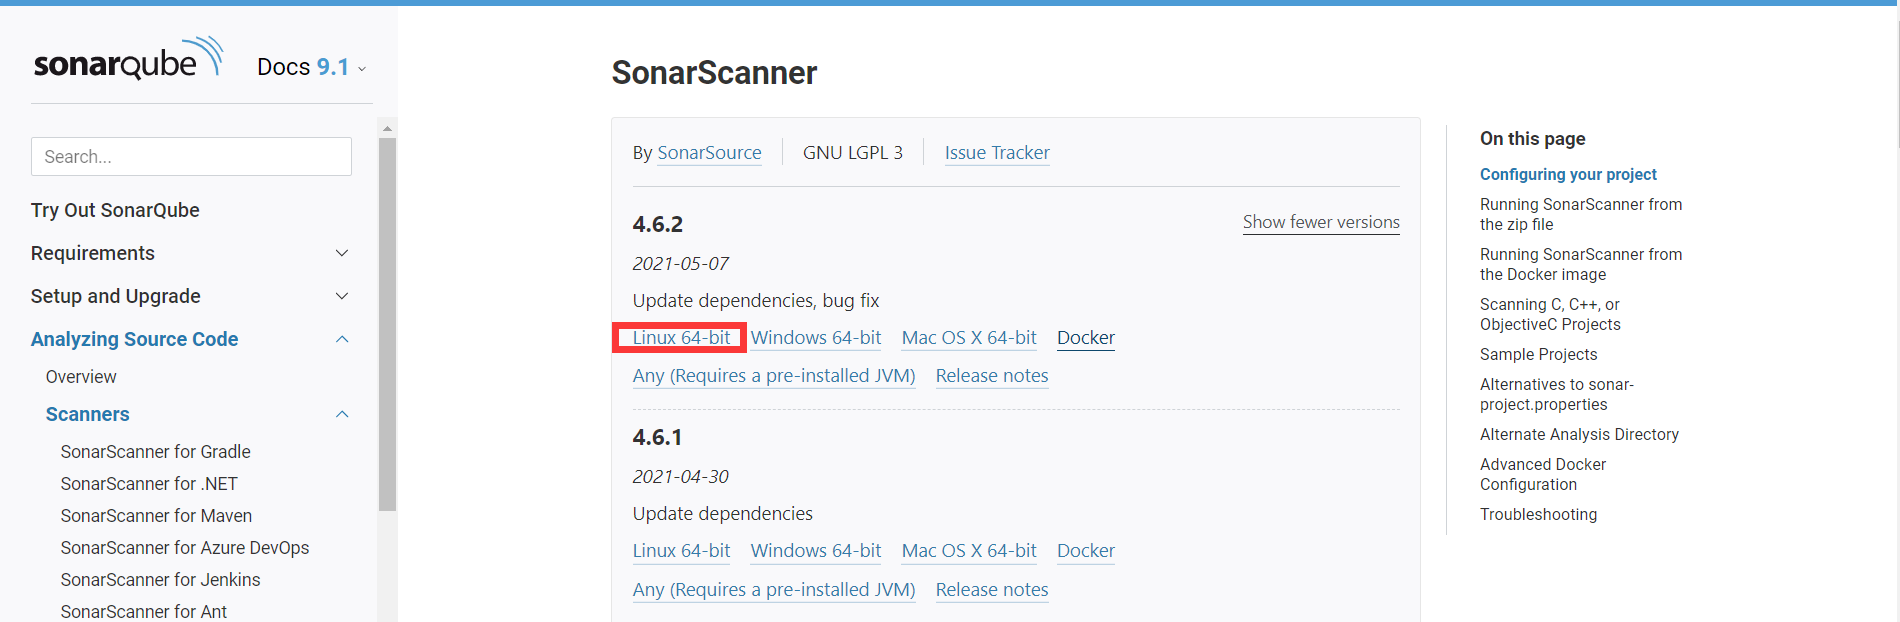
1. 部署sonar-scanner客户端
软件获取地址:https://binaries.sonarsource.com/Distribution/sonar-scanner-cli/
官方文档:https://docs.sonarqube.org/latest/analysis/scan/sonarscanner/
sonarqube通过调用扫描器sonar-scanner进行代码质量分析,即扫描器的具体工作就是扫描代码:
wget https://binaries.sonarsource.com/Distribution/sonar-scanner-cli/sonar-scanner-cli-4.6.2.2472.zip
第二步:
2. 调整配置文件
wget https://binaries.sonarsource.com/Distribution/sonar-scanner-cli/sonar-scanner-cli-4.6.2.2472.zip
mv sonar-scanner-cli-4.6.2.2472.zip  /opt/
unzip sonar-scanner-cli-4.6.2.2472.zip
ln -sv /opt/sonar-scanner-4.6.2.2472/ /usr/local/sonar-scanner

ln -s /opt/sonar-scanner-4.6.2.2472/bin/sonar-scanner /usr/bin/
ln -s /opt/sonar-scanner-4.6.2.2472/bin/sonar-scanner-debug /usr/bin/
[root@nexus3 opt]# vim /opt/sonar-scanner-4.6.2.2472/conf/sonar-scanner.properties
#Configure here general information about the environment, such as SonarQube server connection details for example
#No information about specific project should appear here

#----- Default SonarQube server
sonar.host.url=http://192.168.8.30:9000
sonar.login=b6faa970d9e1f513cbdd114b330043f475b68c38         #忽略


#----- Default source code encoding
sonar.sourceEncoding=UTF-8

第三步:
准备测试代码,进行代码扫描,这里以python为例子
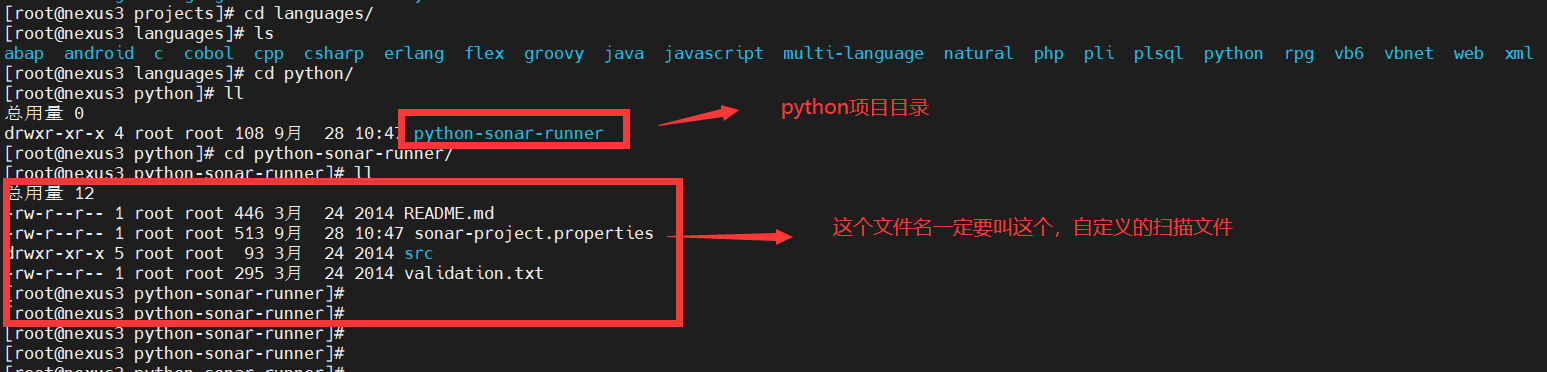
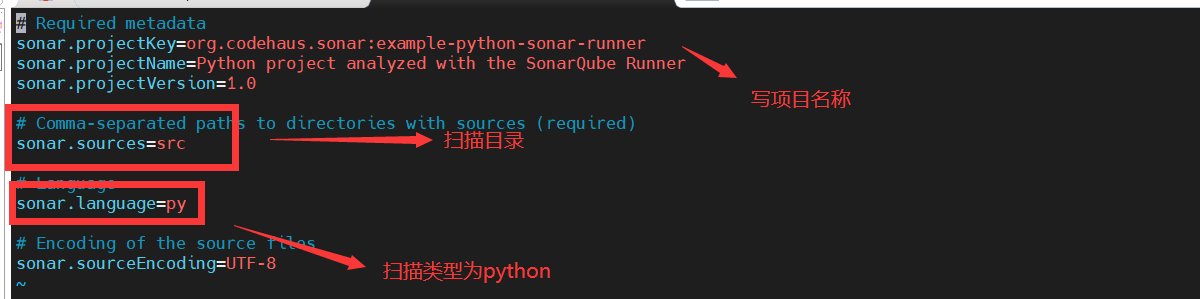
以上配置文件:
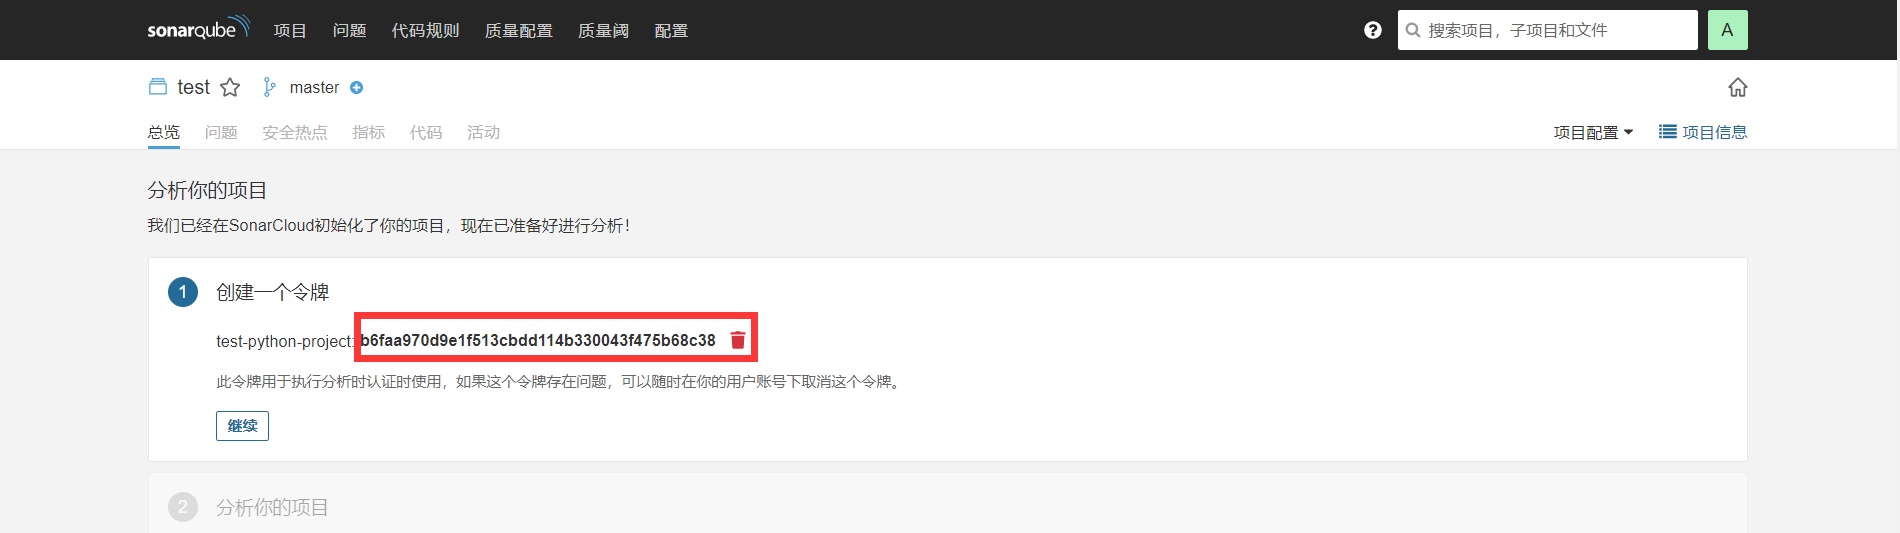
root@nexus3 python-sonar-runner]# cat sonar-project.properties
# Required metadata
sonar.projectKey=org.codehaus.sonar:example-python-sonar-runner
sonar.projectName=Python project analyzed with the SonarQube Runner
sonar.projectVersion=1.0

# Comma-separated paths to directories with sources (required)
sonar.sources=src
sonar.login=b6faa970d9e1f513cbdd114b330043f475b68c38       # 这里的指写创建项目的token

# Language
sonar.language=py

# Encoding of the source files
sonar.sourceEncoding=UTF-8
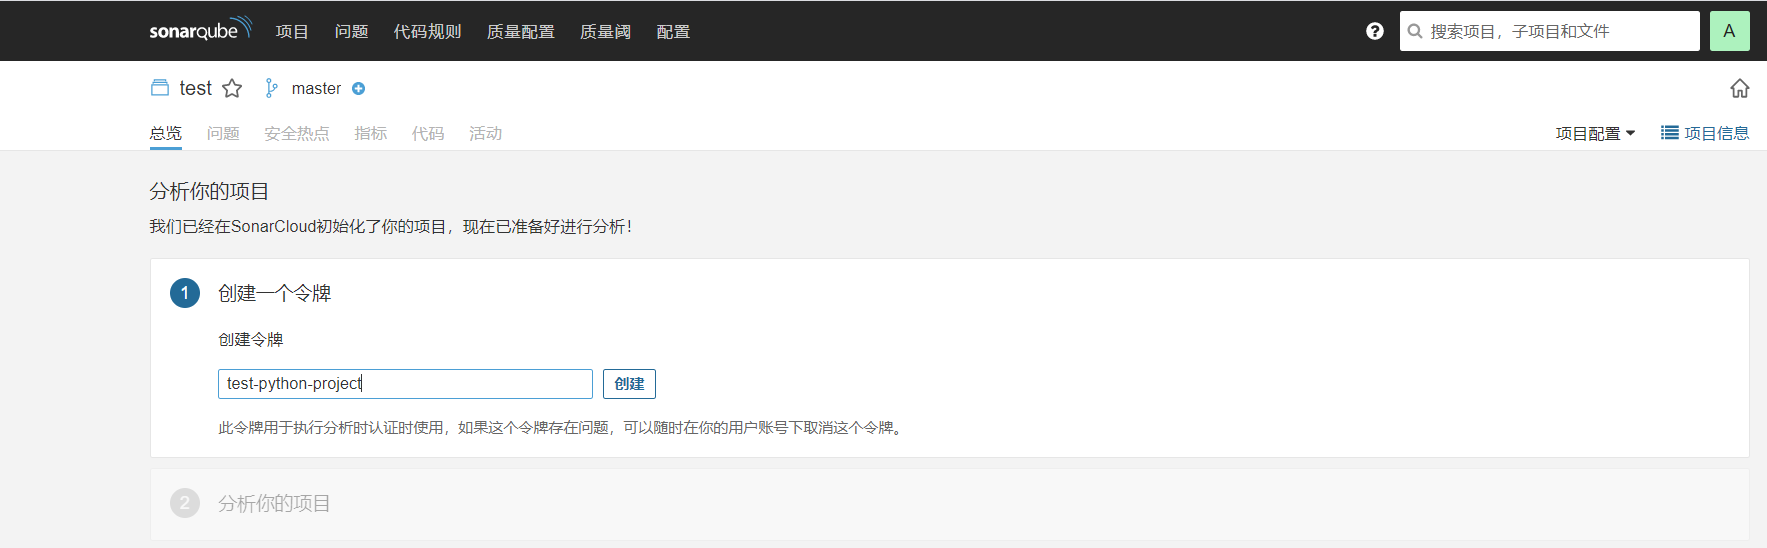
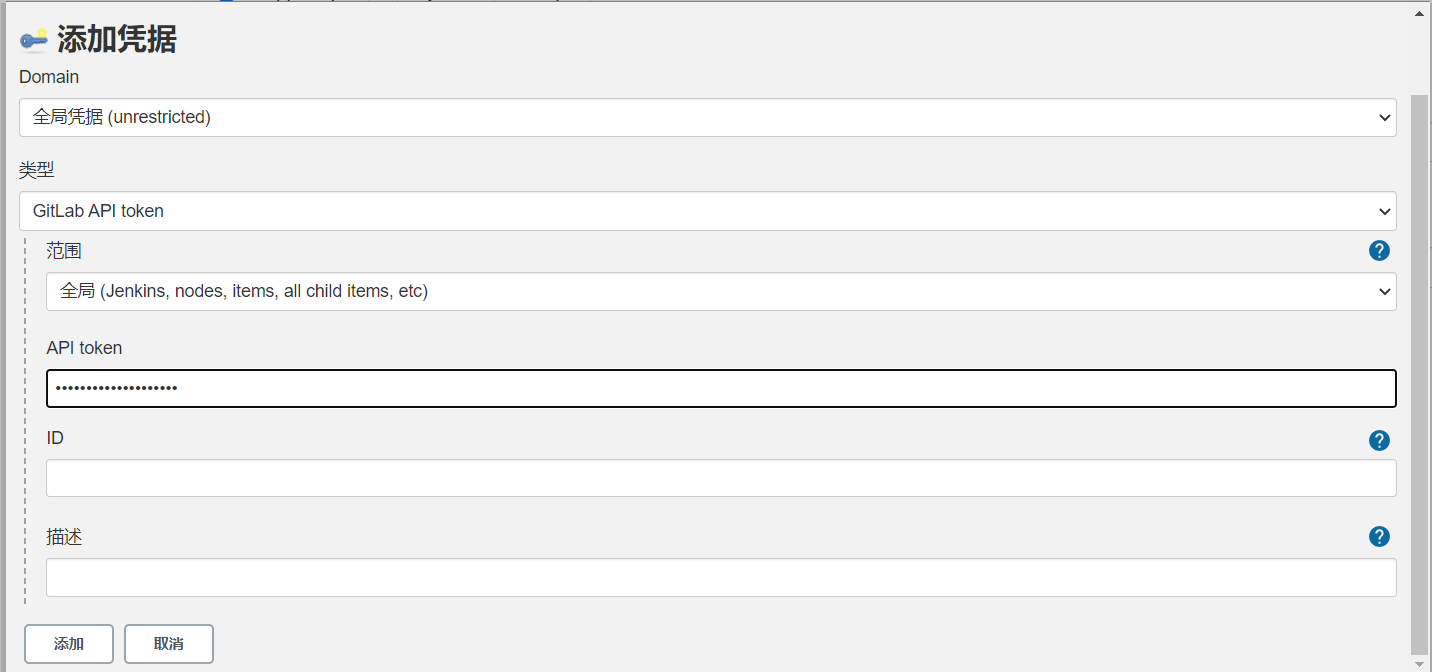
填写一个Token名称生成新的Token,或使用上面生成的Token,点击Continue继续下一步
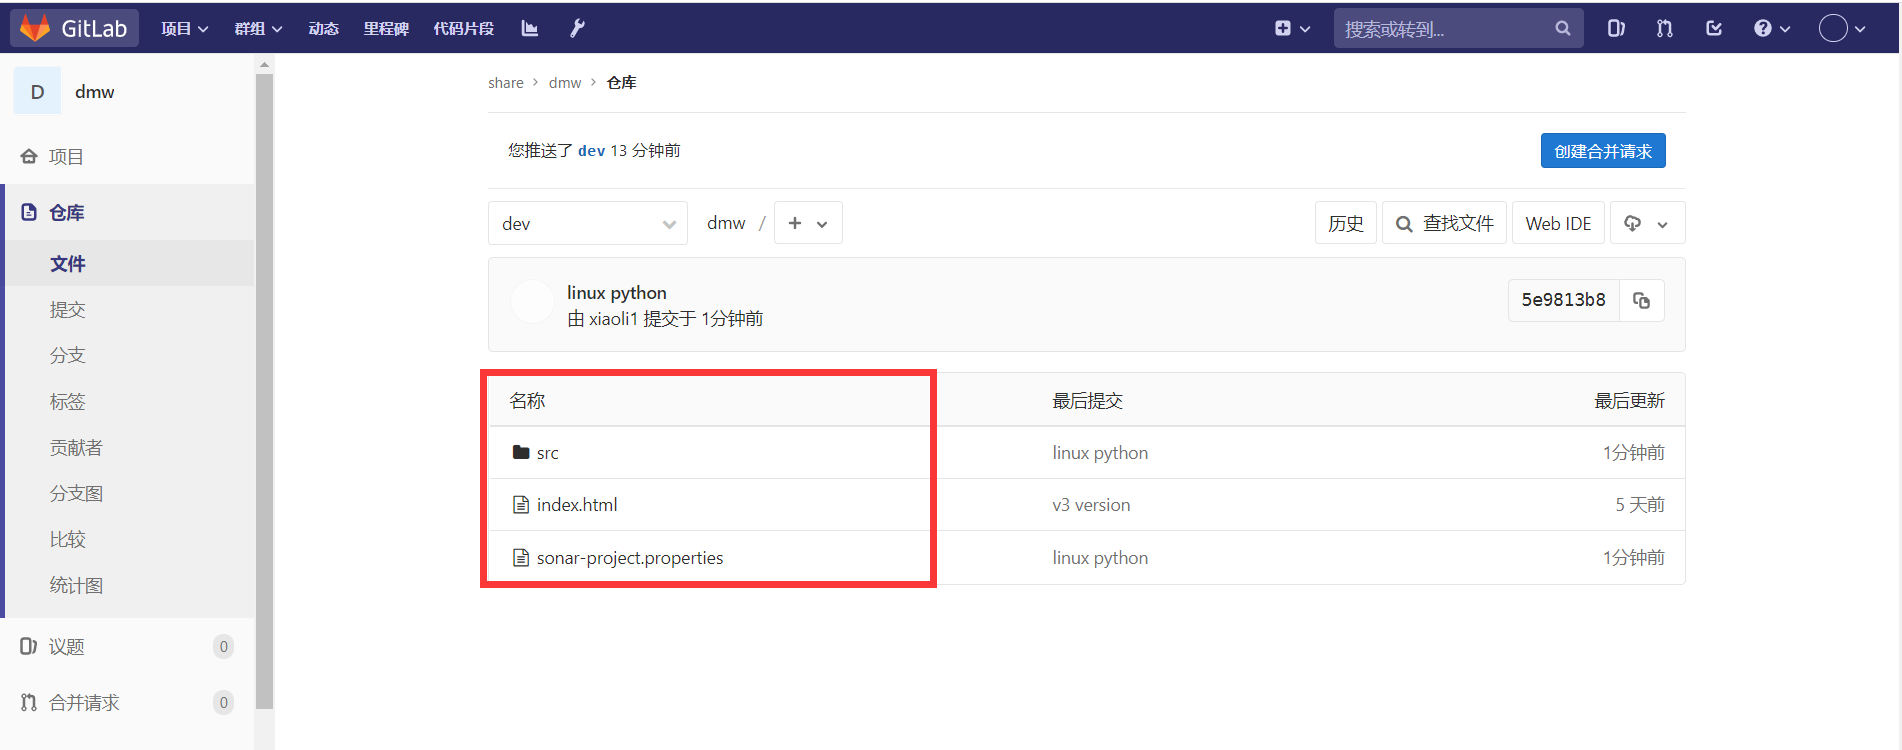
使用技巧:

[root@nexus3 share]# git clone -b dev http://192.168.8.40/share/dmw.git
正克隆到 'dmw'...
Username for 'http://192.168.8.40': xiaoli
Password for 'http://xiaoli@192.168.8.40':
remote: Enumerating objects: 15, done.
remote: Counting objects: 100% (15/15), done.
remote: Compressing objects: 100% (7/7), done.
remote: Total 15 (delta 1), reused 15 (delta 1)
Unpacking objects: 100% (15/15), done.
[root@nexus3 share]#
[root@nexus3 share]# ls
dmw
[root@nexus3 share]#
[root@nexus3 share]# cd dmw/
[root@nexus3 dmw]# ls
index.html
[root@nexus3 dmw]# ls
index.html
[root@nexus3 dmw]# vim sonar-project.properties
[root@nexus3 dmw]#
[root@nexus3 dmw]#
[root@nexus3 dmw]# vim sonar-project.properties
[root@nexus3 dmw]# ls
index.html  sonar-project.properties
[root@nexus3 dmw]# cat sonar-project.properties
# Required metadata
sonar.projectKey=test-lixie-python
sonar.projectName=test-lixie-python
sonar.projectVersion=v1.1

# Comma-separated paths to directories with sources (required)
sonar.sources=src
sonar.login=b6faa970d9e1f513cbdd114b330043f475b68c38

# Language
sonar.language=py

# Encoding of the source files
sonar.sourceEncoding=UTF-8
[root@nexus3 dmw]#
[root@nexus3 dmw]#
[root@nexus3 dmw]# ls
index.html  sonar-project.properties
[root@nexus3 dmw]#
[root@nexus3 dmw]# mkdir src
[root@nexus3 dmw]# cd src/
[root@nexus3 src]# ls
[root@nexus3 src]# vim py.py
[root@nexus3 src]# python py.py
linux
[root@nexus3 src]# vim py.py
[root@nexus3 src]#
[root@nexus3 src]# python py.py
Traceback (most recent call last):
  File "py.py", line 2, in <module>
    print linux
NameError: name 'linux' is not defined
[root@nexus3 dmw]# git add .
[root@nexus3 dmw]# git commit -m "linux python"
[dev 5e9813b] linux python
 2 files changed, 16 insertions(+)
 create mode 100644 sonar-project.properties
 create mode 100644 src/py.py
[root@nexus3 dmw]#
[root@nexus3 dmw]# git push
warning: push.default 未设置,它的默认值将会在 Git 2.0 由 'matching'
修改为 'simple'。若要不再显示本信息并在其默认值改变后维持当前使用习惯,
进行如下设置:

  git config --global push.default matching

若要不再显示本信息并从现在开始采用新的使用习惯,设置:

  git config --global push.default simple

参见 'git help config' 并查找 'push.default' 以获取更多信息。
('simple' 模式由 Git 1.7.11 版本引入。如果您有时要使用老版本的 Git,
为保持兼容,请用 'current' 代替 'simple' 模式)

Username for 'http://192.168.8.40': xiaoli
Password for 'http://xiaoli@192.168.8.40':
Counting objects: 6, done.
Delta compression using up to 4 threads.
Compressing objects: 100% (3/3), done.
Writing objects: 100% (5/5), 613 bytes | 0 bytes/s, done.
Total 5 (delta 0), reused 0 (delta 0)
remote:
remote: To create a merge request for dev, visit:
remote:   http://10.10.10.11/share/dmw/merge_requests/new?merge_request%5Bsource_branch%5D=dev
remote:
To http://192.168.8.40/share/dmw.git
   7e0efb7..5e9813b  dev -> dev
案例三:手动实现代码扫描
[root@nexus3 python-sonar-runner]# pwd
/data/sonar-examples-master/projects/languages/python/python-sonar-runner
[root@nexus3 python-sonar-runner]# /usr/local/sonar-scanner/bin/sonar-scanner
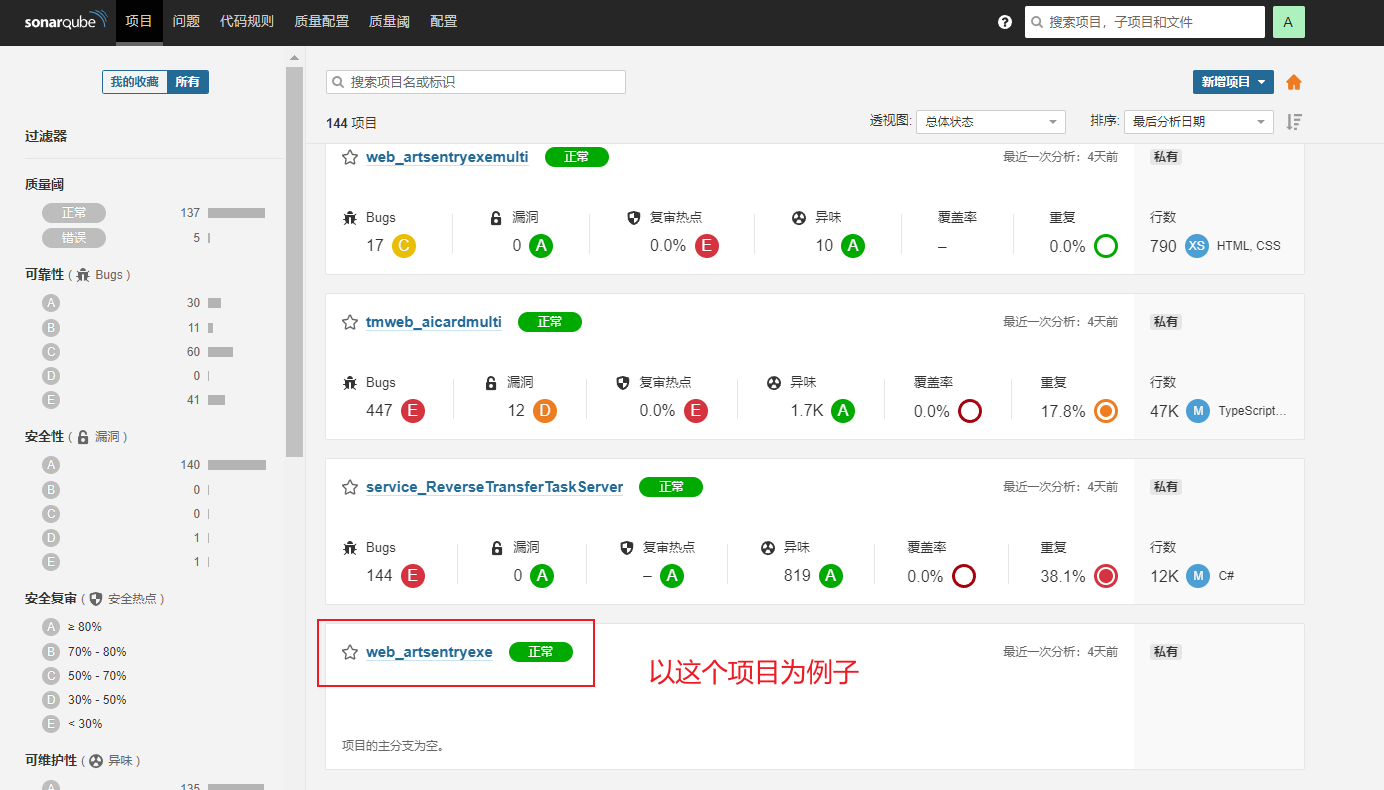
案例四:删除项目
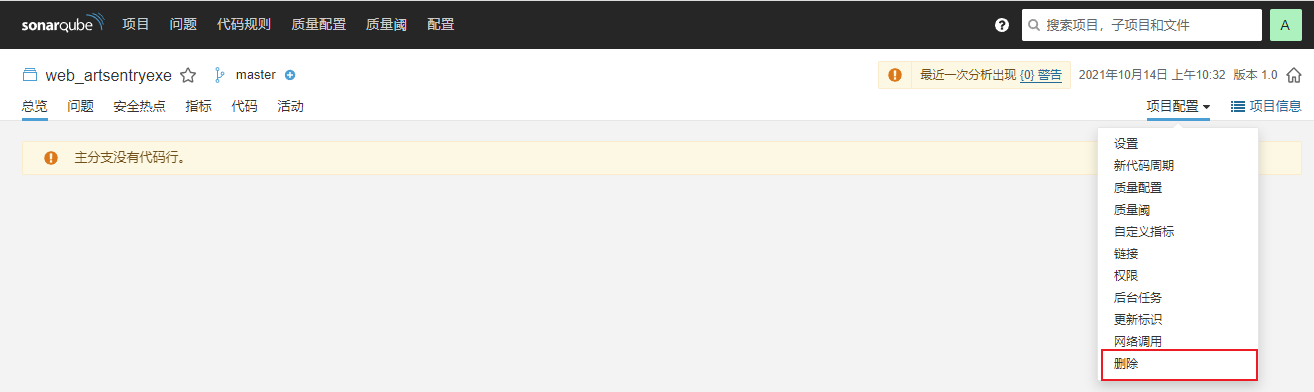
删除某个项目,以下面的为例
点击项目配置,这样就删除了
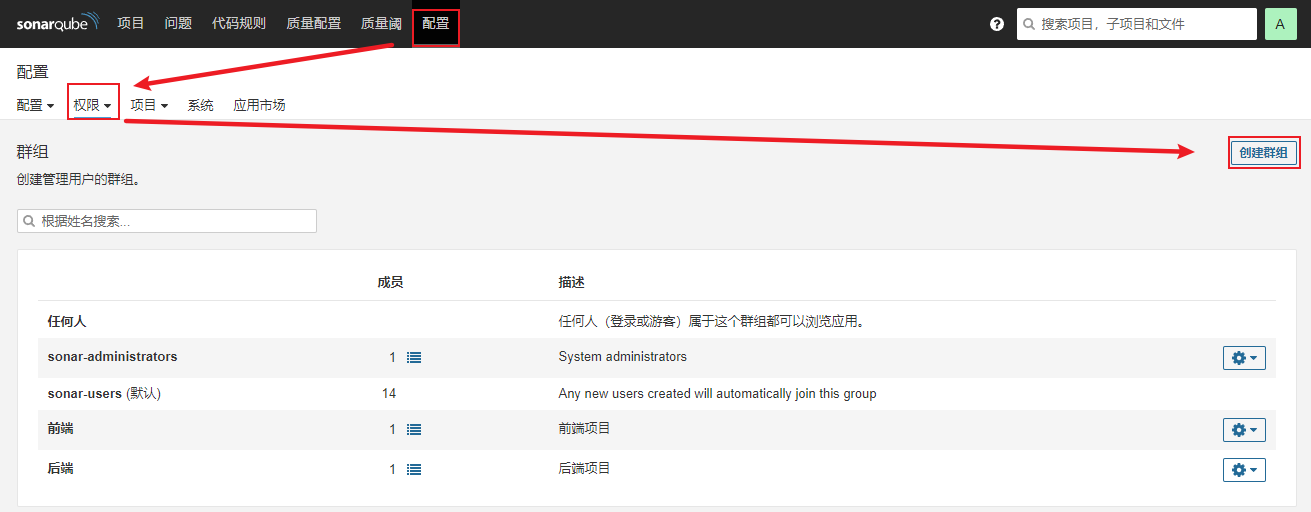
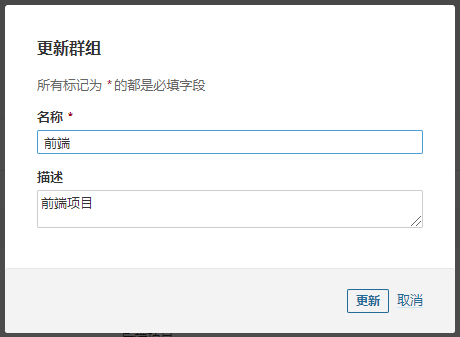
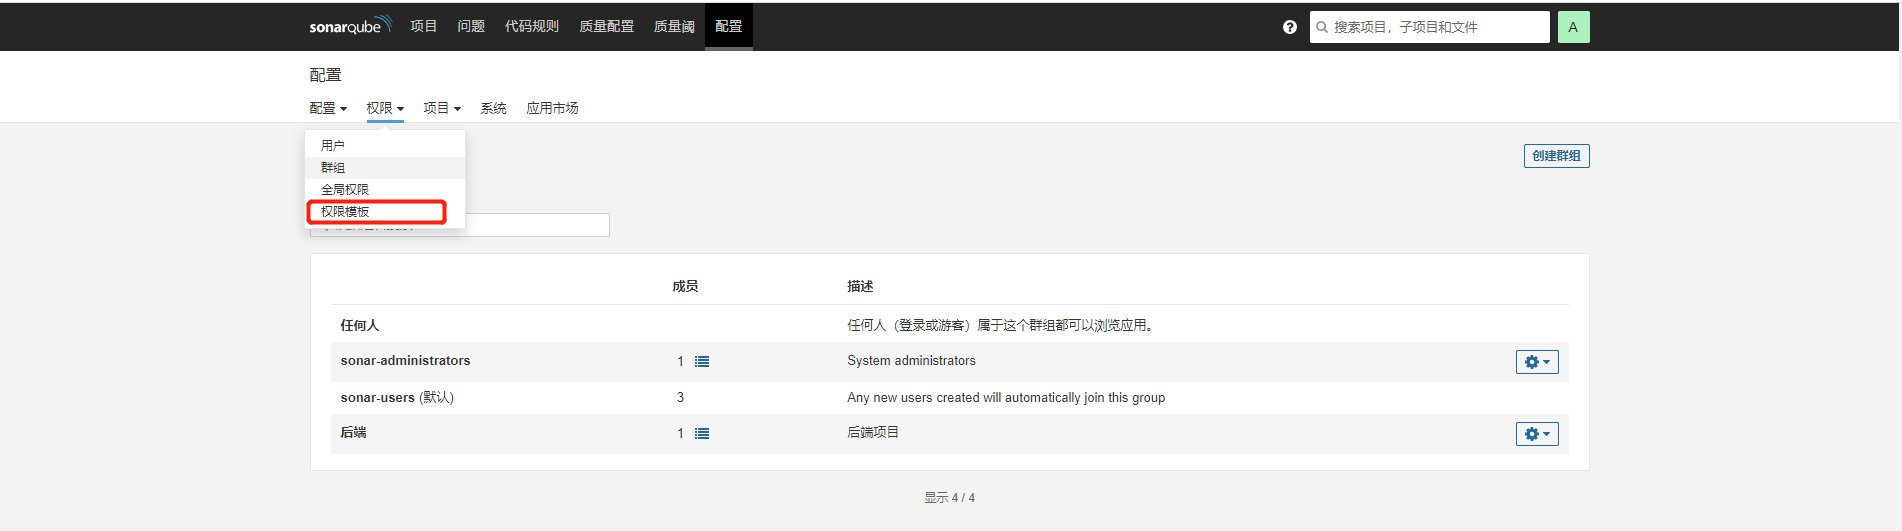
案例五:配置权限管理
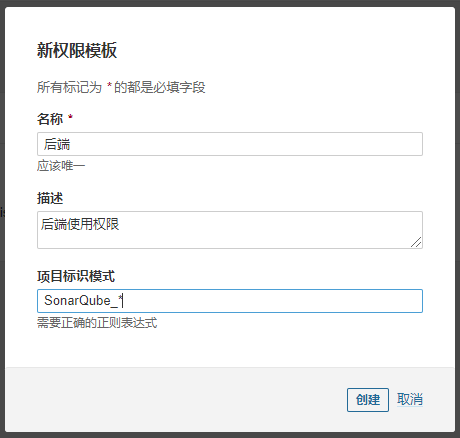
配置——>权限——>创建群组

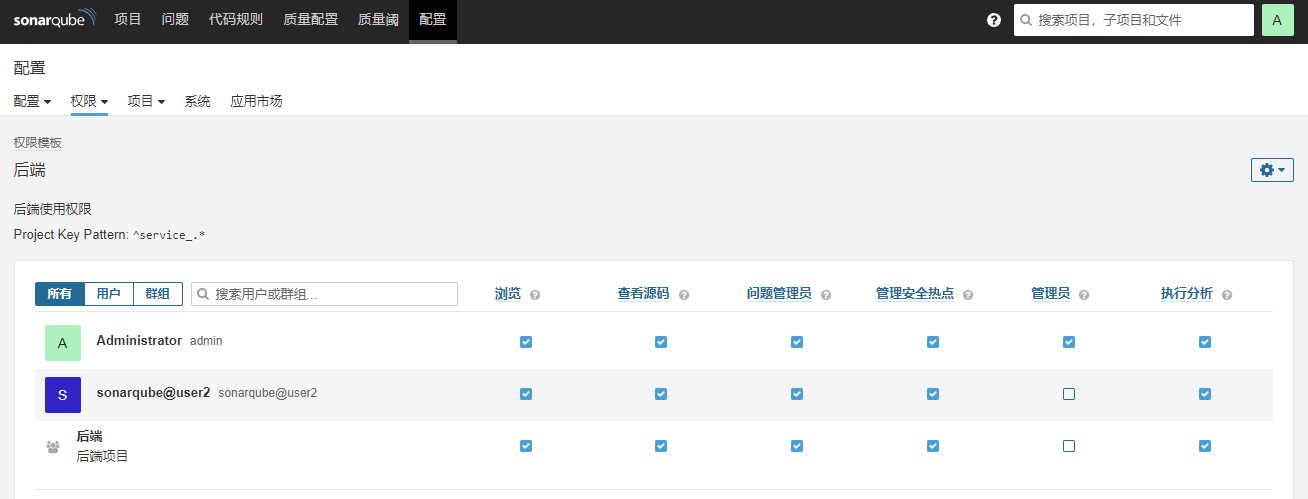
修改权限模板

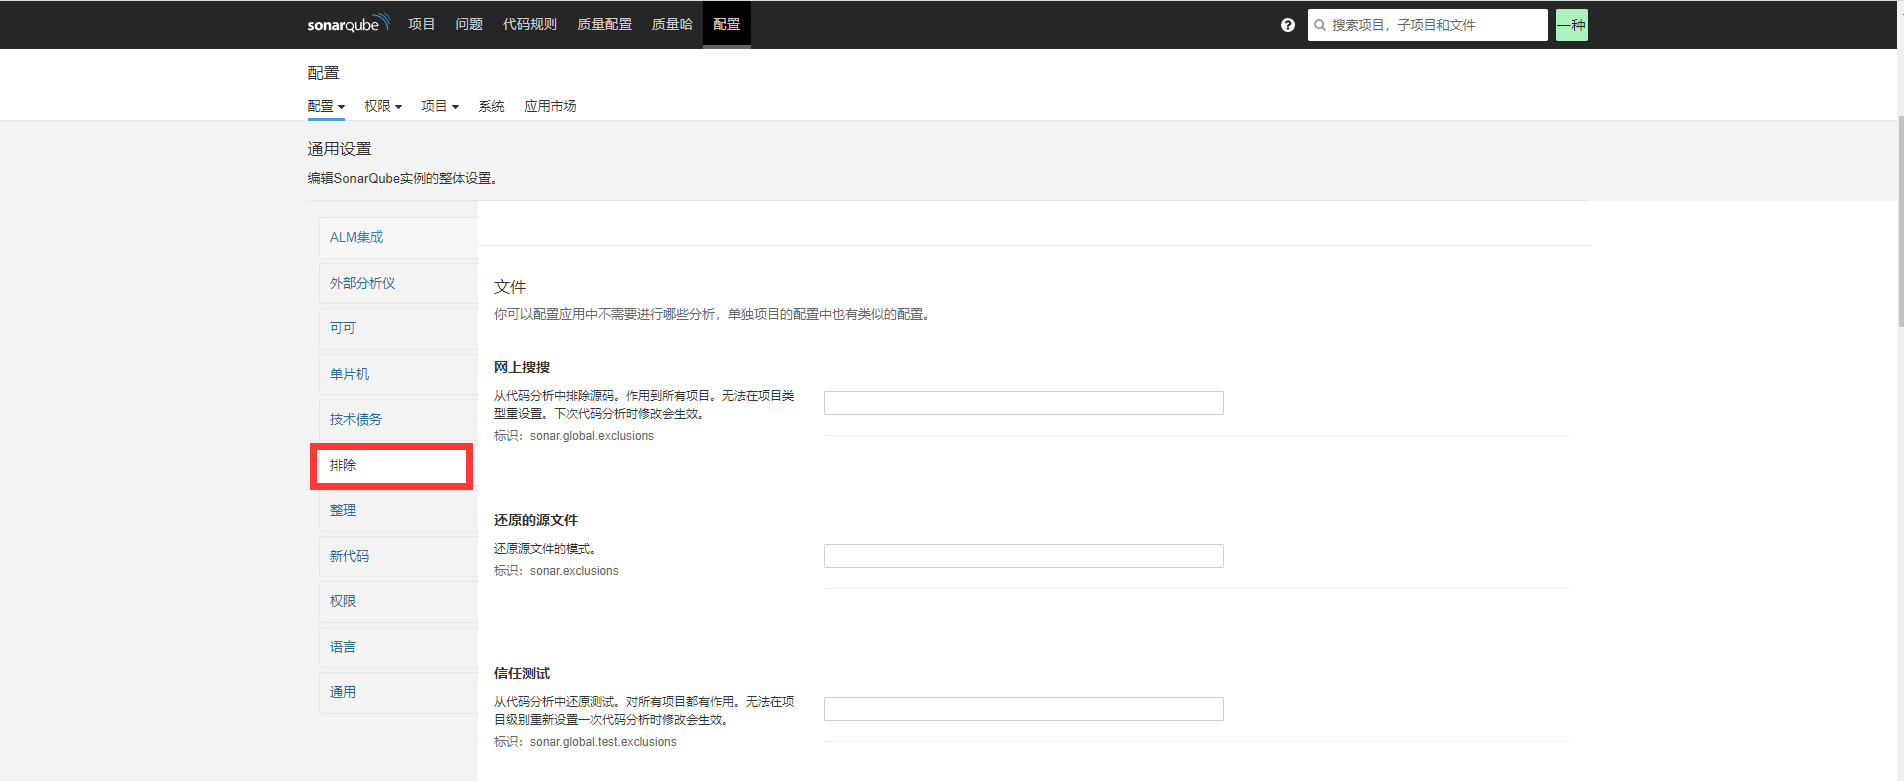
排除某个单独的目录不进行扫描(配置——排除)

案例六:创建用户

案例七: 制作docker版扫描客户端(前后端)
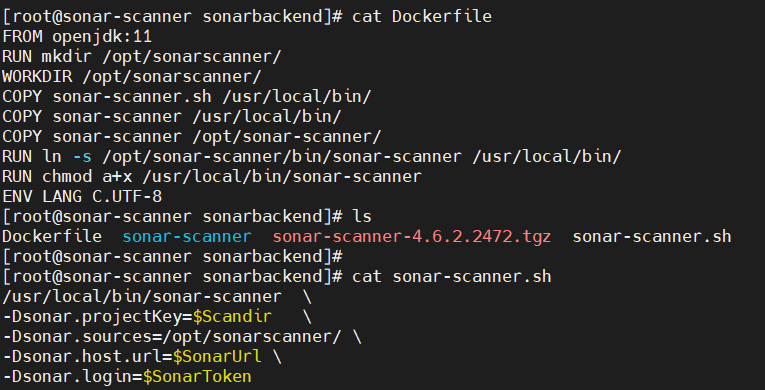
前端:
[root@sonar-scanner sonarbackend]# cat Dockerfile
FROM openjdk:11
RUN mkdir /opt/sonarscanner/
WORKDIR /opt/sonarscanner/
COPY sonar-scanner.sh /usr/local/bin/
COPY sonar-scanner /usr/local/bin/
COPY sonar-scanner /opt/sonar-scanner/
RUN ln -s /opt/sonar-scanner/bin/sonar-scanner /usr/local/bin/
RUN chmod a+x /usr/local/bin/sonar-scanner
ENV LANG C.UTF-8
[root@sonar-scanner sonarbackend]# ls
Dockerfile  sonar-scanner  sonar-scanner-4.6.2.2472.tgz  sonar-scanner.sh
[root@sonar-scanner sonarbackend]#
[root@sonar-scanner sonarbackend]# cat sonar-scanner.sh
/usr/local/bin/sonar-scanner  \
-Dsonar.projectKey=$Scandir   \
-Dsonar.sources=/opt/sonarscanner/ \
-Dsonar.host.url=$SonarUrl \
-Dsonar.login=$SonarToken

docker build . -t reg.hexfuture.com/dotnet/sonarscanner-frontend:1.0.4
截图如下:
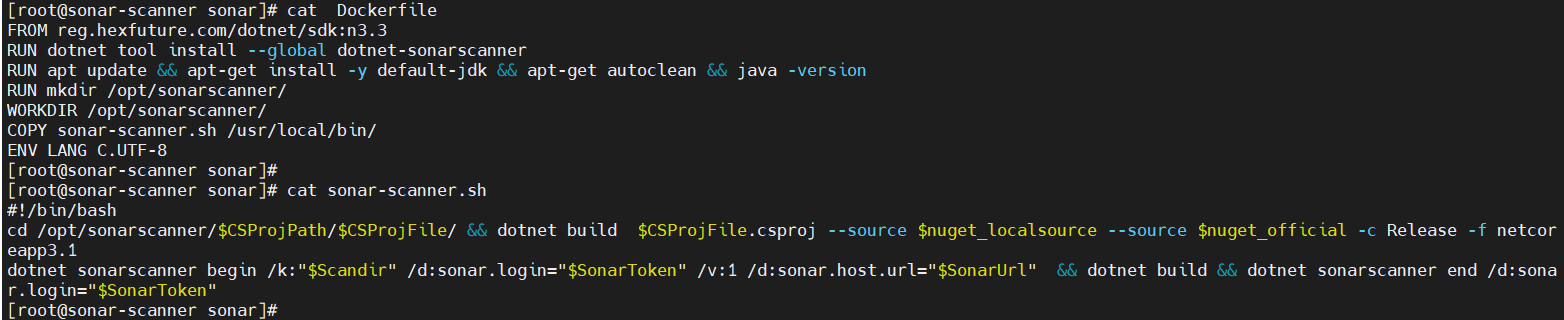
后端:
[root@sonar-scanner sonar]# cat  Dockerfile
FROM reg.hexfuture.com/dotnet/sdk:n3.3
RUN dotnet tool install --global dotnet-sonarscanner
RUN apt update && apt-get install -y default-jdk && apt-get autoclean && java -version
RUN mkdir /opt/sonarscanner/
WORKDIR /opt/sonarscanner/
COPY sonar-scanner.sh /usr/local/bin/
ENV LANG C.UTF-8
[root@sonar-scanner sonar]#
[root@sonar-scanner sonar]# cat sonar-scanner.sh
#!/bin/bash
cd /opt/sonarscanner/$CSProjPath/$CSProjFile/ && dotnet build  $CSProjFile.csproj --source $nuget_localsource --source $nuget_official -c Release -f netcoreapp3.1
dotnet sonarscanner begin /k:"$Scandir" /d:sonar.login="$SonarToken" /v:1 /d:sonar.host.url="$SonarUrl"  && dotnet build && dotnet sonarscanner end /d:sonar.login="$SonarToken"

 docker build . -t reg.hexfuture.com/dotnet/sonarscanner:n3.3
截图如下:
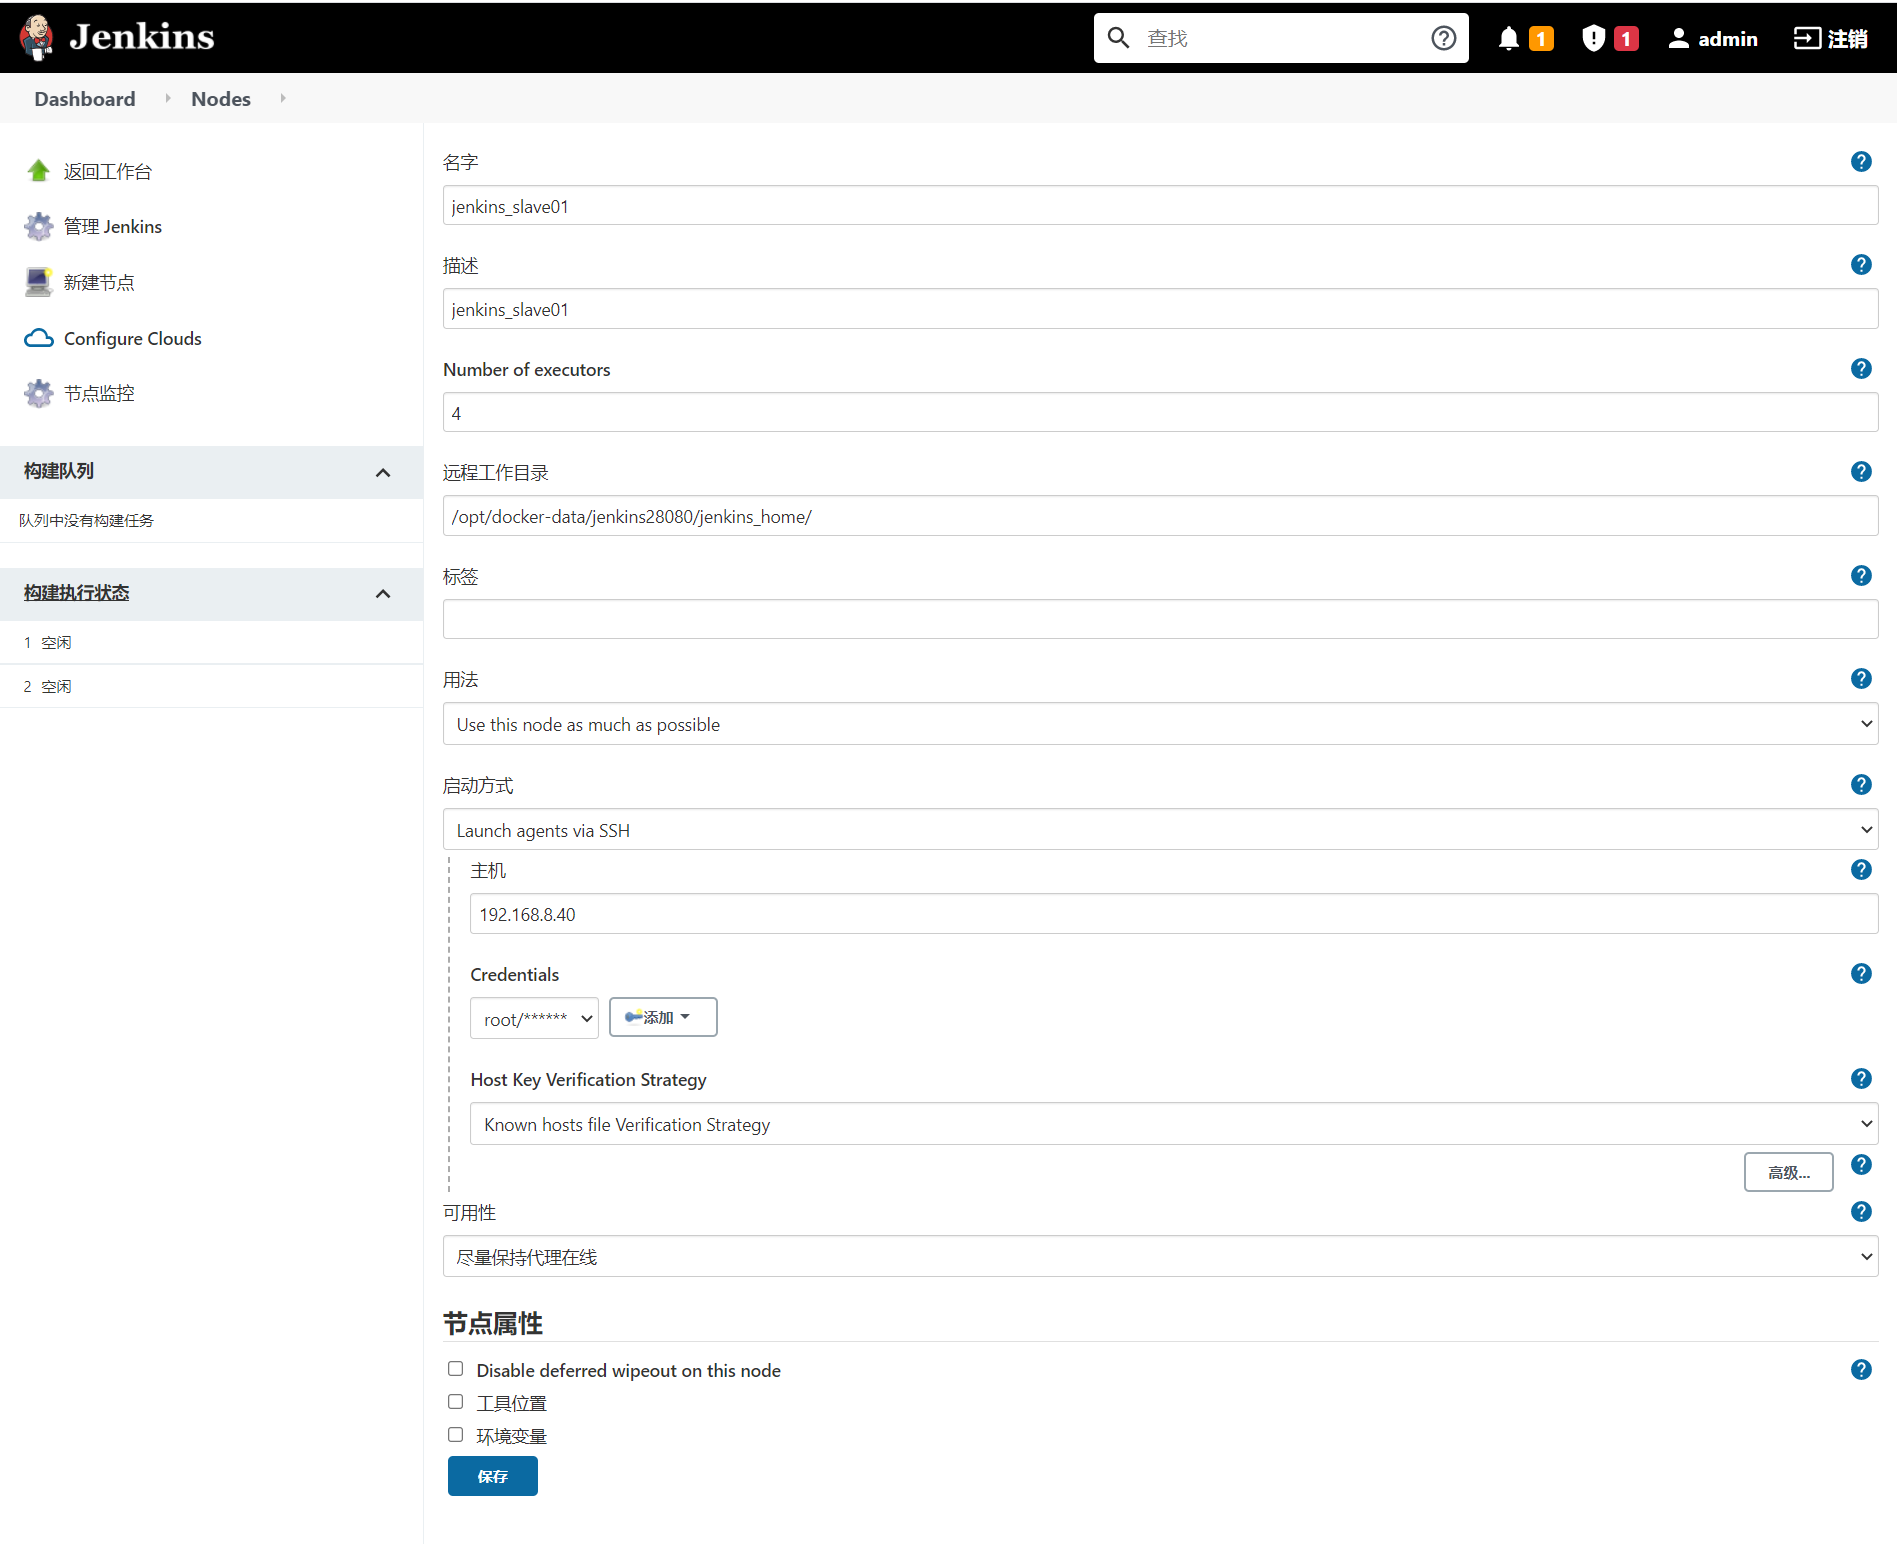
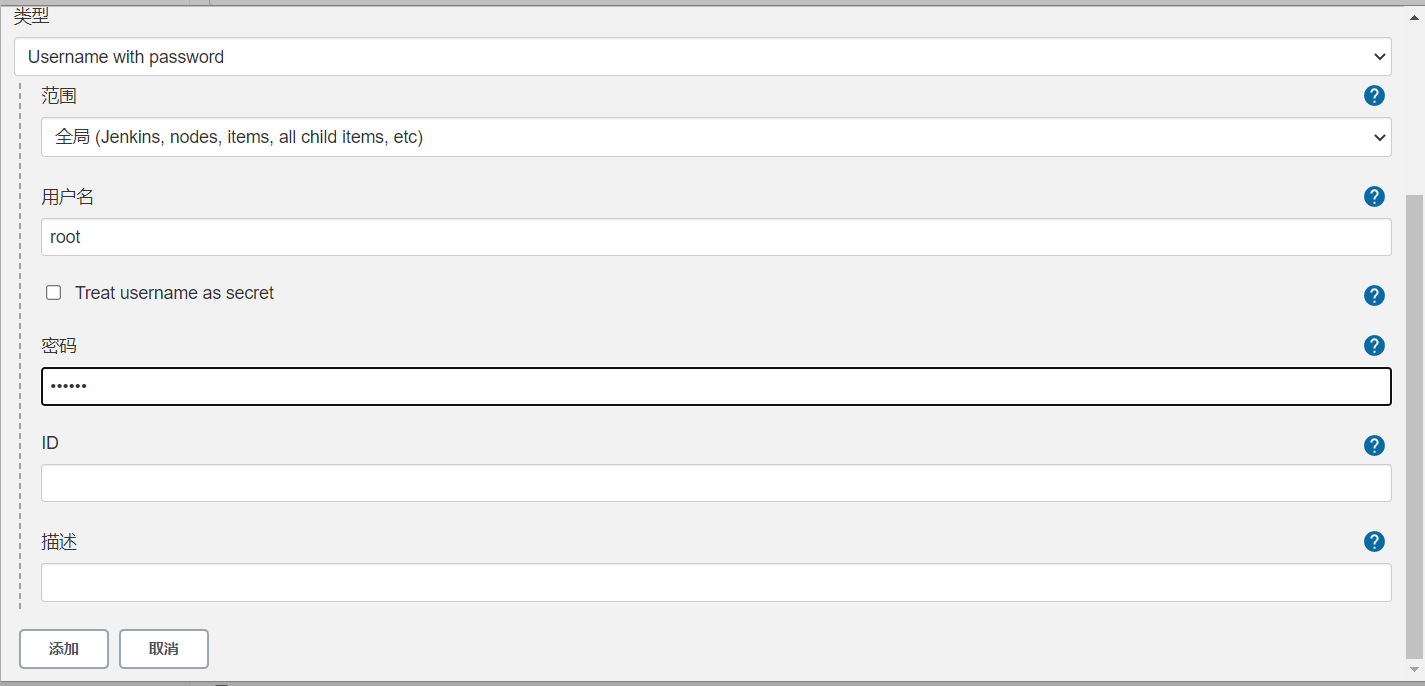
前端Jenkins配置: (示例一)

扫描配置:
SonarToken=8523c52e6a6d3e637d3259506f6c028c15387e65:Scandir=web_beike

docker login -u $dockerUser -p $dockerPwd reg.hexfuture.com
docker pull reg.hexfuture.com/dotnet/sonarscanner-frontend:1.0.5
pwd
ls
docker run --rm -v /usr/local/src/workspace/$JOB_NAME/:/opt/sonarscanner/ \
--env Scandir=$Scandir \
--env SonarToken=$SonarToken \
--env SonarUrl=$SonarUrl \
reg.hexfuture.com/dotnet/sonarscanner-frontend:1.0.5 \
/bin/bash /usr/local/bin/sonar-scanner.sh
后端Jenkins配置:(示例二)
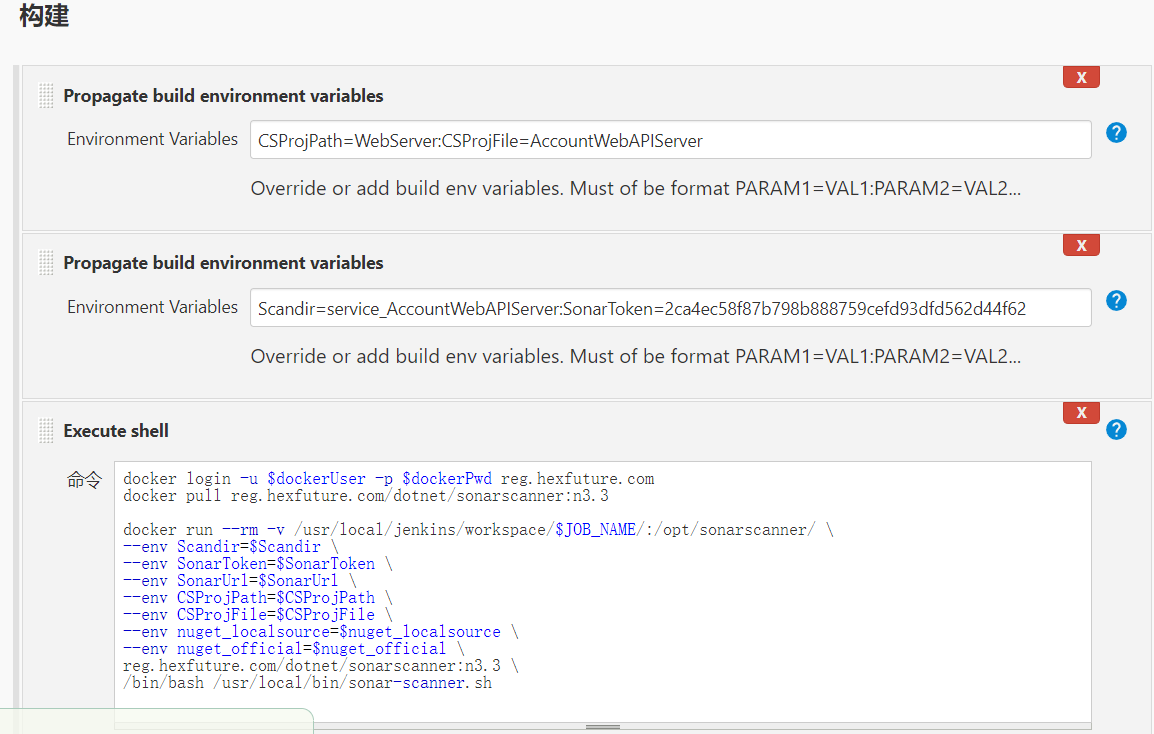
扫描配置:
CSProjPath=WebServer:CSProjFile=AccountWebAPIServer

Scandir=service_AccountWebAPIServer:SonarToken=2ca4ec58f87b798b888759cefd93dfd562d44f62

docker login -u $dockerUser -p $dockerPwd reg.hexfuture.com
docker pull reg.hexfuture.com/dotnet/sonarscanner:n3.3

docker run --rm -v /usr/local/jenkins/workspace/$JOB_NAME/:/opt/sonarscanner/ \
--env Scandir=$Scandir \
--env SonarToken=$SonarToken \
--env SonarUrl=$SonarUrl \
--env CSProjPath=$CSProjPath \
--env CSProjFile=$CSProjFile \
--env nuget_localsource=$nuget_localsource \
--env nuget_official=$nuget_official \
reg.hexfuture.com/dotnet/sonarscanner:n3.3 \
/bin/bash /usr/local/bin/sonar-scanner.sh
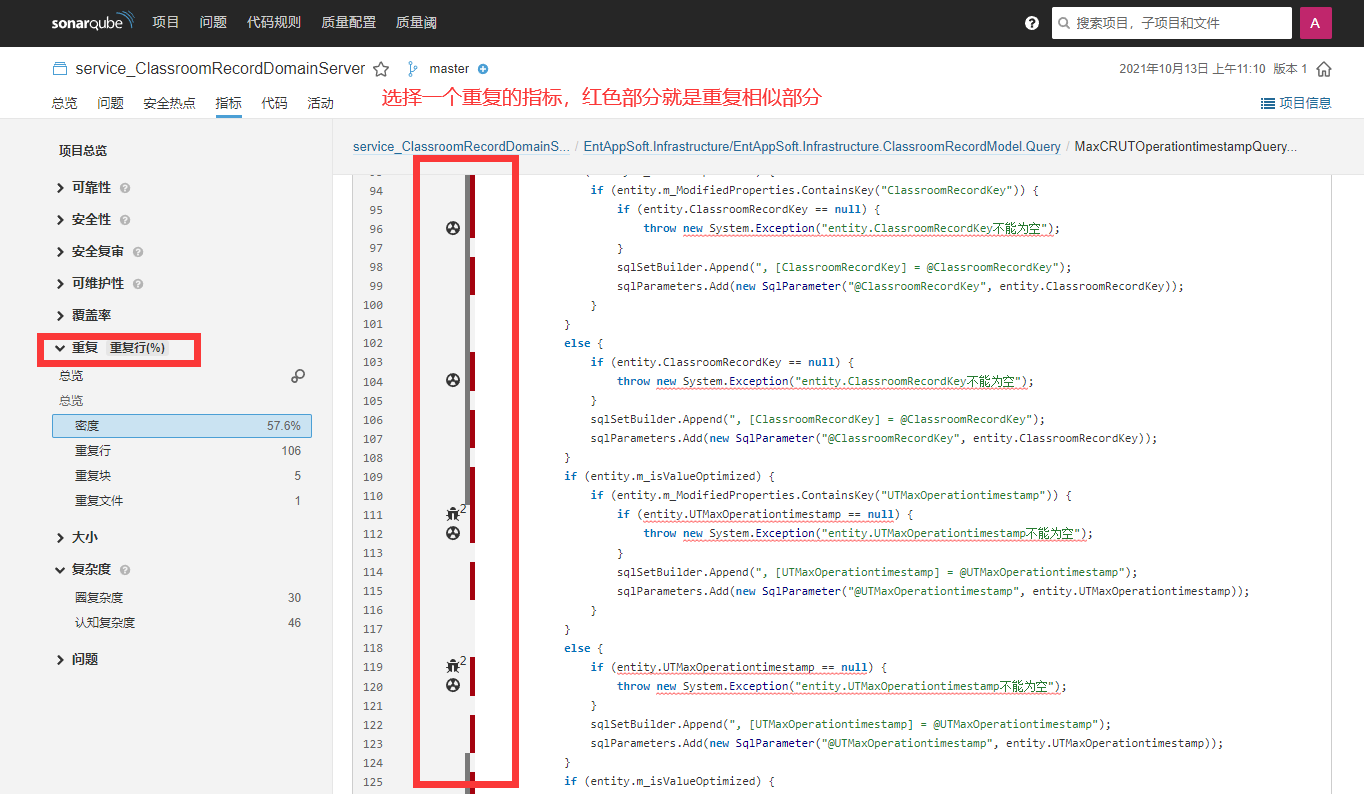
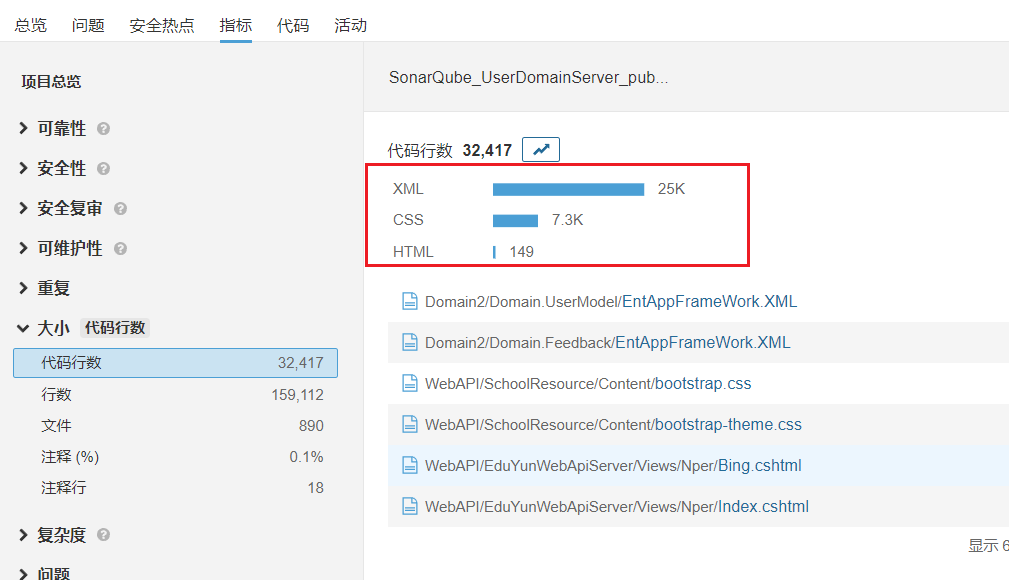
案例八:研发使用技巧
部署报错问题:
问题一:
1、检测代码类型为C#,但是扫描下来的结果却没有显示
解决方法:
dotnet sonarscanner begin /k:"SonarQubeCourseDomainServerPublish" /d:sonar.login="c4a35de102f338a814307adc552db8cbfaacf39e" /v:1 /d:sonar.host.url="http://192.168.8.30:9000"
dotnet build
dotnet sonarscanner end /d:sonar.login="c4a35de102f338a814307adc552db8cbfaacf39e"


dotnet tool install --global dotnet-sonarscanner


提示找不到dotnet sonar....  的命令  加到环境变量里就行
export PATH="$PATH:/root/.dotnet/tools"
问题二:
名称: SonarQube_AccountDomainServer_Publish


workdir=SonarQube_CenterShareWebApiServer_publish

cat << EOF >> /usr/local/jenkins/workspace/$workdir/sonar-scanner1.sh
#!/bin/bash
cd /opt/$workdir/$CSProjPath/$CSProjFile/ && dotnet publish $CSProjFile.csproj --source $nuget_localsource --source $nuget_official -c Release -f netcoreapp3.1
cd /opt/$workdir/$CSProjPath/$CSProjFile/$BINPATH3/publish/
#dotnet $CSProjFile.dll
EOF


cat << EOF >> /usr/local/jenkins/workspace/$workdir/sonar-scanner2.sh
#!/bin/bash
cd /opt/$workdir/$CSProjPath/$CSProjFile/ && dotnet build  $CSProjFile.csproj --source $nuget_localsource --source $nuget_official -c Release -f netcoreapp3.1
dotnet sonarscanner begin /k:"$workdir" /d:sonar.login="c4a35de102f338a814307adc552db8cbfaacf39e" /v:1 /d:sonar.host.url="http://192.168.8.30:9000"  && dotnet build && dotnet sonarscanner end /d:sonar.login="c4a35de102f338a814307adc552db8cbfaacf39e"
EOF

chmod a+x /usr/local/jenkins/workspace/$workdir/sonar-scanner1.sh
chmod a+x /usr/local/jenkins/workspace/$workdir/sonar-scanner2.sh

scp -r /usr/local/jenkins/workspace/$workdir root@192.168.8.33:/opt/
#ssh root@192.168.8.33 "/opt/$workdir/sonar-scanner1.sh"
ssh root@192.168.8.33 "/opt/$workdir/sonar-scanner2.sh"


#前端扫描 (脚本):
workdir=sonarqube_htestatic

cat  << EOF >> /usr/local/src/workspace/$workdir/sonar-project.properties
# Required metadata
sonar.projectKey=$workdir
sonar.projectName=$workdir
sonar.projectVersion=1.0

# Comma-separated paths to directories with sources (required)
sonar.sources=./
sonar.login=8523c52e6a6d3e637d3259506f6c028c15387e65

# Language
sonar.language=js

# Encoding of the source files
sonar.sourceEncoding=UTF-8

EOF

scp -r /usr/local/src/workspace/$workdir root@192.168.8.33:/opt/
ssh root@192.168.8.33 "cd /opt/$workdir && sonar-scanner"

改版:


==========================================================================================
#后端扫描 (脚本):
workdir=sonarscanner_CenterShareWebApiServer

cat << EOF >> /usr/local/jenkins/workspace/$workdir/sonar-scanner1.sh
#!/bin/bash
cd /opt/$workdir/$CSProjPath/$CSProjFile/ && dotnet publish $CSProjFile.csproj --source $nuget_localsource --source $nuget_official -c Release -f netcoreapp3.1
cd /opt/$workdir/$CSProjPath/$CSProjFile/$BINPATH3/publish/
#dotnet $CSProjFile.dll
EOF


cat << EOF >> /usr/local/jenkins/workspace/$workdir/sonar-scanner2.sh
#!/bin/bash
cd /opt/$workdir/$CSProjPath/$CSProjFile/ && dotnet build  $CSProjFile.csproj --source $nuget_localsource --source $nuget_official -c Release -f netcoreapp3.1
dotnet sonarscanner begin /k:"$workdir" /d:sonar.login="c4a35de102f338a814307adc552db8cbfaacf39e" /v:1 /d:sonar.host.url="http://192.168.8.30:9000"  && dotnet build && dotnet sonarscanner end /d:sonar.login="c4a35de102f338a814307adc552db8cbfaacf39e"
EOF

chmod a+x /usr/local/jenkins/workspace/$workdir/sonar-scanner1.sh
chmod a+x /usr/local/jenkins/workspace/$workdir/sonar-scanner2.sh

scp -r /usr/local/jenkins/workspace/$workdir root@192.168.8.33:/opt/
#ssh root@192.168.8.33 "/opt/$workdir/sonar-scanner1.sh"
ssh root@192.168.8.33 "/opt/$workdir/sonar-scanner2.sh"

改版:
workdir=sonarscanner_CoursewareSubsServer
scandir=service_CoursewareSubsServer

cat << EOF >> /usr/local/jenkins/workspace/$workdir/sonar-scanner2.sh
#!/bin/bash
cd /opt/$workdir/$CSProjPath/$CSProjFile/ && dotnet build  $CSProjFile.csproj --source $nuget_localsource --source $nuget_official -c Release -f netcoreapp3.1
dotnet sonarscanner begin /k:"$scandir" /d:sonar.login="c4a35de102f338a814307adc552db8cbfaacf39e" /v:1 /d:sonar.host.url="http://192.168.8.30:9000"  && dotnet build && dotnet sonarscanner end /d:sonar.login="c4a35de102f338a814307adc552db8cbfaacf39e"
EOF

chmod a+x /usr/local/jenkins/workspace/$workdir/sonar-scanner2.sh

scp -r /usr/local/jenkins/workspace/$workdir root@192.168.8.33:/opt/
ssh root@192.168.8.33 "/opt/$workdir/sonar-scanner2.sh"
参考文章:
https://help.sonatype.com/repomanager3
https://blog.csdn.net/luckydog612/article/details/118408874
https://my.oschina.net/u/4406727/blog/3256543

 浙公网安备 33010602011771号