springboot定时任务
第一步:在启动类上添加@EnableScheduling注解开启生效,自动扫描。
第二步:在任务类上添加@Component被容器扫描。
第三步:在定时方法上添加@Scheduled()定时执行,有两种方式,fixedRate和cron表达式。
具体如下:
启动类
import org.springframework.boot.SpringApplication;
import org.springframework.boot.autoconfigure.SpringBootApplication;
import org.springframework.context.annotation.ComponentScan;
import org.springframework.scheduling.annotation.EnableAsync;
import org.springframework.scheduling.annotation.EnableScheduling;

@EnableScheduling  //开启对定时任务的支持
@EnableAsync  //开启异步事件支持
@ComponentScan(basePackages = "com.spring")  //扫描指定包的注解
@SpringBootApplication
public class TestspringbootApplication {

    public static void main(String[] args) {
        SpringApplication.run(TestspringbootApplication.class, args);
    }

}
定时任务类
import org.springframework.scheduling.annotation.Scheduled;
import org.springframework.stereotype.Component;

@Component
public class TestCronConfig {
    //2秒一次
    @Scheduled(fixedRate=2000)
    private void test(){
        System.out.println("test");
    }
    //5秒一次,具体查看cron表达式
    @Scheduled(cron = "0/5 * * * * *")
    private void test1(){
        System.out.println("test1");
    }
//    @Scheduled(cron = "${cron.heart}")
    //定时任务如果不启动,删除配置文件的配置即可,方法改为 @Scheduled(cron = "${cron.heart:-}")
    @Scheduled(cron = "${cron.heart:-}")
    public void test2() {
        System.out.println("test2");
    }
}
配置文件
server: port: 9999 cron: heart: 0/5 * * * * ?
方式二: 使用多线程执行定时器
在方法被调用的时候按照设置的时间执行一次。
第一步:定义线程池
import org.springframework.context.annotation.Bean; import org.springframework.context.annotation.Configuration; import org.springframework.scheduling.annotation.EnableAsync; import org.springframework.scheduling.concurrent.ThreadPoolTaskExecutor; import java.util.concurrent.Executor; /** * 定义线程池(使用 @EnableAsync 开启异步事件的支持) */ @Configuration @EnableAsync public class TestAsyConfig { /** * 此处成员变量应该使用@Value从配置中读取 */ private int corePoolSize = 10; private int maxPoolSize = 200; private int queueCapacity = 10; private Integer time = 0; @Bean("taskExecutor") public Executor taskExecutor() { ThreadPoolTaskExecutor executor = new ThreadPoolTaskExecutor(); executor.setCorePoolSize(corePoolSize); executor.setMaxPoolSize(maxPoolSize); executor.setQueueCapacity(queueCapacity); executor.initialize(); return executor; } }
第二步:使用线程池定义需要执行的任务
import org.slf4j.Logger; import org.slf4j.LoggerFactory; import org.springframework.scheduling.annotation.Async; import org.springframework.scheduling.annotation.Scheduled; import org.springframework.stereotype.Service; /** * 使用线程池定义需要执行的任务(使用@Service标注对应的类,使用@Async 开启线程支持 ,“taskExecutor” 为线程bean 的ID */ @Service public class TestAsyncService { Logger log = LoggerFactory.getLogger(TestAsyncService.class); @Async("taskExecutor") @Scheduled(cron = "*/10 * * * * ?") public void service1() throws InterruptedException { log.info("--------start-service1------------"); Thread.sleep(5000); // 模拟耗时 log.info("--------end-service1------------"); } @Async("taskExecutor") @Scheduled(cron = "*/5 * * * * ?") public void service2() throws InterruptedException { log.info("--------start-service2------------"); Thread.sleep(2000); // 模拟耗时 log.info("--------end-service2------------"); } }
第三步:调用 第二步定义的任务
import com.spring.testspringboot.service.TestAsyncService; import org.springframework.beans.factory.annotation.Autowired; import org.springframework.web.bind.annotation.GetMapping; import org.springframework.web.bind.annotation.RestController; @RestController public class TestController { @Autowired private TestAsyncService testAsyncService; @GetMapping("/") public void test(){ try { testAsyncService.service1(); } catch (InterruptedException e) { e.printStackTrace(); } } }
自定义CompleteScheduleConfig 继承 SchedulingConfigurer;在启动类上添加@EnableScheduling注解开启生效,自动扫描。
注意:需要添加 @Component 注解
import org.springframework.scheduling.annotation.SchedulingConfigurer; import org.springframework.scheduling.config.ScheduledTaskRegistrar; import org.springframework.scheduling.support.CronTrigger; import org.springframework.stereotype.Component; import java.time.LocalDateTime; /** * @Author liwinallucky * @Date 2022/7/6 11:26 */ @Component public class CompleteScheduleConfig implements SchedulingConfigurer { /** * 执行定时任务. */ @Override public void configureTasks(ScheduledTaskRegistrar taskRegistrar) { //设置corn表达式,后续配置在数据库中查询出来 String cron = "*/6 * * * * ?"; taskRegistrar.addTriggerTask( //1.添加任务内容(Runnable) () -> { System.out.println("定时任务执行,时间为 :" + LocalDateTime.now().toLocalTime()); }, //2.设置定时时间 triggerContext -> { //2.2 合法性校验. if (cron != null) { //填写异常处理代码 } //2.3 返回执行周期(Date) return new CronTrigger(cron).nextExecutionTime(triggerContext); } ); } }
方式四:使用ThreadPoolTaskScheduler实现调用启动
利用线程池任务调度实现调用开启。
import org.springframework.boot.SpringApplication;
import org.springframework.boot.autoconfigure.SpringBootApplication;
import org.springframework.context.annotation.Bean;
import org.springframework.context.annotation.ComponentScan;
import org.springframework.scheduling.concurrent.ThreadPoolTaskScheduler;

import java.util.concurrent.ConcurrentHashMap;
import java.util.concurrent.ScheduledFuture;

@ComponentScan(basePackages = "study")   //扫描指定包的注解
@SpringBootApplication
public class ThreadPoolApplication {
    // 线程存储器
    public static ConcurrentHashMap<String, ScheduledFuture> map = new ConcurrentHashMap<String, ScheduledFuture>();

    public static void main(String[] args) {
        SpringApplication.run(ThreadPoolApplication.class, args);
    }

    @Bean
    public ThreadPoolTaskScheduler threadPoolTaskScheduler() {
        ThreadPoolTaskScheduler executor = new ThreadPoolTaskScheduler();
        //线程池的线程总数
        executor.setPoolSize(20);
        //线程名前缀
        executor.setThreadNamePrefix("taskExecutor-");
        executor.setWaitForTasksToCompleteOnShutdown(true);
        executor.setAwaitTerminationSeconds(60);
        return executor;
    }

}
2. service开启关闭类
在service中用ThreadPoolTaskScheduler开启定时任务。
import org.springframework.beans.factory.annotation.Autowired;
import org.springframework.scheduling.concurrent.ThreadPoolTaskScheduler;
import org.springframework.scheduling.support.CronTrigger;
import org.springframework.stereotype.Component;
import study.canal.cron.ThreadPoolApplication;

import java.text.SimpleDateFormat;
import java.util.Date;
import java.util.concurrent.ScheduledFuture;

/**
 * 启动关闭程序
 */
@Component
public class TestServiceImpl {
    @Autowired
    private ThreadPoolTaskScheduler threadPoolTaskScheduler;

    private ScheduledFuture<?> future;

    /**
     * 开启定时器
     * @param value
     */
    public void start(String value){
        System.out.println(value);
        String name = Thread.currentThread().getName();
        future = threadPoolTaskScheduler.schedule(new myTask(),new CronTrigger("0/1 * * * * ?"));
        ThreadPoolApplication.map.put(name, future);
    }

    //关闭定时任务
    public String stop() {
        //取出要关闭的定时器线程
        ScheduledFuture scheduledFuture = ThreadPoolApplication.map.get("http-nio-9999-exec-1");
        //将cancel设为true即为关闭
        scheduledFuture.cancel(true);
        // 查看任务是否在正常执行之前结束,正常true
        boolean cancelled = scheduledFuture.isCancelled();
        while (!cancelled) {
            scheduledFuture.cancel(true);
        }
        return "定时任务关闭成功!";
    }

    //定时任务跑的内容,可用构造器传参
    private class myTask implements Runnable {
        @Override
        public void run() {
            String name = Thread.currentThread().getName();
            System.out.println(name);
            System.out.println("test" + new SimpleDateFormat("yyyy-MM-dd HH:mm:ss").format(new Date()));
        }
    }
}
import org.springframework.beans.factory.annotation.Autowired;
import org.springframework.web.bind.annotation.GetMapping;
import org.springframework.web.bind.annotation.RestController;
import study.canal.cron.service.TestServiceImpl;

@RestController
public class AsyncController {

    @Autowired
    private TestServiceImpl testService;

    @GetMapping("/start")
    public void start(){
        testService.start("123");

    }
    @GetMapping("/stop")
    public void stop(){
        testService.stop();
    }
}
附录一:cron表达式
Cron表达式是一个字符串,字符串以5或6个空格隔开,分为6或7个域,每一个域代表一个含义,Cron有如下两种语法格式:
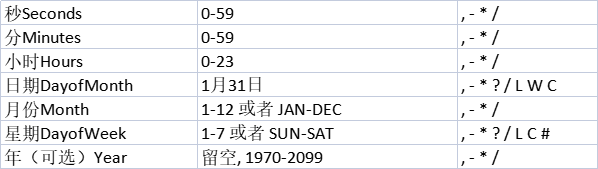
Seconds Minutes Hours DayofMonth Month DayofWeek Year (秒 分 小时 月份中的日期 月份 星期中的日期 年份)
或 Seconds Minutes Hours DayofMonth Month DayofWeek
每一个域可出现的字符如下:
注意事项:
每一个域都使用数字,但还可以出现如下特殊字符,它们的含义是:
(1)*:表示匹配该域的任意值。假如在Minutes域使用, 即表示每分钟都会触发事件。
(2)?:只能用在DayofMonth和DayofWeek两个域。它也匹配域的任意值,但实际不会。因为 DayofMonth和DayofWeek会相互影响。例如想在每月的20日触发调度,不管20日到底是星期几,则只能使用如下写法: 13 13 15 20 * ?, 其中最后一位只能用?,而不能使用*,如果使用*表示不管星期几都会触发,实际上并不是这样。
(3)-:表示范围。例如在Minutes域使用5-20,表示从5分到20分钟每分钟触发一次
(4)/:表示起始时间开始触发,然后每隔固定时间触发一次。例如在Minutes域使用5/20,则意味着5分钟触发一次,而25,45等分别触发一次.
(5),:表示列出枚举值。例如:在Minutes域使用5,20,则意味着在5和20分每分钟触发一次。
(6)L:表示最后,只能出现在DayofWeek和DayofMonth域。如果在DayofWeek域使用5L,意味着在最后的一个星期四触发。
(7)W:表示有效工作日(周一到周五),只能出现在DayofMonth域,系统将在离指定日期的最近的有效工作日触发事件。例如:在 DayofMonth使用5W,如果5日是星期六,则将在最近的工作日:星期五,即4日触发。如果5日是星期天,则在6日(周一)触发;如果5日在星期一到星期五中的一天,则就在5日触发。另外一点,W的最近寻找不会跨过月份 。
(8)LW:这两个字符可以连用,表示在某个月最后一个工作日,即最后一个星期五。
(9)#:用于确定每个月第几个星期几,只能出现在DayofMonth域。例如在4#2,表示某月的第二个星期三。
常用表达式例子
(1)0 0 2 1 * ? * 表示在每月的1日的凌晨2点调整任务
(2)0 15 10 ? * MON-FRI 表示周一到周五每天上午10:15执行作业
(3)0 15 10 ? 6L 2002-2006 表示2002-2006年的每个月的最后一个星期五上午10:15执行作
(4)0 0 10,14,16 * * ? 每天上午10点,下午2点,4点
(5)0 0/30 9-17 * * ? 朝九晚五工作时间内每半小时
(6)0 0 12 ? * WED 表示每个星期三中午12点
(7)0 0 12 * * ? 每天中午12点触发
(8)0 15 10 ? * * 每天上午10:15触发
(9)0 15 10 * * ? 每天上午10:15触发
(10)0 15 10 * * ? * 每天上午10:15触发
(11)0 15 10 * * ? 2005 2005年的每天上午10:15触发
(12)0 * 14 * * ? 在每天下午2点到下午2:59期间的每1分钟触发
(13)0 0/5 14 * * ? 在每天下午2点到下午2:55期间的每5分钟触发
(14)0 0/5 14,18 * * ? 在每天下午2点到2:55期间和下午6点到6:55期间的每5分钟触发
(15)0 0-5 14 * * ? 在每天下午2点到下午2:05期间的每1分钟触发
(16)0 10,44 14 ? 3 WED 每年三月的星期三的下午2:10和2:44触发
(17)0 15 10 ? * MON-FRI 周一至周五的上午10:15触发
(18)0 15 10 15 * ? 每月15日上午10:15触发
(19)0 15 10 L * ? 每月最后一日的上午10:15触发
(20)0 15 10 ? * 6L 每月的最后一个星期五上午10:15触发
(21)0 15 10 ? * 6L 2002-2005 2002年至2005年的每月的最后一个星期五上午10:15触发
(22)0 15 10 ? * 6#3 每月的第三个星期五上午10:15触发
在线cron表达式:
https://qqe2.com/cron

 浙公网安备 33010602011771号