SpringAll(1-12)
SpringAll
开启Spring Boot
Spring Boot是在Spring框架上创建的一个全新的框架,其设计目的是简化Spring应用的搭建和开发过程。
spring-boot-starter-parent指定了当前项目为一个Spring Boot项目,它提供了诸多的默认Maven依赖,具体可查看目录
需要说明的是,并非所有在
Spring Boot提供了许多开箱即用的依赖模块,这些模块都是以spring-boot-starter-XX命名的。比如要开启Spring Boot的web功能,只需要在pom.xml中配置spring-boot-starter-web即可:
因为其依赖于spring-boot-starter-parent,所以这里可以不用配置version。保存后Maven会自动帮我们下载spring-boot-starter-web模块所包含的jar文件。
依赖都是隐式依赖于spring-boot-starter-web,我们也可以手动排除一些我们不需要的依赖。
spring-boot-maven-plugin
spring-boot-maven-plugin为Spring Boot Maven插件,提供了:
-
把项目打包成一个可执行的超级JAR(uber-JAR),包括把应用程序的所有依赖打入JAR文件内,并为JAR添加一个描述文件,其中的内容能让你用java -jar来运行应用程序。
-
搜索public static void main()方法来标记为可运行类。
Spring Boot一些基础配置
全局配置文件
Spring Boot提供了一个名为application.properties的全局配置文件,可对一些默认配置的配置值进行修改
Bean通过@Value("${属性名}")加载配置文件中的属性值
@Autowired
- 自定义属性值
在属性非常多的情况下,也可以定义一个和配置文件对应的Bean:
通过注解@ConfigurationProperties(prefix="mrbird.blog")指明了属性的通用前缀,通用前缀加属性名和配置文件的属性名一一对应。
在Spring Boot入口类加上注解@EnableConfigurationProperties({ConfigBean.class})来启用该配置:
之后便可在IndexController中注入该Bean,并使用了:
Profile配置
多环境配置文件必须以application-{profile}.properties的格式命,其中{profile}为环境标识。比如定义两个配置文件:
application-dev.properties:开发环境
application-prod.properties:生产环境
至于哪个具体的配置文件会被加载,需要在application.properties文件中通过spring.profiles.active属性来设置,其值对应{profile}值。
Spring Boot中使用MyBatis
引入mybatis-spring-boot-starter和数据库连接驱动
mybatis-spring-boot-starter
将ojdbc6.jar依赖安装到本地的maven仓库
将ojdbc6.jar依赖安装到本地的maven仓库,然后才可以在pom中进行配置

mvn install:install-file -Dfile=D:/ojdbc6.jar -DgroupId=com.oracle -DartifactId=ojdbc6 -Dversion=6.0 -
Dpackaging=jar -DgeneratePom=true

<dependency>
    <groupId>com.oracle</groupId>
    <artifactId>ojdbc6</artifactId>
    <version>6.0</version>
</dependency>
Druid数据源
Druid是一个关系型数据库连接池。Druid不但提供连接池的功能,还提供监控功能,可以实时查看数据库连接池和SQL查询的工作情况。
druid-spring-boot-starter
查看mybatis starter的隐性依赖发现,Spring Boot的数据源配置的默认类型是org.apache.tomcat.jdbc.pool.Datasource,为了使用Druid连接池,需要在application.yml下配置。
spring:
  datasource:
    druid:
      # 数据库访问配置, 使用druid数据源
      type: com.alibaba.druid.pool.DruidDataSource
      driver-class-name: oracle.jdbc.driver.OracleDriver
      url: jdbc:oracle:thin:@localhost:1521:ORCL
      username: scott
      password: 123456
      # 连接池配置
      initial-size: 5
      min-idle: 5
      max-active: 20
      # 连接等待超时时间
      max-wait: 30000
      # 配置检测可以关闭的空闲连接间隔时间
      time-between-eviction-runs-millis: 60000
      # 配置连接在池中的最小生存时间
      min-evictable-idle-time-millis: 300000
      validation-query: select '1' from dual
      test-while-idle: true
      test-on-borrow: false
      test-on-return: false
      # 打开PSCache,并且指定每个连接上PSCache的大小
      pool-prepared-statements: true
      max-open-prepared-statements: 20
      max-pool-prepared-statement-per-connection-size: 20
      # 配置监控统计拦截的filters, 去掉后监控界面sql无法统计, 'wall'用于防火墙
      filters: stat,wall
      # Spring监控AOP切入点,如x.y.z.service.*,配置多个英文逗号分隔
      aop-patterns: com.springboot.servie.*


      # WebStatFilter配置
      web-stat-filter:
        enabled: true
        # 添加过滤规则
        url-pattern: /*
        # 忽略过滤的格式
        exclusions: '*.js,*.gif,*.jpg,*.png,*.css,*.ico,/druid/*'

      # StatViewServlet配置
      stat-view-servlet:
        enabled: true
        # 访问路径为/druid时,跳转到StatViewServlet
        url-pattern: /druid/*
        # 是否能够重置数据
        reset-enable: false
        # 需要账号密码才能访问控制台
        login-username: druid
        login-password: druid123
        # IP白名单
        # allow: 127.0.0.1
        # IP黑名单(共同存在时,deny优先于allow)
        # deny: 192.168.1.218

      # 配置StatFilter
      filter:
        stat:
          log-slow-sql: true
上述配置不但配置了Druid作为连接池,而且还开启了Druid的监控功能
使用MyBatis
创建对应实体
创建一个包含基本CRUD的StudentMapper
StudentMapper的实现可以基于xml也可以基于注解。
@Component
@Mapper
public interface StudentMapper {
    @Insert("insert into student(sno,sname,ssex) values(#{sno},#{name},#{sex})")
    int add(Student student);

    @Update("update student set sname=#{name},ssex=#{sex} where sno=#{sno}")
    int update(Student student);

    @Delete("delete from student where sno=#{sno}")
    int deleteBysno(String sno);

    @Select("select * from student where sno=#{sno}")
    @Results(id = "student",value= {
        @Result(property = "sno", column = "sno", javaType = String.class),
        @Result(property = "name", column = "sname", javaType = String.class),
        @Result(property = "sex", column = "ssex", javaType = String.class)
    })
    Student queryStudentBySno(String sno);
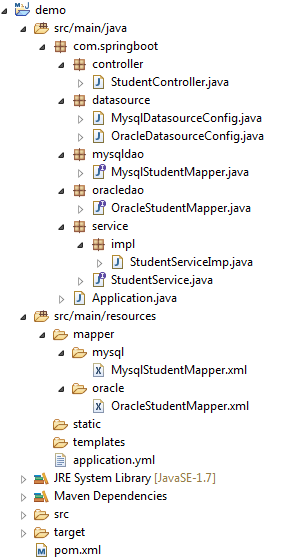
pojo entity -> mapper -> service -> service impl -> controller
Spring Boot中使用JdbcTemplate
JdbcTemplate相较于MyBaits,Hibernate等数据库框架更容易上手,对SQL的操作也更为直观方便,所以在项目中也是一个不错的选择。
Spring Boot开启JdbcTemplate很简单,只需要引入spring-boot-starter-jdbc依赖即可。
在引入spring-boot-starter-jdbc驱动后,可直接在类中注入JdbcTemplate。
@Repository("studentDao")
public class StudentDaoImp implements StudentDao {

    @Autowired
    private JdbcTemplate jdbcTemplate;

    @Override
    public int add(Student student) {
        // String sql = "insert into student(sno,sname,ssex) values(?,?,?)";
        // Object[] args = { student.getSno(), student.getName(), student.getSex() };
        // int[] argTypes = { Types.VARCHAR, Types.VARCHAR, Types.VARCHAR };
        // return this.jdbcTemplate.update(sql, args, argTypes);
        String sql = "insert into student(sno,sname,ssex) values(:sno,:name,:sex)";
        NamedParameterJdbcTemplate npjt = new NamedParameterJdbcTemplate(this.jdbcTemplate.getDataSource());
        return npjt.update(sql, new BeanPropertySqlParameterSource(student));
    }

    @Override
    public int update(Student student) {
        String sql = "update student set sname = ?,ssex = ? where sno = ?";
        Object[] args = { student.getName(), student.getSex(), student.getSno() };
        int[] argTypes = { Types.VARCHAR, Types.VARCHAR, Types.VARCHAR };
        return this.jdbcTemplate.update(sql, args, argTypes);
    }

    @Override
    public int deleteBysno(String sno) {
        String sql = "delete from student where sno = ?";
        Object[] args = { sno };
        int[] argTypes = { Types.VARCHAR };
        return this.jdbcTemplate.update(sql, args, argTypes);
    }

    @Override
    public List<Map<String, Object>> queryStudentsListMap() {
        String sql = "select * from student";
        return this.jdbcTemplate.queryForList(sql);
    }

    @Override
    public Student queryStudentBySno(String sno) {
        String sql = "select * from student where sno = ?";
        Object[] args = { sno };
        int[] argTypes = { Types.VARCHAR };
        List<Student> studentList = this.jdbcTemplate.query(sql, args, argTypes, new StudentMapper());
        if (studentList != null && studentList.size() > 0) {
            return studentList.get(0);
        } else {
            return null;
        }
    }
}
Spring Boot MyBatis配置Druid多数据源
在Spring Boot中配置MyBatis多数据源的关键在于创建SqlSessionFactory的时候为其分配不同的数据源。
@Qualifier 注解作用就是为了给Bean打上一个标记,用来查找bean。
@Primary标志这个Bean如果在多个同类Bean候选时,该Bean优先被考虑。多数据源配置的时候,必须要有一个主数据源,用@Primary标志该Bean。
Spring Boot JdbcTemplate配置Druid多数据源
JdbcTemplate配置Druid多数据源的核心在于创建JdbcTemplate时候为其分配不同的数据源,然后在需要访问不同数据库的时候使用对应的JdbcTemplate即可。这里介绍在Spring Boot中基于Oracle和Mysql配置Druid多数据源。
Spring Boot AOP记录用户操作日志
在Spring框架中,使用AOP配合自定义注解可以方便的实现用户操作的监控。
<!-- aop依赖 -->
<dependency>
    <groupId>org.springframework.boot</groupId>
    <artifactId>spring-boot-starter-aop</artifactId>
</dependency>
定义一个LogAspect类,使用@Aspect标注让其成为一个切面,切点为使用@Log注解标注的方法,使用@Around环绕通知
Spring Boot中使用thymeleaf
Spring Boot支持FreeMarker、Groovy、Thymeleaf和Mustache四种模板解析引擎,官方推荐使用Thymeleaf。
<dependency>
    <groupId>org.springframework.boot</groupId>
    <artifactId>spring-boot-starter-thymeleaf</artifactId>
</dependency>
在Spring Boot中,默认的html页面地址为src/main/resources/templates,默认的静态资源地址为src/main/resources/static。
#开启模板缓存(默认值:true)
spring.thymeleaf.cache=true
#Check that the template exists before rendering it.
spring.thymeleaf.check-template=true
#检查模板位置是否正确(默认值:true)
spring.thymeleaf.check-template-location=true
#Content-Type的值(默认值:text/html)
spring.thymeleaf.content-type=text/html
#开启MVC Thymeleaf视图解析(默认值:true)
spring.thymeleaf.enabled=true
#模板编码
spring.thymeleaf.encoding=UTF-8
#要被排除在解析之外的视图名称列表,用逗号分隔
spring.thymeleaf.excluded-view-names=
#要运用于模板之上的模板模式。另见StandardTemplate-ModeHandlers(默认值:HTML5)
spring.thymeleaf.mode=HTML5
#在构建URL时添加到视图名称前的前缀(默认值:classpath:/templates/)
spring.thymeleaf.prefix=classpath:/templates/
#在构建URL时添加到视图名称后的后缀(默认值:.html)
spring.thymeleaf.suffix=.html
#Thymeleaf模板解析器在解析器链中的顺序。默认情况下,它排第一位。顺序从1开始,只有在定义了额外的TemplateResolver Bean时才需要设置这个属性。
spring.thymeleaf.template-resolver-order=
#可解析的视图名称列表,用逗号分隔
spring.thymeleaf.view-names=
@Controller
public class IndexController {
    @RequestMapping("/account")
    public String index(Model m) {
        List<Account> list = new ArrayList<Account>();
        list.add(new Account("KangKang", "康康", "e10adc3949ba59abbe56e", "超级管理员", "17777777777"));
        list.add(new Account("Mike", "麦克", "e10adc3949ba59abbe56e", "管理员", "13444444444"));
        list.add(new Account("Jane","简","e10adc3949ba59abbe56e","运维人员","18666666666"));
        list.add(new Account("Maria", "玛利亚", "e10adc3949ba59abbe56e", "清算人员", "19999999999"));
        m.addAttribute("accountList",list);
        return "account";
    }
}
Spring Boot中使用缓存
在程序中可以使用缓存的技术来节省对数据库的开销.Spring Boot对缓存提供了很好的支持,我们几乎不用做过多的配置即可使用各种缓存实现。
使用缓存
开启Spring Boot的缓存功能
<dependency>
    <groupId>org.springframework.boot</groupId>
    <artifactId>spring-boot-starter-cache</artifactId>
</dependency>
接着在Spring Boot入口类中加入@EnableCaching注解开启缓存功能
@SpringBootApplication
@EnableCaching
public class Application {
    public static void main(String[] args) {
        SpringApplication.run(Application.class,args);
    }
}
加入缓存注解
**@CacheConfig(cacheNames = "student")
@Repository
public interface StudentService {
    @CachePut(key = "#p0.sno")
    Student update(Student student);

    @CacheEvict(key = "#p0", allEntries = true)
    void deleteStudentBySno(String sno);

    @Cacheable(key = "#p0")
    Student queryStudentBySno(String sno);
}**
缓存注解
@CacheConfig:主要用于配置该类中会用到的一些共用的缓存配置。在这里@CacheConfig(cacheNames = "student"):配置了该数据访问对象中返回的内容将存储于名为student的缓存对象中,我们也可以不使用该注解,直接通过@Cacheable自己配置缓存集的名字来定义;
@Cacheable:配置了queryStudentBySno函数的返回值将被加入缓存。同时在查询时,会先从缓存中获取,若不存在才再发起对数据库的访问。该注解主要有下面几个参数:
value、cacheNames:两个等同的参数(cacheNames为Spring 4新增,作为value的别名),用于指定缓存存储的集合名。由于Spring 4中新增了@CacheConfig,因此在Spring 3中原本必须有的value属性,也成为非必需项了;
key:缓存对象存储在Map集合中的key值,非必需,缺省按照函数的所有参数组合作为key值,若自己配置需使用SpEL表达式,比如:@Cacheable(key = "#p0"):使用函数第一个参数作为缓存的key值,更多关于SpEL表达式的详细内容可参考https://docs.spring.io/spring/docs/current/spring-framework-reference/integration.html#cache;
condition:缓存对象的条件,非必需,也需使用SpEL表达式,只有满足表达式条件的内容才会被缓存,比如:@Cacheable(key = "#p0", condition = "#p0.length() < 3"),表示只有当第一个参数的长度小于3的时候才会被缓存;
unless:另外一个缓存条件参数,非必需,需使用SpEL表达式。它不同于condition参数的地方在于它的判断时机,该条件是在函数被调用之后才做判断的,所以它可以通过对result进行判断;
keyGenerator:用于指定key生成器,非必需。若需要指定一个自定义的key生成器,我们需要去实现org.springframework.cache.interceptor.KeyGenerator接口,并使用该参数来指定;
cacheManager:用于指定使用哪个缓存管理器,非必需。只有当有多个时才需要使用;
cacheResolver:用于指定使用那个缓存解析器,非必需。需通过org.springframework.cache.interceptor.CacheResolver接口来实现自己的缓存解析器,并用该参数指定;
@CachePut:配置于函数上,能够根据参数定义条件来进行缓存,其缓存的是方法的返回值,它与@Cacheable不同的是,它每次都会真实调用函数,所以主要用于数据新增和修改操作上。它的参数与@Cacheable类似,具体功能可参考上面对@Cacheable参数的解析;
@CacheEvict:配置于函数上,通常用在删除方法上,用来从缓存中移除相应数据。除了同@Cacheable一样的参数之外,它还有下面两个参数:
allEntries:非必需,默认为false。当为true时,会移除所有数据;
beforeInvocation:非必需,默认为false,会在调用方法之后移除数据。当为true时,会在调用方法之前移除数据。
我们在StudentService接口中加入了@CacheConfig注解,queryStudentBySno方法使用了注解@Cacheable(key="#p0"),即将id作为redis中的key值。当我们更新数据的时候,应该使用@CachePut(key="#p0.sno")进行缓存数据的更新,否则将查询到脏数据,因为该注解保存的是方法的返回值,所以这里应该返回Student。
注解@Cacheable(key="#p0"),即将id作为redis中的key值。
当我们更新数据的时候,应该使用@CachePut(key="#p0.sno")进行缓存数据的更新,否则将查询到脏数据,因为该注解保存的是方法的返回值,所以这里应该返回Student。
要使用上Spring Boot的缓存功能,还需要提供一个缓存的具体实现。通过配置属性spring.cache.type来强制指定。
准备工作做完后,接下来开始在Spring Boot项目里引入Redis:
<!-- spring-boot redis -->
<dependency>
    <groupId>org.springframework.boot</groupId>
    <artifactId>spring-boot-starter-data-redis</artifactId>
</dependency>
在application.yml中配置Redis:
spring:
  redis:
    # Redis数据库索引(默认为0)
    database: 0
    # Redis服务器地址
    host: localhost
    # Redis服务器连接端口
    port: 6379
    pool:
      # 连接池最大连接数(使用负值表示没有限制)
      max-active: 8
      # 连接池最大阻塞等待时间(使用负值表示没有限制)
      max-wait: -1
      # 连接池中的最大空闲连接
      max-idle: 8
      # 连接池中的最小空闲连接
      min-idle: 0
    # 连接超时时间(毫秒)
    timeout: 0
创建一个Redis配置类:
@Configuration
public class RedisConfig extends CachingConfigurerSupport {

    // 自定义缓存key生成策略
    @Bean
    public KeyGenerator keyGenerator() {
        return new KeyGenerator() {
            @Override
            public Object generate(Object target, java.lang.reflect.Method method, Object... params) {
                StringBuffer sb = new StringBuffer();
                sb.append(target.getClass().getName());
                sb.append(method.getName());
                for (Object obj : params) {
                    sb.append(obj.toString());
                }
                return sb.toString();
            }
        };
    }

    // 缓存管理器
    @Bean
    public CacheManager cacheManager(@SuppressWarnings("rawtypes") RedisTemplate redisTemplate) {
        RedisCacheManager cacheManager = new RedisCacheManager(redisTemplate);
        // 设置缓存过期时间(秒)
        cacheManager.setDefaultExpiration(3600);
        return cacheManager;
    }

    @Bean
    public RedisTemplate<String, String> redisTemplate(RedisConnectionFactory factory) {
        StringRedisTemplate template = new StringRedisTemplate(factory);
        setSerializer(template);// 设置序列化工具
        template.afterPropertiesSet();
        return template;
    }

    private void setSerializer(StringRedisTemplate template) {
        @SuppressWarnings({ "rawtypes", "unchecked" })
        Jackson2JsonRedisSerializer jackson2JsonRedisSerializer = new Jackson2JsonRedisSerializer(Object.class);
        ObjectMapper om = new ObjectMapper();
        om.setVisibility(PropertyAccessor.ALL, JsonAutoDetect.Visibility.ANY);
        om.enableDefaultTyping(ObjectMapper.DefaultTyping.NON_FINAL);
        jackson2JsonRedisSerializer.setObjectMapper(om);
        template.setValueSerializer(jackson2JsonRedisSerializer);
    }
}
更新数据库的同时,缓存也得到了更新。
Spring Boot中的JSON技术
Spring Boot内置的Jackson来完成JSON的序列化和反序列化操作也挺方便。Jackson不但可以完成简单的序列化和反序列化操作,也能实现复杂的个性化的序列化和反序列化操作。
自定义ObjectMapper
@ResponseBody注解可以将方法返回的对象序列化成JSON
序列化
Jackson通过使用mapper的writeValueAsString方法将Java对象序列化为JSON格式字符串
反序列化
readTree方法可以接受一个字符串或者字节数组、文件、InputStream等, 返回JsonNode作为根节点,你可以像操作XML DOM那样操作遍历JsonNode以获取数据。
json注解
Jackson注解
Jackson包含了一些实用的注解:
@JsonProperty
@JsonProperty,作用在属性上,用来为JSON Key指定一个别名。
@JsonProperty("bth")
private Date birthday;
再次访问getuser页面输出:
{"userName":"mrbird","age":0,"password":null,"bth":"2018-04-02 10:38:37"}
key birthday已经被替换为了bth。
@Jsonlgnore
@Jsonlgnore,作用在属性上,用来忽略此属性。
@JsonIgnore
private String password;
再次访问getuser页面输出:
{"userName":"mrbird","age":0,"bth":"2018-04-02 10:40:45"}
password属性已被忽略。
@JsonIgnoreProperties
@JsonIgnoreProperties,忽略一组属性,作用于类上,比如JsonIgnoreProperties({ "password", "age" })。
@JsonIgnoreProperties({ "password", "age" })
public class User implements Serializable {
...
}
再次访问getuser页面输出:
{"userName":"mrbird","bth":"2018-04-02 10:45:34"}
@JsonFormat
@JsonFormat,用于日期格式化,如:
@JsonFormat(pattern = "yyyy-MM-dd HH:mm:ss")
private Date birthday;
@JsonNaming
@JsonNaming,用于指定一个命名策略,作用于类或者属性上。Jackson自带了多种命名策略,你可以实现自己的命名策略,比如输出的key 由Java命名方式转为下面线命名方法 —— userName转化为user-name。
@JsonNaming(PropertyNamingStrategy.LowerCaseWithUnderscoresStrategy.class)
public class User implements Serializable {
...
}
再次访问getuser页面输出:
{"user_name":"mrbird","bth":"2018-04-02 10:52:12"}
@JsonSerialize
@JsonSerialize,指定一个实现类来自定义序列化。类必须实现JsonSerializer接口,代码如下:
import java.io.IOException;
import com.example.pojo.User;
import com.fasterxml.jackson.core.JsonGenerator;
import com.fasterxml.jackson.core.JsonProcessingException;
import com.fasterxml.jackson.databind.JsonSerializer;
import com.fasterxml.jackson.databind.SerializerProvider;
public class UserSerializer extends JsonSerializer
@Override
public void serialize(User user, JsonGenerator generator, SerializerProvider provider)
        throws IOException, JsonProcessingException {
    generator.writeStartObject();
    generator.writeStringField("user-name", user.getUserName());
    generator.writeEndObject();
}
}
上面的代码中我们仅仅序列化userName属性,且输出的key是user-name。 使用注解@JsonSerialize来指定User对象的序列化方式:
@JsonSerialize(using = UserSerializer.class)
public class User implements Serializable {
...
}
再次访问getuser页面输出:
{"user-name":"mrbird"}
@JsonDeserialize
@JsonDeserialize,用户自定义反序列化,同@JsonSerialize ,类需要实现JsonDeserializer接口。
import java.io.IOException;
import com.example.pojo.User;
import com.fasterxml.jackson.core.JsonParser;
import com.fasterxml.jackson.core.JsonProcessingException;
import com.fasterxml.jackson.databind.DeserializationContext;
import com.fasterxml.jackson.databind.JsonDeserializer;
import com.fasterxml.jackson.databind.JsonNode;
public class UserDeserializer extends JsonDeserializer
@Override
public User deserialize(JsonParser parser, DeserializationContext context)
        throws IOException, JsonProcessingException {
    JsonNode node = parser.getCodec().readTree(parser);
    String userName = node.get("user-name").asText();
    User user = new User();
    user.setUserName(userName);
    return user;
}
}
使用注解@JsonDeserialize来指定User对象的序列化方式:
@JsonDeserialize (using = UserDeserializer.class)
public class User implements Serializable {
...
}
测试:
@Autowired
ObjectMapper mapper;
@RequestMapping("readjsonasobject")
@ResponseBody
public String readJsonAsObject() {
try {
String json = "{"user-name":"mrbird"}";
User user = mapper.readValue(json, User.class);
String name = user.getUserName();
return name;
} catch (Exception e) {
e.printStackTrace();
}
return null;
}
访问readjsonasobject,页面输出:
mrbird
@JsonView
@JsonView,作用在类或者属性上,用来定义一个序列化组。 比如对于User对象,某些情况下只返回userName属性就行,而某些情况下需要返回全部属性。 因此User对象可以定义成如下:
public class User implements Serializable {
private static final long serialVersionUID = 6222176558369919436L;
public interface UserNameView {};
public interface AllUserFieldView extends UserNameView {};

@JsonView(UserNameView.class)
private String userName;

@JsonView(AllUserFieldView.class)
private int age;

@JsonView(AllUserFieldView.class)
private String password;

@JsonView(AllUserFieldView.class)
private Date birthday;
...
}
User定义了两个接口类,一个为userNameView,另外一个为AllUserFieldView继承了userNameView接口。这两个接口代表了两个序列化组的名称。属性userName使用了@JsonView(UserNameView.class),而剩下属性使用了@JsonView(AllUserFieldView.class)。
Spring中Controller方法允许使用@JsonView指定一个组名,被序列化的对象只有在这个组的属性才会被序列化,代码如下:
@JsonView(User.UserNameView.class)
@RequestMapping("getuser")
@ResponseBody
public User getUser() {
User user = new User();
user.setUserName("mrbird");
user.setAge(26);
user.setPassword("123456");
user.setBirthday(new Date());
return user;
}
访问getuser页面输出:
{"userName":"mrbird"}
如果将@JsonView(User.UserNameView.class)替换为@JsonView(User.AllUserFieldView.class),输出:
{"userName":"mrbird","age":26,"password":"123456","birthday":"2018-04-02 11:24:00"}
因为接口AllUserFieldView继承了接口UserNameView所以userName也会被输出。

 浙公网安备 33010602011771号