CICD部署服务总结
CICD
应用 -> 服务 -> k8s环境 -> 流水线
spring项目 -> git -> 安全扫描 -> maven打包 -> jar -> dockerfile (基础镜像,文件,端口) -> deployment.yaml -> k8s pod管理/健康检测/svc(内部调用)/ingress请求转发(外部调用)
k8s配置文件
# service svc相关配置
apiVersion: v1
kind: Service
metadata:
  name: xx-deploy # 服务名称
  labels:
    app: xx-deploy # 服务标签
spec:
  type: ClusterIP # 服务类型
  ports:
  - port: 80 # 服务端口
    name: http
    targetPort: 38089 # 容器端口
  selector:
    app: xx-deploy # 服务标签

# deployment
apiVersion: apps/v1 # api版本
kind: Deployment # yaml为部署类型
metadata:
  name: xxx-deploy # 部署服务名称
spec:
  replicas: 2 # 副本数
  selector:
    matchLabels:
      app: xxx-deploy # 服务标签
  template: # pod模板
    metadata:
      labels:
        app: xxx-deploy # 服务标签
    spec:
      hostAliases: # 容器内部host映射
        - ip: "x.x.x.x"
          hostnames:
            - "xx"
        - ip: "x.x.x.x"
          hostnames:
            - "xx"
      containers: # 容器列表
      - name: xxx-deploy
        image: ${IMAGE:} # 镜像地址
        imagePullPolicy: Always # 镜像拉取策略
        resources: # 资源限制
          requests:
            cpu: 2
            memory: 4G
          limits:
            cpu: 4.0
            memory: 8G
        volumeMounts: # 容器内部挂载目录
          - name: time
            mountPath: /etc/localtime
            readOnly: true
        livenessProbe: # 健康检测
          httpGet:
            path: /actuator/health # 健康检测路径
            port: 38089 # 容器端口
            scheme: HTTP # 协议
          initialDelaySeconds: 60 # 初始延迟
          timeoutSeconds: 30 # 超时时间
          successThreshold: 1 # 成功阈值
          failureThreshold: 5 # 失败阈值
        readinessProbe: # 健康检测
          httpGet:
            path: /actuator/health
            port: 38089
            scheme: HTTP
          initialDelaySeconds: 30
          timeoutSeconds: 30
          successThreshold: 1
          failureThreshold: 5
        ports: # 容器端口
        - name: http
          containerPort: 38089
      volumes: # 容器外部挂载目录
        - name: time
          hostPath:
            path: /etc/localtime


# ingress
apiVersion: networking.k8s.io/v1
kind: Ingress # yaml为ingress类型
metadata:
  annotations: # 注解
    kubernetes.io/ingress.class: nginx
    nginx.ingress.kubernetes.io/rewrite-target: /$1
  name: work-xxx-ingress
spec:
  rules:
  - host: work.xxx.cn # 域名
    http:
      paths:
      - backend: # 后端服务
          service:
            name: xxx-deploy # 服务名称
            port:
              number: 80
        path: /xxx/server/(.*) # 路径
        pathType: Prefix # 路径类型
  - host: work.xxx.cn # 域名
    http:
      paths:
      - backend: # 后端服务
          service:
            name: xxx-api-deploy # 服务名称
            port:
              number: 80
        path: /xxx/api/(.*) # 路径
        pathType: Prefix # 路径类型
  - host: work.xxx.cn # 域名
    http:
      paths:
      - backend:
          service:
            name: xxx-web
            port:
              number: 80
        path: /xxx/(.*)
        pathType: Prefix
流水线配置文件
dockerfile
FROM 仓库的基础镜像

USER root
WORKDIR /opt
COPY xxx.jar xxx.jar

#RUN sed -i 's/dl-cdn.alpinelinux.org/mirrors.aliyun.com/g' /etc/apk/repositories && apk add -U tzdata && cp /usr/share/zoneinfo/Asia/Shanghai /etc/localtime && echo "Asia/Shanghai" > /etc/timezone && export TZ="Asia/Shanghai" && apk del tzdata
EXPOSE 38089
# 执行环境,基础配置
ENTRYPOINT ["java", "-Djava.security.egd=file:/dev/./urandom", "-Dspring.profiles.active=test", "-jar", "-XX:MetaspaceSize=512m", "-XX:MaxMetaspaceSize=512m", "-Xms2048m", "-Xmx2048m", "-Xmn1024m", "-Xss1024k", "/opt/xxx-api.jar"]
打包推送镜像流水线
mvn clean install -U -Dmaven.test.skip=true

mvn clean package -Dmaven.test.skip=true -Dcheckstyle.skip=true

mkdir -p docker_src

cp xxx-api/target/xxx-api-1.0.0.jar ./docker_src

cp hawaii/dockerfiles_test/* ./docker_src

cd ./docker_src &&

docker build -f xxx-api-k8s.dockerfile -t ${DOCKER_REG_HOST}/${DOCKER_REPO_NAME}/${PROJECT_NAME}/${PACKAGE_NAME}:${VERSION} .

docker push ${DOCKER_REG_HOST}/${DOCKER_REPO_NAME}/${PROJECT_NAME}/${PACKAGE_NAME}:${VERSION}
卡点记录
K8S集群中Pod资源处于CrashLoopBackOff状态排查思路

http://localhost:7777/xxx/server/actuator/health/
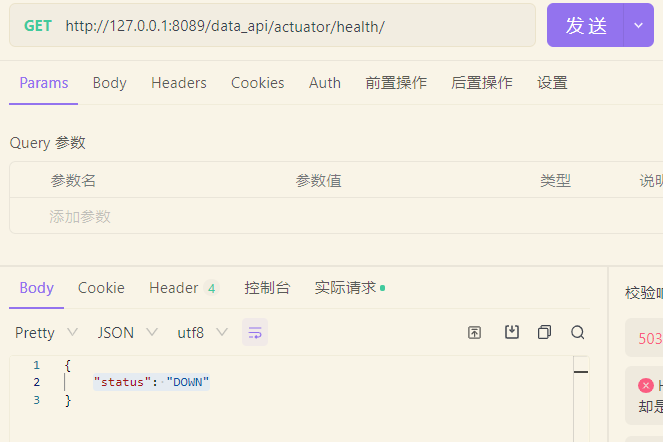
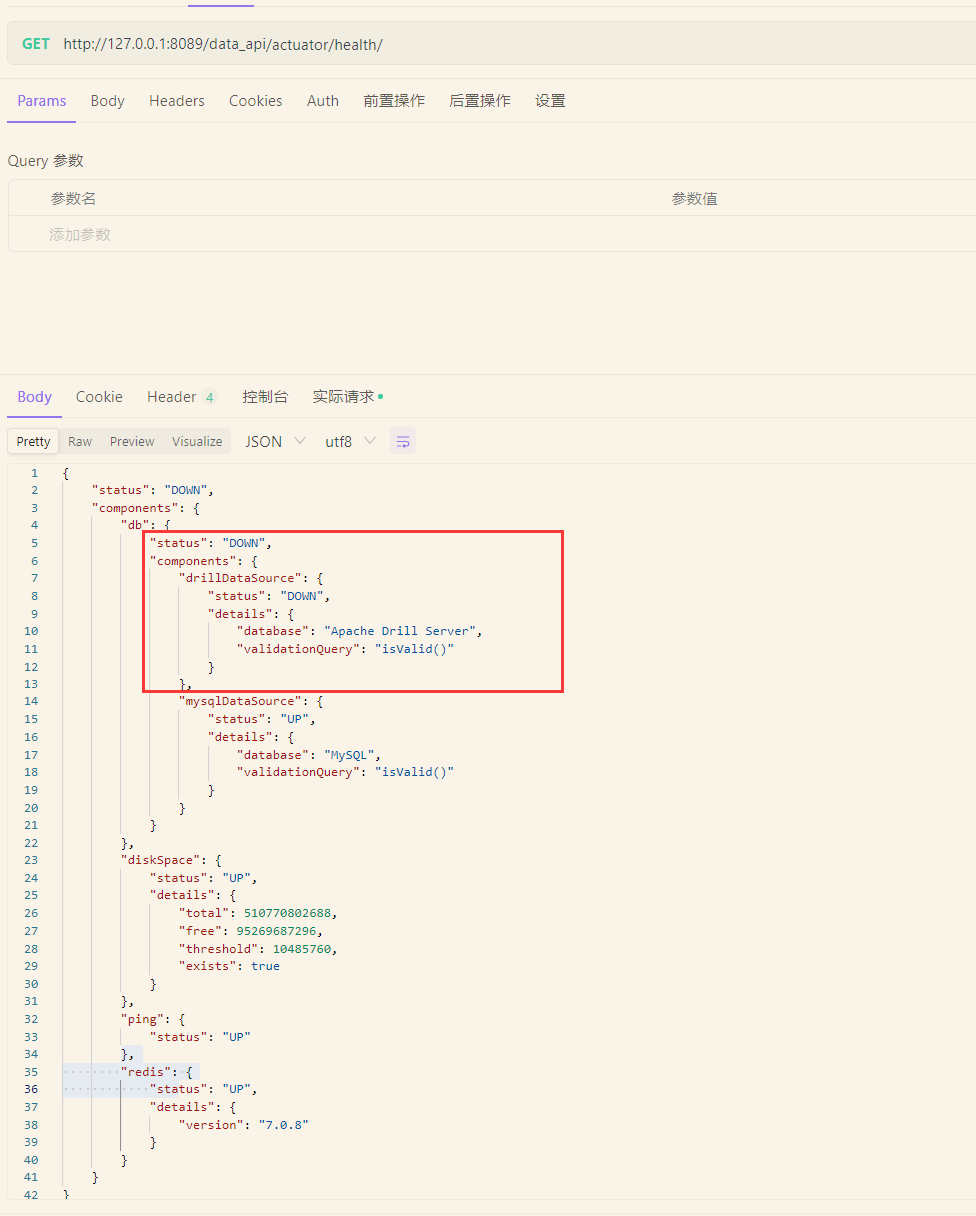
如果你在使用 Spring Boot Actuator 的 /actuator/health 端点时发现应用程序状态为 down,可能是因为该端点返回的状态信息中包含了 down 信息。一种解决方法是添加配置文件 application.properties 中的一个属性,从而显示更详细的信息并排除其他错误。
具体地,可以在 application.properties 配置文件中加入以下属性:
management.endpoint.health.show-details=always
这个属性会告诉 Actuator 在 /actuator/health 端点返回的信息中显示更多的细节,从而帮助你排除错误。
-
总结:
# actuator health check exclude db
management:
  health:
    db:
      enabled: false
spring boot 与 redis集群模式的配置, 以及redisson的使用配置
spring:
  redis:
    host: redis-cluster-service.middleware # 集群地址
    port: 6379 # 端口号
    password: xxxxx # 集群密码

spring:
  redis:
    database: 0 # 数据库索引
    jedis: # jedis连接池配置
      pool:
        max-active: 200
        max-idle: 10
        max-wait: -1
        min-idle: 0
    port: 6379 # 端口号
    timeout: 6000 # 连接超时时间
    cluster: # 集群配置
      password: xxxx  # 集群密码
      nodes: redis-cluster-0.redis-cluster-service.middleware:6379,redis-cluster-1.redis-cluster-service.middleware:6379,redis-cluster-2.redis-cluster-service.middleware:6379,redis-cluster-3.redis-cluster-service.middleware:6379,redis-cluster-4.redis-cluster-service.middleware:6379,redis-cluster-5.redis-cluster-service.middleware:6379 # 集群节点
spring boot 与 mysql集群模式的配置
spring:
  datasource:  # 数据源配置
    druid:  # druid连接池配置
      connection-properties: druid.stat.mergeSql=true;  # 合并sql
      driver-class-name: com.mysql.cj.jdbc.Driver  # 驱动
      url: jdbc:mysql://xxx:3306/xxx?useUnicode=true&characterEncoding=utf-8&useSSL=false&useTimezone=true&serverTimezone=Asia/Shanghai&allowPublicKeyRetrieval=true  # 数据库地址
      username: xxx  # 用户名
      password: xxx  # 密码
      initial-size: 5  # 初始化连接数
      max-active: 30  # 最大连接数
      max-pool-prepared-statement-per-connection-size: 50  # 每个连接上最大的pstmt缓存数
      max-wait: 60000 # 获取连接等待超时的时间
      min-evictable-idle-time-millis: 300000  # 连接保持空闲而不被驱逐的最小时间
      min-idle: 5  # 最小空闲连接数
      pool-prepared-statements: true  # 是否缓存preparedStatement
      use-global-data-source-stat: true  # 是否开启监控
      validation-query: SELECT 1 FROM DUAL  # 用来检测连接是否有效的sql


spring:
  datasource: # 数据源配置
    druid:
      connection-properties: druid.stat.mergeSql=true;
      driver-class-name: com.mysql.cj.jdbc.Driver
      filter:   # 过滤器
        stat:  # 监控统计用的filter:stat日志用的filter:log4j防御sql注入的filter:wall
          slow-sql-millis: 1 # 慢sql阈值,超过此值则输出慢日志
      filters: stat,wall # 过滤器
      initial-size: 5 # 初始化连接数
      max-active: 30
      max-pool-prepared-statement-per-connection-size: 50
      max-wait: 60000
      min-evictable-idle-time-millis: 300000
      min-idle: 5
      password: xxx
      pool-prepared-statements: true
      test-on-borrow: false # 申请连接时执行validationQuery检测连接是否有效,做了这个配置会降低性能
      test-on-return: false # 归还连接时执行validationQuery检测连接是否有效,做了这个配置会降低性能
      test-while-idle: true # 建议配置为true,不影响性能,并且保证安全性。申请连接的时候检测,如果空闲时间大于timeBetweenEvictionRunsMillis,执行validationQuery检测连接是否有效
      time-between-eviction-runs-millis: 60000
      url: jdbc:mysql://xxx:3306/xxx?useUnicode=true&characterEncoding=utf-8&useSSL=false&useTimezone=true&serverTimezone=Asia/Shanghai&allowPublicKeyRetrieval=true
      username: oxx
      validation-query: SELECT 1 FROM DUAL # 用来检测连接是否有效的sql
      web-stat-filter: # web监控的filter
        exclusions: '*.js,*.gif,*.jpg,*.png,*.css,*.ico,/druid/*' # 忽略资源
spring boot 打印日志的配置
logging:  # 日志配置
  config: classpath:log4j2.xml # 日志配置文件
<dependency>
    <groupId>org.springframework.boot</groupId>
    <artifactId>spring-boot-starter-log4j2</artifactId>
</dependency>
maven依赖管理
spring boot 与 datasource的配置
@Configuration
public class DataSourceConfig {
    @Bean(name = "drillDataSource")
    @Qualifier("drillDataSource")
    @ConfigurationProperties(prefix = "spring.datasource.drill")
    public DataSource drillDataSource() {
        return DataSourceBuilder.create().type(DruidDataSource.class).build();
    }


    @Bean(name = "mysqlDataSource")
    @Qualifier("mysqlDataSource")
    @ConfigurationProperties(prefix = "spring.datasource.druid")
    @Primary
    public DataSource mysqlDataSource() {
        return DataSourceBuilder.create().type(DruidDataSource.class).build();
    }

}


@Configuration
public class JdbcTemplateConfig {
    @Bean(name = "drillDataTemplate")
    public JdbcTemplate drillJdbcTemplate(
            @Qualifier("drillDataSource") DataSource dataSource) {
        return new JdbcTemplate(dataSource);
    }
}


@Autowired
private JdbcTemplate drillDataTemplate;

 浙公网安备 33010602011771号