spring-security(1)创建工程
日志生成(输出相关信息):
1 @Component
2 public class Task{
3 private static final Logger log =LoggerFactory.getLogger(Task.class);
4 public void output(){
5
6 log.info("你好!");
7 }
8 }
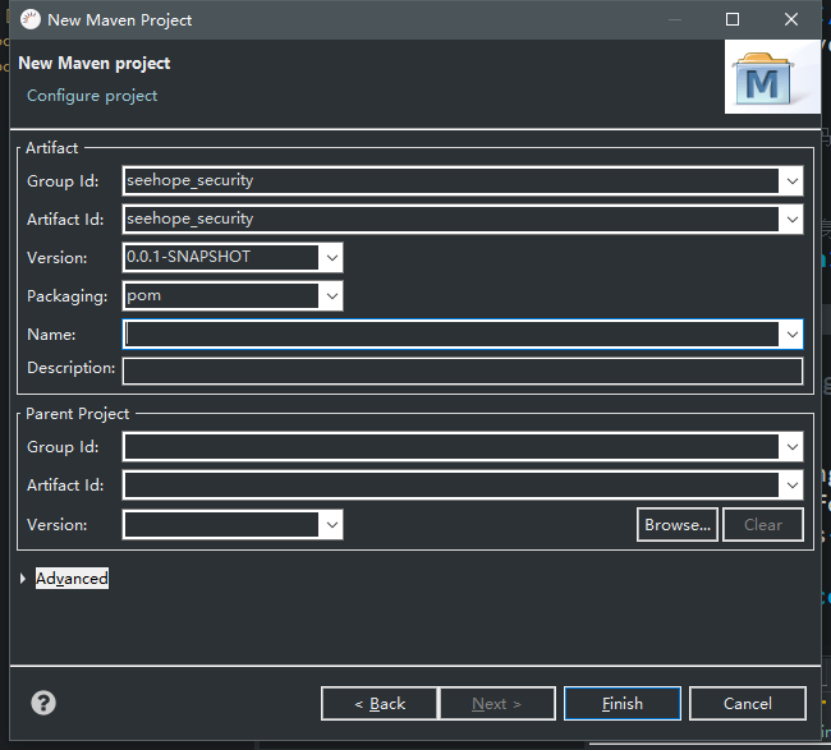
一.创建分布式(maven聚合)工程:
4个模块构成了整个Seehope Security工程。
core{browser(demo),app}
工程分为core,app,browser,demo 4个模块。
Core:作为工程的核心模块,分别被browser以及app模块引用,在core模块中存放通用代码以及通用依赖。
Browser:该模块用来描述基于浏览器端的应用服务,引用core模块,被demo模块引用。
App:该模块用来描述基于移动端的应用服务,引用core模块。
Demo:该模块引用browser模块,主要用来测试代码。
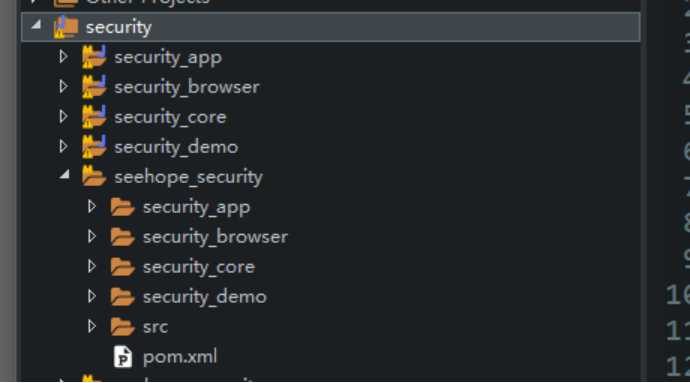
如果在创建的过程中新创建的工程无显示,请在eclipse的window->show view中选择Package Explorer 视窗,并使用该视窗查看工程 。
- 创建MavenProject Seehope Security 归档成POM

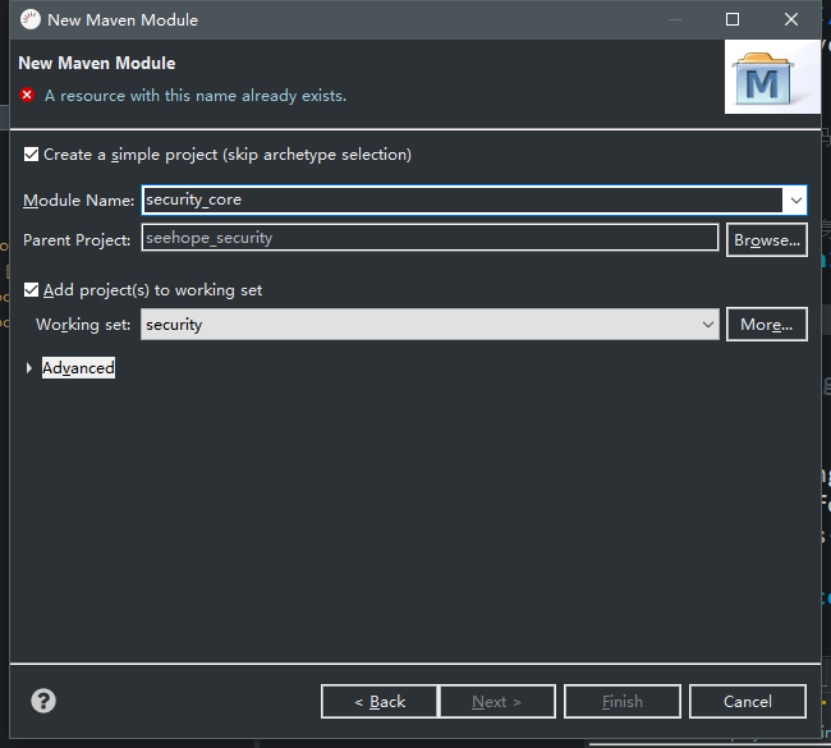
2.选中已创建的seehope security ,创建Maven Module seehope-core模块


3.重复以上步骤,选中seehope_security 工程,创建borwser,app以及demo 模块
最终结果

在创建工程的过程中并没有体现出browser以及app模块依赖core的关系而是在之后两个模块的POM文件配置中依赖core模块。
使用以上方式创建工程之后,也就是选中seehope security(POM)工程之后创建Maven Module,那么打开POM工程的Pom文件中,我们可以看到自动添加了
1   <modules>
2     <module>security_core</module>
3     <module>security_browser</module>
4     <module>security_app</module>
5     <module>security_demo</module>
6   </modules>
这样一段代码,表示seehope security工程中包含这4个模块。
以上,工程环境创建完毕。
二.各个模块的pom配置
首先要配置好工程依赖,创建hello工程,统一不同模块之间的版本号
找到总工程的pom文件,先定义maven变量
1  <!--用以整合子项目,本身没有任何java代码-->
2
3     <properties>
4         <!--定义项目版本号 整个项目,包括本身以及其子项目-->
5         <seehope.security.version>1.0.0-SNAPSHOT</seehope.security.version>
6     </properties>
然后在每个模块的pom.xml文件中,引用该版本变量,包括总工程的pom.xml文件本身
1 <version>${seehope.security.version}</version>
① 在总工程的pom.xml文件中,引入jar包版本管理器
2.<dependencyManagement>
3.    <!--引入spring io 以及 spirng cloud 项目进行依赖管理  -->
4.    <dependencies>
5.        <dependency>
6.            <groupId>io.spring.platform</groupId>
7.            <artifactId>platform-bom</artifactId>
8.            <version>Brussels-SR4</version>
9.            <type>pom</type>
10.            <scope>import</scope>
11.        </dependency>
12.        <dependency>
13.            <groupId>org.springframework.cloud</groupId>
14.            <artifactId>spring-cloud-dependencies</artifactId>
15.            <version>Dalston.SR2</version>
16.            <type>pom</type>
17.            <scope>import</scope>
18.        </dependency>
19.    </dependencies>
20.</dependencyManagement>
引用spring io 以及spring cloud 的jar包版本管理器来管理该工程的jar包版本管理器来管理本工程的jar包版本,当我们的工程使用的jar包在这两个spring的工程也用使用的情况下,我们不需要写jar包的版本号,最大程度避免了jar包版本冲突问题。
③ 引入springboot maven 编译插件 配置工程环境
 1 <!--设置项目的编译以及运行版本  -->
 2 <build>
 3     <plugins>
 4         <plugin>
 5             <groupId>org.apache.maven.plugins</groupId>
 6             <artifactId>maven-compiler-plugin</artifactId>
 7             <version>2.3.2</version>
 8             <configuration>
 9                 <source>1.8</source>
10                 <target>1.8</target>
11                 <encoding>UTF-8</encoding>
12             </configuration>
13         </plugin>
14     </plugins>
15 </build>
至此,总工程pom.xml文件配置完毕
 1 <project xmlns="http://maven.apache.org/POM/4.0.0" xmlns:xsi="http://www.w3.org/2001/XMLSchema-instance"
 2     xsi:schemaLocation="http://maven.apache.org/POM/4.0.0 http://maven.apache.org/xsd/maven-4.0.0.xsd">
 3     <modelVersion>4.0.0</modelVersion>
 4     <groupId>net.seehope.security</groupId>
 5     <artifactId>seehope-security</artifactId>
 6     <version>${seehope.security.version}</version>
 7     <packaging>pom</packaging>
 8
 9     <!--用以整合子项目,本身没有任何java代码-->
10
11     <properties>
12  <!--定义项目版本号 整个项目,包括本身以及其子项目-->
13         <seehope.security.version>1.0.0-SNAPSHOT</seehope.security.version>
14     </properties>
15
16     <dependencyManagement>
17         <!--引入spring io 以及 spirng cloud 项目进行依赖管理  -->
18         <dependencies>
19             <dependency>
20                 <groupId>io.spring.platform</groupId>
21                 <artifactId>platform-bom</artifactId>
22                 <version>Brussels-SR4</version>
23                 <type>pom</type>
24                 <scope>import</scope>
25             </dependency>
26             <dependency>
27                 <groupId>org.springframework.cloud</groupId>
28                 <artifactId>spring-cloud-dependencies</artifactId>
29                 <version>Dalston.SR2</version>
30                 <type>pom</type>
31                 <scope>import</scope>
32             </dependency>
33         </dependencies>
34     </dependencyManagement>
35
36     <!--设置项目的编译以及运行版本  -->
37     <build>
38         <plugins>
39             <plugin>
40                 <groupId>org.apache.maven.plugins</groupId>
41                 <artifactId>maven-compiler-plugin</artifactId>
42                 <version>2.3.2</version>
43                 <configuration>
44                     <source>1.8</source>
45                     <target>1.8</target>
46                     <encoding>UTF-8</encoding>
47                 </configuration>
48             </plugin>
49         </plugins>
50     </build>
51
52     <!--整合子项目 创建过程中自动生成-->
53     <modules>
54         <module>../seehope-security-app</module>
55         <module>../seehope-security-browser</module>
56         <module>../seehope-security-core</module>
57         <module>../seehope-security-demo</module>
58     </modules>
59 </project>
core模块中的pom.xml中的所有内容
  1 <project xmlns="http://maven.apache.org/POM/4.0.0" xmlns:xsi="http://www.w3.org/2001/XMLSchema-instance"
  2     xsi:schemaLocation="http://maven.apache.org/POM/4.0.0 http://maven.apache.org/xsd/maven-4.0.0.xsd">
  3     <modelVersion>4.0.0</modelVersion>
  4     <artifactId>seehope-security-core</artifactId>
  5
  6     <!--核心源码包,位于第二层  引入项目整体依赖环境-->
  7     <!-- 创建工程时自动生成 -->
  8     <parent>
  9         <groupId>net.seehope.security</groupId>
 10         <artifactId>seehope-security</artifactId>
 11         <version>${seehope.security.version}</version>
 12         <relativePath>../seehope-security</relativePath>
 13     </parent>
 14
 15     <dependencies>
 16         <!--springbootAOP  -->
 17         <dependency>
 18             <groupId>org.springframework.boot</groupId>
 19             <artifactId>spring-boot-starter-aop</artifactId>
 20         </dependency>
 21         <dependency>
 22             <groupId>org.springframework.boot</groupId>
 23             <artifactId>spring-boot-starter-jta-narayana</artifactId>
 24         </dependency>
 25         <!--认证模块  -->
 26         <dependency>
 27             <groupId>org.springframework.cloud</groupId>
 28   <artifactId>spring-cloud-starter-oauth2</artifactId>
 29         </dependency>
 30         <!--缓存模块  -->
 31         <dependency>
 32             <groupId>org.springframework.boot</groupId>
 33             <artifactId>spring-boot-starter-data-redis</artifactId>
 34         </dependency>
 35         <!--数据库操作模块  -->
 36         <dependency>
 37             <groupId>org.springframework.boot</groupId>
 38             <artifactId>spring-boot-starter-jdbc</artifactId>
 39         </dependency>
 40         <!--数据库连接驱动  -->
 41         <dependency>
 42             <groupId>mysql</groupId>
 43             <artifactId>mysql-connector-java</artifactId>
 44         </dependency>
 45         <!--spring 测试框架,方便测试RESTful风格API  -->
 46         <dependency>
 47             <groupId>org.springframework.boot</groupId>
 48             <artifactId>spring-boot-starter-test</artifactId>
 49         </dependency>
 50
 51         <!--社交模块, 第三方授权认证 开始  -->
 52         <dependency>
 53             <groupId>org.springframework.social</groupId>
 54             <artifactId>spring-social-config</artifactId>
 55         </dependency>
 56         <dependency>
 57             <groupId>org.springframework.social</groupId>
 58             <artifactId>spring-social-core</artifactId>
 59         </dependency>
 60         <dependency>
 61             <groupId>org.springframework.social</groupId>
 62             <artifactId>spring-social-security</artifactId>
 63         </dependency>
 64         <dependency>
 65             <groupId>org.springframework.social</groupId>
 66             <artifactId>spring-social-web</artifactId>
 67         </dependency>
 68         <!--社交模块, 第三方授权认证 结束  -->
 69
 70         <!--常用工具模块,字符串操作等  -->
 71         <dependency>
 72  <groupId>commons-lang</groupId>
 73             <artifactId>commons-lang</artifactId>
 74         </dependency>
 75         <!--集合操作相关  -->
 76         <dependency>
 77             <groupId>commons-collections</groupId>
 78             <artifactId>commons-collections</artifactId>
 79         </dependency>
 80         <!--对象操作相关-->
 81         <dependency>
 82             <groupId>commons-beanutils</groupId>
 83             <artifactId>commons-beanutils</artifactId>
 84         </dependency>
 85         <!--io相关操作 -->
 86         <dependency>
 87             <groupId>commons-io</groupId>
 88             <artifactId>commons-io</artifactId>
 89         </dependency>
 90         <!-- Google Json -->
 91         <!-- https://mvnrepository.com/artifact/com.google.code.gson/gson -->
 92         <dependency>
 93             <groupId>com.google.code.gson</groupId>
 94             <artifactId>gson</artifactId>
 95         </dependency>
 96
 97         <!-- https://mvnrepository.com/artifact/io.springfox/springfox-swagger2 -->
 98         <dependency>
 99             <groupId>io.springfox</groupId>
100             <artifactId>springfox-swagger2</artifactId>
101             <version>2.8.0</version>
102         </dependency>
103         <!-- https://mvnrepository.com/artifact/io.springfox/springfox-swagger-ui -->
104         <dependency>
105             <groupId>io.springfox</groupId>
106             <artifactId>springfox-swagger-ui</artifactId>
107             <version>2.8.0</version>
108         </dependency>
109
110         <dependency>
111             <groupId>com.github.tomakehurst</groupId>
112             <artifactId>wiremock</artifactId>
113         </dependency>
114 <!-- https://mvnrepository.com/artifact/org.apache.httpcomponents/httpclient -->
115 <dependency>
116             <groupId>org.apache.httpcomponents</groupId>
117             <artifactId>httpclient</artifactId>
118 </dependency>
119     </dependencies>
120 </project>
配置browser 以及 app 和 demo模块的 pom.xml 文件
首先还是在步骤①中的版本号配置,其次,引入 对 core 模块的依赖
Brower – pom.xml
 1 <project xmlns="http://maven.apache.org/POM/4.0.0" xmlns:xsi="http://www.w3.org/2001/XMLSchema-instance"
 2     xsi:schemaLocation="http://maven.apache.org/POM/4.0.0 http://maven.apache.org/xsd/maven-4.0.0.xsd">
 3     <modelVersion>4.0.0</modelVersion>
 4     <artifactId>seehope-security-browser</artifactId>
 5     <!--浏览器端服务模块  -->
 6     <parent>
 7         <groupId>net.seehope.security</groupId>
 8         <artifactId>seehope-security</artifactId>
 9         <version>${seehope.security.version}</version>
10         <relativePath>../seehope-security</relativePath>
11     </parent>
12
13     <dependencies>
14         <!--依赖于核心包  -->
15         <dependency>
16             <groupId>net.seehope.security</groupId>
17             <artifactId>seehope-security-core</artifactId>
18             <version>${seehope.security.version}</version>
19         </dependency>
20         <!--session 创建分发以及管理模块-->
21         <dependency>
22             <groupId>org.springframework.session</groupId>
23             <artifactId>spring-session</artifactId>
24         </dependency>
25         <!--session管理-->
26         <dependency>
27          <groupId>commons-httpclient</groupId>
28             <artifactId>commons-httpclient</artifactId>
29         </dependency>
30     </dependencies>
31 </project>
App – pom.xml
 1 <project xmlns="http://maven.apache.org/POM/4.0.0" xmlns:xsi="http://www.w3.org/2001/XMLSchema-instance"
 2     xsi:schemaLocation="http://maven.apache.org/POM/4.0.0 http://maven.apache.org/xsd/maven-4.0.0.xsd">
 3     <modelVersion>4.0.0</modelVersion>
 4     <groupId>net.seehope</groupId>
 5     <artifactId>seehope-security-app</artifactId>
 6
 7     <!--移动端服务模块-->
 8
 9     <parent>
10         <groupId>net.seehope.security</groupId>
11         <artifactId>seehope-security</artifactId>
12         <version>${seehope.security.version}</version>
13         <relativePath>../seehope-security</relativePath>
14     </parent>
15
16     <dependencies>
17         <!--依赖于核心包-->
18         <dependency>
19             <groupId>net.seehope.security</groupId>
20             <artifactId>seehope-security-core</artifactId>
21             <version>${seehope.security.version}</version>
22         </dependency>
23     </dependencies>
24 </project>
Demo – pom.xml
 1 <project xmlns="http://maven.apache.org/POM/4.0.0" xmlns:xsi="http://www.w3.org/2001/XMLSchema-instance"
 2     xsi:schemaLocation="http://maven.apache.org/POM/4.0.0 http://maven.apache.org/xsd/maven-4.0.0.xsd">
 3     <modelVersion>4.0.0</modelVersion>
 4     <artifactId>seehope-security-demo</artifactId>
 5     <!--示例模块-->
 6     <parent>
 7         <groupId>net.seehope.security</groupId>
 8   <artifactId>seehope-security</artifactId>
 9         <version>${seehope.security.version}</version>
10         <relativePath>../seehope-security</relativePath>
11     </parent>
12
13     <dependencies>
14         <dependency>
15             <groupId>net.seehope.security</groupId>
16             <artifactId>seehope-security-browser</artifactId>
17             <version>${seehope.security.version}</version>
18         </dependency>
19     </dependencies>
20
21     <build>
22         <plugins>
23             <plugin>
24                 <groupId>org.springframework.boot</groupId>
25                 <artifactId>spring-boot-maven-plugin</artifactId>
26                 <version>1.3.3.RELEASE</version>
27                 <executions>
28                     <execution>
29                         <goals>
30                             <!--重新打包,按照springboot打包  -->
31                             <goal>repackage</goal>
32                         </goals>
33                     </execution>
34                 </executions>
35             </plugin>
36         </plugins>
37     </build>
38 </project>
至此,所有模块POM文件配置完毕。
三.创建hello spring security 。
在demo 模块中创建包结构以及主程序DemoApplication.class,在resources目录中创建jdbc.properties配置文件(数据库连接)。
编辑DemoApplication.class
 1 package net.seehope.demo;
 2
 3 import org.springframework.boot.SpringApplication;
 4 import org.springframework.boot.autoconfigure.SpringBootApplication;
 5 import org.springframework.context.annotation.ComponentScan;
 6
 7 import springfox.documentation.swagger2.annotations.EnableSwagger2;
 8
 9
10 @SpringBootApplication
11 @ComponentScan("net.seehope")//扫描所有net.seehop开头的包
12 public class DemoApplication {
13
14     public static void main(String[] args) {
15         SpringApplication.run(DemoApplication.class, args);
16   }
17 }
编辑配置文件jdbc.properties
jdbc.username=root
jdbc.password=123456
jdbc.url=jdbc:mysql://localhost:3306/ssm?useUnicode=true&characterEncoding=utf-8&serverTimezone=UTC
jdbc.driverClassName=com.mysql.cj.jdbc.Driver
创建DemoController.java进行hello测试
 1 package net.seehope.demo.web.controller;
 2
 3 import org.slf4j.Logger;
 4 import org.slf4j.LoggerFactory;
 5 import org.springframework.stereotype.Controller;
 6 import org.springframework.web.bind.annotation.GetMapping;
 7 @Controller
 8 public class DemoController {
 9
10     private static final Logger log = LoggerFactory.getLogger(DemoController.class);
11
12     @GetMapping("/hello")
13     public void sayHello() {
14         log.info(" hello spring security ~~~");
15     }
16 }
之后选中DemoApplication,启动该主方法,打开浏览器。访问http://localhost:8080/hello即可看到控制台的日志输出信息。
至此。Hello工程创建完毕。


