『心善渊』Selenium3.0基础 — 2、搭建Selenium测试框架环境
Selenium环境搭建步骤:
- 安装浏览器。
- 下载浏览器对应的Selenium驱动。
- 把下载好的Selenium驱动,与Python进行整合。
- 安装Selenium自动化测试框架。
- 在Python代码中导入Selenium相关API,进行操作。
1、浏览器安装
下载并安装好需要的浏览器,如下:
Chrome浏览器、Firefox浏览器、Safari浏览器、Edge浏览器、Opera浏览器等。
根据自己的需求安装对应的浏览器,非常简单,不做过多说明。
2、浏览器驱动下载
(1)ChromeDriver for Chrome
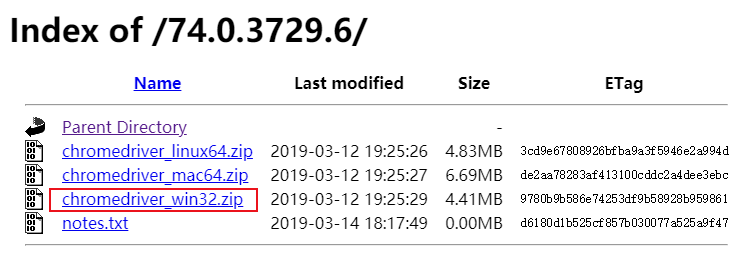
如果使用Chrome浏览器进行自动化测试,就需要下载ChromeDriver驱动。
ChromeDriver驱动下载地址:http://chromedriver.storage.googleapis.com/index.html。- 国内镜像地址:https://npm.taobao.org/mirrors/chromedriver。
- 版本对应地址:http://chromedriver.storage.googleapis.com/2.43/notes.txt。
选择指定的ChromeDriver版本,可根据不同的平台(Win、Mac、Linux)下载指定的ChromeDriver。
如下图所示:
(2)Geckodriver for Firefox
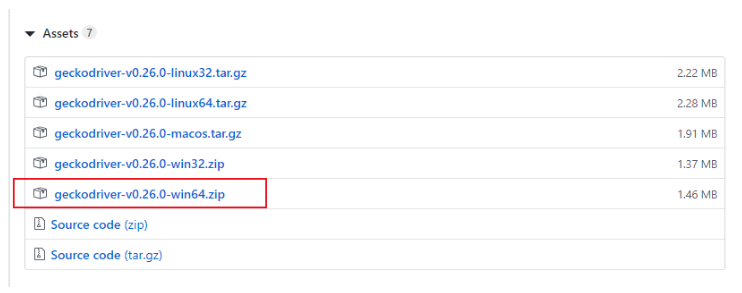
如果使用Firefox进行自动化测试,在Selenium 1.0或者Selenium 2.0是可以直接驱动Firefox进行测试的,但如果使用的是Selenium 3.0,则需要下载geckodriver驱动。
Geckodriver驱动下载地址:https://github.com/mozilla/geckodriver/releases。- 国内镜像地址:https://npm.taobao.org/mirrors/geckodriver/。
根据不同的平台(Win、Mac、Linux等)下载指定的geckodriver驱动。
如下图所示:
提示:
Firefox 47及以前版本,不需要geckodriver驱动。geckodriver v0.19.0:Firefox 55(及更高版本),Selenium3.5(及更高)geckodriver v0.21.0:Firefox 57(及更高版本),Selenium3.11(及更高)- 我应用的版本
v0.24.0和v0.26.0,Firefox 76,Selenium3.14。
(3)IEDriverServer for IE
如果使用IE进行自动化测试,就需要下载IEDriverServer驱动。
IEDriverServer下载地址:http://selenium-release.storage.googleapis.com/index.html。
根据Win平台是32位还是64位,下载指定的IEDriverServer驱动。
如下图所示:
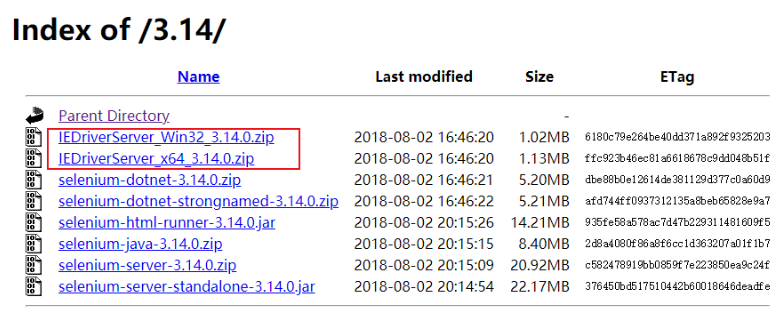
IEDriverServer的版本号和Selenium的版本号一定要一致。
如果执行脚本的时候会有如下报错:
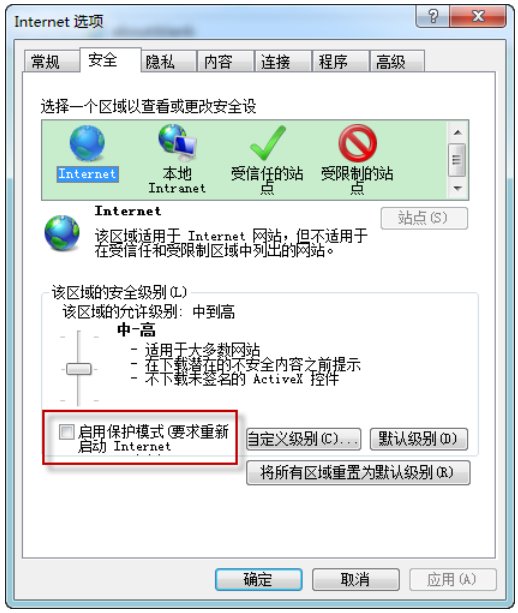
Unexpected error launching Internet Explorer. Protected Mode settings are not the same for all zones.
说明浏览器的安全性设置较高,解决方法:
修改IE的设置,打开IE --->选项--->安全,不选中启用保护模式。
如下图所示:
(4)for Edge
在Windows 10中Edge浏览器的驱动由Microsoft提供,也需要单独下载。
下载地址:https://developer.microsoft.com/en-us/microsoft-edge/tools/webdriver/。
需要根据Edge浏览器版本下载对应的版本驱动。
1)如何查看windows 10中Edge浏览器的版本
方式一:打开Edge浏览器,进入设置
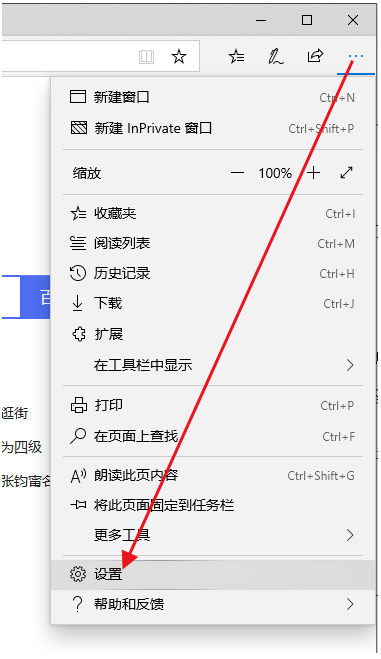
设置的界面的最下方,就可以查看到Edge浏览器的版本。

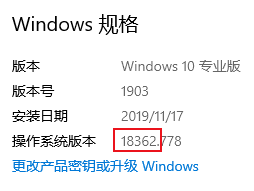
方式二:开始 —> 设置 —> 系统 —> 关于
就可以查看到Edge浏览器的版本,如下图所示:
2)Edge浏览器18版本的Selenium驱动安装
Edge浏览器18版本以前的Selenium驱动,在上面网址中,下载对应的驱动版本就可以了。
Edge浏览器18版本,需要在Windows 10系统的命令提示符中(管理员方式打开),执行如下命令即可。
DISM.exe /Online /Add-Capability /CapabilityName:Microsoft.WebDriver~~~~0.0.1.0
如下图:

安装完成之后,我们就可以适用Selenium测试Edge浏览器了,不需要在下载单独的Edge浏览器驱动了。
(5)OperaDriver for Opera
如果使用Opera浏览器进行自动化测试,就需要下载operadriver驱动。
operadriver驱动下载地址:https://github.com/operasoftware/operachromiumdriver/releases。- 国内镜像地址:https://npm.taobao.org/mirrors/operadriver/。
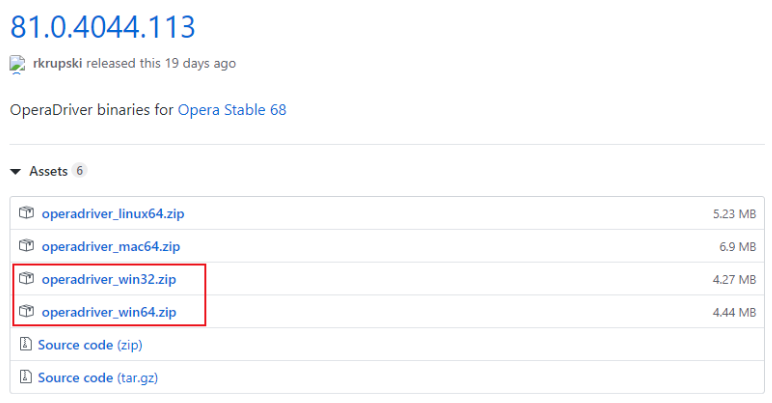
下载驱动的时候,一定要看好驱动支持的浏览器版本。
如下图所示:
3、浏览器驱动与Python整合
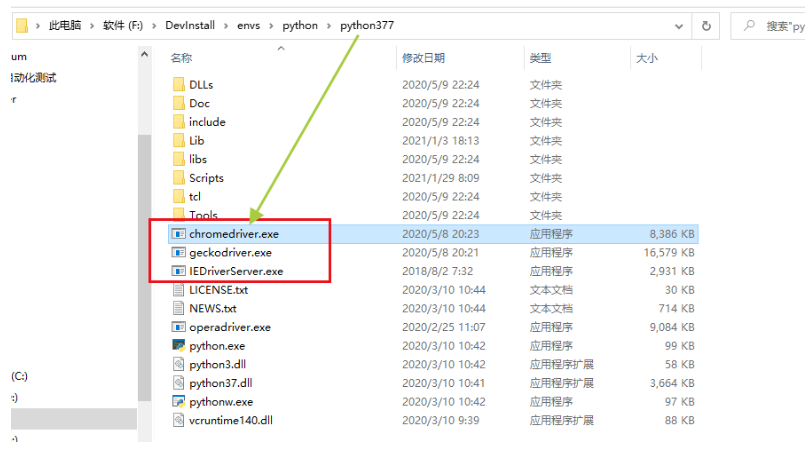
将下载好的浏览器驱动解压后,如:chromedriver.exe放置在Python安装路径的根目录下即可。
这样一步操作,就完成了浏览器驱动与Python的整合。
如下图所示:
4、安装Selenium
在Windows环境下,安装方式有两种(任选一种即可)
(1)在线安装
- 命令行输入
pip install -U selenium - 若Selenium安装超时失败,可以试试国内源:
- 使用阿里云镜像:
pip install -i http://mirrors.aliyun.com/pypi/simple/ selenium - 使用清华大学镜像:
pip install -i https://pypi.tuna.tsinghua.edu.cn/simple/ selenium - 使用中国科技大学镜像:
pip install -i https://pypi.mirrors.ustc.edu.cn/simple/ selenium - 使用豆瓣镜像:
pip install -i http://pypi.douban.com/simple/ selenium
- 使用阿里云镜像:
- 安装Selenium指定版本(例如3.9.0)
命令行输入pip install -U selenium==3.9.0
(2)离线安装
打开网址:https://pypi.org/project/selenium/
点击Download files,下载后缀名为tar.gz包文件。
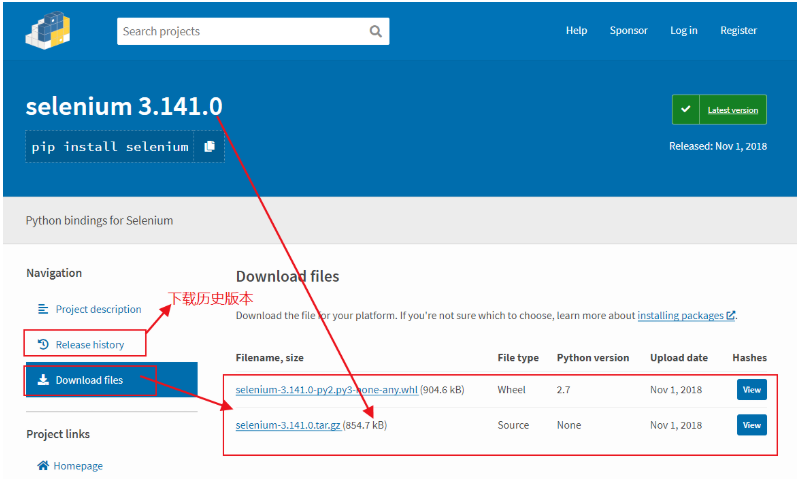
下载完成后,进行解压,例如:selenium-3.14.0.tar.gz。
解压后的文件目录,如下图所示:
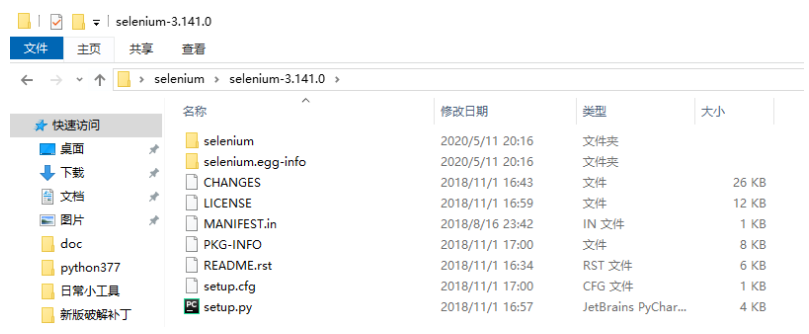
打开命令行,跳转到解压后的目录路径,输入安装命令python setup.py install即可。
安装完成后,打开命令行,输入pip list,查询已安装的模块,如下图:
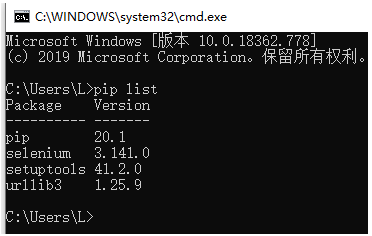
如图所示Selenium就安装成功。
同时在PyCharm中导入Selenium模块,没有报错,就可以正常在PyCharm中使用Selenium了。
# 1.导入selenium包
from selenium import webdriver
5、使用Selenium启动谷歌浏览器
在Python的IDE中,编写如下代码,如:PyCharm。
"""
1.学习目标
    掌握使用selenium启动谷歌浏览器
2.操作步骤
    2.1 导入selenium包
    2.2 选择并打开浏览器(谷歌)
    2.3 输入百度网址
    2.4 对网址操作
    2.5 关闭浏览器
3.需求
    使用selenium实现在谷歌浏览器中打开百度网站
4.注意事项
    4.1 脚本的名称一定不能为selenium
    4.2 输入网址的时候要加上协议,如:http://
"""
# 学习selenium主要学习的是对webdriver的使用

# 1.导入selenium包
from selenium import webdriver
from time import sleep

# 2.选择并打开浏览器(谷歌)
driver = webdriver.Chrome()

# 3. 输入百度网址
driver.get("http://www.baidu.com")
sleep(3)

# 4.对网址的操作
# 5.关闭浏览器
driver.quit()
6、拓展说明
(1)屏蔽“Chrome 正受到自动测试软件的控制“提示信息
81版不好用,75版可以。
"""
1.学习目标
    熟悉selenium屏蔽谷歌浏览器的信息提示栏
2.操作步骤
    1.导包
    2.添加谷歌浏览器加载项
        屏蔽信息提示栏
    3.打开谷歌浏览器——将屏蔽信息提示栏参数传入到打开浏览器中
    4.打开地址
    5.关闭浏览器

    总结:
    options = webdriver.ChromeOptions()  # 实例化谷歌浏览器加载项
    options.add_argument("disable-infobars")  # 去掉谷歌浏览器信息提示栏
    webdriver.Chrome(chrom_options=options)  # 使用浏览器加载项
3.需求
    使用selenium将谷歌浏览器的信息提示栏屏蔽
"""
# 1.导入selenium包
from selenium import webdriver
from time import sleep

# 2.添加谷歌浏览器加载项
options = webdriver.ChromeOptions()
options.add_argument("disable-infobars")

# 3.打开谷歌浏览器——将屏蔽信息提示栏参数传入打开浏览器中
"""
DeprecationWarning: use options instead of chrome_options
弃用警告:使用选项代替chrome_options,改用options选项
"""
driver = webdriver.Chrome(options=options)

# 4.打开地址
url = "http://www.baidu.com"
driver.get(url)
sleep(3)

# 5.关闭浏览器
driver.quit()
(2)Chrome模拟移动端
打开chrome —> F12 —> 开启移动端视角,如图所示,可以模拟iphone6等设备。
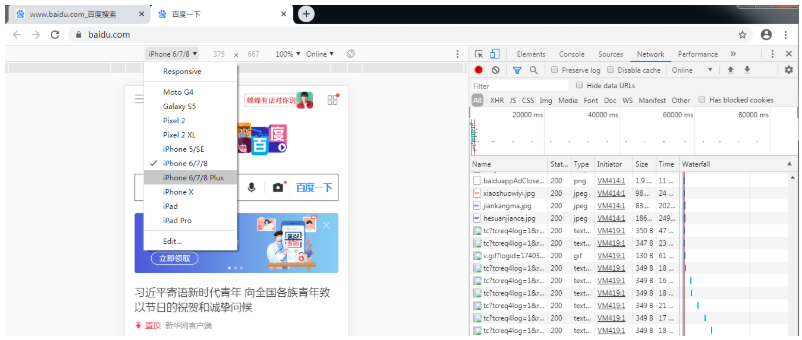
也可以添加或删除设备,点击Edit进行设置。
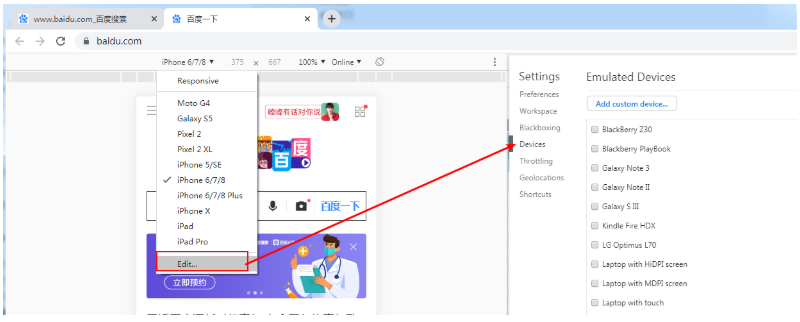
在脚本里deviceName属性,要定义为所要模拟的设备名。
脚本代码如下:
"""
1.学习目标
    熟悉selenium使用谷歌浏览器模拟移动端
2.操作步骤
    1.导包
    2.添加谷歌浏览器加载项
        设置模拟的手机型号,字典类型的参数
        mobileEmulation = {"deviceName": "iPhone X"}
        options=webdriver.ChromeOptions()
        options.add_experimental_option("mobileEmulation", mobileEmulation)
        注:"mobileEmulation"为固定写法。
    3.打开谷歌浏览器——将参数传入打开的浏览器中
    4.打开地址
    5.关闭浏览器
3.需求
    使用selenium打开谷歌浏览器,模拟iPhoneX手机

"""
# 1.导入selenium包
from selenium import webdriver
from time import sleep

# 2.添加谷歌浏览器加载项
mobileEmulation = {"deviceName": "iPhone X"}
options = webdriver.ChromeOptions()
# 因为传入的是字典类型的数据,所以使用的add方法也不一样
options.add_experimental_option("mobileEmulation", mobileEmulation)

# 3.打开谷歌浏览器——将模拟移动端的参数,传入打开的浏览器中
# options和chrome_options一样,chrome_options将弃用。
driver = webdriver.Chrome(options=options)

# 4.打开地址
url = "http://www.baidu.com"
driver.get(url)
sleep(3)

# 5.关闭浏览器
driver.quit()

