
CentOS Linux release 7.6 zabbix5.0 安装
# zabbix 安装关方文档
https://www.zabbix.com/cn/download?zabbix=5.0&os_distribution=centos&os_version=7&components=server_frontend_agent&db=mysql&ws=nginx
安装步骤
Install and configure Zabbix for your platform
a. Install Zabbix repository
rpm -Uvh https://repo.zabbix.com/zabbix/5.0/rhel/7/x86_64/zabbix-release-5.0-1.el7.noarch.rpm
yum clean all
b. 安装Zabbix server,Web前端,agent
yum install zabbix-server-mysql zabbix-agent
c. Install Zabbix frontend
Enable Red Hat Software Collections
yum install centos-release-scl
编辑配置文件 /etc/yum.repos.d/zabbix.repo and enable zabbix-frontend repository.
[zabbix-frontend]
...
enabled=1
...
Install Zabbix frontend packages.
yum install zabbix-web-mysql-scl zabbix-apache-conf-scl
d. 创建初始数据库
Make sure you have database server up and running.
在数据库主机上运行以下代码。
# mysql -uroot -p
password
mysql> create database zabbix character set utf8 collate utf8_bin;
mysql> create user zabbix@localhost identified by 'password';
mysql> grant all privileges on zabbix.* to zabbix@localhost;
mysql> set global log_bin_trust_function_creators = 1;
mysql> quit;
导入初始架构和数据,系统将提示您输入新创建的密码。
# zcat /usr/share/doc/zabbix-server-mysql*/create.sql.gz | mysql -uzabbix -p zabbix
Disable log_bin_trust_function_creators option after importing database schema.
# mysql -uroot -p
password
mysql> set global log_bin_trust_function_creators = 0;
mysql> quit;
e. 为Zabbix server配置数据库
编辑配置文件 /etc/zabbix/zabbix_server.conf
DBPassword=password
f. 为Zabbix前端配置PHP
编辑配置文件 /etc/opt/rh/rh-php72/php-fpm.d/zabbix.conf uncomment and set the right timezone for you.
; php_value[date.timezone] = Asia/Shanghai
g. 启动Zabbix server和agent进程
启动Zabbix server和agent进程,并为它们设置开机自启:
# systemctl restart zabbix-server zabbix-agent httpd rh-php72-php-fpm
# systemctl enable zabbix-server zabbix-agent httpd rh-php72-php-fpm
#################################
# 从window下载字体,上传字体,解决页面乱码问题 #####
cd /usr/share/zabbix/assets/fonts
mv graphfont.ttf graphfont.ttf.bak
mv msyh.ttf graphfont.ttf
###################################
##########################################
# zabbix-agent 安装
Install and configure Zabbix for your platform
a. Install Zabbix repository
产品手册
# rpm -Uvh https://repo.zabbix.com/zabbix/5.0/rhel/7/x86_64/zabbix-release-5.0-1.el7.noarch.rpm
# yum clean all
b. Install Zabbix agent
# yum install zabbix-agent
c. Start Zabbix agent process
Start Zabbix agent process and make it start at system boot.
# systemctl restart zabbix-agent
# systemctl enable zabbix-agent
################################################################
## agent 监控端配置
# 配置文件
[root@VM-8-3-centos ~]# cat /etc/zabbix/zabbix_agentd.conf
PidFile=/var/run/zabbix/zabbix_agentd.pid
LogFile=/var/log/zabbix/zabbix_agentd.log
LogFileSize=100
Server=212.129.
StartAgents=16
DebugLevel=3
ServerActive=212.129
SourceIP=43.143
HostnameItem=system.hostname
RefreshActiveChecks=90
BufferSend=30
BufferSize=2048
Timeout=9
AllowRoot=0
Include=/etc/zabbix/zabbix_agentd.d/
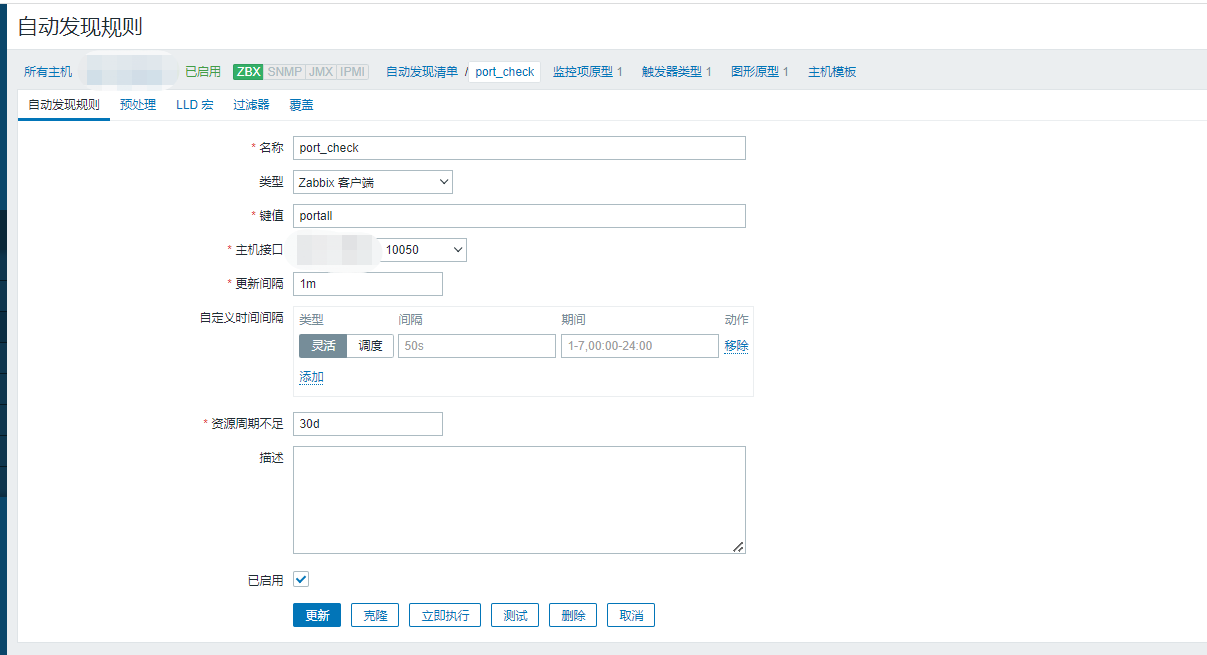
# 自定义监控项+自动发现
UserParameter=portall,/root/zabbix-test/postjson.py
UserParameter=test,cat /etc/zabbix/1.txt
# 端口监控脚本
[root@VM-8-3-centos ~]# cat /root/zabbix-test/postjson.py
#!/usr/bin/env python
import json
import os
cmd=os.popen("""netstat -ntl|tail -n +3|awk '{print $4}'|awk -F: '{print $NF}'|sort|uniq""")
ports=[]
for port in cmd.readlines():
r=port.strip()
ports+=[{'{#PORT}':r}]
print json.dumps({'data':ports},sort_keys=True,indent=4,separators=(',',':'))
# 脚本执行结果
[root@VM-8-3-centos ~]# /root/zabbix-test/postjson.py
{
"data":[
{
"{#PORT}":"10050"
},
{
"{#PORT}":"22"
},
{
"{#PORT}":"80"
},
{
"{#PORT}":"8111"
}
]
}


 浙公网安备 33010602011771号