IntelliJ IDEA 2017版 spring-boot-devtools实现热部署
1、配置pom.xml文档


 1 <?xml version="1.0" encoding="UTF-8"?>
 2 <project xmlns="http://maven.apache.org/POM/4.0.0" xmlns:xsi="http://www.w3.org/2001/XMLSchema-instance"
 3     xsi:schemaLocation="http://maven.apache.org/POM/4.0.0 http://maven.apache.org/xsd/maven-4.0.0.xsd">
 4     <modelVersion>4.0.0</modelVersion>
 5
 6     <groupId>com.easytest</groupId>
 7     <artifactId>rebushu</artifactId>
 8     <version>0.0.1-SNAPSHOT</version>
 9     <packaging>jar</packaging>
10
11     <name>rebushu</name>
12     <url>http://maven.apache.org</url>
13     <description>Demo project for Spring Boot</description>
14
15     <parent>
16         <groupId>org.springframework.boot</groupId>
17         <artifactId>spring-boot-starter-parent</artifactId>
18         <version>1.5.9.RELEASE</version>
19         <relativePath/> <!-- lookup parent from repository -->
20     </parent>
21
22     <properties>
23         <project.build.sourceEncoding>UTF-8</project.build.sourceEncoding>
24         <project.reporting.outputEncoding>UTF-8</project.reporting.outputEncoding>
25         <java.version>1.8</java.version>
26     </properties>
27
28     <dependencies>
29         <dependency>
30             <groupId>org.springframework.boot</groupId>
31             <artifactId>spring-boot-starter-web</artifactId>
32         </dependency>
33
34         <dependency>
35             <groupId>org.springframework.boot</groupId>
36             <artifactId>spring-boot-starter-test</artifactId>
37             <scope>test</scope>
38         </dependency>
39         <dependency>
40             <groupId>com.alibaba</groupId>
41             <artifactId>fastjson</artifactId>
42             <version>1.2.15</version>
43         </dependency>
44
45         <!-- spring boot devtools 依赖包. -->
46         <dependency>
47             <groupId>org.springframework.boot</groupId>
48             <artifactId>spring-boot-devtools</artifactId>
49             <optional>true</optional>
50             <scope>true</scope>
51         </dependency>
52     </dependencies>
53
54     <!--构建节点-->
55     <build>
56         <plugins>
57             <plugin>
58                 <groupId>org.springframework.boot</groupId>
59                 <artifactId>spring-boot-maven-plugin</artifactId>
60                 <configuration>
61                     <!--fork :  如果没有该项配置,肯呢个devtools不会起作用,即应用不会restart -->
62                     <fork>true</fork>
63                 </configuration>
64
65             </plugin>
66
67         </plugins>
68     </build>
69
70 </project>
2、书写测试代码pojo(实体类)
 1 package com.easytest;
 2
 3 import com.alibaba.fastjson.annotation.JSONField;
 4
 5 import java.util.Date;
 6
 7 /**
 8  * Created by liuya on 2018-01-17.
 9  */
10 public class UserPoJo
11 {
12     private int userId;
13     private String userName;
14     @JSONField(format="yyyy-MM-dd HH:mm:ss")
15     private Date createTime;
16
17     public Date getCreateTime() {
18         return createTime;
19     }
20
21     public void setCreateTime(Date createTime) {
22         this.createTime = createTime;
23     }
24
25     public int getUserId() {
26         return userId;
27     }
28
29     public void setUserId(int userId) {
30         this.userId = userId;
31     }
32
33     public String getUserName() {
34         return userName;
35     }
36
37     public void setUserName(String userName) {
38         this.userName = userName;
39     }
40
41     @Override
42     public String toString() {
43         return "UserPoJo{" +
44                 "userId=" + userId +
45                 ", userName='" + userName + '\'' +
46                 ", createTime=" + createTime +
47                 '}';
48     }
49 }
3、书写测试服务器
 1 package com.easytest;
 2
 3 import com.alibaba.fastjson.serializer.SerializerFeature;
 4 import com.alibaba.fastjson.support.config.FastJsonConfig;
 5 import com.alibaba.fastjson.support.spring.FastJsonHttpMessageConverter;
 6 import org.springframework.boot.SpringApplication;
 7 import org.springframework.boot.autoconfigure.SpringBootApplication;
 8 import org.springframework.http.MediaType;
 9 import org.springframework.http.converter.HttpMessageConverter;
10 import org.springframework.web.servlet.config.annotation.WebMvcConfigurerAdapter;
11
12 import java.util.ArrayList;
13 import java.util.List;
14
15 @SpringBootApplication
16 public class RebushuApplication extends WebMvcConfigurerAdapter {
17
18     /**
19      //     * 在这里我们使用 @Bean注入 fastJsonHttpMessageConvert
20      //     * @return
21      //     */
22     @Override
23     public void configureMessageConverters(List<HttpMessageConverter<?>> converters) {
24
25         // 1、需要先定义一个 convert 转换消息的对象;
26         FastJsonHttpMessageConverter fastConverter = new FastJsonHttpMessageConverter();
27
28         //2、添加fastJson 的配置信息,比如:是否要格式化返回的json数据;
29         FastJsonConfig fastJsonConfig = new FastJsonConfig();
30         fastJsonConfig.setSerializerFeatures(SerializerFeature.PrettyFormat);
31
32         //处理中文乱码
33         List<MediaType> fastMediaTypes = new ArrayList<>();
34         fastMediaTypes.add(MediaType.APPLICATION_JSON_UTF8);
35         fastConverter.setSupportedMediaTypes(fastMediaTypes);
36
37         //3、在convert中添加配置信息.
38         fastConverter.setFastJsonConfig(fastJsonConfig);
39
40         HttpMessageConverter<?> converter = fastConverter;
41         converters.add(fastConverter);
42     }
43
44     public static void main(String[] args) {
45         SpringApplication.run(RebushuApplication.class, args);
46     }
47 }
4、书写controller代码
 1 package com.easytest;
 2
 3 import org.springframework.web.bind.annotation.RequestMapping;
 4 import org.springframework.web.bind.annotation.RestController;
 5
 6 import java.util.Date;
 7
 8 /**
 9  * Created by liuya on 2018-01-16.
10  *
11  *  测试用的一个helloworld例子
12  */
13
14
15 @RestController
16 public class ControllerJson {
17
18     @RequestMapping("user2")
19     public UserPoJo hello(){
20         //实体类赋值
21         UserPoJo userPoJo  = new UserPoJo();
22         userPoJo.setUserId(111);
23         userPoJo.setUserName("王小二");
24         userPoJo.setCreateTime(new Date());
25         //返回实体类
26         return userPoJo;
27     }
28 }
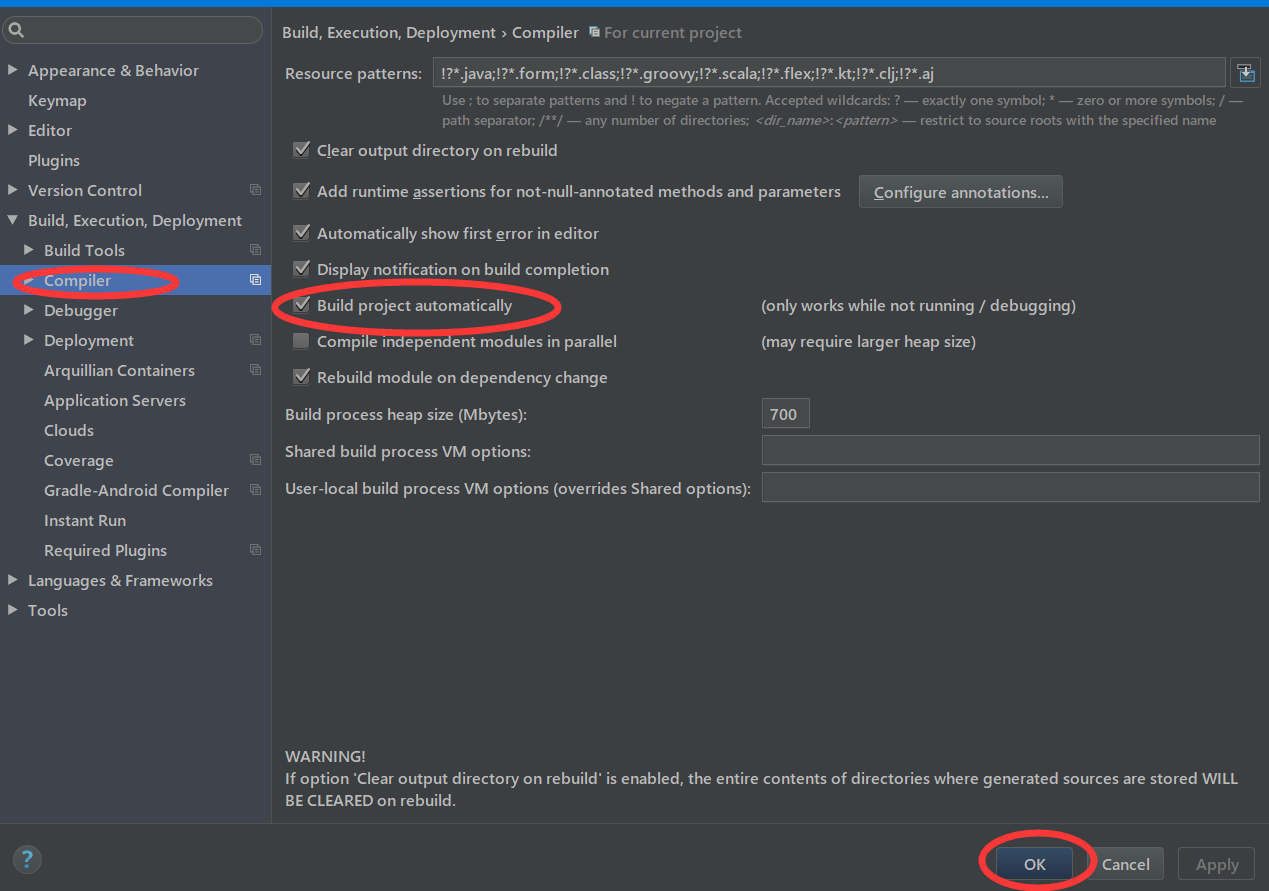
5、编译器配置
(1)开启idea自动make功能
File--->setting--->如图:

(2)点击Compiler进入界面如图:(选择make project automatically)
(3)CTRL + SHIFT + A ----->查找Registry --->勾选compiler.automake.allow.when.app.running项目(详见:http://www.cnblogs.com/liuyangfirst/p/8317419.html)
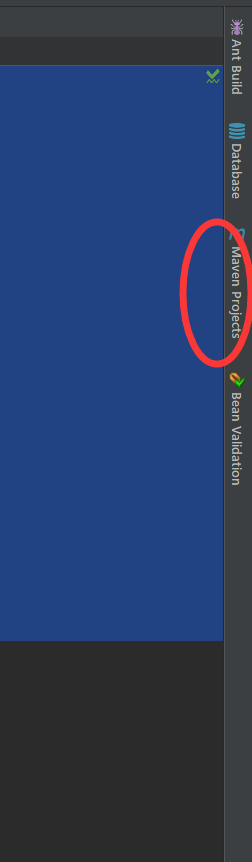
6、maven启动,在编译器右侧栏点开右侧栏
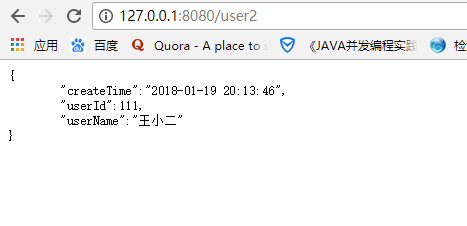
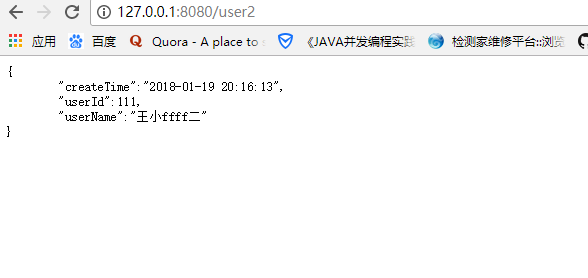
7、访问网页测试一下是否联通
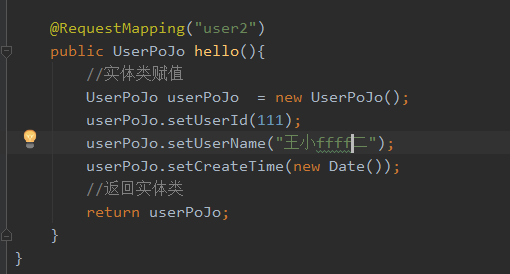
8、controller中加如下内容,然后F5刷新界面,如图就是成功实现热部署
十年磨一剑,一剑破万法

 浙公网安备 33010602011771号