

实验4、Flask基于Blueprint & Bootstrap布局的应用服务
1. 实验内容
模块化工程内容能够更好的与项目组内成员合作,Flask Blueprint提供了重要的模块化功能,使得开发过程更加清晰便利。此外,Flask也支持Bootstrap的使用。
2. 实验要点
- 学习和掌握Flask Blueprint的基本用法
- 尝试Flask Bootstrap的支持
3.实验环境
- Centos 7.9
4. 工作目录
本实验的工作目录为: /experiment
Flask Application
如果你仔细观察app/__init__.py文件就会发现在该文件的代码中
from flask import Flask
app = Flask(__name__)
代码创建了Flask实例并命名为app。Flask类的实例试Flask Application, 它是WSGI应用程序的实例。
Flask Blueprint
Flask Blueprint使我们可以将相关功能结合在一起,并有助于更好的开发实践。Flask蓝图的一些好处如下:
- 轻松组织大型应用程序。
- 通过多次注册相同的Blueprint来提高代码的可重用性。
- 记录了一组操作,并可以在注册Blueprint后随后重播。
有了Flask Blueprint的上述内容,我们就可以继续设计第一个Blueprint。我们也可以将Blueprint视为一个模块。让我们创建一个HelloWorld蓝图。
Blueprint的所有组件,资源和功能都与Flask应用程序的其他源代码分开保存和组织。这意味着Flask Blueprint可以具有其视图,表单,模型,静态文件和模板。
您可以从同一组资源创建多个Blueprint。但是,这可能会造成混乱,不是一个好习惯。
创建文件和目录
启动MongoDB服务
mongod --dbpath /var/lib/mongodb --logpath /var/log/mongodb/mongod.log --fork
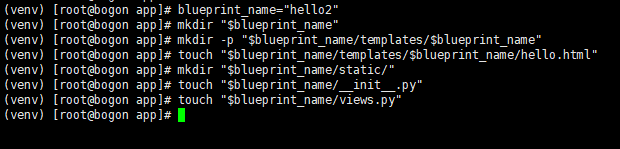
让我们开始创建一个名称为hello2的Flask Blueprint。激活虚拟环境后,使用以下提供的脚本创建目录结构,需要在app目录下。
blueprint_name="hello2"
mkdir "$blueprint_name"
mkdir -p "$blueprint_name/templates/$blueprint_name"
touch "$blueprint_name/templates/$blueprint_name/hello.html"
mkdir "$blueprint_name/static/"
touch "$blueprint_name/__init__.py"
touch "$blueprint_name/views.py"
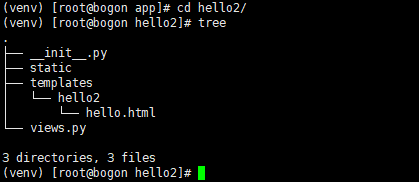
我们希望hello2蓝图具有其视图,然后将其导入__init__.py。我们使用模板和静态目录为Blueprint创建一个单独的目录,以分别渲染Flask视图和提供静态资源。
Blueprint的目录结构应如下所示。使用tree命令创建如下输出。
现在让我们在views.py中定义一个简单的视图。打开hello2/views.py,然后输入下面给出的代码
from flask import Blueprint, render_template

hello2 = Blueprint(
    'hello2',
    __name__,
    template_folder="templates",
    static_folder='static'
)


@hello2.route("/")
def hello2_view():
    greeting = "Hello World 2"
    return render_template("hello2/hello.html", greeting=greeting)
我们导入Blueprint类和render_template方法。然后,通过提供模板和静态目录的名称来创建一个Blueprint对象。
然后,我们使用装饰器@ hello2.route和名称为hello2_view的控制器来定义路由。该控制器是Python函数。在此函数中,我们为名为greeting的变量分配一个值,然后将其传递给render_template方法。
创建Flask Blueprint模板
现在,让我们创建模板hello.html。如果您正在阅读我们以前的教程,那么您一定已经注意到该模板与我们为租用HelloWorld视图而创建的名称相同。对于此hello2蓝图,我们通过扩展前一个模板来创建一个新模板。
此外,请注意,在调用render_template在模板中呈现问候语时,我们已经使用了路径语义hello2 / hello.html。此模式避免了相同名称的模板之间的冲突。
使用下面给出的代码片段创建hello.html并将其保存在hello2/templates/hello2/路径下
{% extends "hello.html" %}

{% block hello %}

<p> <b/>{{ greeting }} </b>, from Software Testing Help. </p>

{% endblock %}
这个模板几乎类似于hello.html。但是,它从hello.html继承了大部分HTML部分。{%block hello%}和{%endblock%}里面的内容将是被替代的内容。
现在,让我们打开hello2 Blueprint的__init__.py文件,并在其中提及以下代码。
from app.hello2.views import * # expose all views at the blueprint level
在此语句中,我们导入在hello2 Blueprint的views.py中创建的所有修饰方法。如果需要,我们只能导入准备使用或测试的那些方法/控制器。
现在,让我们打开Flask app目录下的__init__.py并注册我们的hello2 Blueprint,如下面的代码所示。
from app.hello2 import hello2
app.register_blueprint(hello2, url_prefix="/hello2")
同样在这里,请注意,我们可以选择性地导入视图并仅注册准备使用或测试的视图。
让我们在项目的根目录中使用命令python run.py在调试模式下运行Flask应用,并导航至IP:8080/hello2以查看hello2的视图是否工作正常。

我们还可以通过使用Twitter的bootstrap框架,更好地呈现hello2 Blueprint。此外,在下一部分中,您将了解有关更改Flask Blueprint的可选参数的更多信息。让我们借助名为Flask Bootstrap的Flask Blueprint示例进行查看。
Flask Blueprint模块化
根据对hello2 Flask Blueprint的了解,接下来我们添加更多Blueprint来了解如何在Flask中创建模块化应用程序。
让我们假设我们有一个Web应用程序,以电子书,教程和课程的形式向访问者提供内容。它还包含一些有关团队信息和主页的其他内容。
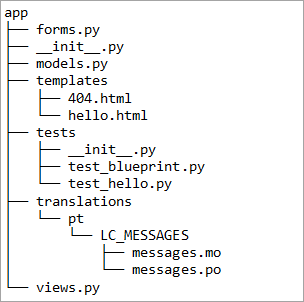
如果我们尝试在现有应用程序中容纳这些新功能,则必须在views.py中创建视图,并在应用程序模板目录下创建相应的模板。同样,我们需要在models.py和forms.py中创建模型和表单。
但是,维护所有应用程序代码将变得很麻烦,并且与其他团队成员的协作将过于复杂,并可能导致提交冲突或复杂的开发工作流程。
在上述方法下,应用程序结构是这样的
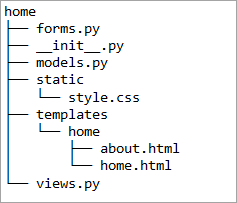
为了避免这种情况,我们可以使用Flask Blueprint来创建特定于功能和相应内容的模块。让我们用它们各自的资源来创建。
每种Flask Blueprint布局看起来都与以下所示类似。
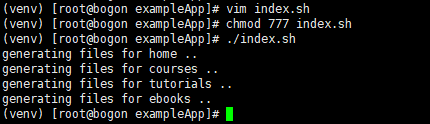
使用下面提供的脚本为计划的Flask Blueprint创建所需的文件和目录。从项目的根目录运行此脚本。
cd app
for dir in home courses tutorials ebooks
 do
  echo "generating files for $dir .."
  mkdir -p $dir/templates/$dir
  touch $dir/templates/$dir/$dir.html
  mkdir $dir/static
  touch $dir/static/style.css
  touch $dir/__init__.py
  touch $dir/views.py
  touch $dir/models.py
  touch $dir/forms.py
 done
我们先开始编辑Home模块打开app/home/views.py
from flask import render_template, Blueprint

home = Blueprint("home", __name__, template_folder="templates",
                 static_folder="static")


@home.route("/")
def index():
    return render_template("home/home.html")
在此文件中,我们导入了Flask的Blueprint类,并使用所需的参数(带有单独的模板和一个静态文件夹)实例化了它。然后,我们使用@home装饰来声明称为index的视图方法的关联路由。
现在,在app/templates目录下创建一个base.html Jinja2模板。使用下面提供的代码更新文件。
<h1>Welcome to our {% block pagename %} {% endblock %}</h1>
{% block content %}
{% endblock %}
现在,在home模块的模板下打开home.html,并使用以下代码对其进行更新。
{% extends "base.html" %}

{% block pagename %}
Home Page
{% endblock %}

{% block content %}
    Check following pages
    <ol>
        <li><a href="/courses">Courses</a></li>
        <li><a href="/ebooks">Ebooks</a></li>
        <li><a href="/tutorials">Tutorials</a></li>

    </ol>

<p>
    Check <a href="/home/about">About Us</a>
</p>

{% endblock %}
在上面提供的模板中,请注意我们如何利用extend关键字继承base.html。而且,我们在两个名为页面名和内容的块中覆盖了内容,如图所示。
与上面创建的模板类似,让我们创建about.html。
{% extends "base.html" %}

{% block pagename %}
About Page
{% endblock %}

{% block content %}

<p>
    Lorem ipsum dolor sit amet, consectetur adipiscing elit. Etiam turpis
    tellus, interdum sed diam cursus, sollicitudin luctus libero. Vestibulum
    tincidunt ex vel consectetur aliquet. Donec odio sapien, gravida non
    laoreet sed, rhoncus eu dolor. Cras tincidunt purus ac justo pharetra,
    accumsan faucibus justo interdum. Aliquam commodo justo at urna
    sollicitudin pretium. Vivamus vitae diam luctus, faucibus nibh ut, faucibus
    tortor. Vestibulum varius ipsum nec mi lobortis dignissim. Aliquam
    dignissim placerat purus, eu lobortis elit interdum et. Donec velit sem,
    tristique in lacus mollis, ultricies malesuada felis. Praesent nec urna
    eros.
</p>

<p>
    In hac habitasse platea dictumst. Maecenas egestas sit amet neque sed
    pretium. Curabitur nec ex vitae tortor luctus vulputate sit amet sed orci.
    Nam vehicula augue sem, sit amet aliquet ipsum aliquet vel. Curabitur
    varius odio eget nisl gravida malesuada. Phasellus neque neque, scelerisque
    vel eleifend ac, ullamcorper nec lacus. Aliquam auctor nibh lacus, at
    tristique quam sodales nec.
</p>
{% endblock %}
将以下视图添加到home下的views.py中。
@home.route("/about")
def about():
    return render_template("home/about.html")
在home/__init__.py中添加
from app.home.views import *
通过这种方法,我们现在可以将与电子书,教程和课程相关的功能作为单独的模块独立创建,并将其插入app文件夹下的__init__.py文件中以进行测试或生产使用,如下所示。
from app.home import home
app.register_blueprint(home, url_prefix="/home")
之后运行服务器,访问IP:8080/home

与上述示例类似,我们可以创建与上述其他模块相对应的Flask Blueprint。
现在项目的结构如下所示
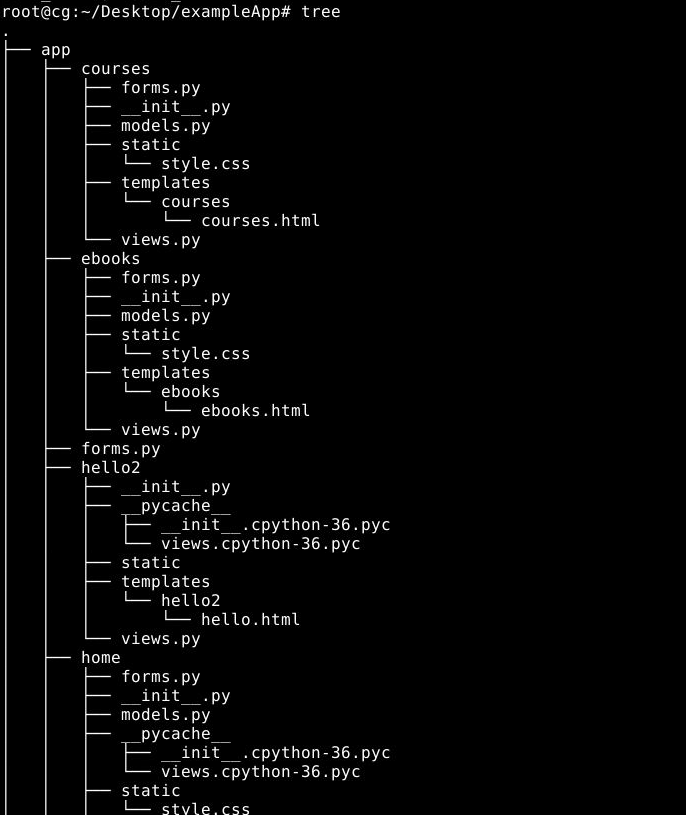
比较传统方法和使用Flask Blueprint的新方法之间的项目布局。
使用Flask Blueprint的这种模块化方法可以更轻松地管理和扩展Web应用程序,因为遵循Flask Blueprint的约定,各个功能是在各自的目录中开发和组织的。
测试Flask Blueprint
现在让我们创建一些测试来测试Blueprint hello2。让我们看看当客户端在/hello2发送资源的Get请求时,我们的示例应用程序是否返回正确的HTTP代码。如果您还记得的话,我们将Flask Blueprint hello2注册为url_prefix,其值为/hello2。
在app目录下创建一个名为test_blueprint.py的文件,并将以下测试添加到其中。
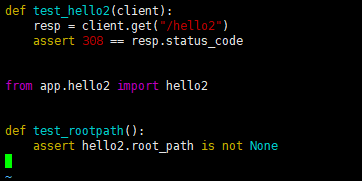
def test_hello2(client):
    resp = client.get("/hello2")
    assert 308 == resp.status_code
HTTP 308与永久重定向有关,并且我们的Flask应用程序需要将请求重定向到与名为hello2的蓝图相关的资源。
现在,让我们添加另一个测试来检查蓝图资源的根路径。让我们添加一个测试以查看它是否具有值。
from app.hello2 import hello2


def test_rootpath():
    assert hello2.root_path is not None
现在,让我们将这些测试与其他测试一起运行以确保它们通过。
pytest -v

实验总结
在本教程中,我们介绍了Flask Blueprint以及为Flask应用程序创建静态资源的概念。我们借助称为Flask-Bootstrap的Flask插件,探索了使用Flask Blueprint的好处以及Blueprint资源的想法。我们还创建了两个测试来验证Flask Blueprint。
在我们的下一个教程中,我们将介绍使用Flask在Web应用程序中构建功能时常用的模式。
常见的问题
Q:什么是Flask Blueprint?
A:Flask Blueprint是一种将Flask应用程序构造为较小且可重用的模块的方法。Flask Blueprint具有其单独的资源,例如视图,模板,静态文件,模型,表单等。我们使用Flask Blueprint来创建易于维护和可拓展的Flask应用程序。
Q:如何使用Flask Blueprint?
A:要使用Flask Blueprint,我们需要将其导入并使用app.register_blueprint方法在Flask Application对象中注册。我们可以将一个值传递给url_prefix参数,在Flask Blueprint的路径之前添加路径。


【推荐】国内首个AI IDE,深度理解中文开发场景,立即下载体验Trae
【推荐】编程新体验,更懂你的AI,立即体验豆包MarsCode编程助手
【推荐】抖音旗下AI助手豆包,你的智能百科全书,全免费不限次数
【推荐】轻量又高性能的 SSH 工具 IShell:AI 加持,快人一步
· 基于Microsoft.Extensions.AI核心库实现RAG应用
· Linux系列:如何用heaptrack跟踪.NET程序的非托管内存泄露
· 开发者必知的日志记录最佳实践
· SQL Server 2025 AI相关能力初探
· Linux系列:如何用 C#调用 C方法造成内存泄露
· Manus爆火,是硬核还是营销?
· 终于写完轮子一部分:tcp代理 了,记录一下
· 别再用vector<bool>了!Google高级工程师:这可能是STL最大的设计失误
· 单元测试从入门到精通
· 震惊!C++程序真的从main开始吗?99%的程序员都答错了