

【HDLBit】— 刷题
一、Getting Started
1.1 Step one
module top_module( output one );

    assign one = 1;

endmodule
1.2 Zero
module top_module(zero);
    output zero;
    assign zero = 1'b0;

endmodule
二、Verilog language
2.1 Basics
2.1.1 wire
module top_module( input in, output out );
    assign out = in;

endmodule
2.1.2 Wire4
module top_module(
    input a,b,c,
    output w,x,y,z );
    assign w = a;
    assign x = b;
    assign y = b;
    assign z = c;
endmodule
2.1.3 Notgate
module top_module( input in, output out );
    assign out = ~in;

endmodule
2.1.4 Andgate
module top_module(
    input a,
    input b,
    output out );
    assign out = a&b;

endmodule
2.1.5 Norgate
module top_module(
    input a,
    input b,
    output out );
    assign out = ~(a|b);

endmodule
2.1.6 Xnorgate
module top_module(
    input a,
    input b,
    output out );
    assign out = a?(b?1:0):(b?0:1);
endmodule
2.1.7 Wire decl

module top_module(
    input a,
    input b,
    input c,
    input d,
    output out,
    output out_n   );

    wire w1,w2,w3;

    assign out_n = ~w1;
    assign out = w1;
    assign w1 = w2|w3;
    assign w2 = a&b;
    assign w3 = c&d;

endmodule
2.1.8 7458
module top_module (
    input p1a, p1b, p1c, p1d, p1e, p1f,
    output p1y,
    input p2a, p2b, p2c, p2d,
    output p2y );

    assign p1y = (p1a & p1b & p1c)|(p1d & p1e & p1f);
    assign p2y = (p2a & p2b)|(p2c & p2d);

endmodule
2.2 vectors
2.2.1 vector0
module top_module (
    input wire [2:0] vec,
    output wire [2:0] outv,
    output wire o2,
    output wire o1,
    output wire o0  ); // Module body starts after module declaration

    assign outv = vec;
    assign o0 = vec[0];
    assign o1 = vec[1];
    assign o2 = vec[2];

endmodule
2.2.2 vector1
module top_module(
    input wire [15:0] in,
    output wire [7:0] out_hi,
    output wire [7:0] out_lo );

    assign out_lo[7:0] = in[7:0];
    assign out_hi[7:0] = in[15:8];

endmodule
2.2.3 Vector2
module top_module(
    input [31:0] in,
    output [31:0] out );//

    // assign out[31:24] = ...;
    assign out[7:0] = in[31:24];
    assign out[15:8] = in[23:16];
    assign out[23:16] = in[15:8];
    assign out[31:24] = in[7:0];

endmodule
2.2.4 Bitwise vs. Logical Operators
module top_module(
    input [2:0] a,
    input [2:0] b,
    output [2:0] out_or_bitwise,
    output out_or_logical,
    output [5:0] out_not
);
    // 按位或
    assign out_or_bitwise = a | b;
    // 逻辑或
    assign out_or_logical = a || b;
    // 取反
    assign out_not[2:0] = ~a;
    assign out_not[5:3] = ~b;

endmodule
2.2.4 four-input gates:AND, OR, and XOR operators
module top_module(
    input [3:0] in,
    output out_and,
    output out_or,
    output out_xor
);
// 写法一:
    assign out_and = in[0]&&in[1]&&in[2]&&in[3];
    assign out_or = in[0]||in[1]||in[2]||in[3];
    assign out_xor = in[0]^in[1]^in[2]^in[3];
// 写法二:
   assign out_and = ∈
   assign out_or = |in;
   assign out_xor = ^in;
endmodule
2.2.6 反转8bit输入
因为Verilog中向量顺序,先高位再低位的顺序[7:0]不能改变,因此不能用out[7:0]=in[0:7]来实现反转操作
module top_module(
    input [7:0] in,
    output [7:0] out
);
    //assign {out[0],out[1],out[2],out[3],out[4],out[5],out[6],out[7]} = in;
    assign out = {in[0],in[1],in[2],in[3],in[4],in[5],in[6],in[7]};
endmodule
2.3 模块
2.3.5 移位寄存器+4选一
注意:case语句必须在always块中使用
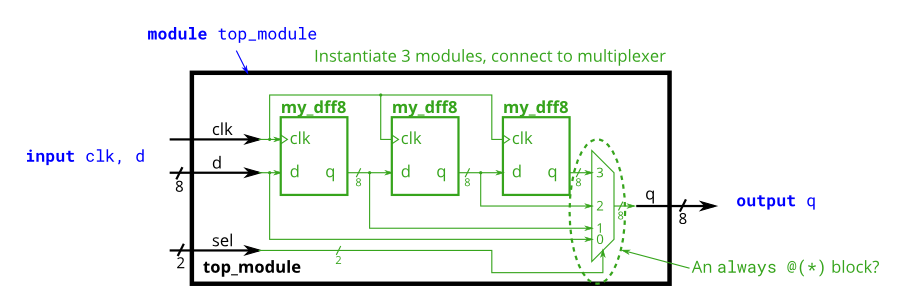
module top_module (
    input clk,
    input [7:0] d,
    input [1:0] sel,
    output [7:0] q
);
    wire [7:0]w1,w2,w3;
    my_dff8 a1(.clk(clk),.d(d),.q(w1));
    my_dff8 a2(.clk(clk),.d(w1),.q(w2));
    my_dff8 a3(.clk(clk),.d(w2),.q(w3));
    always@(*)begin
    case(sel)
        2'b00:q = d;
        2'b01:q = w1;
        2'b10:q = w2;
        2'b11:q = w3;
    endcase
        end
endmodule
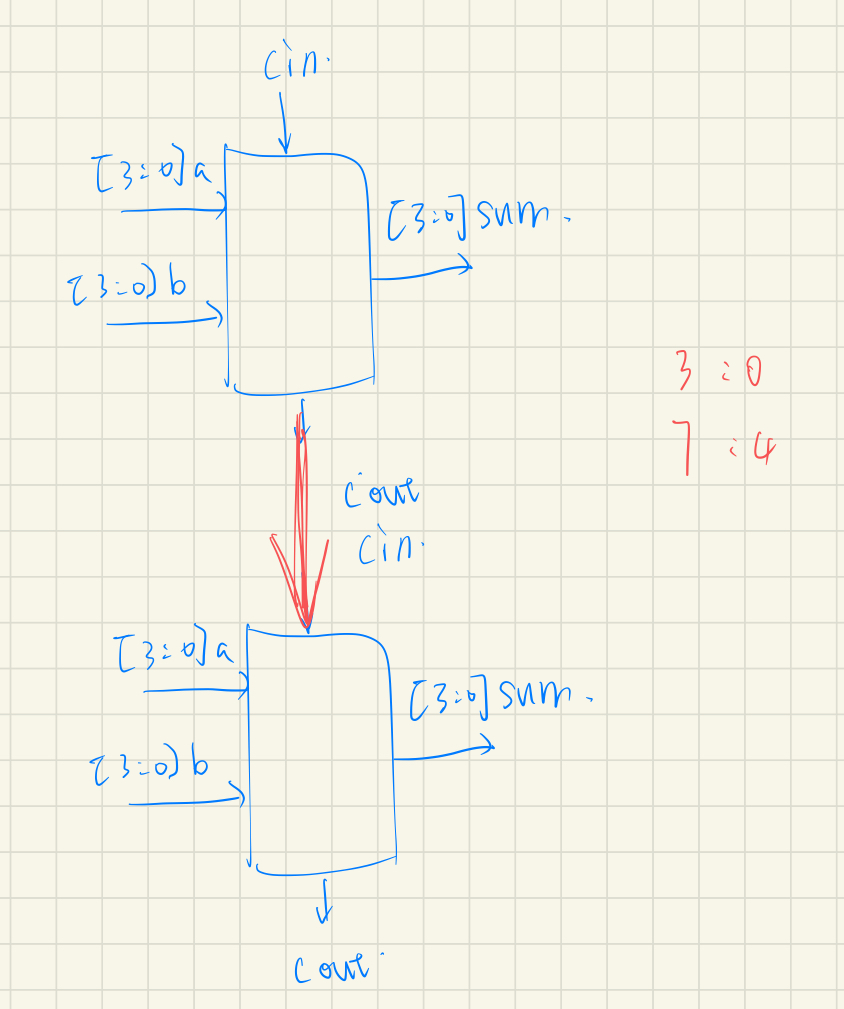
2.3.6 顶层模块和子模块之间连接
子模块的输入输出都是wire,只需要将其和顶层模块的输入输出使用assign相连即可

module top_module(
    input [31:0] a,
    input [31:0] b,
    output [31:0] sum
);
    wire [15:0]a1,a2,b1,b2,s1,s2;
    wire cin,c;
    assign cin = 0;
    assign a1 = a[15:0];
    assign a2 = a[31:16];
    assign b1 = b[15:0];
    assign b2 = b[31:16];
    add16 add16_inst01
    (
        .a(a1),
        .b(b1),
        .cin(cin),
        .cout(c),
        .sum(s1)
    );
    add16 add16_inst02
    (
        .a(a2),
        .b(b2),
        .cin(c),
        .sum(s2)
    );
    assign sum = {s2,s1};
endmodule
2.3.7全加器
add16可以直接用,add1全加器需要自己写
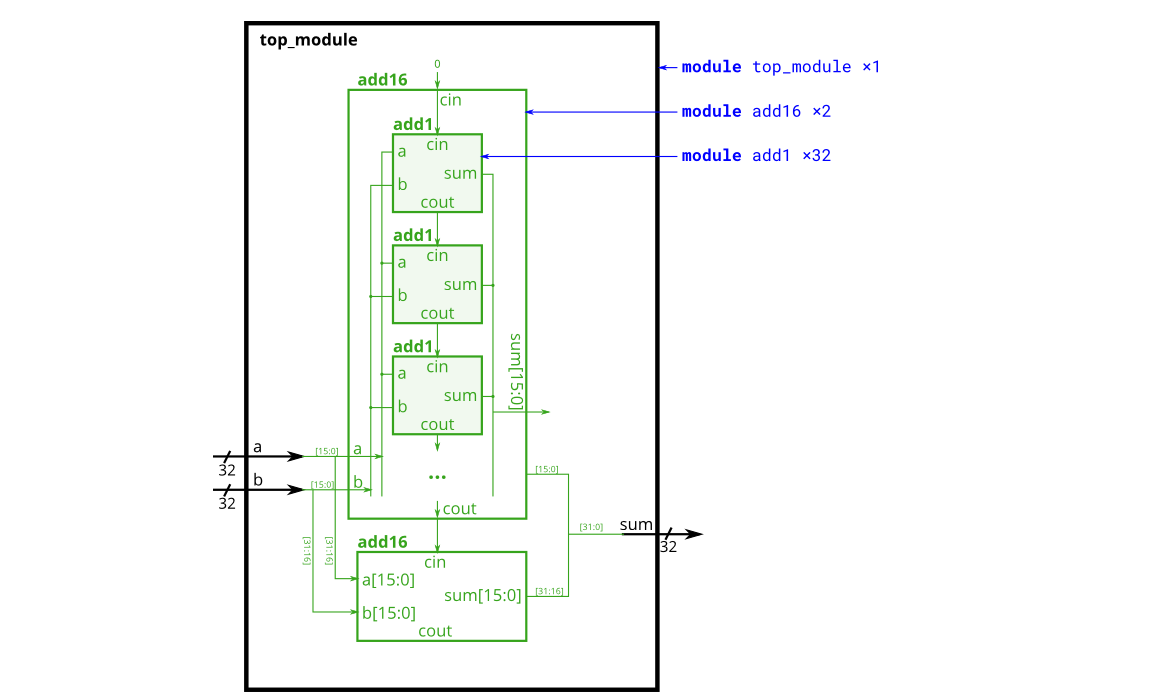
module top_module (
    input [31:0] a,
    input [31:0] b,
    output [31:0] sum
);

    wire cout1;
add16 add1_inst01
    (
        .a(a[15:0]),//将a的指定位宽和端口相连,就不用在外面单独声明变量
        .b(b[15:0]),
        .cin(1'd0),
        .cout(cout1),
        .sum(sum[15:0])
    );
add16 add1_inst02
    (
        .a(a[31:16]),
        .b(b[31:16]),
        .cin(cout1),
        .cout(),
        .sum(sum[31:16])
    );
endmodule

module add1 ( input a, input b, input cin,   output sum, output cout );

    // Full adder module here
    //输入信号:a+b+cin 相加产生的进位信号会自动给cout 输出信号:cout、sum,
    assign {cout,sum} = a+b+cin;

endmodule
2.3.7 带有选择的加法器(用资源换速度)
3个模块同时计算,等第一个模块得到cout后,直接去选下面两个模块的输出
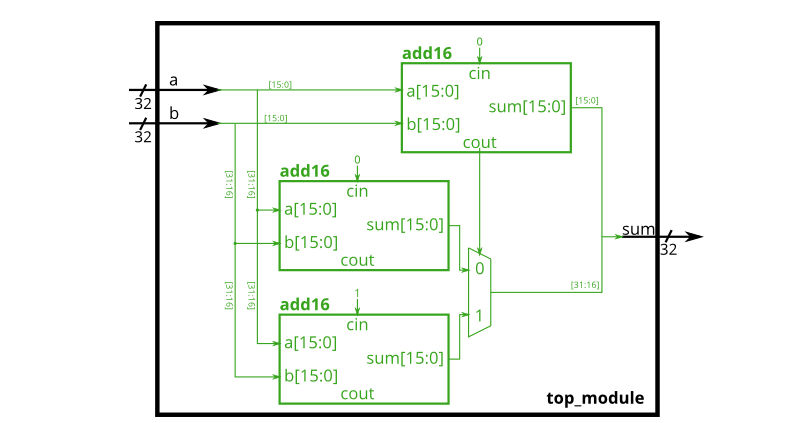
module top_module(
    input [31:0] a,
    input [31:0] b,
    output [31:0] sum
);
    wire wei;
    wire [15:0]sum1,sum2,sum3,sum4;

add16 add1_inst01
    (
        .a(a[15:0]),
        .b(b[15:0]),
        .cin(1'd0),
        .cout(wei),
        .sum(sum1)
    );
add16 add1_inst02
    (
        .a(a[31:16]),
        .b(b[31:16]),
        .cin(1'd0),
        .cout(),
        .sum(sum2)
    );
add16 add1_inst03
    (
        .a(a[31:16]),
        .b(b[31:16]),
        .cin(1'd1),
        .cout(),
        .sum(sum3)
    );
    always@(*)begin
        case(wei)
            1'd0: sum4 = sum2;
            1'd1: sum4 = sum3;
        endcase
    end
    assign sum = {sum4,sum1};
endmodule
2.3.8 加法器和减法器
减一个数,相当于加上这个数的补码,以此来实现减法功能
a-b=a+((~b)+1)
(~b)+1:原码按位取反得到反码,反码加1后得到补码
----------------------------------------------------------------------------------
加法器:(a + b + 0)
减法器 :(a + ~b + 1)
当输入端口sub为1时,add16就是减法器;当输入端口sub为0时,add16就是加法器
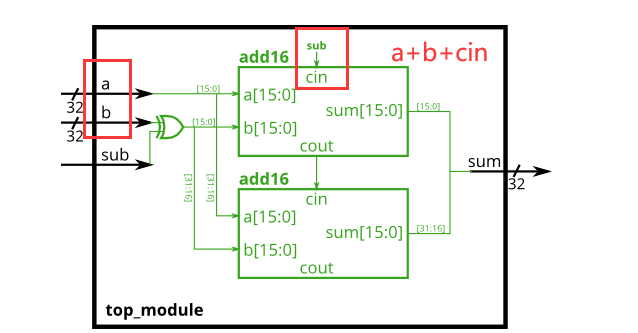
module top_module(
    input [31:0] a,
    input [31:0] b,
    input sub,
    output [31:0] sum
);
    wire cout1;
    wire [31:0]bb;

    assign bb = b^{32{sub}}; //按位异或,于是需要复制32个sub

    //end
add16 add1_inst01
    (
        .a(a[15:0]),
        .b(bb[15:0]),
        .cin(sub),
        .cout(cout1),
        .sum(sum[15:0])
    );

add16 add1_inst02
    (
        .a(a[31:16]),
        .b(bb[31:16]),
        .cin(cout1),
        .cout(),
        .sum(sum[31:16])
    );
endmodule
2.3 过程块
过程块,是一个过程,中间有些东西需要被记忆,所以会用到寄存器
2.4.1 组合always块

// synthesis verilog_input_version verilog_2001
module top_module(
    input a,
    input b,
    output wire out_assign,
    output reg out_alwaysblock
);
assign out_assign = a&b;
    always@(*)begin
        out_alwaysblock = a&b;
    end

endmodule
2.4.2 时序always块
使用非阻塞赋值即可
2.4.3 使用if实现2-1复用器
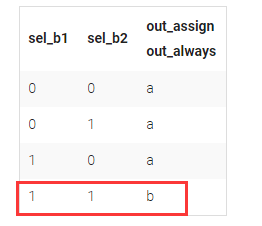
// synthesis verilog_input_version verilog_2001
module top_module(
    input a,
    input b,
    input sel_b1,
    input sel_b2,
    output wire out_assign,
    output reg out_always   );
// always
    always @(*)begin
        if(sel_b1 & sel_b2)// 为啥不能用sel_b1 == sel_b2
          out_always = b;
        else
           out_always = a;
    end
 //assign
    assign out_assign = (sel_b1 & sel_b2)?b:a;
endmodule
2.4.4、5 if语句、case语句产生的锁存器
在if语句和case语句中,需要将语句写完整,else和endcase要写出来,这样能避免出现锁存器
2.4.6 四输入的优先编码器
// synthesis verilog_input_version verilog_2001
module top_module (
    input [3:0] in,
    output reg [1:0] pos  );
    always@(*)begin
        case(in)
            4'b0000:pos = 2'b00;
            4'b0001:pos = 2'b00;
            4'b0010:pos = 2'b01;
            4'b0011:pos = 2'b00;
            4'b0100:pos = 2'b10;
            4'b0101:pos = 2'b00;
            4'b0110:pos = 2'b01;
            4'b0111:pos = 2'b00;
            4'b1000:pos = 2'b11;
            4'b1001:pos = 2'b00;
            4'b1010:pos = 2'b01;
            4'b1011:pos = 2'b00;
            4'b1100:pos = 2'b10;
            4'b1101:pos = 2'b00;
            4'b1110:pos = 2'b01;
            4'b1110:pos = 2'b01;
            default:pos = 2'b00;
        endcase
    end

endmodule
2.4.7 八输入的优先编码器(casez)
不关心z位置上的值是多少
// synthesis verilog_input_version verilog_2001
module top_module (
    input [7:0] in,
    output reg [2:0] pos  );
    always@(*)begin
        casez(in)
            8'bzzzzzzz1: pos = 3'b000;
            8'bzzzzzz1z: pos = 3'b001;
            8'bzzzzz1zz: pos = 3'b010;
            8'bzzzz1zzz: pos = 3'b011;
            8'bzzz1zzzz: pos = 3'b100;
            8'bzz1zzzzz: pos = 3'b101;
            8'bz1zzzzzz: pos = 3'b110;
            8'b1zzzzzzz: pos = 3'b111;
            default:pos = 3'b000;
        endcase
    end

endmodule
2.4.8 键盘输入
在case语句使用前,先对输出赋值,当满足case语句条件,再改变输出的值
对于出现多输出,需要在每种情况下,对每个输出进行赋值,不然会出现锁存器
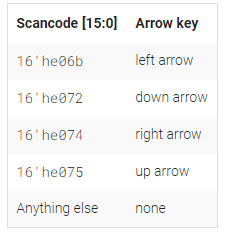
// synthesis verilog_input_version verilog_2001
module top_module (
    input [15:0] scancode,
    output reg left,
    output reg down,
    output reg right,
    output reg up  );
    always@(*)begin
        left = 1'b0;down = 1'b0; right = 1'b0; up = 1'b0;
        case(scancode)
            16'he06b:left = 1'b1;
            16'he072:down = 1'b1;
            16'he074:right = 1'b1;
            16'he075:up = 1'b1;
        endcase
    end
endmodule
2.5 关于其他
2.5.1 条件判断 (a<b)?a:b
module top_module (
    input [7:0] a, b, c, d,
    output [7:0] min);//

    // assign intermediate_result1 = compare? true: false;
    wire [7:0]w1,w2;
    assign w1 = (a<b)?a:b;
    assign w2 = (c<d)?c:d;
    assign min = (w1<w2)?w1:w2;

endmodule
2.5.2 缩位运算(奇偶校验)
8bit数据位+1bit奇偶校验位
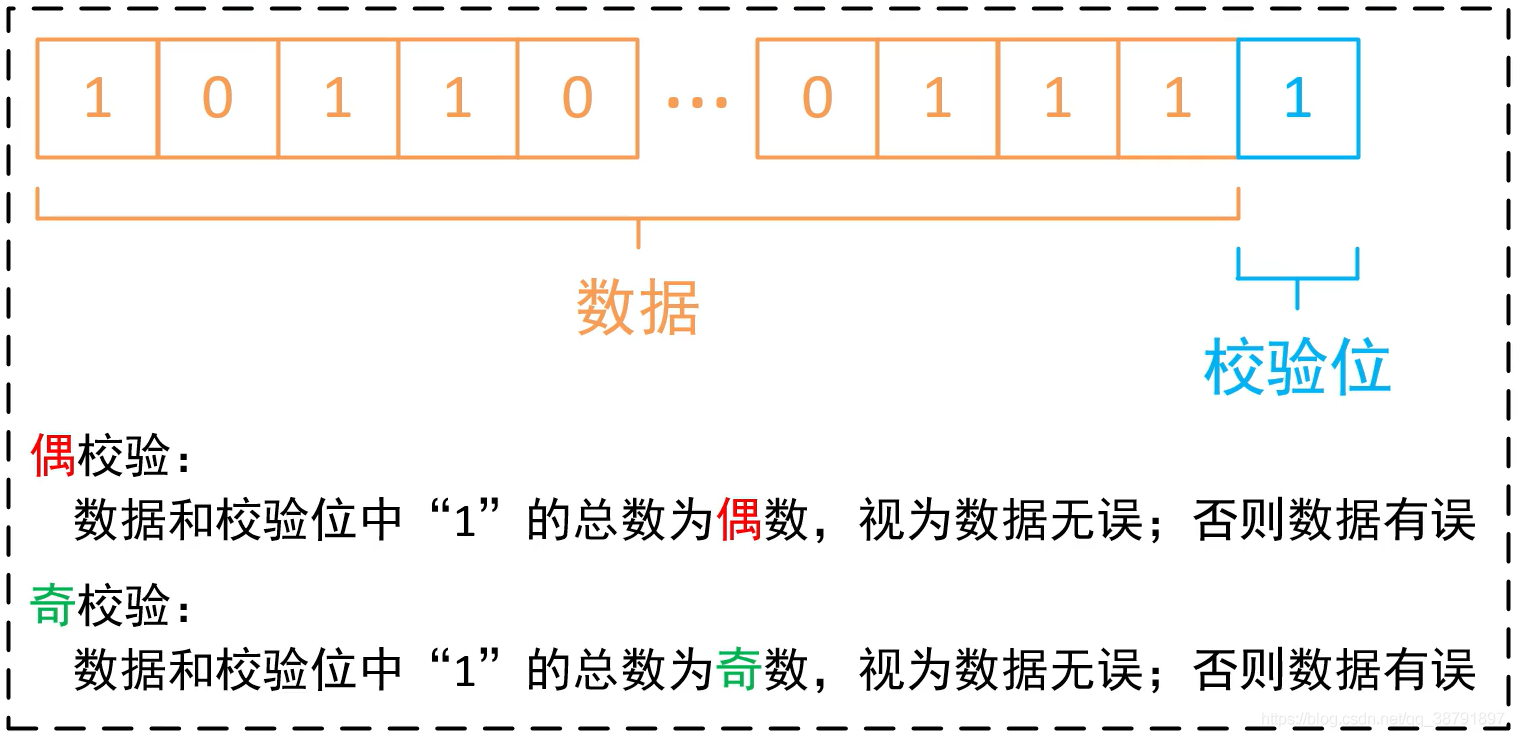
module top_module (
    input [7:0] in,
    output parity);
    assign parity = ^in;
endmodule
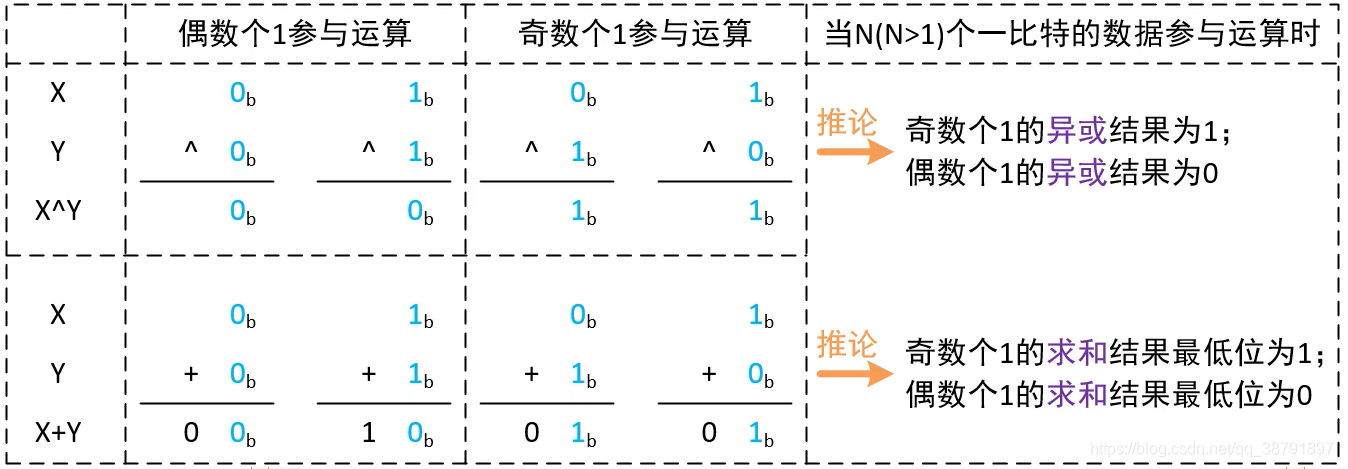
为什么奇偶校验不常用?
数据通信中的数据只能是1或者0,如果一个数据中的1位发生错误,那1的个数肯定就从奇数变为偶数(或者偶数变为奇数)。
但是如果数据中有多个数据位都发生错误了呢。举例来说,我们要发送11110000.如果有两位发生了错误,比如变成了11000000,那么1的个数还是偶数,那奇偶校验就检测不出来错误了。
所以说:如果数据中发生多位数据错误就可能检测不出来,更检测不到错误发生在哪一位
module top_module(
    input [99:0] in,
    output out_and,
    output out_or,
    output out_xor
);
    assign out_and = ∈
    assign out_or = |in;
    assign out_xor = ^in;
endmodule
2.5.4 for循环实现数据翻转
这里的out[i]代表数据的第几位
module top_module(
    input [99:0] in,
    output [99:0] out
);
integer i;
    always@(*)begin
        for(i=0;i<100;++i)begin
            out[i] = in[99-i];
        end
    end
endmodule
2.5.5 求出255个输入数据中1的总数
module top_module(
    input [254:0] in,
    output [7:0] out );
    integer i;
    always@(*)begin
    out = 0;
    for(i=0;i<$bits(in);++i)
        //写法一
        if(in[i])
            out = out+8'd1;
        //写法二
        out = out+in[i];
    end
endmodule
2.5.6 使用generate重复例化实现100位全加器
module top_module(
    input [99:0] a, b,
    input cin,
    output [99:0] cout,
    output [99:0] sum );
    generate
        genvar i;
        for(i=0;i<$bits(a);++i)begin:adder
            if(i == 0)begin
                fullder fullder_inst01(
                    .a(a[i]),
                    .b(b[i]),
                    .cin(cin),
                    .cout(cout[i]),
                    .sum(sum[i])
                );
            end
            else begin
                fullder fullder_inst02(
                    .a(a[i]),
                    .b(b[i]),
                    .cin(cout[i-1]),
                    .cout(cout[i]),
                    .sum(sum[i])
                );
            end
        end
    endgenerate
endmodule
module  fullder
    (
    input a,b,cin,
    output cout,sum
    );
    assign {cout,sum} = a+b+cin;
endmodule
2.5.7 使用generate重复例化实现100个BCD加法器
BCD:用4位2进制表示1个十进制数
module top_module(
    input [399:0] a, b,
    input cin,
    output cout,
    output [399:0] sum );
    wire [100:0]mid;
    assign mid[0] = cin;

    generate
        genvar i;
        for(i=0;i<100;++i)begin:adder
            bcd_fadd bcd_fadd_inst(
                .a(a[4*i+3:4*i]),
                .b(b[4*i+3:4*i]),
                .cin(mid[i]),
                .cout(mid[i+1]),
                .sum(sum[4*i+3:4*i])
            );
        end
    endgenerate
    assign cout = mid[100];

endmodule
三、电路
3.1 基本门电路
3.1.3 或非门
这里取非,为什么用~或者!都可以啊?
~:按位取反——即在数值的二进制表示方式上,将0变为1,将1变为0
!:逻辑取反——即把所有非0的数值(相当于1)变为0,0变为1;
一般在设计门级电路时,常用逻辑取反
module top_module (
    input in1,
    input in2,
    output out);
    assign out = ~(in1|in2);
    //assign out = !(in1|in2);

endmodule
3.1.5 两个门级电路
分析:从输出端往前推,巧用括号
module top_module (
    input in1,
    input in2,
    input in3,
    output out);
    assign out = (!((in1)^(in2)))^(in3);

endmodule
3.1.8 真值表
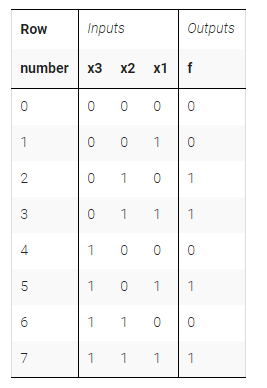
module top_module(
    input x3,
    input x2,
    input x1,  // three inputs
    output f   // one output
);
    assign f = ((!x1)&x2&(!x3))|(x1&x2&(!x3))|(x1&(!x2)&x3)|(x1&x2&x3);
endmodule
3.1.11 同或门
module top_module ( input x, input y, output z );
    assign z = (x&y)|((!x)&(!y));
    //assign z = !(x^y); 同或是异或取反
endmodule
3.1.12 多个小模块的例化
优点:只需要关注小模块的输出,在top顶层模块中进行例化
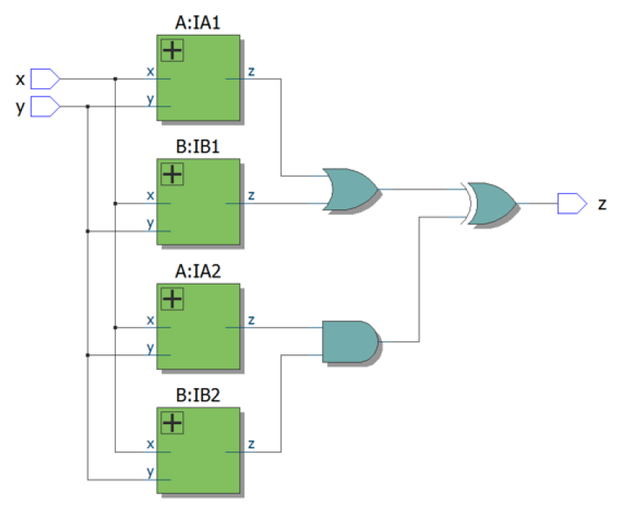
module top_module (input x, input y, output z);
    wire w1,w2,w3,w4;
    A A_inst01(
        .x(x),
        .y(y),
        .z(w1)
    );
    A A_inst02(
        .x(x),
        .y(y),
        .z(w2)
    );
    B B_inst01(
        .x(x),
        .y(y),
        .z(w3)
    );
    B B_inst02(
        .x(x),
        .y(y),
        .z(w4)
    );
    assign z = ((w3)&(w4))^((w1)|(w2));

endmodule

module A (input x, input y, output z);
    assign z = (x^y)&x;
endmodule
module B (input x, input y, output z);
    assign z = !(x^y);
endmodule
3.1.13 手机来电
门级描述
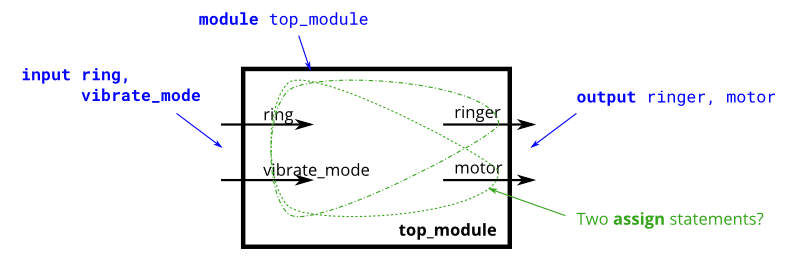
module top_module(
    input ring,
    input vibrate_mode,
    output ringer,
    output motor
);

    // When should ringer be on? When (phone is ringing) and (phone is not in vibrate mode)
    assign ringer = ring & ~vibrate_mode;

    // When should motor be on? When (phone is ringing) and (phone is in vibrate mode)
    assign motor = ring & vibrate_mode;

endmodule
3.2 时序逻辑
3.2.1锁存器和触发器
3.2.1.3 带有同步复位
同步复位信号不再敏感信号里面;
要受到时钟上升沿控制;
高电平有效
module top_module (
    input clk,
    input reset,            // Synchronous reset
    input [7:0] d,
    output [7:0] q
);
    always@(posedge clk)
        if(reset)
            q <= 8'd0;
        else
            q <= d;

endmodule
3.2.1.13 DFF和门
看到DFF模块,考虑建立一个DFF模块,然后调用它
在设计比较复杂的电路时,这种思维是很好的
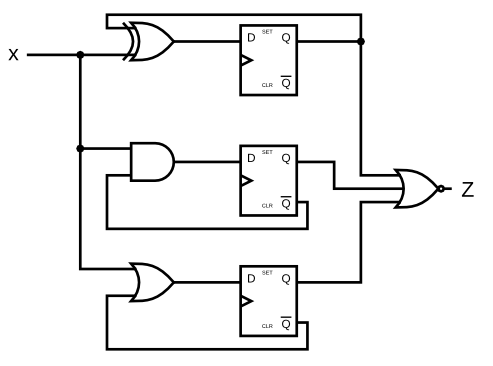
module top_module (
    input clk,
    input x,
    output z
);
    wire a,b,c,d,e,f;
    assign a = x^d;
    assign b = x&(~e);
    assign c = x|(!f);

    DFF DFF_inst_01
    (
        .clk(clk),
        .d(a),
        .q(d));
    DFF DFF_inst_02
    (
        .clk(clk),
        .d(b),
        .q(e));
    DFF DFF_inst_03
    (
        .clk(clk),
        .d(c),
        .q(f));

    assign z = ~(d|e|f);

endmodule

module DFF(
    input clk,
    input d,
    output reg q
);
    always@(posedge clk)
        q <= d;
endmodule
3.2.1.15 检测上升沿
打一拍
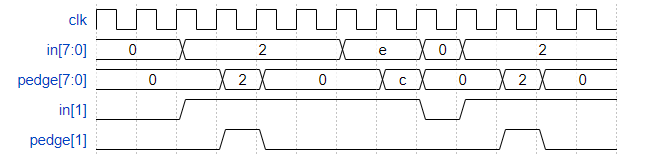
1 2 3 4 5 6 7 8 9 10 11 12 | module top_module ( input clk, input [7:0] in, output [7:0] pedge); reg [7:0] Q1; always @(posedge clk)begin Q1 <= in; pedge <= (~Q1) & in; end endmodule |
3.2.1.16 检测上升沿和下降沿
使用异或,只要前后信号不一致,就检测
module top_module (
    input clk,
    input [7:0] in,
    output reg[7:0] anyedge
);
    reg [7:0]Q;
    always@(posedge clk)begin
        Q <= in;
        anyedge <= Q^in;
    end
endmodule
3.2.1.17 clk上升沿下降沿均变化
使用2个always分别检测上升沿和下降沿
module top_module (
    input clk,
    input d,
    output reg q
);

    reg a,b;
    always @(posedge clk)
        a <= d;

    always @(negedge clk)
        b <= d;
    assign q = clk?a:b;

endmodule
3.2.2 计数器
3.2.2.4 带暂停
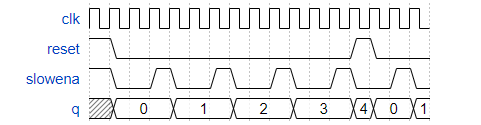
module top_module (
    input clk,
    input slowena,
    input reset,
    output [3:0] q);
    always @(posedge clk)
        if(reset)
            q <= 4'd0;
    else if(slowena)begin
        if(q == 4'd9)
            q <= 4'd0;
    else
        q <= q + 4'd1;
    end
    else
        q <= q;
endmodule
3.2.2.5 没懂
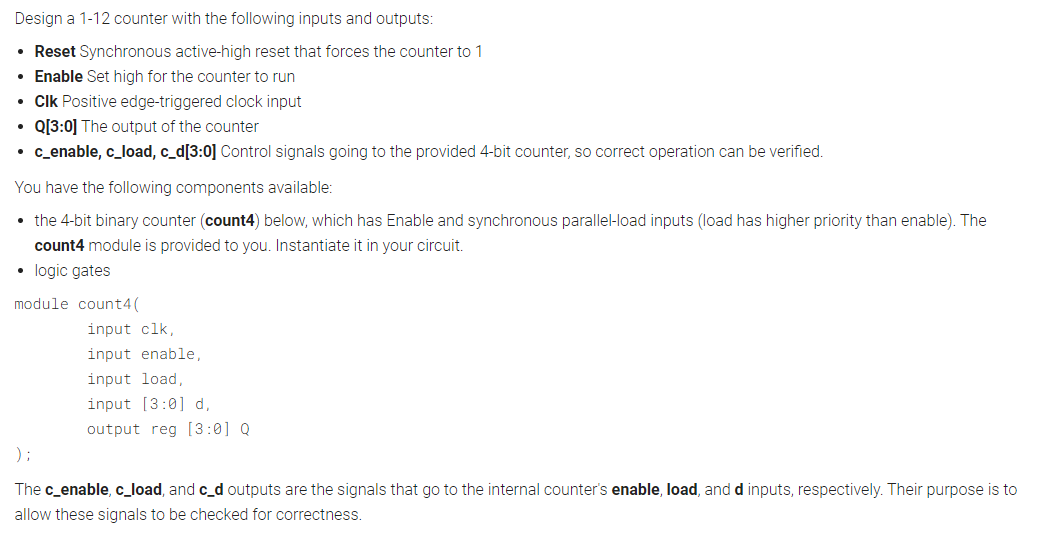
module top_module (
    input clk,
    input reset,
    input enable,
    output [3:0] Q,
    output c_enable,
    output c_load,
    output [3:0] c_d
); //
    assign c_enable = enable;
    assign c_load = (Q == 4'd12 && enable)||reset ? 1'b1 : 1'b0;
    assign c_d = 4'd1;
    count4 the_counter (clk, c_enable, c_load, c_d,Q);

endmodule


【推荐】国内首个AI IDE,深度理解中文开发场景,立即下载体验Trae
【推荐】编程新体验,更懂你的AI,立即体验豆包MarsCode编程助手
【推荐】抖音旗下AI助手豆包,你的智能百科全书,全免费不限次数
【推荐】轻量又高性能的 SSH 工具 IShell:AI 加持,快人一步
· winform 绘制太阳,地球,月球 运作规律
· AI与.NET技术实操系列(五):向量存储与相似性搜索在 .NET 中的实现
· 超详细:普通电脑也行Windows部署deepseek R1训练数据并当服务器共享给他人
· 上周热点回顾(3.3-3.9)
· AI 智能体引爆开源社区「GitHub 热点速览」