C# GDI+绘图介绍
最近查阅网上资料,将GDI+的基本知识汇总如下:
一、基本的知识
GDI+:Graphics Device Interface Plus也就是图形设备接口,提供了各种丰富的图形图像处理功能;
在C#.NET中,使用GDI+处理二维(2D)的图形和图像,使用DirectX处理三维(3D)的图形图像,
图形图像处理用到的主要命名空间是System.Drawing,程序集:System.Drawing.d11:提供了对GDI+基本图形功能的访问,主要有Graphics类、Bitmap类、从Brush类继承的类、Font类、Icon类、Image类、Pen类、Color类等.
1.1Graphics类
俗称:画布,用于在其上面绘制相应的图像、图片、文字等内容...有以下三种创建方式
(1)利用窗体或控件的Paint事件的参数PaintEventArgs创建Graphics对象。
private void Form1_Paint(object sender, PaintEventArgs e)
{
Graphics g = e.Graphics; //创建画板,这里的画板是由Form提供的.
}
(2)使用窗体或控件的CreateGraphics方法
Graphics g=this.CreateGraphics();
Graphics g=this.button1.CreateGraphics();
(3)使用Image的派生类创建Graphics对象。使用Image的任何派生类均可以生成相应的Graphics对象,这种方法一般适用于在C#中对图像进行处理的场合。
Bitmap b=new Bitmap("Mybmp.bmp");
Graphics g=Graphics.FromImage(b);
1.2 Pen对象
Pen类的构造函数有四种,使用方法如下。
(1)创建某一颜色的Pen对象:public Pen(Color)
(2)创建某一刷子样式的Pen对象:public Pen(Brush)
(3)创建某—刷子样式并具有相应宽度的Pen对象:public Pen(Brush,float)
(4)创建某一颜色和相应宽度的Pen对象:public Pen(Color,float)
Pen对象的常用属性
(1)Alignment属性:用来获取或设置此Pen对象的对齐方式。
(2)Color属性:用来获取或设置此Pen对象的颜色。
(3)Width属性:用来获取或设置此Pen对象的宽度。
(4)DashStyle属性:用来获取或设置通过此Pen对象绘制的虚线的样式。
(5)DashCap属性:用来指定虚线两端风格,是一个DashCap枚举型的值。
(6)StartCap属性:用来获取或设置通过此Pen对象绘制的直线起点的帽样式。
(7)EndCap属性:用来获取或设置通过此Pen对象绘制的直线终点的帽样式。
(8)PenType属性:用来获取用此Pen对象绘制的直线的样式。
private void Form1_Paint(object sender, PaintEventArgs e)
        {
            Graphics g = e.Graphics; //创建画板,这里的画板是由Form提供的.
            Pen p = new Pen(Color.Blue, 2);//定义了一个蓝色,宽度为的画笔
            g.DrawLine(p, 10, 10, 100, 100);//在画板上画直线,起始坐标为(10,10),终点坐标为(100,100)
            g.DrawRectangle(p, 10, 10, 100, 100);//在画板上画矩形,起始坐标为(10,10),宽为,高为
            g.DrawEllipse(p, 10, 10, 100, 100);//在画板上画椭圆,起始坐标为(10,10),外接矩形的宽为,高为
        }
1.3Brush类的使用
作用:我们可以用画刷填充各种图形形状,如矩形、椭圆、扇形、多边形和封闭路径等,主要有几种不同类型的画刷:
SolidBrush:画刷最简单的形式,用纯色进行绘制
• HatchBrush:类似于 SolidBrush,但是可以利用该类从大量预设的图案中选择绘制时要使用的图案,而不是纯色
• TextureBrush:使用纹理(如图像)进行绘制
• LinearGradientBrush:使用沿渐变混合的两种颜色进行绘制
• PathGradientBrush :基于编程者定义的唯一路径,使用复杂的混合色渐变进行绘制
以下是一段实例的代码
Graphics g = this.CreateGraphics();
Rectangle rect = new Rectangle(10, 10, 50, 50);//定义矩形,参数为起点横纵坐标以及其长和宽

//单色填充
SolidBrush b1 = new SolidBrush(Color.Blue);//定义单色画刷
g.FillRectangle(b1, rect);//填充这个矩形

//字符串
g.DrawString("字符串", new Font("宋体", 10), b1, new PointF(90, 10));

//用图片填充
TextureBrush b2 = new TextureBrush(Image.FromFile(@"e:\picture\1.jpg"));
rect.Location = new Point(10, 70);//更改这个矩形的起点坐标
rect.Width = 200;//更改这个矩形的宽来
rect.Height = 200;//更改这个矩形的高
g.FillRectangle(b2, rect);

//用渐变色填充
rect.Location = new Point(10, 290);
LinearGradientBrush b3 = new  LinearGradientBrush(rect, Color.Yellow , Color.Black , LinearGradientMode.Horizontal);
g.FillRectangle(b3, rect);
二、其他知识点
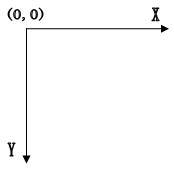
2.1坐标轴的转化
在winform中的坐标轴和我们平时接触的平面直角坐标轴不同,winform中的坐标轴方向完全相反:窗体的左上角为原点(0,0),水平向左则X增大,垂直下向则Y增大

Graphics g = this.CreateGraphics();

//单色填充
//SolidBrush b1 = new SolidBrush(Color.Blue);//定义单色画刷
Pen p = new Pen(Color.Blue,1);

//转变坐标轴角度
for (int i = 0; i < 90; i++)
{
    g.RotateTransform(i);//每旋转一度就画一条线
    g.DrawLine(p, 0, 0, 100, 0);
    g.ResetTransform();//恢复坐标轴坐标
}

//平移坐标轴
g.TranslateTransform(100, 100);
g.DrawLine(p, 0, 0, 100, 0);
g.ResetTransform();

//先平移到指定坐标,然后进行度旋转
g.TranslateTransform(100,200);
for (int i = 0; i < 8; i++)
{
g.RotateTransform(45);
g.DrawLine(p, 0, 0, 100, 0);
}

g.Dispose();
2.2附加一段仿QQ截图形式的一种截图形式
using System;
using System.Collections.Generic;
using System.ComponentModel;
using System.Data;
using System.Drawing;
using System.Text;
using System.Windows.Forms;

namespace Client
{
    public partial class Catch : Form
    {
        public Catch()
        {
            InitializeComponent();
        }

        #region 用户变量
        private Point DownPoint = Point.Empty;//记录鼠标按下坐标,用来确定绘图起点
        private bool CatchFinished = false;//用来表示是否截图完成
        private bool CatchStart = false;//表示截图开始
        private Bitmap originBmp;//用来保存原始图像
        private Rectangle CatchRect;//用来保存截图的矩形
        #endregion

        //窗体初始化操作
        private void Catch_Load(object sender, EventArgs e)
        {
            this.SetStyle(ControlStyles.OptimizedDoubleBuffer | ControlStyles.AllPaintingInWmPaint | ControlStyles.UserPaint, true);
            this.UpdateStyles();
            //以上两句是为了设置控件样式为双缓冲,这可以有效减少图片闪烁的问题,关于这个大家可以自己去搜索下
            originBmp = new Bitmap(this.BackgroundImage);//BackgroundImage为全屏图片,我们另用变量来保存全屏图片
        }

        //鼠标右键点击结束截图
        private void Catch_MouseClick(object sender, MouseEventArgs e)
        {
            if (e.Button == MouseButtons.Right)
            {
                this.DialogResult = DialogResult.OK;
                this.Close();
            }
        }

        //鼠标左键按下时动作
        private void Catch_MouseDown(object sender, MouseEventArgs e)
        {
            if (e.Button == MouseButtons.Left)
            {
                if (!CatchStart)
                {//如果捕捉没有开始
                    CatchStart = true;
                    DownPoint = new Point(e.X, e.Y);//保存鼠标按下坐标
                }
            }
        }

        private void Catch_MouseMove(object sender, MouseEventArgs e)
        {
            if (CatchStart)
            {//如果捕捉开始
                Bitmap destBmp = (Bitmap)originBmp.Clone();//新建一个图片对象,并让它与原始图片相同
                Point newPoint = new Point(DownPoint.X, DownPoint.Y);//获取鼠标的坐标
                Graphics g = Graphics.FromImage(destBmp);//在刚才新建的图片上新建一个画板
                Pen p = new Pen(Color.Blue,1);
                int width = Math.Abs(e.X - DownPoint.X), height = Math.Abs(e.Y - DownPoint.Y);//获取矩形的长和宽
                if (e.X < DownPoint.X)
                {
                    newPoint.X = e.X;
                }
                if (e.Y < DownPoint.Y)
                {
                    newPoint.Y = e.Y;
                }
                CatchRect = new Rectangle(newPoint,new Size(width,height));//保存矩形
                g.DrawRectangle(p,CatchRect);//将矩形画在这个画板上
                g.Dispose();//释放目前的这个画板
                p.Dispose();
                Graphics g1 = this.CreateGraphics();//重新新建一个Graphics类
                //如果之前那个画板不释放,而直接g=this.CreateGraphics()这样的话无法释放掉第一次创建的g,因为只是把地址转到新的g了.如同string一样
                g1 = this.CreateGraphics();//在整个全屏窗体上新建画板
                g1.DrawImage(destBmp,new Point(0,0));//将刚才所画的图片画到这个窗体上
                //这个也可以属于二次缓冲技术,如果直接将矩形画在窗体上,会造成图片抖动并且会有无数个矩形.
                g1.Dispose();
                destBmp.Dispose();//要及时释放,不然内存将会被大量消耗

            }
        }

        private void Catch_MouseUp(object sender, MouseEventArgs e)
        {
            if (e.Button == MouseButtons.Left)
            {
                if (CatchStart)
                {
                    CatchStart = false;
                    CatchFinished = true;

                }
            }
        }

        //鼠标双击事件,如果鼠标位于矩形内,则将矩形内的图片保存到剪贴板中
        private void Catch_MouseDoubleClick(object sender, MouseEventArgs e)
        {
            if (e.Button == MouseButtons.Left&&CatchFinished)
            {
                if (CatchRect.Contains(new Point(e.X, e.Y)))
                {
                    Bitmap CatchedBmp = new Bitmap(CatchRect.Width, CatchRect.Height);//新建一个于矩形等大的空白图片
                    Graphics g = Graphics.FromImage(CatchedBmp);
                    g.DrawImage(originBmp, new Rectangle(0, 0, CatchRect.Width, CatchRect.Height), CatchRect, GraphicsUnit.Pixel);
                    //把orginBmp中的指定部分按照指定大小画在画板上
                    Clipboard.SetImage(CatchedBmp);//将图片保存到剪贴板
                    g.Dispose();
                    CatchFinished = false;
                    this.BackgroundImage = originBmp;
                    CatchedBmp.Dispose();
                    this.DialogResult = DialogResult.OK;
                    this.Close();
                }
            }
        }
    }
}
  C.创建了Catch窗体后,我们在截图按钮(位于聊天窗体上)上加入以下事件:

        private void bCatch_Click(object sender, EventArgs e)
        {

            if (bCatch_HideCurrent.Checked)
            {
                this.Hide();//隐藏当前窗体
                Thread.Sleep(50);//让线程睡眠一段时间,窗体消失需要一点时间
                Catch CatchForm = new Catch();
                Bitmap CatchBmp = new Bitmap(Screen.AllScreens[0].Bounds.Width, Screen.AllScreens[0].Bounds.Height);//新建一个和屏幕大小相同的图片
                Graphics g = Graphics.FromImage(CatchBmp);
                g.CopyFromScreen(new Point(0, 0), new Point(0, 0), new Size(Screen.AllScreens[0].Bounds.Width, Screen.AllScreens[0].Bounds.Height));//保存全屏图片
                CatchForm.BackgroundImage = CatchBmp;//将Catch窗体的背景设为全屏时的图片
                if (CatchForm.ShowDialog() == DialogResult.OK)
                {//如果Catch窗体结束,就将剪贴板中的图片放到信息发送框中
                    IDataObject iData = Clipboard.GetDataObject();
                    DataFormats.Format myFormat = DataFormats.GetFormat(DataFormats.Bitmap);
                    if (iData.GetDataPresent(DataFormats.Bitmap))
                    {
                        richtextbox1.Paste(myFormat);
                        Clipboard.Clear();//清除剪贴板中的对象
                    }
                    this.Show();//重新显示窗体
                }
            }

        }


