Linux上 发布.Net Core
环境准备
下面我们使用VM虚拟机.我这里安装的Linux系统是centos7
软件提供:
VM: https://www.vmware.com/cn.html
centos7 Minimal :https://www.centos.org/download/
如果不会下载可以到我的百度网盘下载:由于避免某某东东不直接提供下载 请右上角加群索要
直接打开VM 选择 文件打开 centos7镜像文件(我是使用的我网盘制作的镜像) 然后在配置内存网络就行了如图设置

选择开启系统

帐号: root
密码:123123
注意这里linux不支持小键盘输入
查看本机IP

安装 .NET Core SDK
Linux各个发行版如何安装 .NET Core SDK,微软官方已经给出了标准答案,我这里就把在 CentOS 上的安装方法做一个简要说明。
Step1:安装 dotnet 产品提要
要开始安装 .NET,您需要注册 Microsoft 签名密钥并添加 Microsoft 产品提要。每台机器只需要做一次。 打开命令提示符并运行以下命令:
sudo rpm --import https://packages.microsoft.com/keys/microsoft.asc
sudo sh -c 'echo -e "[packages-microsoft-com-prod]\nname=packages-microsoft-com-prod \nbaseurl= https://packages.microsoft.com/yumrepos/microsoft-rhel7.3-prod\nenabled=1\ngpgcheck=1\ngpgkey=https://packages.microsoft.com/keys/microsoft.asc" > /etc/yum.repos.d/dotnetdev.repo'
Step2:安装 .NET SDK
更新可用于安装的产品,安装 .NET 所需的组件,然后安装 .NET SDK。
在命令提示符下,运行以下命令:
sudo yum update
sudo yum install libunwind libicu
sudo yum install dotnet-sdk-2.1.3  #最新版本请关注官网
注意你自己项目的版本
我选择的项目版本是2.1.1
然后我执行的命令就是
sudo yum install dotnet-sdk-2.1
两步即可完成 .NET Core SDK 在 CentOS7 系统下的安装,最后可执行一下命令dotnet --version,如果正常输出版本号则说明安装没有出现问题。
Linux 其他发行版安装 .NET Core SDK 教程请参见官方教程 Get started with .NET in 10 minutes。
安装3.1版本
sudo rpm -Uvh https://packages.microsoft.com/config/rhel/7/packages-microsoft-prod.rpm

sudo yum update

sudo yum install dotnet-sdk-3.1
部署 ASP.NET Core 应用程序
下面就尝试把我用 ASP.NET Core Web API 开发的一个接口网站部署到我们已经安装 .NET SDK 的 CentOS 系统(下文简称服务器)中。
程序发布过程省略(跟以前一样选择Release版本发布文件系统),把编译后的程序发布到了本地 桌面\publish 文件夹
然后借助 FTP 工具 XFTP 把程序文件传输到服务器/home/wwwroot文件夹。
上传截图:

上传完毕后,需要先通过cd命令进入网站根目录/home/wwwroot,再输入如下命令启动网站程序:
dotnet WebApplication1.dll
如果在任意非站点根目录,通过下面这种方式直接运行,程序会抛异常,不知是程序原因还是其他原因。
dotnet /home/wwwroot/WebApplication1.dll
如果你可以看到如下界面则表示程序启动成功。

Nginx配置反向代理
Nginx是一个高性能的Web服务器软件。这是一个比 Apache HTTP Server 更加灵活和轻量级的程序。
我们的网站程序启动的端口是5000,可以借助 Nginx 把程序5000端口映射到80端口。
Nginx官方文档 & Nginx开发从入门到精通 - Tengine
安装 Nginx
首先,我们需要在服务器上安装 Nginx。
Step1:添加 Nginx 存储库
要添加 CentOS 7 EPEL 仓库,请打开终端并使用以下命令:
sudo yum install epel-release
Step2:安装 Nginx
现在 Nginx 存储库已经安装在您的服务器上,请使用以下yum命令安装 Nginx:
sudo yum install nginx
Step3:启动 Nginx
Nginx 不会自行启动。要运行 Nginx,请输入:
sudo systemctl start nginx
如果您正在运行防火墙,请运行以下命令以允许 HTTP 和 HTTPS 通信:
sudo firewall-cmd --permanent --zone=public --add-service=http
sudo firewall-cmd --permanent --zone=public --add-service=https
sudo firewall-cmd --reload
此时,可以在本机的浏览器中访问服务器的 IP 地址http://192.168.83.128来验证 Nginx 是否成功运行。
如果能看到 Nginx 的默认转发网页则说明一切正常。如下截图:

如果拒绝访问,考虑服务器80端口是否开放。可尝试通过下面两条命令开放80端口、重启防火墙使修改即时生效。
firewall-cmd --zone=public --add-port=80/tcp --permanent
systemctl restart firewalld
设置 Nginx 开机启动
避免开机需要手动开启 Nginx,可以通过如下快捷命令把 Nginx 配置成系统服务,并设置为开机启动:
systemctl enable nginx #设置开机启动
其他命令:
systemctl disable nginx   #禁止开机启动
systemctl status nginx     #查看运行状态
systemctl restart nginx    #重启服务
修改 Nginx 配置文件
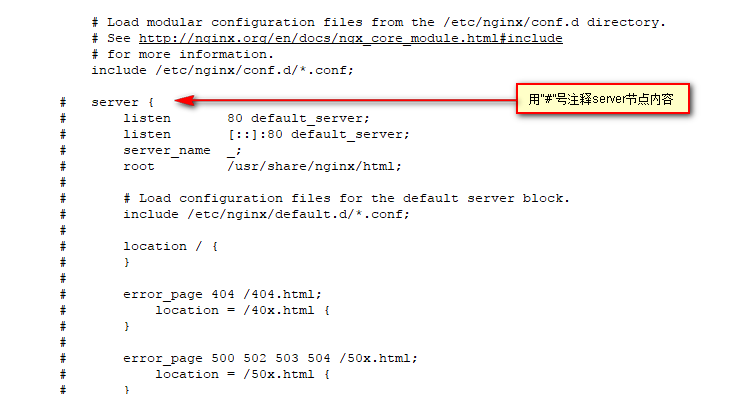
首先,拿到 Nginx 的默认配置文件/etc/nginx/nginx.conf,把默认80端口转发配置server节点用#符注释掉。

然后,我们新建一个配置文件netcore.conf,内容如下:
server {
    listen 80;
    location / {
        proxy_pass http://localhost:5000;
        proxy_http_version 1.1;
        proxy_set_header Upgrade $http_upgrade;
        proxy_set_header Connection keep-alive;
        proxy_set_header Host $host;
        proxy_cache_bypass $http_upgrade;
    }
}
保存并上传到 Nginx 的配置加载目录/etc/nginx/conf.d,最后执行命令nginx -s reload重载 Nginx 配置,使其生效。
在本地浏览器上访问服务器地址,运行结果如下:

这个问题是由于 SELinux 保护机制所导致,我们需要将 Nginx 添加至 SELinux 的白名单。执行命令:
yum install policycoreutils-python

sudo cat /var/log/audit/audit.log | grep nginx | grep denied | audit2allow -M mynginx

sudo semodule -i mynginx.pp
这里安装可能会报错Exiting on user cancel
这是yum的一个bug导致的问题。修改/usr/lib/python2.7/site-packages/urlgrabber/grabber.py.
vi /usr/lib/python2.7/site-packages/urlgrabber/grabber.py


             elif errcode == 42:
                # this is probably wrong but ultimately this is what happens
                # we have a legit http code and a pycurl 'writer failed' code
                # which almost always means something aborted it from outside
                # since we cannot know what it is -I'm banking on it being
                # a ctrl-c. XXXX - if there's a way of going back two raises to
                # figure out what aborted the pycurl process FIXME
                raise KeyboardInterrupt
修改后
             #elif errcode == 42:
                 # this is probably wrong but ultimately this is what happens
                 # we have a legit http code and a pycurl 'writer failed' code
                 # which almost always means something aborted it from outside
                 # since we cannot know what it is -I'm banking on it being
                 # a ctrl-c. XXXX - if there's a way of going back two raises to
                 # figure out what aborted the pycurl process FIXME
             #    raise KeyboardInterrupt
然后以root用户运行如下命令升级:
yum clean metadata
yum clean all
yum upgrade
升级完成后运行yum命令安装即可。

可以看到,访问的接口成功返回数据,证明 Nginx 已经完成对我们部署应用程序的转发。
Supervisor 配置守护进程
Supervisor 是用 Python 开发的 Linux/Unix 系统下的一个进程管理工具。它可以使进程脱离终端,变为后台守护进程(daemon)。实时监控进程状态,异常退出时能自动重启。
Supervisor 不支持任何版本的 Window 系统;仅支持在 Python2.4 或更高版本,但不能在任何版本的 Python 3 下工作。
其主要组成部分:
supervisord:Supervisor 的守护进程服务,用于接收进程管理命令;
supervisorctl:Supervisor 命令行工具,用于和守护进程通信,发送管理进程的指令;
Web Server:Web 端进程管理工具,提供与 supervisorctl 类似功能,管理进程;
XML-RPC Interface:提供 XML-RPC 接口,请参阅 XML-RPC API文档。
安装 Supervisor
联网状态下,官方推荐首选安装方法是使用easy_install,它是setuptools(Python 包管理工具)的一个功能。所以先执行如下命令安装 setuptools:
yum install python-setuptools
请更换root用户,执行如下命令安装 Supervisor:
easy_install supervisor
第二种方式安装
yum install epel-release
yum install -y supervisor
配置 Supervisor
运行supervisord服务的时候,需要指定 Supervisor 配置文件,如果没有显示指定,默认会从以下目录中加载:
$CWD/supervisord.conf  #$CWD表示运行 supervisord 程序的目录
$CWD/etc/supervisord.conf
/etc/supervisord.conf
/etc/supervisor/supervisord.conf (since Supervisor 3.3.0)
../etc/supervisord.conf (Relative to the executable)
../supervisord.conf (Relative to the executable)
所以,先通过如下命令创建目录,以便让 Supervisor 成功加载默认配置:
mkdir /etc/supervisor
加载目录有了,然后通过echo_supervisord_conf程序(用来生成初始配置文件)来初始化一个配置文件:
echo_supervisord_conf > /etc/supervisor/supervisord.conf
尾部找到如下文本片段:
;[include]
;files = relative/directory/*.ini
改为:
[include]
files = conf.d/*.conf
即,把注释去除、设置/etc/supervisor/conf.d为 Supervisor 进程配置文件加载目录。
这样,Supervisor 会自动加载该目录下.conf后缀的文件作为共同服务配置。Supervisor 管理的每个进程单独写一个配置文件放在该目录下,supervisord.conf配置文件中保留公共配置。
创建进程配置加载目录:
mkdir /etc/supervisor/conf.d
创建文件
touch netcore.conf
接下来就需要为我们已经部署的 ASP .NET Core 程序的宿主进程创建一个进程配置文件netcore.conf,保存并上传到/etc/supervisor/conf.d目录。
配置文件netcore.conf内容如下:
[program:WebApplication1]                        ;自定义进程名称
command=dotnet WebApplication1.dll               ;程序启动命令
directory=/home/wwwroot                         ;命令执行的目录
autostart=true                                  ;在Supervisord启动时,程序是否启动
autorestart=true                                ;程序退出后自动重启
startretries=5                                  ;启动失败自动重试次数,默认是3
startsecs=1                                     ;自动重启间隔
user=root                                       ;设置启动进程的用户,默认是root
priority=999                                    ;进程启动优先级,默认999,值小的优先启动
stderr_logfile=/var/log/WebApplication1.err.log  ;标准错误日志
stdout_logfile=/var/log/WebApplication1.out.log  ;标准输出日志
environment=ASPNETCORE_ENVIRONMENT=Production   ;进程环境变量
stopsignal=INT                                  ;请求停止时用来杀死程序的信号
启动 Supervisor 服务,命令如下:
supervisord -c /etc/supervisor/supervisord.conf
这时,在会发现我们部署的网站程序不在 shell 中通过dotnet xxx.dll启动,同样可以访问。
设置 Supervisor 开机启动
首先为 Supervisor 新建一个启动服务脚本supervisor.service,然后保存并上传至服务器/usr/lib/systemd/system/目录。
which supervisord
which supervisorctl
脚本内容如下:
#supervisord.service
[Unit]
Description=Supervisor daemon
[Service]
Type=forking
ExecStart=/usr/local/bin/supervisord -c /etc/supervisor/supervisord.conf
ExecStop=/usr/local/bin/supervisorctl shutdown
ExecReload=/usr/local/bin/supervisorctl reload
KillMode=process
Restart=on-failure
RestartSec=42s
[Install]
WantedBy=multi-user.target
设置开启启动:
systemctl enable supervisor
验证是否成功:
systemctl is-enabled supervisor
如果输出enabled则表示设置成功,也可重启服务器验证。
如果报错 Another program is already listening on a port that one of our HTTP servers is configured to use. Shut this program down first before starting supervisord
解决方法:
find / -name supervisor.sock
unlink /name/supervisor.sock
其它 Linux 发行版开机启动脚本 User-contributed OS init scripts for Supervisor
Supervisorctl 管理进程
Supervisor 服务启动后,受其管理的进程会在后台运行。可以通过supervisorctl客户端管理进程。
输入如下命令进入supervisorctl交互终端,按Ctrl+C键退出:
supervisorctl
输入help查询帮助:
supervisor> help

default commands (type help <topic>):
=====================================
add    exit      open  reload  restart   start   tail
avail  fg        pid   remove  shutdown  status  update
clear  maintail  quit  reread  signal    stop    version
输入help ****查询详细命令,比如输入help stop:
#更新配置文件 supervisorctl update

#重启 supervisorctl reload

#启动所有:supervisorctl start all

# 重启所有:supervisorctl restart all

# 停止所有:supervisorctl stop all

# 提示:把上述的all换成服务名可操作指定服务,服务名如[program:cap.sys.api] 中配置的为:cap.sys.api

# 查看服务程序列表:supervisorctl status
supervisor> help stop

stop <name>             Stop a process
stop <gname>:*          Stop all processes in a group
stop <name> <name>      Stop multiple processes or groups
stop all                Stop all processes
如何启动、停止、重启进程等命令,我这里就不在记录,大家自行查找吧。
除此之外,Supervisor 还提供了 Web 管理界面用来管理进程,如何配置启动请参考官方文档。
至此,我们已经完成了 ASP.NET Core 应用程序在 CentOS7 服务器上的部署。


