第九章 原型模式 (Prototype)
原型模式的定义与特点
原型(Prototype)模式的定义如下:用一个已经创建的实例作为原型,通过复制该原型对象来创建一个和原型相同或相似的新对象。在这里,原型实例指定了要创建的对象的种类。用这种方式创建对象非常高效,根本无须知道对象创建的细节。
原型模式的结构与实现
- 模式的结构
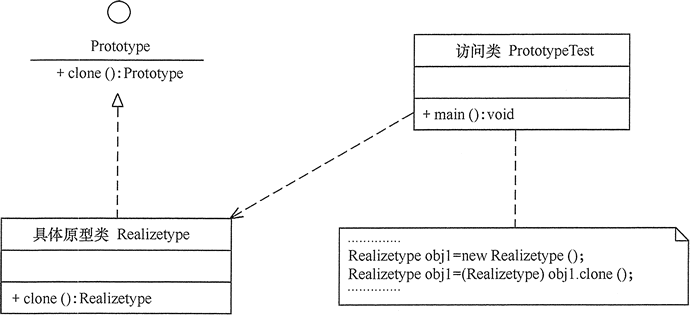
原型模式包含以下主要角色。
抽象原型类:规定了具体原型对象必须实现的接口。
具体原型类:实现抽象原型类的 clone() 方法,它是可被复制的对象。
访问类:使用具体原型类中的 clone() 方法来复制新的对象。
其结构图如图所示:

其中第二个obj1应为obj2.
- 模式的实现
原型模式的克隆分为浅克隆和深克隆,Java 中的 Object 类提供了浅克隆的 clone() 方法,具体原型类只要实现 Cloneable 接口就可实现对象的浅克隆,这里的 Cloneable 接口就是抽象原型类。
原型类:
public class Prototype implements Cloneable {

    private String name;

    private City city;

    public Prototype() {
    }

    public Prototype(String name,City city) {
        this.name = name;
        this.city = city;
    }

    @Override
    protected Object clone() throws CloneNotSupportedException {
        return (Prototype) super.clone();
    }

    public String getName() {
        return this.name;
    }

    public City getCity() {
        return this.city;
    }
}
City类:
public class City {

    private String name;

    public String getName() {
        return name;
    }

    public void setName(String name) {
        this.name = name;
    }

}
测试类:
public class PrototypeTest {
    public static void main(String[] args) {
        City city = new City();
        Prototype prototype = new Prototype("jack", city);

        try {
            Prototype prototypeCloned = (Prototype) prototype.clone();
            System.out.println(prototype);
            System.out.println(prototype.getCity());

            System.out.println(prototypeCloned);
            System.out.println(prototypeCloned.getName());
            System.out.println(prototypeCloned.getCity());
        } catch (CloneNotSupportedException e) {
            e.printStackTrace();
        }
    }
}
测试结果:
cn.liuxiany.prototype.Prototype@4b67cf4d
cn.liuxiany.prototype.City@7ea987ac
cn.liuxiany.prototype.Prototype@12a3a380
jack
cn.liuxiany.prototype.City@7ea987ac

Process finished with exit code 0
从测试结果中可以证实,Prototype对象实现了克隆。
原型模式的应用场景
原型模式通常适用于以下场景。
- 对象之间相同或相似,即只是个别的几个属性不同的时候。
- 对象的创建过程比较麻烦,但复制比较简单的时候。
浅克隆(shallowClone)和深克隆(deepClone)
从上面的例子可以看到Prototype对象实现了克隆,其中的name属性也实现了克隆,但是city却没有克隆,还是原来的值。这就涉及到了对象的浅复制和深复制。
在java中,数据类型分为基本数据类型和引用数据类型,因为引用类型的存在,克隆又可以分为浅克隆和深克隆。如果要克隆一个对象,此对象中含有引用类型的属性。克隆生成之后的对象,如果引用类型所指向的对象也被克隆了一份,那这种克隆方式称为深克隆,反之则为浅克隆。在上面的例子中的克隆就是浅克隆,City对象并没有被克隆,还是同一个对象。
上面的例子有几点要说明:
- clone()方法是Object对象的,并非是Cloneable接口的,Cloneable接口只是一个标记接口(Marker Interface)。标记接口中没有任何方法和变量,用以标识实现这个接口的类具有某种功能。常见的标记接口有三个:Serializable,Cloneable,RandomAccess。如果一个类没有实现Cloneable接口,那么调用clone()方法时,就会报CloneNotSupportedException异常。
- Object类中的clone()方法是protected的,所以如果在子类中不重载此方法,就在子类外无法被访问。在子类重写此方法的目的是为了扩大此方法的访问权限,因为在子类重写此方法也只是调用父类的clone()方法。如果是深克隆的话,则重写的clone()方法就不仅仅是调用父类的clone()方法了。
- Strig类型的属性。String类因为被final修饰,被克隆后,两个引用指向同一个String对象。但当改变其中一个时,不会该表原有的String对象,而会生成一个新的对象,让被修改的引用指向新的对象。外表看起来和基本数据类型一个,其实不然。
浅克隆
浅克隆就是引用数据类型无法被克隆的情况,上面的Prototype的例子已经证实。
深克隆
实现深克隆有两种方式,一种是要被克隆的类中的引用类型的类也继承Cloneable接口,并在要被克隆的类的clone()方法调用它的clone()方法,并重新赋值,使其引用指向被克隆出来的新对象。
第一种方式:
City2类:
public class City2 implements Cloneable {

    private String name;

    @Override
    public Object clone() throws CloneNotSupportedException {
        return super.clone();
    }

    public String getName() {
        return name;
    }

    public void setName(String name) {
        this.name = name;
    }
}
其中City2类实现了Cloneable接口,并重写了clone()方法。
Prototype2类:
public class Prototype2 implements Cloneable {

    private String name;

    private City2 city2;

    public Prototype2() {
    }

    public Prototype2(String name, City2 city2) {
        this.name = name;
        this.city2 = city2;
    }

    @Override
    protected Object clone() throws CloneNotSupportedException {
        Prototype2 prototype2 = (Prototype2) super.clone();

        prototype2.setCity2((City2) this.city2.clone());

        return prototype2;
    }

    public void setName(String name) {
        this.name = name;
    }

    public String getName() {
        return this.name;
    }

    public City2 getCity2() {
        return this.city2;
    }

    public void setCity2(City2 city2) {
        this.city2 = city2;
    }
}
这个Prototype2类与Prototype类相比的区别是clone()方法,调用了City2对象的clone()方法,并进行了set。
测试类:
public class Prototype2Test {
    public static void main(String[] args) {
        City2 city2 = new City2();
        Prototype2 prototype2 = new Prototype2("jack", city2);

        try {
            Prototype2 prototype2Cloned = (Prototype2) prototype2.clone();
            prototype2Cloned.setName("tom");
            System.out.println(prototype2);
            System.out.println(prototype2.getCity2());

            System.out.println(prototype2Cloned);
            System.out.println(prototype2Cloned.getName());
            System.out.println(prototype2Cloned.getCity2());
        } catch (CloneNotSupportedException e) {
            e.printStackTrace();
        }
    }
}
测试结果:
cn.liuxiany.prototype.Prototype2@4b67cf4d
cn.liuxiany.prototype.City2@7ea987ac
cn.liuxiany.prototype.Prototype2@12a3a380
tom
cn.liuxiany.prototype.City2@29453f44

Process finished with exit code 0
测试结果证实了深克隆之后,city2对象是两个不同的对象。打印的tom则证实了String前面所说的String类型被克隆后如果被修改,会生成一个新的String对象。
第二种方式
如果类之间的关系比较复杂,或者包含数组类型的字段,那么第一种方式要实现深克隆就比较繁琐了。第二种方式需要对对象进行序列化,要克隆的类和其中的引用类型的类需要实现Serializable接口。代码如下。
City3类:
public class City3 implements Serializable {

    private String name;

    public String getName() {
        return name;
    }

    public void setName(String name) {
        this.name = name;
    }

    @Override
    public String toString() {
        return "City3{" +
                "name='" + name + '\'' +
                '}';
    }
}
Country类:
public class Country implements Serializable {

    private String name;

    private City3 city3;

    public String getName() {
        return name;
    }

    public void setName(String name) {
        this.name = name;
    }

    public City3 getCity3() {
        return city3;
    }

    public void setCity3(City3 city3) {
        this.city3 = city3;
    }

    @Override
    public String toString() {
        return "Country{" +
                "name='" + name + '\'' +
                ", city3=" + city3 +
                '}';
    }
}
测试类:
public class DeepCloneTest {
    public static void main(String[] args) throws Exception{

        City3 city3 = new City3();
        city3.setName("beijing");

        Country country = new Country();
        country.setName("china");
        country.setCity3(city3);

        System.out.println(country);

        //序列化
        ByteArrayOutputStream bo = new ByteArrayOutputStream();
        ObjectOutputStream oo = new ObjectOutputStream(bo);
        oo.writeObject(country);

        //反序列化
        ByteArrayInputStream bi = new ByteArrayInputStream(bo.toByteArray());
        ObjectInputStream oi = new ObjectInputStream(bi);
        Country countryClone = (Country) oi.readObject();

        System.out.println(countryClone);
    }
}
测试结果:
Country{name='china', city3=City3{name='beijing'}}
Country{name='china', city3=City3{name='beijing'}}

Process finished with exit code 0
测试结果证实了可以通过序列化的方式进行深克隆。


