

---Docker学习随笔---基础管理部分---
docker是什么?
提供快速、高效、轻量的微服务平台
1. 背景介绍
突破虚拟机对资源占用高、启动时间长、镜像存储大、集群规模小等限制,摆脱操作系统级的隔离级别,实现进程级管理。
主要专用名词:
chroot
namespaces命名空间
PID NET IPC MNT UTS
Cgroups资源分配管控
---------------------------
---------------------------
今世起源
LXC (LinuXContainer) ----> Docker (dotcloud)
版本
EE 企业版
CE 社区版
2. Docker的安装
2.0 yum源准备
采用阿里云作为yun源
curl http://mirrors.aliyun.com/docker-ce/linux/centos/docker-ce.repo -o /etc/yum.repos.d/docker-ce.repo
wget -O /etc/yum.repos.d/epel.repo http://mirrors.aliyun.com/repo/epel-7.repo
curl -o /etc/yum.repos.d/CentOS-Base.repo http://mirrors.aliyun.com/repo/Centos-7.repo
2.1 安装依赖包
yum install -y yum-utils device-mapper-persistent-data lvm2
yum list docker-ce.x86_64 --showduplicates | sort -r ###显示重复项并排序,可找出最新版
yum install -y docker-ce
2.2 安装docker-ce
yum install -y --setopt=obsoletes=0 \
docker-ce-17.03.2.ce-1.el7.centos.x86_64 \
docker-ce-selinux-17.03.2.ce-1.el7.centos.noarch
附阿里云搭建docker库方法
搭建docker repo库
采用阿里云搭建步骤
vim /etc/yum.repos.d/docker-ce-internal.repo
添加内容:
[docker-ce-stable]
name=Docker CE Stable - $basearch
#baseurl=https://mirrors.aliyun.com/docker-ce/linux/centos/7/$basearch/stable
baseurl=https://mirrors.aliyun.com/docker-ce/linux/centos/7/x86_64/stable/
enabled=1
gpgcheck=1
gpgkey=https://mirrors.aliyun.com/docker-ce/linux/centos/gpg
[docker-ce-stable-debuginfo]
name=Docker CE Stable - Debuginfo $basearch
baseurl=https://mirrors.aliyun.com/docker-ce/linux/centos/7/x86_64/stable/
enabled=0
gpgcheck=1
gpgkey=https://mirrors.aliyun.com/docker-ce/linux/centos/gpg
[docker-ce-stable-source]
name=Docker CE Stable - Sources
baseurl=https://mirrors.aliyun.com/docker-ce/linux/centos/7/source/stable
enabled=0
gpgcheck=1
gpgkey=https://mirrors.aliyun.com/docker-ce/linux/centos/gpg
[docker-ce-edge]
name=Docker CE Edge - $basearch
baseurl=https://mirrors.aliyun.com/docker-ce/linux/centos/7/$basearch/edge
enabled=0
gpgcheck=1
gpgkey=https://mirrors.aliyun.com/docker-ce/linux/centos/gpg
[docker-ce-edge-debuginfo]
name=Docker CE Edge - Debuginfo $basearch
baseurl=https://mirrors.aliyun.com/docker-ce/linux/centos/7/debug-$basearch/edge
enabled=0
gpgcheck=1
gpgkey=https://mirrors.aliyun.com/docker-ce/linux/centos/gpg
[docker-ce-edge-source]
name=Docker CE Edge - Sources
baseurl=https://mirrors.aliyun.com/docker-ce/linux/centos/7/source/edge
enabled=0
gpgcheck=1
gpgkey=https://mirrors.aliyun.com/docker-ce/linux/centos/gpg
[docker-ce-test]
name=Docker CE Test - $basearch
baseurl=https://mirrors.aliyun.com/docker-ce/linux/centos/7/$basearch/test
enabled=0
gpgcheck=1
gpgkey=https://mirrors.aliyun.com/docker-ce/linux/centos/gpg
[docker-ce-test-debuginfo]
name=Docker CE Test - Debuginfo $basearch
baseurl=https://mirrors.aliyun.com/docker-ce/linux/centos/7/debug-$basearch/test
enabled=0
gpgcheck=1
gpgkey=https://mirrors.aliyun.com/docker-ce/linux/centos/gpg
[docker-ce-test-source]
name=Docker CE Test - Sources
baseurl=https://mirrors.aliyun.com/docker-ce/linux/centos/7/source/test
enabled=0
gpgcheck=1
gpgkey=https://mirrors.aliyun.com/docker-ce/linux/centos/gpg
[docker-ce-nightly]
name=Docker CE Nightly - $basearch
baseurl=https://mirrors.aliyun.com/docker-ce/linux/centos/7/$basearch/nightly
enabled=0
gpgcheck=1
gpgkey=https://mirrors.aliyun.com/docker-ce/linux/centos/gpg
[docker-ce-nightly-debuginfo]
name=Docker CE Nightly - Debuginfo $basearch
baseurl=https://mirrors.aliyun.com/docker-ce/linux/centos/7/debug-$basearch/nightly
enabled=0
gpgcheck=1
gpgkey=https://mirrors.aliyun.com/docker-ce/linux/centos/gpg
[docker-ce-nightly-source]
name=Docker CE Nightly - Sources
baseurl=https://mirrors.aliyun.com/docker-ce/linux/centos/7/source/nightly
enabled=0
gpgcheck=1
gpgkey=https://mirrors.aliyun.com/docker-ce/linux/centos/gpg
yum -y install docker-ce
2.3 启动Docker服务
systemctl daemon-reload
systemctl restart docker
docker version
docker info
2.4 配置镜像加速
阿里云Docker-hub
https://cr.console.aliyun.com/cn-hangzhou/mirrors
mkdir -p /etc/docker
tee /etc/docker/daemon.json <<-'EOF'
{
"registry-mirrors": ["https://uoggbpok.mirror.aliyuncs.com"]
}
EOF
systemctl daemon-reload
systemctl restart docker
或者:
vim /etc/docker/daemon.json
{
"registry-mirrors": ["https://68rmyzg7.mirror.aliyuncs.com"] ###这里可在阿里云服务中创建一个镜像加速
}
3. Docker体系结构
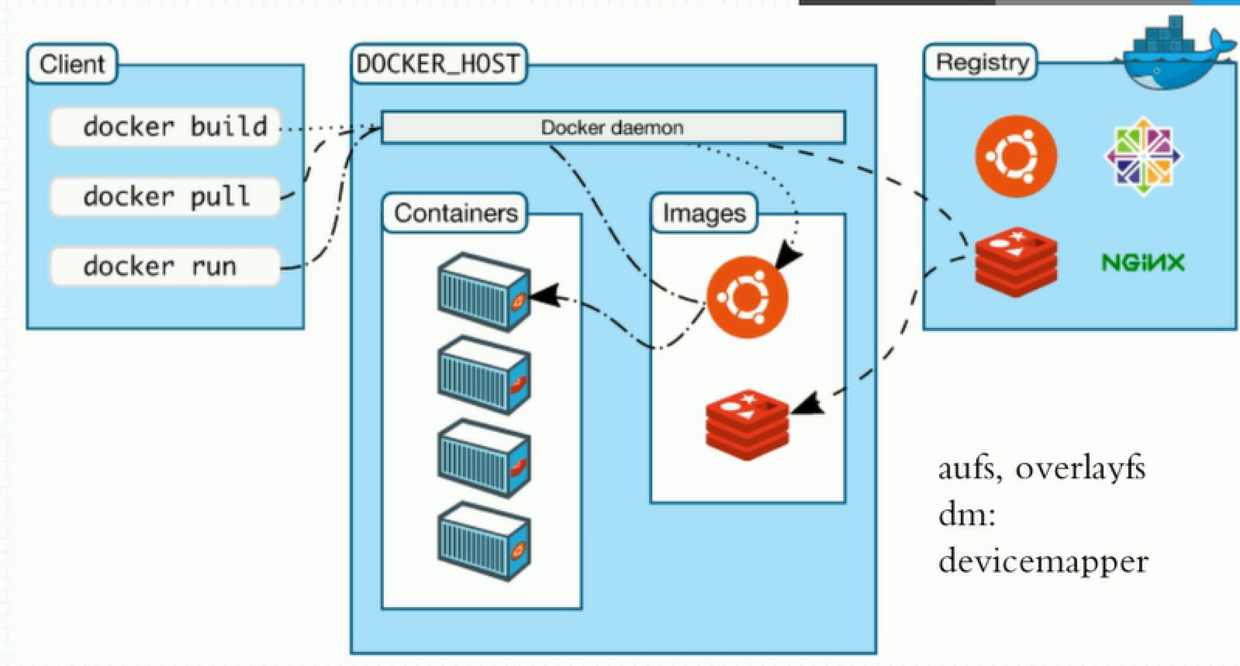
docker_host client Registry三大部分
安装好docker后,即具备docker_host和client功能
服务端docker_host 管理容器,维护镜像
客户端client 通过docker命令:创建、拉取或下载(自动搜索并获取)、运行容器
注册中心Registry docker-hub 提供所有镜像索引、验证功能(部分镜像)、镜像存储、提供本地镜像库的更新,也可以用国内其他Registry
4. Docker镜像基础管理
4.1 获取镜像
docker search centos
docker pull centos:6.9
docker pull nginx
4.2 镜像基本查看
[root@docker ~]# docker image ls
REPOSITORY TAG IMAGE ID CREATED SIZE
centos 6.8 82f3b5f3c58f 4 months ago 195 MB
centos 6.9 2199b8eb8390 4 months ago 195 MB
centos 7.5.1804 cf49811e3cdb 4 months ago 200 MB
centos 7.6.1810 f1cb7c7d58b7 4 months ago 202 MB
oldguo/centos_sshd v1.0
oldguo/centos_sshd v2.0
oldguo/centos_sshd v3.0
注解:
###repository(存储库) 如centos、nginx表示官方(docker-hub)镜像;如oldguo/centos_sshd表示私有库镜像或已修改名的镜像标识
###标识镜像唯一性的方法:
1. REPOSITORY:TAG
centos:7.5.1804
2. IMAGE ID (sha256:64位的号码,默认只截取12位)
cf49811e3cdb
查看镜像详细image id的方法:
[root@ora12c /]# docker image ls --no-trunc
REPOSITORY TAG IMAGE ID CREATED SIZE
nginx latest sha256:7e4d58f0e5f3b60077e9a5d96b4be1b974b5a484f54f9393000a99f3b6816e3d 7 days ago 133MB
centos 6.9 sha256:2199b8eb8390197d175b1dd57ed79f53ed92ffa58e23826ada54113262237e56 18 months ago 195MB
4.3 查看某一镜像详细信息
[root@docker /]# docker image inspect ubuntu:latest
[root@docker /]# docker image inspect 82f3b5f3c58f
示例:
[root@ora12c /]# docker image inspect nginx:latest
[
{
"Id": "sha256:7e4d58f0e5f3b60077e9a5d96b4be1b974b5a484f54f9393000a99f3b6816e3d",
"RepoTags": [
"nginx:latest"
],
"RepoDigests": [
"nginx@sha256:c628b67d21744fce822d22fdcc0389f6bd763daac23a6b77147d0712ea7102d0"
],
"Parent": "",
"Comment": "",
"Created": "2020-09-10T12:33:10.502421624Z",
"Container": "c72d14cf840a1720d6a3edc1d2217754786d41b89e7afa9f3ca8f1a47e0bb8a7",
"ContainerConfig": {
"Hostname": "c72d14cf840a",
"Domainname": "",
"User": "",
"AttachStdin": false,
-------------部分截取----------------------
4.4 只查看镜像ID
[root@docker ~]# docker image ls -q
示例:
[root@ora12c /]# docker image ls -q
7e4d58f0e5f3
2199b8eb8390
[root@ora12c /]# docker image ls nginx -q
7e4d58f0e5f3
附初始学习docker对于docker命令不熟习,可使用--help查看帮助。主要看Usage:内容
[root@ora12c /]# docker image inspect --help
Usage: docker image inspect [OPTIONS] IMAGE [IMAGE...]
Display detailed information on one or more images
Options:
-f, --format string Format the output using the given Go template
4.5 镜像的导入和导出
[root@docker ~]# docker image save 3556258649b2 >/tmp/ubu.tar
[root@docker ~]# docker image rm 3556258649b2
[root@docker ~]# docker image load -i /tmp/ubu.tar
[root@docker ~]# docker image tag 3556258649b2 oldguo/ubu:v1
4.6 镜像的删除
[root@docker ~]# docker image rm -f 3556258649b2
[root@docker ~]# docker image rm -f `docker image ls -q` ###查询全部的image id后然后全部删除
5. 容器的基础管理
5.1 运行容器
5.1.1 交互式的容器的运行:
[root@ora12c ~]# docker container run -it 2199b8eb8390 ###-it 表示交互式启动容器
[root@8f9027115cce /]#
[root@ora12c ~]# docker container ls ###显示正运行的容器信息
CONTAINER ID IMAGE COMMAND CREATED STATUS PORTS NAMES
8f9027115cce 2199b8eb8390 "/bin/bash" 8 minutes ago Up 8 minutes intelligent_chaum
解析:
CONTAINER ID : 容器的唯一号码(自动生成的)
NAMES : 容器的名字(可以自动,也可以手工指定)
STATUS : 容器的运行状态 ( Exited , Up)
[root@ora12c ~]# docker container run -it --name="docker-test01" 2199b8eb839 ###手工指定容器名方式
[root@ora12c ~]# docker container ls -a ###显示所有容器信息
CONTAINER ID IMAGE COMMAND CREATED STATUS PORTS NAMES
60589c457aaf 2199b8eb8390 "/bin/bash" 4 minutes ago Up 4 minutes quizzical_easley
cdf0c8747381 2199b8eb8390 "/bin/bash" 10 minutes ago Exited (0) 9 minutes ago docker-test01
8f9027115cce 2199b8eb8390 "/bin/bash" 23 minutes ago Exited (127) 8 minutes ago intelligent_chaum
e1f633881116 2199b8eb8390 "/bin/bash" 24 minutes ago Exited (0) 24 minutes ago affectionate_franklin
5.1.2 守护式容器的运行
[root@ora12c ~]# docker run -d --name="liuxc-nginx01" nginx:1.14 ###-d 表示daemon ;当本地并无nginx1.14容器库时,会自动pull指定的Registry中的nignx1.14
Unable to find image 'nginx:1.14' locally
1.14: Pulling from library/nginx
27833a3ba0a5: Pull complete
0f23e58bd0b7: Pull complete
8ca774778e85: Pull complete
Digest: sha256:f7988fb6c02e0ce69257d9bd9cf37ae20a60f1df7563c3a2a6abe24160306b8d
Status: Downloaded newer image for nginx:1.14
35fea801b72950fc42781da5ee9346e97ac874af61c65992958f691fa3a9bea2
[root@ora12c ~]# docker container inspect liuxc-nginx01 ###查询容器的详细信息
[
{
"Id": "35fea801b72950fc42781da5ee9346e97ac874af61c65992958f691fa3a9bea2",
"Created": "2020-09-19T02:29:59.112498528Z",
"Path": "nginx",
"Args": [
"-g",
"daemon off;"
],
"State": {
"Status": "running",
"Running": true,
"Paused": false,
"Restarting": false,
"OOMKilled": false,
"Dead": false,
"Pid": 7048,
"ExitCode": 0,
"Error": "",
"StartedAt": "2020-09-19T02:29:59.996566437Z",
"FinishedAt": "0001-01-01T00:00:00Z"
},
......
"Gateway": "172.17.0.1",
"IPAddress": "172.17.0.3", ###自动创建的容器访问地址,目前宿主机可访问
"IPPrefixLen": 16,
"IPv6Gateway": "",
"GlobalIPv6Address": "",
"GlobalIPv6PrefixLen": 0,
"MacAddress": "02:42:ac:11:00:03",
"DriverOpts": null
}
}
}
-------------部分截取----------------------
[root@ora12c ~]# curl -I http://172.17.0.3/ ###通过宿主机访问容器nignx
HTTP/1.1 200 OK
Server: nginx/1.14.2
Date: Sat, 19 Sep 2020 02:38:59 GMT
Content-Type: text/html
Content-Length: 612
Last-Modified: Tue, 04 Dec 2018 14:44:49 GMT
Connection: keep-alive
ETag: "5c0692e1-264"
Accept-Ranges: bytes
5.1.3 容器的应用场景
交互式的容器: 作为工具使用,如开发,测试,临时性的任务等场景下。
容器在临时任务中的使用,只存在一次或一段时间的测试、开发功能,完成后,容器无实用价值,故使用完后自动删除:
[root@docker ~]# docker container run -it --name="liuxc_cent76" --rm 9f38484d220f ###后面--rm image id的方式设置一次性使用,完成后自动删除
守护式容器: 如提供网络服务
[root@docker /]# docker run -d -p 8080:80 --name="liuxc_nginx_80" nginx:1.14 ###-d 表示放在后台运行 ###将内部TCP的80端口映射到本地任何地址的8080端口,通过访问宿主机的8080端口,实现docker的80端口(nignx)对外提供访问
[root@ora12c ~]# docker container ls -a
CONTAINER ID IMAGE COMMAND CREATED STATUS PORTS NAMES
7f3e0496a02d nginx:1.14 "nginx -g 'daemon of…" 5 seconds ago Up 3 seconds 0.0.0.0:8080->80/tcp liuxc_nginx_80
35fea801b729 nginx:1.14 "nginx -g 'daemon of…" About an hour ago Up About an hour 80/tcp liuxc-nginx01
60589c457aaf 2199b8eb8390 "/bin/bash" 2 hours ago Up 5 minutes quizzical_easley
cdf0c8747381 2199b8eb8390 "/bin/bash" 2 hours ago Exited (0) 2 hours ago docker-test01
8f9027115cce 2199b8eb8390 "/bin/bash" 2 hours ago Exited (127) 2 hours ago intelligent_chaum
e1f633881116 2199b8eb8390 "/bin/bash" 2 hours ago Exited (0) 2 hours ago affectionate_franklin
[root@ora12c ~]# curl -I 192.168.217.71:8080 ###注意是宿主机端口
HTTP/1.1 200 OK
Server: nginx/1.14.2
Date: Sat, 19 Sep 2020 04:03:50 GMT
Content-Type: text/html
Content-Length: 612
Last-Modified: Tue, 04 Dec 2018 14:44:49 GMT
Connection: keep-alive
ETag: "5c0692e1-264"
Accept-Ranges: bytes
5.1.4 容器的启动、关闭、连接
交互式的容器的启动和关闭
[root@ora12c ~]# docker container start -i intelligent_chaum ###启动intelligent_chaum容器
[root@8f9027115cce /]# ###启动并登录进了容器
[root@ora12c ~]# docker container stop intelligent_chaum ###关闭intelligent_chaum容器;比直接kill进程好(kill容易掉数据)
intelligent_chaum
守护式容器的启动和关闭
[root@docker /]# docker container stop liuxc_nginx_80
[root@docker /]# docker container start liuxc_nginx_80 ###启动liuxc_nginx_80容器
容器的连接方法:
[root@ora12c ~]# docker container attach nervous_allen
采用子进程的方式登录(在已有工作容器中生成子进程,做登录.可以用于进行容器的调试,退出时也不会影响到当前容器)
[root@ora12c ~]# docker container exec -it nervous_allen /bin/bash
容器的后台及前台运行:
当交互式容器启动后,会进入到容器中,退出会关闭交互式容器。但如果完成操作后,又不想关闭容器。则需要将容器置于后台运行:
1. ctrl + p q ###按住ctrl 先按P键,再按Q键
attach 调用到前台
示例:
[root@60589c457aaf /]# read escape sequence ###调入后台运行
[root@ora12c ~]#
[root@ora12c ~]#
[root@ora12c ~]# docker container attach quizzical_easley ###attach调用
2. 守护式容器制作时常用方法:
[root@ora12c ~]# docker container run --name="test_nignx01" 295c7be07902 ###未加-d 表示放在前台
WARNING: IPv4 forwarding is disabled. Networking will not work.
^C[root@ora12c ~]# ^C
[root@ora12c ~]# ^C
[root@ora12c ~]# docker container ls -a --no-trunc
CONTAINER ID IMAGE COMMAND CREATED STATUS PORTS NAMES
fd6feeba0ab47e71a7f11862dfb9dfcc20d189f9113ac2b3d4ed8e6c277baf36 295c7be07902 "nginx -g 'daemon off;'" 3 minutes ago Up 4 seconds 80/tcp test_nignx01
###nginx -g 'daemon off; 表示nginx容器启动时就直接夯在服务下。除非关闭。制作容器时,也应该注意将服务直接体现出来。
附删除容器的方法:
[root@ora12c ~]# docker container ls -a
CONTAINER ID IMAGE COMMAND CREATED STATUS PORTS NAMES
7f3e0496a02d nginx:1.14 "nginx -g 'daemon of…" 2 days ago Up 4 hours 0.0.0.0:8080->80/tcp liuxc_nginx_80
35fea801b729 nginx:1.14 "nginx -g 'daemon of…" 2 days ago Up 2 days 80/tcp liuxc-nginx01
60589c457aaf 2199b8eb8390 "/bin/bash" 2 days ago Up 2 days quizzical_easley
cdf0c8747381 2199b8eb8390 "/bin/bash" 2 days ago Up 2 days docker-test01
8f9027115cce 2199b8eb8390 "/bin/bash" 2 days ago Exited (137) 2 days ago intelligent_chaum
e1f633881116 2199b8eb8390 "/bin/bash" 2 days ago Exited (0) 2 days ago affectionate_franklin
[root@ora12c ~]# docker container rm affectionate_franklin ###删除单个容器
affectionate_franklin
[root@ora12c ~]# docker container rm intelligent_chaum
intelligent_chaum
[root@ora12c ~]# docker container ls -a
CONTAINER ID IMAGE COMMAND CREATED STATUS PORTS NAMES
44070e1b53db 2199b8eb8390 "sleep 100000" 57 seconds ago Up 56 seconds test001
7f3e0496a02d nginx:1.14 "nginx -g 'daemon of…" 2 days ago Up 4 hours 0.0.0.0:8080->80/tcp liuxc_nginx_80
35fea801b729 nginx:1.14 "nginx -g 'daemon of…" 2 days ago Up 2 days 80/tcp liuxc-nginx01
60589c457aaf 2199b8eb8390 "/bin/bash" 2 days ago Exited (0) 2 minutes ago quizzical_easley
cdf0c8747381 2199b8eb8390 "/bin/bash" 2 days ago Up 2 days docker-test01
[root@ora12c ~]# docker container rm -f `docker container ls -a -q` ###删除所有的容器
44070e1b53db
7f3e0496a02d
35fea801b729
cdf0c8747381
[root@ora12c ~]#
[root@ora12c ~]# docker container ls -a
CONTAINER ID IMAGE COMMAND CREATED STATUS PORTS NAMES
[root@ora12c ~]#
另附Docker容器启动报“WARNING: IPv4 forwarding is disabled. Networking will not work”解决办法:
解决办法:
# vi /etc/sysctl.conf
或者
# vi /usr/lib/sysctl.d/00-system.conf
添加如下代码:
net.ipv4.ip_forward=1
重启network服务
# systemctl restart network
查看是否修改成功
# sysctl net.ipv4.ip_forward
如果返回为“ net.ipv4.ip_forward = 1 ”则表示成功
5.2 docker容器的网络访问
指定映射(docker 会自动添加一条iptables规则来实现端口映射),具体方法如下:
-p hostPort:containerPort
-p ip:hostPort:containerPort
-p ip::containerPort(随机端口范围:32768-60999)
-p hostPort:containerPort/udp
-p 81:80 –p 443:443 (多服务情况,-p 并列)
随机映射
docker run -p 80(随机映射端口)
[root@docker ~]# docker container run -d -p 8080:80 --name='n2' nginx:1.14
[root@docker ~]# docker container run -d -p 10.0.0.100:8081:80 --name='n3' nginx:1.14
[root@docker ~]# docker container run -d -p 80 --name='n5' nginx:1.14 ###将容器的80端口与宿主机任意随机端口进行映射,通过docker container ls -a 可以查询PORT映射情况
[root@docker ~]# docker container run -d -p 172.16.1.200::80 --name='n6' nginx:1.14
5.3容器的其他管理
docker ps -a -q === docker container ls -a -q
###-a 表示all所有;-q 表示container id号
外部调试工具top:查看某个容器的详细进程,如有子进程,包括子进程。
docker top ba9143bcaf74 === docker container top ba9143bcaf74
示例:
[root@ora12c ~]# docker top 87b41bb74d87
Error response from daemon: Container 87b41bb74d87a8d94201106c7b6f0db91a839b81f9b28a8c0f7e9cabc06d3d2e is not running
[root@ora12c ~]# docker top da76777a9970
UID PID PPID C STIME TTY TIME CMD
root 50410 50390 0 16:42 ? 00:00:00 nginx: master process nginx -g daemon off;
101 50444 50410 0 16:42 ? 00:00:00 nginx: worker process
查看日志:
[root@oldboy docker]# docker logs testxx
[root@oldboy docker]# docker logs -tf testxx ###查看实时日志
[root@oldboy docker]# docker logs -t testxx
[root@oldboy docker]# docker logs -tf --tail 10 testxx
[root@oldboy docker]# docker logs -tf --tail 0 testxx
5.4 docker的数据卷实现持久化存储
容器启动后,由于其精简化特性,不能过多存储更多文件,根据需求可将需要的文档加入其中;注意nignx容器中的网页文档存放在/usr/share/nginx/html/目录下
1. 手工交互数据:
[root@docker opt]# docker container cp index.html n1:/usr/share/nginx/html/ ###将宿主机文件拷到容器中
[root@docker opt]# docker container cp n1:/usr/share/nginx/html/50x.html ./ ###从容器中拷出文件到本地根目录下
示例:
启动一个名为“nginx_114”的nginx容器,然后将宿主机/data1/docker-files/html下的index.html和50x.html两个文件拷到nginx容器相应目录下,并查看内容
[root@ora12c ~]# docker container ls -a
CONTAINER ID IMAGE COMMAND CREATED STATUS PORTS NAMES
911b5cb84cc2 295c7be07902 "nginx -g 'daemon of…" 4 seconds ago Up 3 seconds 0.0.0.0:90->80/tcp nginx_114
nginx容器中/usr/share/nginx/html下原有index.html和50x.html
root@911b5cb84cc2:/usr/share/nginx/html# ls -al
total 8
drwxr-xr-x 2 root root 40 Mar 26 2019 .
drwxr-xr-x 3 root root 18 Mar 26 2019 ..
-rw-r--r-- 1 root root 537 Dec 4 2018 50x.html ###原有文件时间信息
-rw-r--r-- 1 root root 612 Dec 4 2018 index.html ###原有文件时间信息
root@911b5cb84cc2:/usr/share/nginx/html# cat index.html
<!DOCTYPE html>
<html>
<head>
<title>Welcome to nginx!</title>
<style>
body {
width: 35em;
margin: 0 auto;
font-family: Tahoma, Verdana, Arial, sans-serif;
}
</style>
</head>
<body>
<h1>Welcome to nginx!</h1>
<p>If you see this page, the nginx web server is successfully installed and
working. Further configuration is required.</p>
<p>For online documentation and support please refer to
<a href="http://nginx.org/">nginx.org</a>.<br/>
Commercial support is available at
<a href="http://nginx.com/">nginx.com</a>.</p>
<p><em>Thank you for using nginx.</em></p>
</body>
</html>
将宿主机指定文件拷到容器中
[root@ora12c ~]# docker container cp /data1/docker-files/html/index.html nginx_114:/usr/share/nginx/html/
[root@ora12c ~]# docker container cp /data1/docker-files/html/50x.html nginx_114:/usr/share/nginx/html/
验证
root@911b5cb84cc2:/usr/share/nginx/html# ls -al
total 8
drwxr-xr-x 1 root root 40 Sep 22 07:17 .
drwxr-xr-x 1 root root 18 Mar 26 2019 ..
-rw-r--r-- 1 root root 32 Sep 22 06:57 50x.html ###拷贝后的文件时间信息
-rw-r--r-- 1 root root 39 Sep 22 06:56 index.html ###拷贝后的文件时间信息
[root@ora12c ~]# curl 192.168.217.71:90 ###index.html内容已更新
welcome home!!!
nignx-web!!!
test0001
2. Volume实现宿主机和容器的数据共享
[root@docker opt]# mkdir -p /opt/html
[root@docker ~]# docker run -d --name="nginx_3" -p 83:80 -v /opt/html:/usr/share/nginx/html nginx ###-v 表示在宿主机与容器之间文件建立映射关系
作用: 数据持久化
3. 示例: 开启两个nginx容器(90,91),同时挂载一台宿主机下某一数据卷(文件),实现静态资源共享
查看容器数据卷挂载路径:
docker container inspect vol3
mounts下
4. 数据卷容器:
(1)宿主机模拟数据目录
mkdir -p /opt/Volume/a
mkdir -p /opt/Volume/b
touch /opt/Volume/a/a.txt
touch /opt/Volume/b/b.txt
(2)制作并启动数据卷容器
docker run -it --name "nginx_volumes" -v /opt/Volume/a:/opt/a -v /opt/Volume/b:/opt/b centos:6.9 /bin/bash
ctrl p q
解析:
/opt/Volume/a、b为宿主机目录文件
/opt/a、b为数据卷容器下的目录文件
(3)使用数据卷容器
docker run -d -p 8085:80 --volumes-from nginx_volumes --name "n8085" nginx ###--volumes-from 设置数据卷容器,后面跟数据卷容器名
docker run -d -p 8086:80 --volumes-from nginx_volumes --name "n8086" nginx
作用: 在集中管理集群中,大批量的容器都需要挂载相同的多个数据卷时,可以采用数卷容器进行统一管理
示例:
制作数据卷容器volumes,将其放置后台运行,并把宿主机/data1/docker-files/volume下a、b、c文件夹下的文件分别放置到数据卷容器的/opt/a/、/opt/b/、/opt/c/目录下;然后挂载至n9090和n9091的两个nginx容器对应位置下
步骤:
docker container run -it --name="volumes" -v /data1/docker-files/volume/a:/opt/a -v /data1/docker-files/volume/b:/opt/b -v /data1/docker-files/volume/c:/opt/c centos:6.9 /bin/bash
ctrl p q
[root@ora12c ~]# docker run -d -p 9090:80 --volumes-from volumes --name="n9090" nginx:1.14
49aca7c266c28998c5fa2867537e4bda468affa60b017bc64fc4cfa3ed703c88
[root@ora12c ~]# docker run -d -p 9091:80 --volumes-from volumes --name="n9091" nginx:1.14
a4cce47958024d6d8746ecdc525b26378a9c0da287d327e69610024f07d9c04
验证
[root@ora12c ~]# docker container exec -it n9091 /bin/bash
root@a4cce4795802:/# cd opt/
root@a4cce4795802:/opt# ls
a b c
root@a4cce4795802:/opt# cd a
root@a4cce4795802:/opt/a# ls
a.txt
root@a4cce4795802:/opt/a# cat a.txt
aaaaaaaaaaa
aaaaaaaaaaa
aaaaaaaaa!!
[root@ora12c ~]# docker exec -it n9090 /bin/bash
root@49aca7c266c2:/#
root@49aca7c266c2:/# cd opt/c/
root@49aca7c266c2:/opt/c# ls
c.txt
root@49aca7c266c2:/opt/c# cat c.txt
ccccccc!!
cccccc!!
ccccc!!
