
若依项目学习笔记09——数据权限
1. 数据权限
在管理系统中,往往需要设置用户只能查看哪些部门的数据,这种情况一般称为数据权限。例如销售,财务的数据是非常敏感的,因此要求对数据权限进行控制, 对于基于集团性的应用系统而言,就更多需要控制好各自公司的数据了。如设置子公司只能看本公司、或者本部门的数据,对于特殊的领导,可能需要跨部门的数据, 因此程序不能硬编码那个领导该访问哪些数据,需要进行后台的权限和数据权限的控制;默认系统管理员admin拥有所有数据权限(userId=1),默认角色拥有所有数据权限(如不需要数据权限不用设置数据权限操作)
在系统管理-角色管理-角色操作-数据权限中可以看到对应的数据权限选项,如下五种权限,大家自行测试各个功能

1.1 实现步骤
下面用 system.service.impl.SysUserServiceImpl 中的
selectUserList()方法来配合讲解
- 在需要数据权限控制方法上添加
@DataScope注解,其中 d 和 u 用来表示表的别名
// 部门数据权限注解
@DataScope(deptAlias = "u")
// 部门及用户权限注解
@DataScope(deptAlias = "d", userAlias = "u")
支持参数如下:
| 参数 | 类型 | 默认值 | 描述 |
|---|---|---|---|
| deptAlias | String | 空 | 部门表的别名 |
| userAlias | String | 空 | 用户表的别名 |
如:
@Override
@DataScope(deptAlias = "d", userAlias = "u")
public List<SysUser> selectUserList(SysUser user)
{
    return userMapper.selectUserList(user);
}
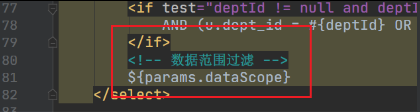
- 在 mybatis 查询底部标签添加数据范围过滤
<!-- 数据范围过滤 -->
${params.dataScope}
如 SysUserMapper.xml 中的 selectUserList语句
其作用就是相当于在一个 select 语句后面拼接一个 and 条件语句,来实现查询限制,例如下面
用户管理(未过滤数据权限的情况)
select u.user_id, u.dept_id, u.login_name, u.user_name, u.email
	, u.phonenumber, u.password, u.sex, u.avatar, u.salt
	, u.status, u.del_flag, u.login_ip, u.login_date, u.create_by
	, u.create_time, u.remark, d.dept_name
from sys_user u
	left join sys_dept d on u.dept_id = d.dept_id
where u.del_flag = '0'
用户管理(已过滤数据权限的情况)
select u.user_id, u.dept_id, u.login_name, u.user_name, u.email
	, u.phonenumber, u.password, u.sex, u.avatar, u.salt
	, u.status, u.del_flag, u.login_ip, u.login_date, u.create_by
	, u.create_time, u.remark, d.dept_name
from sys_user u
	left join sys_dept d on u.dept_id = d.dept_id
where u.del_flag = '0'
	and u.dept_id in (
		select dept_id
		from sys_role_dept
		where role_id = 2
	)
1.2 逻辑实现
逻辑实现代码在 com.ruoyi.framework.aspectj.DataScopeAspect 中
可以看到依旧是一个切面类,首先依旧是通过织入点找到注解为 @DataScope 的点,然后执行下面的方法;其过程为获取注解-获取用户-判断是否是管理员-否-进行数据范围过滤;接下来我们看 dataScopeFilter()数据范围过滤方法,首先是获取用户权限,然后是对权限进行判断(结合上面贴出的权限范围的图)
//管理员?
String dataScope = role.getDataScope();
if (DATA_SCOPE_ALL.equals(dataScope))
{
    sqlString = new StringBuilder();
    break;
}
//自定义?这里是通过拼接sql语句实现的
else if (DATA_SCOPE_CUSTOM.equals(dataScope))
{
    sqlString.append(StringUtils.format(
            //这里的 {} 是获取后面的deptAlias,即部门别名,用户别名同理
            " OR {}.dept_id IN ( SELECT dept_id FROM sys_role_dept WHERE role_id = {} ) ", deptAlias,
            role.getRoleId()));
}
//本部门?
else if (DATA_SCOPE_DEPT.equals(dataScope))
{
    sqlString.append(StringUtils.format(" OR {}.dept_id = {} ", deptAlias, user.getDeptId()));
}
//本部门及以下?
else if (DATA_SCOPE_DEPT_AND_CHILD.equals(dataScope))
{
    sqlString.append(StringUtils.format(
            //部门以下通过 find_in_set( {} , ancestors ) 来实现,这是MySQL的语句
            " OR {}.dept_id IN ( SELECT dept_id FROM sys_dept WHERE dept_id = {} or find_in_set( {} , ancestors ) )",
            deptAlias, user.getDeptId(), user.getDeptId()));
}
//本人
else if (DATA_SCOPE_SELF.equals(dataScope))
{
    if (StringUtils.isNotBlank(userAlias))
    {
        sqlString.append(StringUtils.format(" OR {}.user_id = {} ", userAlias, user.getUserId()));
    }
    else
    {
        // 数据权限为仅本人且没有userAlias别名不查询任何数据
        sqlString.append(" OR 1=0 ");
    }
}
角色判断完后,下面对sql进行拼接
if (StringUtils.isNotBlank(sqlString.toString()))
        {
            Object params = joinPoint.getArgs()[0];
            if (StringUtils.isNotNull(params) && params instanceof BaseEntity)
            {
                BaseEntity baseEntity = (BaseEntity) params;
                //sql语句需要通过AND来连接,然后put进基类中的 请求参数 属性中;Entity基类
                baseEntity.getParams().put(DATA_SCOPE, " AND (" + sqlString.substring(4) + ")");
            }
        }
1.3 业务实现
下面演示一下新的操作日志的数据权限业务,比如我们要新增用户和部门的数据权限管理,步骤如下
- 修改sql脚本
我们打开sql脚本,将操作日志记录部分copy到SQLyog中(记得把图中上面的备注删除),然后加入用户和部门的数据权限管理内容,执行
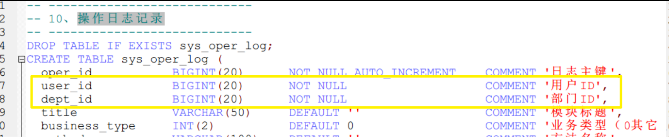
- 在实体类中新增对应属性和方法
打开 system.domain.SysOperLog,分别添加 userId 和 deptId 属性,还有get/set方法(alt+insert)
...

private Long userId;
private Long deptId;

...

public Long getUserId() {
    return userId;
}
public void setUserId(Long userId) {
    this.userId = userId;
}
public Long getDeptId() {
    return deptId;
}
public void setDeptId(Long deptId) {
    this.deptId = deptId;
}
- 添加注解
在操作日志 system.service.impl.SysOperLogServiceImpl 的selectOperLogList()方法中添加注解
@Override
@DataScope(deptAlias = "d", userAlias = "u")
public List<SysOperLog> selectOperLogList(SysOperLog operLog)
{
    return operLogMapper.selectOperLogList(operLog);
}
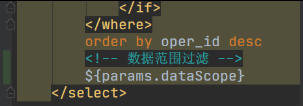
- 在mybatis查询底部标签添加数据范围过滤
打开 SysOperLogMapper ,找到 selectOperLogList 语句,把<where>改成where 1=1防止条件为空
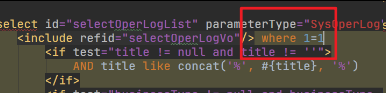
然后在末尾添加数据范围过滤
- 添加管理查询
还是在mapper文件中找到 selectOperLogVo ,然后添加
select o.oper_id, o.user_id, o.dept_id, o.title, o.business_type, o.method, o.request_method, o.operator_type, o.oper_name, o.dept_name, o.oper_url, o.oper_ip, o.oper_location, o.oper_param, o.json_result, o.status, o.error_msg, o.oper_time
        , u.user_id, d.dept_id
        from sys_oper_log o
        left join sys_user u on u.user_id = o.user_id
        left join sys_dept d on u.dept_id = o.dept_id
这时表内容还是空的,所以我们改造一下插入
-
改造插入
打开 framework.aspectj.LogAspect 日志切面类,插入两个字段

-
更改插入方法
回到mapper文件中,更改 insertOperlog 方法
<insert id="insertOperlog" parameterType="SysOperLog">
		insert into sys_oper_log(user_id, dept_id, title, business_type, method, request_method, operator_type, oper_name, dept_name, oper_url, oper_ip, oper_location, oper_param, json_result, status, error_msg, oper_time)
        values (#{userId},#{deptId},#{title}, #{businessType}, #{method}, #{requestMethod}, #{operatorType}, #{operName}, #{deptName}, #{operUrl}, #{operIp}, #{operLocation}, #{operParam}, #{jsonResult}, #{status}, #{errorMsg}, sysdate())
	</insert>
- 效果测试
运行项目,我们用管理员创建一个用户,隶属于研发部门,能查看系统管理菜单,只能查看本部门及以下,然后登陆这个用户,可以发现,该用户只能查看本部门及以下的数据内容(系统中还有另一个别的部门的用户,但是无法查看)

接下来我们用这个用户再创建一个新的用户,再删除,然后到数据库中查看 操作日志表
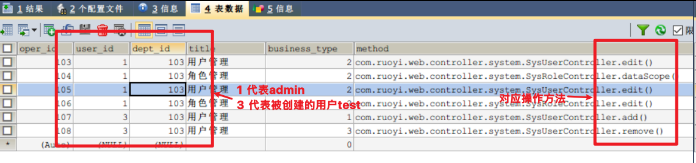
搞定~(●ˇ∀ˇ●)
