
Spring Boot原理分析

相信大家在使用spring boot的过程中,印象最深的便是spring boot使得我们的开发更加便捷快速,免去以前开发时不断导入所需要的各种依赖jar包,下面我们就来一起学习spring boot的依赖管理、自动装配和执行流程吧~
1. 依赖管理
我们创建spring boot的web项目时,会发现其pom配置文件中,亘古不变的存在着两个核心依赖,分别是 spring-boot-starter-parent 和 spring-boot-starter-web ,下面我们就依次来探究其原理
1.1 spring-boot-starter-parent
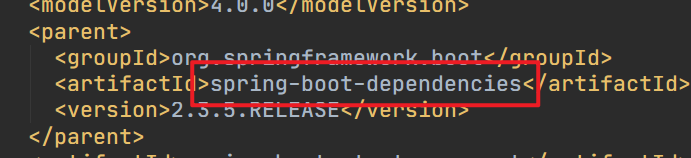
打开pom文件找到parent依赖(记得先创建好sb的web项目),如下
<!-- spring boot父项目依赖管理 -->
<parent>
        <groupId>org.springframework.boot</groupId>
        <artifactId>spring-boot-starter-parent</artifactId>
        <version>2.3.5.RELEASE</version>
        <relativePath/>
</parent>
该依赖是spring boot项目的统一父项目依赖管理,并将项目版本号统一为了 2.3.5.RELEASE (可修改),进到其底层源码文件(Ctrl+左键),可以看到parent底层还有一个父依赖 spring-boot-dependencies
我们再抄他老底
<properties>
    <activemq.version>5.15.13</activemq.version>

    ...

    <thymeleaf.version>3.0.11.RELEASE</thymeleaf.version>
    <tomcat.version>9.0.39</tomcat.version>

      ...

  </properties>
我们可以看到 properties 标签中对一些技术框架的依赖进行了统一的版本管理,如activemq、tomcat等等,都有与spring boot相匹配的版本号,所以我们加依赖时就无需自行添加了,但是parent的版本号需要添加,一个管理别人的依赖,自己本身怎么可能会没有版本号呢?
1.2 spring-boot-starter-web
对依赖jar包的版本管理有了,那被管理的,项目所需的依赖从何而来?又是如何管理的,下面我们就来看看web依赖的底层吧
<!-- Web服务启动器底层 -->
<dependencies>
    <dependency>
      <groupId>org.springframework.boot</groupId>
      <artifactId>spring-boot-starter</artifactId>
      <version>2.3.5.RELEASE</version>
      <scope>compile</scope>
    </dependency>
    <dependency>
      <groupId>org.springframework.boot</groupId>
      <artifactId>spring-boot-starter-json</artifactId>
      <version>2.3.5.RELEASE</version>
      <scope>compile</scope>
    </dependency>
    <dependency>
      <groupId>org.springframework.boot</groupId>
      <artifactId>spring-boot-starter-tomcat</artifactId>
      <version>2.3.5.RELEASE</version>
      <scope>compile</scope>
    </dependency>
    <dependency>
      <groupId>org.springframework</groupId>
      <artifactId>spring-web</artifactId>
      <version>5.2.10.RELEASE</version>
      <scope>compile</scope>
    </dependency>
    <dependency>
      <groupId>org.springframework</groupId>
      <artifactId>spring-webmvc</artifactId>
      <version>5.2.10.RELEASE</version>
      <scope>compile</scope>
    </dependency>
  </dependencies>
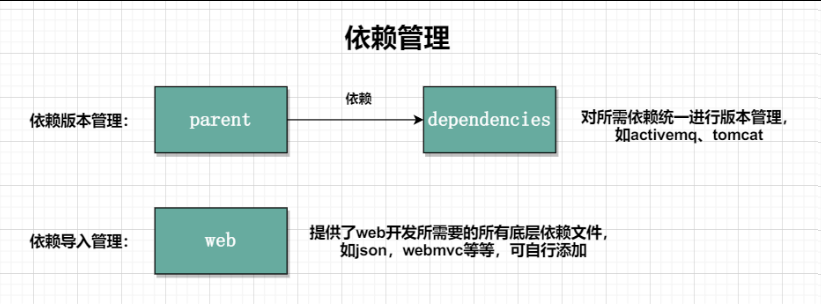
可以看到,web的底层提供了web开发所需要的所有底层依赖文件,并对其进行了统一的管理;所以我们开发web项目时,只需导入web的依赖启动器,便无需再添加其他基本的依赖就可以直接开发,当然,它们的版本管理还是离不开parent;
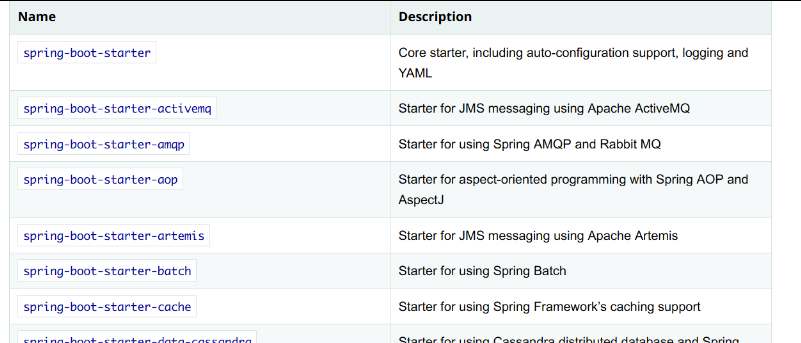
在实际的开发中肯定不止这些依赖,还需要许多其他的开发场景的相关依赖,我们可以打开spring boot的官方文档,搜索“starter”,可以看到spring boot所支持的场景依赖启动器,在开发中,我们需要什么,便导入什么
spring boot对大部分的开发技术框架都提供了场景启动器,但是有些还是没有的,例如mybatis、druid等等,但是这些技术团队主动与spring boot框架进行整合,自行提供了各自的依赖启动器如
mybatis-spring-boot-starter、druid-spring-boot-starter(大家看第三方依赖的命名规则和官方提供的有什么区别?),当然,这些第三方的依赖添加时需要自己加上对应的版本号
2. 自动配置
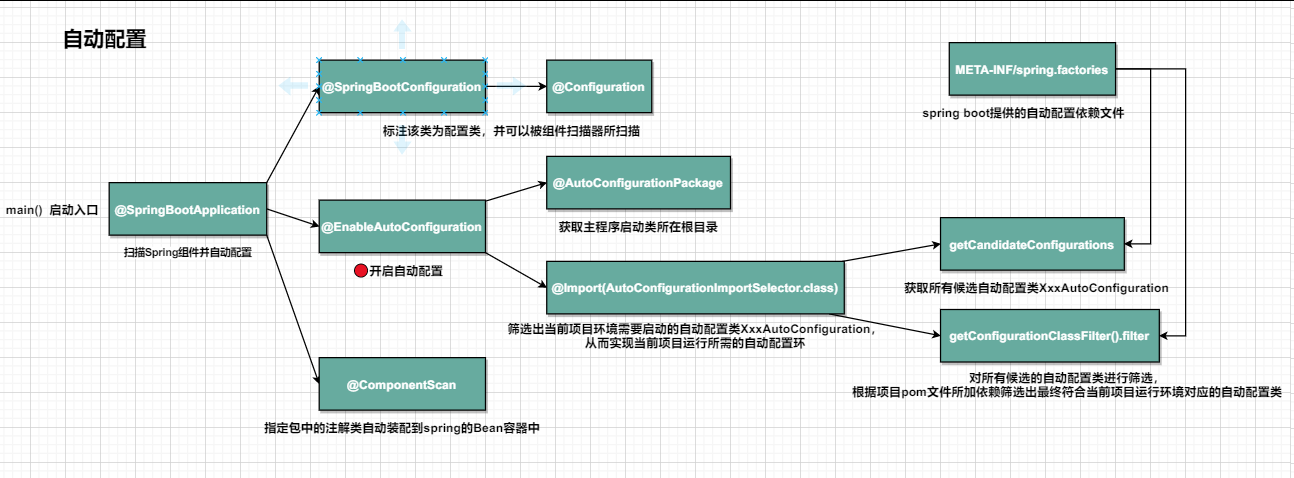
spring boot应用的启动入口是 @SpringBootApplication 注解标注类中的 main() 方法,它能够扫描Spring组件并自动配置spring boot。那它是如何进行的呢?下面我们来康康它的底层源码
@Target(ElementType.TYPE)
@Retention(RetentionPolicy.RUNTIME)
@Documented
@Inherited
@SpringBootConfiguration//标明该类为配置类
@EnableAutoConfiguration//启动自动配置功能
@ComponentScan(           //包扫描器
                  excludeFilters = { @Filter(type = FilterType.CUSTOM, classes = TypeExcludeFilter.class),
		  @Filter(type = FilterType.CUSTOM,
                  classes = AutoConfigurationExcludeFilter.class) })
public @interface SpringBootApplication {

      ...
可以看到
@SpringBootApplication是一个组合注解,包含了三个核心注解(上面我加注释的那三个 -_-),下面就对它们进行讲解
2.1 @SpringBootConfiguration
@Target(ElementType.TYPE)
@Retention(RetentionPolicy.RUNTIME)
@Documented
@Configuration
public @interface SpringBootConfiguration {

      ...
@SpringBootConfiguration 的作用是标注该类为配置类,从上面源码可以看出,其内部有一个核心注解 @Configuration ,它是由spring提供的,表示当前类为一个配置类(xml配置文件的注解表现形式),并可以被组件扫描器所扫描。因此,@SpringBootConfiguration 和 @Configuration的作用相同,都是标识一个可以被组件扫描器扫描的配置类,只是spring boot对 @Configuration 进行重新封装命名成 @SpringBootConfiguration 罢了。
2.2 @EnableAutoConfiguration
表示开启自动配置功能,这个注解也是spring boot最重要的注解,即实现自动配置
@Target(ElementType.TYPE)
@Retention(RetentionPolicy.RUNTIME)
@Documented
@Inherited
@AutoConfigurationPackage                             //自动配置包
@Import(AutoConfigurationImportSelector.class)//自动配置类扫描导入
public @interface EnableAutoConfiguration {

	String ENABLED_OVERRIDE_PROPERTY = "spring.boot.enableautoconfiguration";

	Class<?>[] exclude() default {};

	String[] excludeName() default {};

}
从源码看出,它又是一个组合注解,包含了下面两个核心注解
@AutoConfigurationPackage
@Target(ElementType.TYPE)
@Retention(RetentionPolicy.RUNTIME)
@Documented
@Inherited
@Import(AutoConfigurationPackages.Registrar.class)//导入Registrer中注册的组件
public @interface AutoConfigurationPackage {

      ...
在 @AutoConfigurationPackage 的源码中看出,其功能是由 @Import 实现的,作用是向容器导入注册的所有组件,导入的组件由Registrer决定,查看Registrer源码

可以看到存在一个
registerBeanDefinitions()方法,我们使用debug模式启动项目,会发现上面框起来的部分是项目主程序启动类所在的目录(如com.sb)。即@AutoConfigurationPackage的作用是获取主程序启动类所在根目录,从而指定后续组件扫描器要扫描的包位置。因此在定义项目包结构时,要求定义的包结构非常规范,项目主程序启动类要定义在最外层的根目录位置,然后再根目录位置内部创建子包和类进行业务开发,这样才能够保证定义的类能够被组件扫描器扫描
@Import(AutoConfigurationImportSelector.class)
查看它的getAutoConfigurationEntry方法,其作用是筛选出当前项目环境需要启动的自动配置类XxxAutoConfiguration,从而实现当前项目运行所需的自动配置环境
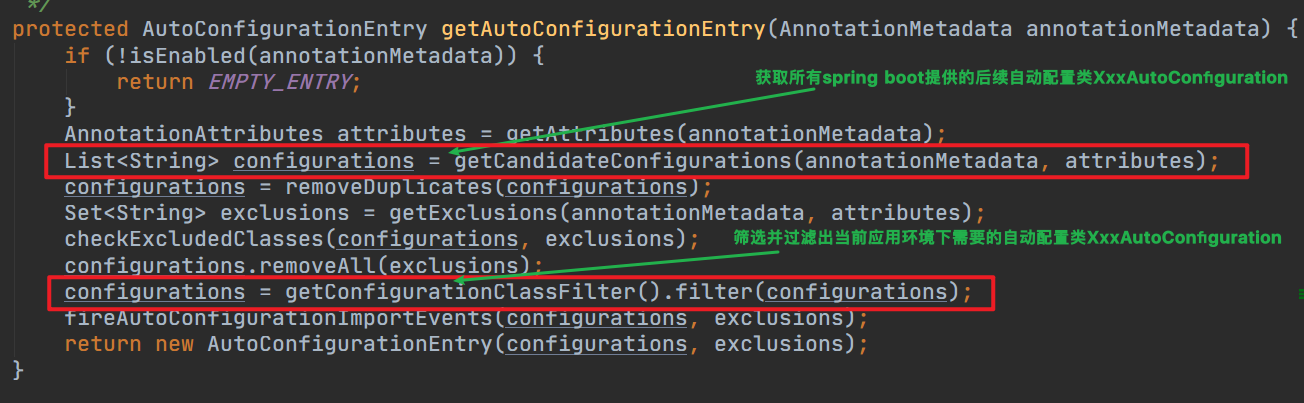
接下来我们对上面框出来的两个重要的业务方法进行说明:
getCandidateConfigurations(annotationMetadata, attributes):从spring boot提供的自动配置依赖 META-INF/spring.factories 文件中获取所有候选自动配置类XxxAutoConfigurationgetConfigurationClassFilter().filter(configurations):对所有候选的自动配置类进行筛选,根据项目pom文件所加依赖筛选出最终符合当前项目运行环境对应的自动配置类
我们可以打开 META-INF/spring.factories 文件看看提供的候选自动配置类XxxAutoConfiguration有哪些

例如我们加入了web依赖,对应的
WebMvcAutoConfiguration自动配置类就会生效。打开该自动配置类会发现,该配置类中通过全注解配置类的方式对Spring MVC运行所需环境进行了默认配置,包括默认前缀/后缀、视图解析、MVC校验器等等。这些自动配置类的本质时传统springmvc中对应的xml配置文件,只是再spring boot中以自动配置的方式进行了预先配置。所以我们再spring boot中加入了相应依赖,基本就不用自己搞任何配置就可以运行程序了,当然我们也可以对这些自动配置默认的配置进行更改
2.3 @ComponentScan
@ComponentScan 是一个组件包扫描器,用于指定包中的注解类自动装配到spring的Bean容器中;具体扫描的包的根路径由spring boot项目主程序启动类所在的包位置决定,在扫描过程中由前面所将的 @AutoConfigurationPackage 进行解析,从而得到主程序启动类所在包的具体位置
3. 执行流程
我们知道,spring boot项目都有一个主程序启动类,其中有一个 main() 方法,执行其中的 SpringApplication.run(BlogSystemApplication.class, args) 即可启动整个项目,那其中是如何运转的呢?我们来看看它的 run() 方法的源码
public static ConfigurableApplicationContext run(Class<?> primarySource, String... args) {
		return run(new Class<?>[] { primarySource }, args);
	}

	public static ConfigurableApplicationContext run(Class<?>[] primarySources, String[] args) {
		return new SpringApplication(primarySources).run(args);
	}
我们可以看到其内部执行了两个操作,分别是SpringApplication实例的初始化和调用 run() 启动项目
3.1 SpringApplication实例的初始化
进入源码
public SpringApplication(ResourceLoader resourceLoader, Class<?>... primarySources) {
	this.resourceLoader = resourceLoader;
	Assert.notNull(primarySources, "PrimarySources must not be null");
	this.primarySources = new LinkedHashSet<>(Arrays.asList(primarySources));
	this.webApplicationType = WebApplicationType.deduceFromClasspath();
	setInitializers((Collection) getSpringFactoriesInstances(ApplicationContextInitializer.class));
	setListeners((Collection) getSpringFactoriesInstances(ApplicationListener.class));
	this.mainApplicationClass = deduceMainApplicationClass();
}
初始化过程主要包括以下四个部分
this.webApplicationType = WebApplicationType.deduceFromClasspath():用于判断当前 webApplicationType 应用的类型。deduceFromClasspath()用于查看 Classpath 类路径下是否存在某个特征类,从而判断当前 webApplicationType 类型是 SERVLET应用(spring5前的传统mvc应用)还是REACTIVE应用(spring5后的WebFlux交互式应用)setInitializers((Collection) getSpringFactoriesInstances(ApplicationContextInitializer.class)):用于设置SpringApplication应用的初始化器。在这个过程中,会使用spring类加载器 SpringFactoriesLoader 从 META-INF/spring.factories 中获取所有可用的应用初始化器类 ApplicationContextInitializersetListeners((Collection) getSpringFactoriesInstances(ApplicationListener.class)):设置SpringApplication应用的监听器。监听器的设置和初始化器的过程基本一致,也是使用spring类加载器 SpringFactoriesLoader 从 META-INF/spring.factories 中获取所有可用的应用初始化器类 ApplicationListenerthis.mainApplicationClass = deduceMainApplicationClass():判断并设置项目main()方法启动的主程序启动类
3.2 调用 run() 启动项目
查看 run(args) 方法源码,项目初始化启动过程大致包括六个部分,已在下面代码中进行注释
public ConfigurableApplicationContext run(String... args) {
	StopWatch stopWatch = new StopWatch();
	stopWatch.start();
	ConfigurableApplicationContext context = null;
	Collection<SpringBootExceptionReporter> exceptionReporters = new ArrayList<>();
	configureHeadlessProperty();
        //1. 获取SpringApplicationRun初始化的SpringApplicationRunListeners运行监听器并运行
	SpringApplicationRunListeners listeners = getRunListeners(args);
	listeners.starting();

	try {
		ApplicationArguments applicationArguments = new DefaultApplicationArguments(args);
                //2. 项目运行环境Environment的预配置,同时通过 configureIgnoreBeanInfo(environment) 排除一些不需要的运行环境
		ConfigurableEnvironment environment = prepareEnvironment(listeners, applicationArguments);
		configureIgnoreBeanInfo(environment);

		Banner printedBanner = printBanner(environment);
                //3. 项目应用上下文ApplicationContext的预配置,包括先创建应用上下文环境ApplicationContext
		context = createApplicationContext();
		exceptionReporters = getSpringFactoriesInstances(SpringBootExceptionReporter.class,
				new Class[] { ConfigurableApplicationContext.class }, context);
                //使用之前初始化设置的context(应用上下文), environment(项目运行环境), listeners(运行监听器), applicationArguments(项目参数), printedBanner(项目图标信息),进行应用上下文的组装配置
		prepareContext(context, environment, listeners, applicationArguments, printedBanner);
                //刷新配置
		refreshContext(context);
		afterRefresh(context, applicationArguments);

		stopWatch.stop();
		if (this.logStartupInfo) {
			new StartupInfoLogger(this.mainApplicationClass).logStarted(getApplicationLog(), stopWatch);
		}
                //4. 由项目运行监听器启动配置好的应用上下文ApplicationContext
		listeners.started(context);
                //5. 调用应用上下文ApplicationContext中配置的程序执行其XxxRunner,使得在项目启动完成后立即执行一些特定程序
                //    其中spring boot提供的执行器接口由ApplicationRunner和CommandLineRunner
                //    在使用时只需自定义一个执行其类实现其中一个接口并重写对应的run()方法接口,spring boot项目启动后会立即执行这些特定程序
		callRunners(context, applicationArguments);
	}
	catch (Throwable ex) {
		handleRunFailure(context, ex, exceptionReporters, listeners);
		throw new IllegalStateException(ex);
	}

	try {
                //6. 由项目运行监听器持续运行配置好的应用上下文ApplicationContext(前面初始化启动都没有问题的前提下)
		listeners.running(context);
	}
	catch (Throwable ex) {
		handleRunFailure(context, ex, exceptionReporters, null);
		throw new IllegalStateException(ex);
	}
	return context;
}

该学习笔记学习自黑马程序员出版的《Spring Boot企业级开发教程》,是我个人的学习总结,如有不足之处请指教

