Mapbox实战项目(1)-栅格图片图层实现地图方位展示
需求背景
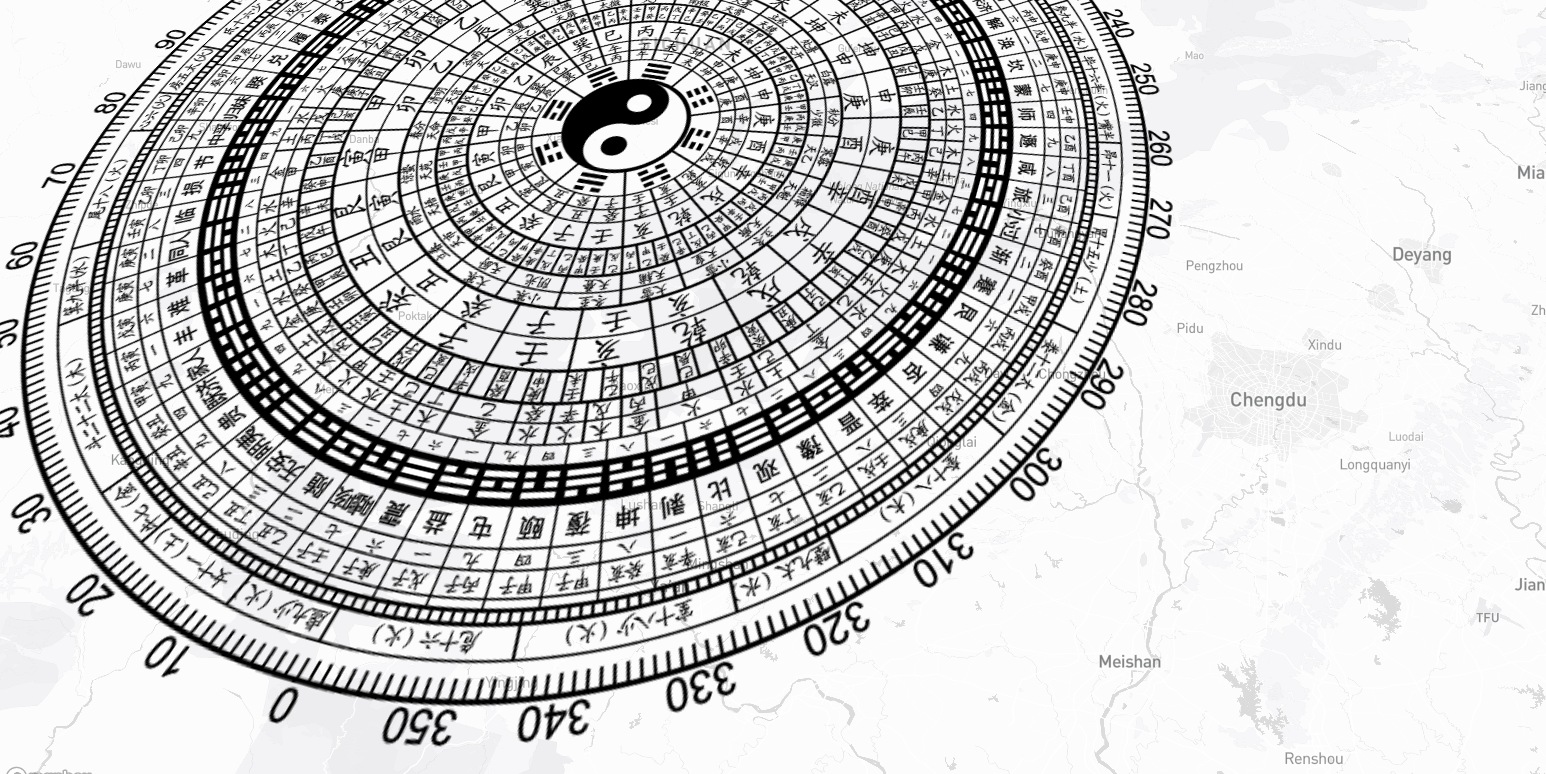
需要实现地图上展示一个类似于罗盘的标记,随着地图的缩放、切换、旋转等,能够在地图的中央指示出地图的方位。
系统自带的方位控件太小,在特殊业务场景下不够醒目。
技术选型
Mapbox
实现分析
- 官网已经有地图上展示图片矢量图层的demo,“Add a raster image to a map layer”和“Add a pattern to a polygon”。注意看前者和后者的区别,前者主要用一张图片覆盖到指定的一个多边形区域;而后者则会用图片区填充一个多边形区域,如果图片太小,矩形区域太大,则会重复叠加多张图片直到矩形区域填充满。
- 从地图开放的接口上来看,我们需要监听的主要地图交互事件有:拖拽、缩放、旋转。可在这三个事件完成时重新调整矢量图片的中心位置,重新绘制图层;
- 重新绘制图片图层时,需要注意地图的旋转角度(bearing)参数,在交互事件结束时实时获取当前地图的中心点和旋转角度,计算图片重新“贴”的位置;
- 通过“Add a raster image to a map layer”示例了解到,往地图上“贴”一张图片需要定义四个经纬度坐标用来确定图片的“粘贴”位置,这样在进行地图旋转或者调整俯视角度的时候就可以紧贴地图跟随地图一起变化。
- 当用户在交互的过程中,需要使用以地图中心点(全屏下:屏幕中心点)计算图片在地图坐标系中的四个经纬度坐标。因此我们需要将图片放在屏幕中间,同时计算出图片在屏幕上的四个屏幕坐标点,通过mapbox提供的屏幕坐标点转经纬度坐标接口进行转换。
- 在屏幕坐标系转地图坐标系时,需要注意图片的旋转角度。mapbox的bearing是逆时针旋转,原始的屏幕坐标点在经过指定的角度旋转之后获得一个新的屏幕坐标点,再将旋转后的坐标点通过mapbox的屏幕坐标点转经纬度坐标点就可以得到一个“贴”图的目标经纬度坐标。
- mapbox针对图片图层的位置更新可以通过
source的setCoordinates(newCoordinates)进行更新,设置以后调用map.triggerRepaint()触发地图重绘,届时功成;
代码实现
<!DOCTYPE html>
<html>

<head>
    <meta charset="utf-8">
    <title>Add a raster image to a map layer</title>
    <meta name="viewport" content="initial-scale=1,maximum-scale=1,user-scalable=no">
    <link href="https://api.mapbox.com/mapbox-gl-js/v3.2.0/mapbox-gl.css" rel="stylesheet">
    <script src="https://api.mapbox.com/mapbox-gl-js/v3.2.0/mapbox-gl.js"></script>
    <style>
        body {
            margin: 0;
            padding: 0;
        }

        #map {
            position: absolute;
            top: 0;
            bottom: 0;
            width: 100%;
        }
    </style>
</head>

<body>
    <div id="map"></div>
    <script>
        mapboxgl.accessToken = '你的KEY';
        const map = new mapboxgl.Map({
            container: 'map',
            zoom: 10,
            center: [103, 30],
            // Choose from Mapbox's core styles, or make your own style with Mapbox Studio
            style: 'mapbox://styles/mapbox/light-v11'
        });

        //图层的长宽尺寸, 务必和真实图片的长宽保持一致,本教程使用的是正方形,矩形同理可实现。
        const imgWidth = 632;
        const corners = getImgcornersAtMapCenter(map, imgWidth)

        map.on('load', () => {
            map.addSource('compass', {
                'type': 'image',
                'url': './assets/823VemjWvJ.png',
                'coordinates': corners
            });
            map.addLayer({
                "id": 'radar-layer',
                'type': 'raster',
                'source': 'compass',
                'paint': {
                    'raster-fade-duration': 0
                }
            });
        });

        //拖拽结束重新绘图
        map.on("dragend", () => {
            var source = map.getSource("compass");
            var corners = getImgcornersAtMapCenter(map, imgWidth);
            source.setCoordinates(corners);
            map.triggerRepaint();
        });

        //添加zoomend事件监听器
        map.on("zoomend", () => {
            var source = map.getSource("compass");
            var corners = getImgcornersAtMapCenter(map, imgWidth);
            source.setCoordinates(corners);
            map.triggerRepaint();
        });

        function getImgcornersAtMapCenter(map, imgWidth) {
            //获取地图的bearing参数
            const bearing = map.getBearing();

            // 获取地图容器的宽度和高度
            const mapWidth = map.getCanvas().width;
            const mapHeight = map.getCanvas().height;

            //计算图片在地图上的显示区域的左上角和右下角的屏幕坐标
            const imageTopLeft = [(mapWidth - imgWidth) / 2, (mapHeight - imgWidth) / 2];
            const imageBottomRight = [imageTopLeft[0] + imgWidth, imageTopLeft[1] + imgWidth];

            //计算图片旋转后的左上角和右下角
            var rotatedcoordinates = rotatecoordinates(imageTopLeft, imageBottomRight, 0 - bearing)

            // 将屏幕坐标转换为经纬度坐标
            const topLeftCoordinates = map.unproject(rotatedcoordinates[0]);
            const bottomRightcoordinates = map.unproject(rotatedcoordinates[1]);

            return new Array(
                [topLeftCoordinates.lng, topLeftCoordinates.lat], // Northwest corner
                [bottomRightcoordinates.lng, topLeftCoordinates.lat], // Southwest corner
                [bottomRightcoordinates.lng, bottomRightcoordinates.lat], //// Southeast corner
                [topLeftCoordinates.lng, bottomRightcoordinates.lat] //Northeast corner
            )
        }

        function rotatecoordinates(topLeft, bottomRight, bearing) {
            const center = [
                (topLeft[0] + bottomRight[0]) / 2,
                (topLeft[1] + bottomRight[1]) / 2
            ];
            //计算左上角相对于中心点的偏移
            const offsetX1 = topLeft[0] - center[0];
            const offsetY1 = topLeft[1] - center[1];

            //计算右下角相对于中心点的偏移
            const offsetX2 = bottomRight[0] - center[0];
            const offsetY2 = bottomRight[1] - center[1];

            const bearingRad = bearing * (Math.PI / 180);
            //计算旋转后的左上角坐标
            const rotatedX1 = offsetX1 * Math.cos(bearingRad) - offsetY1 * Math.sin(bearingRad);
            const rotatedY1 = offsetX1 * Math.sin(bearingRad) + offsetY1 * Math.cos(bearingRad);

            // 计算旋转后的右下角坐标
            const rotatedX2 = offsetX2 * Math.cos(bearingRad) - offsetY2 * Math.sin(bearingRad);
            const rotatedY2 = offsetX2 * Math.sin(bearingRad) + offsetY2 * Math.cos(bearingRad);

            //将旋转后的坐标加上中心点的偏移,得到最终坐标
            const rotatedTopLeft = [rotatedX1 + center[0], rotatedY1 + center[1]];
            const rotatedBottomRight = [rotatedX2 + center[0], rotatedY2 + center[1]];
            return new Array(rotatedTopLeft, rotatedBottomRight);
        }
    </script>

</body>

</html>
效果截图


思考问题
【问】贴图后的图片是否“遮挡”了地图本身的事件交互?
【答】可以调整image图层在地图众图层中的位置人,让它处于最底层;
其他
离线地图服务器,有需求就提issue:mapbox-offline-server


【推荐】国内首个AI IDE,深度理解中文开发场景,立即下载体验Trae
【推荐】编程新体验,更懂你的AI,立即体验豆包MarsCode编程助手
【推荐】抖音旗下AI助手豆包,你的智能百科全书,全免费不限次数
【推荐】轻量又高性能的 SSH 工具 IShell:AI 加持,快人一步
· winform 绘制太阳,地球,月球 运作规律
· 超详细:普通电脑也行Windows部署deepseek R1训练数据并当服务器共享给他人
· TypeScript + Deepseek 打造卜卦网站:技术与玄学的结合
· AI 智能体引爆开源社区「GitHub 热点速览」
· 写一个简单的SQL生成工具