04-Vue生命周期钩子
一:生命周期图
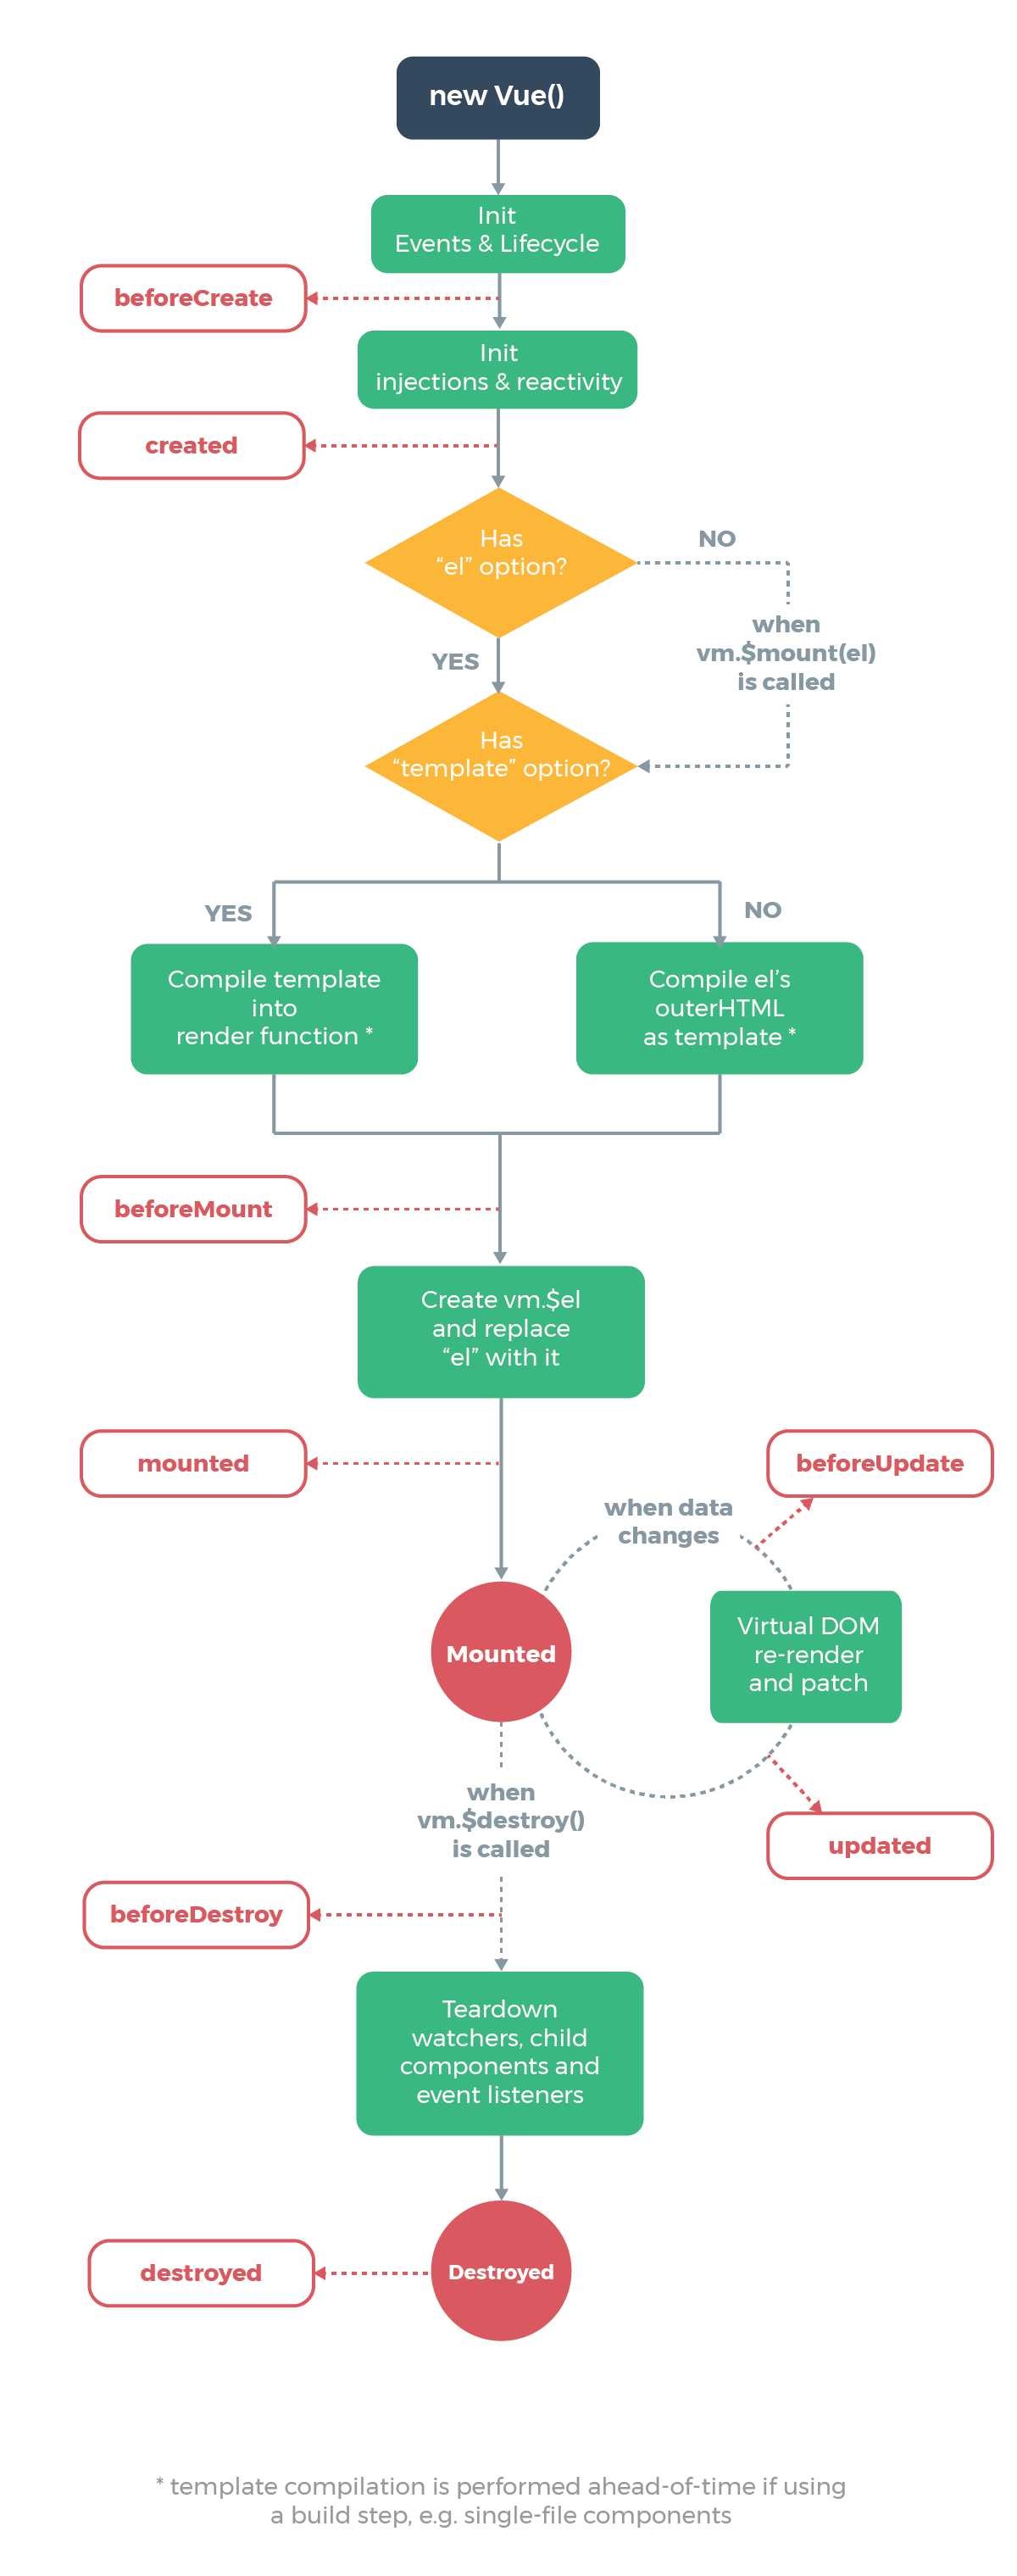
1.官网原图
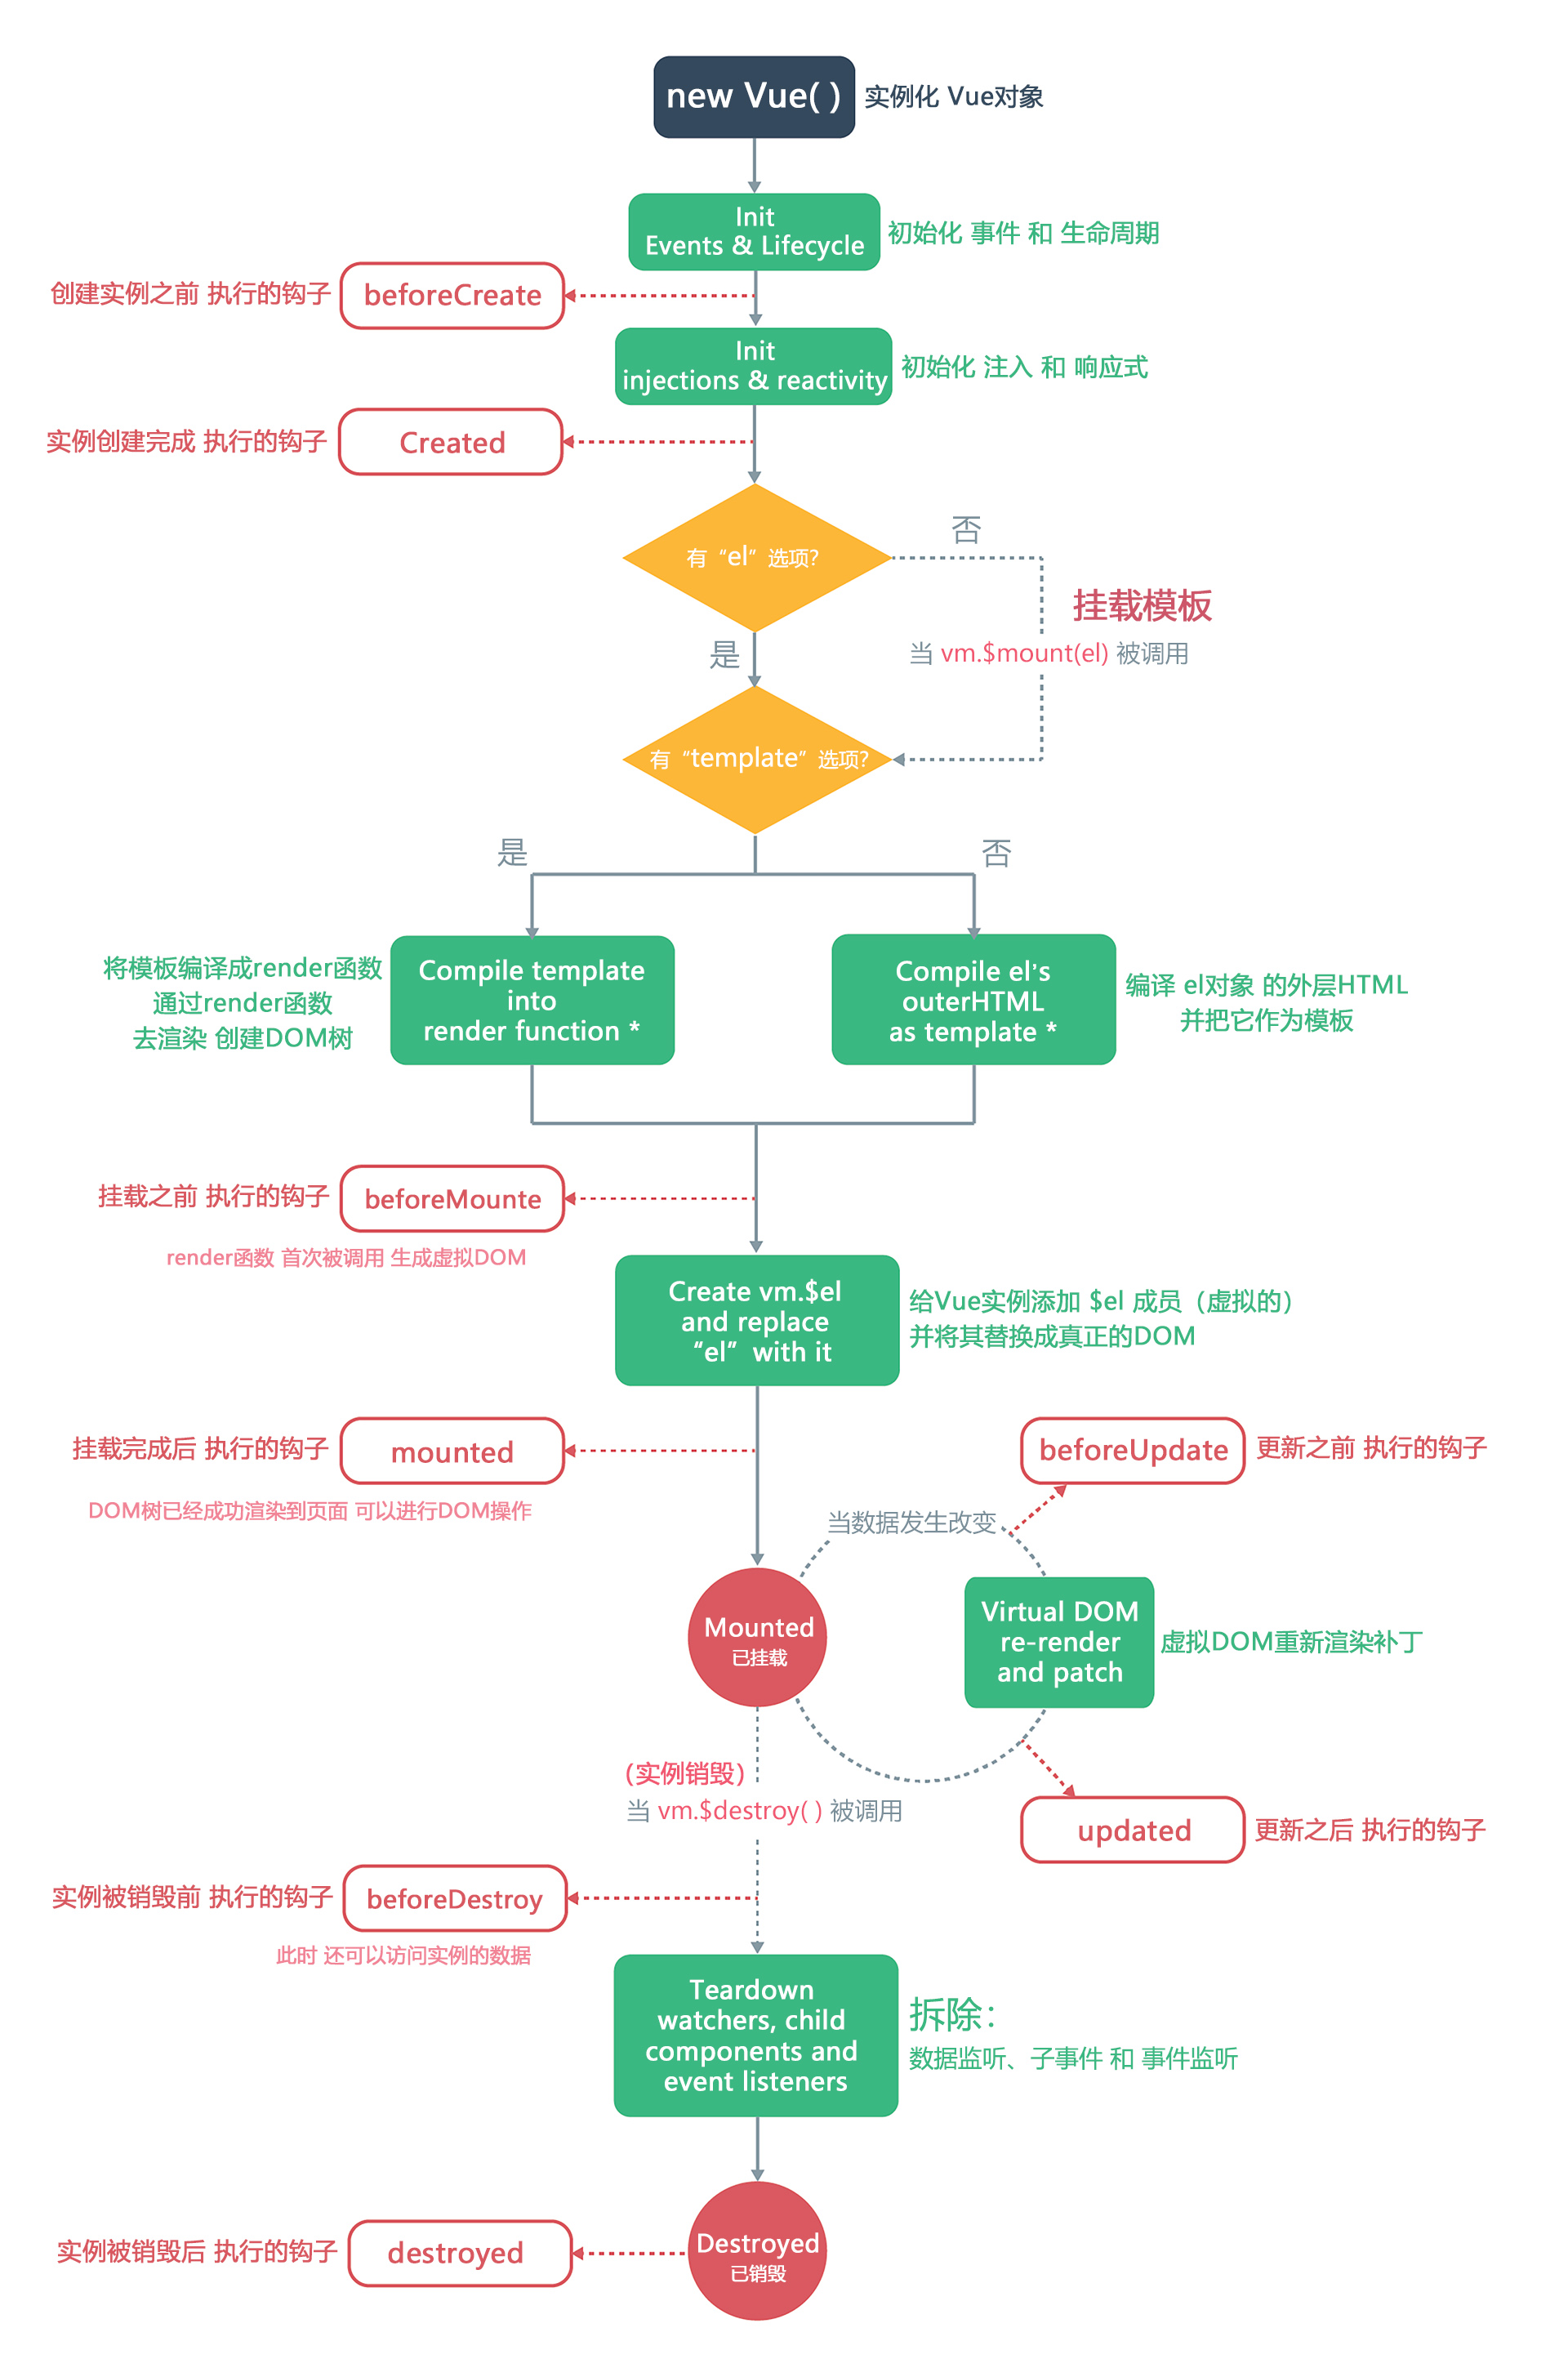
3.我理解的图
二:生命周期
| 钩子函数 | 描述 |
|---|---|
| beforeCreate | 创建Vue实例之前调用 |
| created | 创建Vue实例成功后调用(可以在此处发送异步请求后端数据) |
| beforeMount | 渲染DOM之前调用 |
| mounted | 渲染DOM之后调用 |
| beforeUpdate | 重新渲染之前调用(数据更新等操作时,控制DOM重新渲染) |
| updated | 重新渲染完成之后调用 |
| beforeDestroy | 销毁之前调用 |
| destroyed | 销毁之后调用 |
create
let vm = new Vue()
mount
挂载,把div挂载到组件中
update
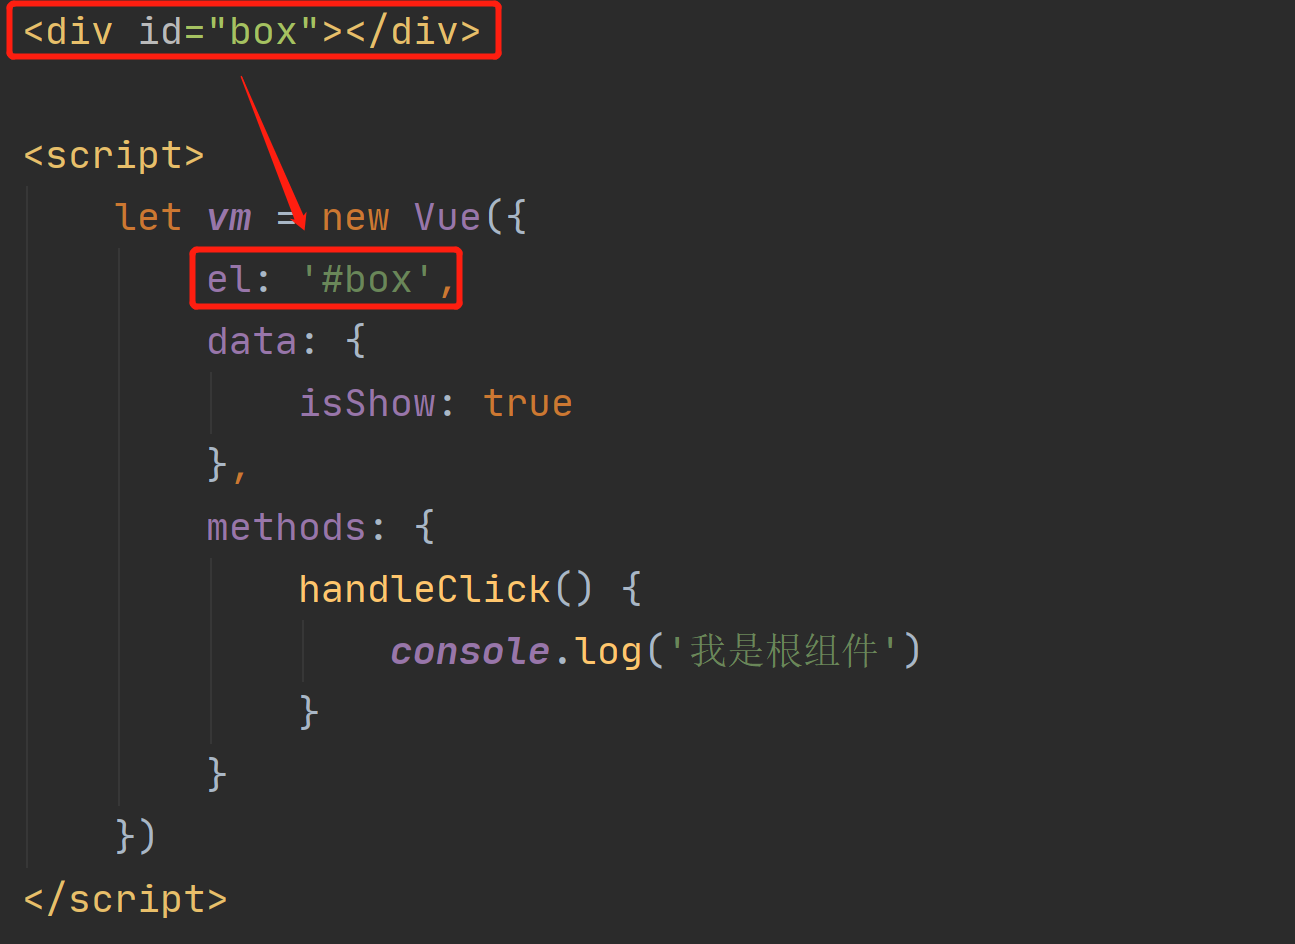
let vm = new Vue({
    el: '#box',
    data: {
        isShow: true    // 修改这个内容
    },
    methods: {
        handleClick() {
            console.log('我是根组件')
        }
    }
})
1.bedoreCreate
2.created
3.beforeMount
4.mounted(用得最多)
这时候可以向后端发送数据了
5.beforeUpdate
6.updated
7.beforeDestroy
8.destroyed
组件销毁 - 给组件写一个定时器
setTimeout()    // 延迟3s干什么事
setInterval()    // 延迟3s干什么事
测试代码
<!DOCTYPE html>
<html lang="en">
<head>
    <meta charset="UTF-8">
    <title>生命周期</title>
    <script src="https://cdn.bootcdn.net/ajax/libs/vue/2.6.12/vue.min.js"></script>
</head>
<body>
<div id="box">
    <child v-if="isShow"></child>
    <br>
    <button @click="terminate">删除子组件</button>
    <button @click="reborn">显示子组件</button>
</div>
</body>
<script>
    Vue.component('child', {
        template: `
            <div>
                {{name}}
                <button @click="name='Darker1'">更新数据1</button>
                <button @click="name='Darker2'">更新数据2</button>
            </div>`,
        data() {
            return {
                name: 'Darker1',
            }
        },
        beforeCreate() {
            console.group('当前状态:beforeCreate')
            console.log('当前el状态:', this.$el)
            console.log('当前data状态:', this.$data)
            console.log('当前name状态:', this.name)
        },
        created() {
            console.group('当前状态:created')
            console.log('当前el状态:', this.$el)
            console.log('当前data状态:', this.$data)
            console.log('当前name状态:', this.name)
        },
        beforeMount() {
            console.group('当前状态:beforeMount')
            console.log('当前el状态:', this.$el)
            console.log('当前data状态:', this.$data)
            console.log('当前name状态:', this.name)
        },
        mounted() {
            console.group('当前状态:mounted')
            console.log('当前el状态:', this.$el)
            console.log('当前data状态:', this.$data)
            console.log('当前name状态:', this.name)
        },
        beforeUpdate() {
            console.group('当前状态:beforeUpdate')
            console.log('当前el状态:', this.$el)
            console.log('当前data状态:', this.$data)
            console.log('当前name状态:', this.name)
        },
        updated() {
            console.group('当前状态:updated')
            console.log('当前el状态:', this.$el)
            console.log('当前data状态:', this.$data)
            console.log('当前name状态:', this.name)
        },
        beforeDestroy() {
            console.group('当前状态:beforeDestroy')
            console.log('当前el状态:', this.$el)
            console.log('当前data状态:', this.$data)
            console.log('当前name状态:', this.name)
        },
        destroyed() {
            console.group('当前状态:destroyed')
            console.log('当前el状态:', this.$el)
            console.log('当前data状态:', this.$data)
            console.log('当前name状态:', this.name)
        },


    })
    let vm = new Vue({
        el: '#box',
        data: {
            isShow: true
        },
        methods: {
            terminate() {
                this.isShow = false
            },
            reborn() {
                this.isShow = true
            }
        }
    })
</script>
</html>
作者:liuqingzheng
出处:https://www.cnblogs.com/liuqingzheng/articles/17124968.html
版权:本作品采用「署名-非商业性使用-相同方式共享 4.0 国际」许可协议进行许可。


· go语言实现终端里的倒计时
· 如何编写易于单元测试的代码
· 10年+ .NET Coder 心语,封装的思维:从隐藏、稳定开始理解其本质意义
· .NET Core 中如何实现缓存的预热?
· 从 HTTP 原因短语缺失研究 HTTP/2 和 HTTP/3 的设计差异
· 使用C#创建一个MCP客户端
· 分享一个免费、快速、无限量使用的满血 DeepSeek R1 模型,支持深度思考和联网搜索!
· ollama系列1:轻松3步本地部署deepseek,普通电脑可用
· 基于 Docker 搭建 FRP 内网穿透开源项目(很简单哒)
· 按钮权限的设计及实现