Vue高级
一 ref属性
被用来给元素或子组件注册引用信息(id的替代者)
应用在html标签上获取的是真实DOM元素,应用在组件标签上是组件实例对象(vc)
使用方式:
打标识:
.....
或获取:this.$refs.xxx
<template>
  <div>
    <h1 v-text="msg" ref="title"></h1>
    <button ref="btn" @click="showDOM">点我输出上方的DOM元素</button>
    <HelloWorld ref="sch" />
  </div>
</template>

<script>
import HelloWorld from "./components/HelloWorld.vue";

export default {
  name: "App",
  components: { HelloWorld },
  data() {
    return {
      msg: "lqz",
    };
  },
  methods: {
    showDOM() {
      console.log(this.$refs.title); //真实DOM元素
      console.log(this.$refs.btn); //真实DOM元素
      console.log(this.$refs.sch); //School组件的实例对象(vc)
    },
  },
};
</script>
二 props配置项
功能:让组件接收外部传过来的数据
传递数据:
接收数据:
第一种方式(只接收):props:['name']
第二种方式(限制类型):props:{name:String}
第三种方式(限制类型、限制必要性、指定默认值):
props:{
	name:{
	type:String, //类型
	required:true, //必要性
	default:'老王' //默认值
	}
}
三 mixin(混入)
mixin(混入)
功能:可以把多个组件共用的配置提取成一个混入对象
使用方式:
第一步定义混入:
export const hunhe = {
  methods: {
    showName() {
      alert(this.name);
    },
  },
  mounted() {
    console.log("你好啊!");
  },
};
export const hunhe2 = {
  data() {
    return {
      x: 100,
      y: 200,
    };
  },
};
第二步:使用混入(全局)
//引入Vue
import Vue from 'vue'
//引入App
import App from './App.vue'
import {hunhe,hunhe2} from './mixin'
//关闭Vue的生产提示
Vue.config.productionTip = false

Vue.mixin(hunhe)
Vue.mixin(hunhe2)


//创建vm
new Vue({
	el:'#app',
	render: h => h(App)
})
第三步:使用混入(局部)
<template>
  <div>

  </div>
</template>

<script>
import {hunhe,hunhe2} from '../mixin'

export default {
  name: "App",
  data() {
    return {
      name: "lqz",
    };
  },
  mixins:[hunhe,hunhe2]
};
</script>
四 插件
-
功能:用于增强Vue
-
本质:包含install方法的一个对象,install的第一个参数是Vue,第二个以后的参数是插件使用者传递的数据。
-
定义插件:plugins/index.js
import Vue from "vue"; export default { install(a) { console.log('执行了插件', a) // 定义指令 //定义全局指令:跟v-bind一样,获取焦点 Vue.directive("fbind", { //指令与元素成功绑定时(一上来) bind(element, binding) { element.value = binding.value; }, //指令所在元素被插入页面时 inserted(element, binding) { element.focus(); }, //指令所在的模板被重新解析时 update(element, binding) { element.value = binding.value; }, }); //定义混入,所有vc和vm上都有name和lqz Vue.mixin({ data() { return { name: '彭于晏', age: 19, }; }, }); // 原型上放方法,所有vc和vm都可以用hello Vue.prototype.hello = () => { alert("你好啊"); }; } } -
使用插件:main.js中
import plugins from './plugins' Vue.use(plugins, 1, 2, 3); -
App.vue中
<template>
  <div>
  {{name}}
    <input type="text" v-fbind:value="v">
    <br>
    <button @click="hello">点我</button>
  </div>
</template>

<script>

export default {
  name: "App",
  data() {
    return {
      v:'xxx'
    };
  },
};
</script>
五 scoped样式
- 作用:让样式在局部生效,防止冲突。
- 写法:
<style scoped>
六 插槽
- 作用:让父组件可以向子组件指定位置插入html结构,也是一种组件间通信的方式,适用于 父组件 ===> 子组件
- 分类:默认插槽、具名插槽
- 使用方式:
<template v-slot:footer>
    <div>html结构2</div>
</template>
七 Elementui的使用
https://element.eleme.cn/#/zh-CN/component/installation
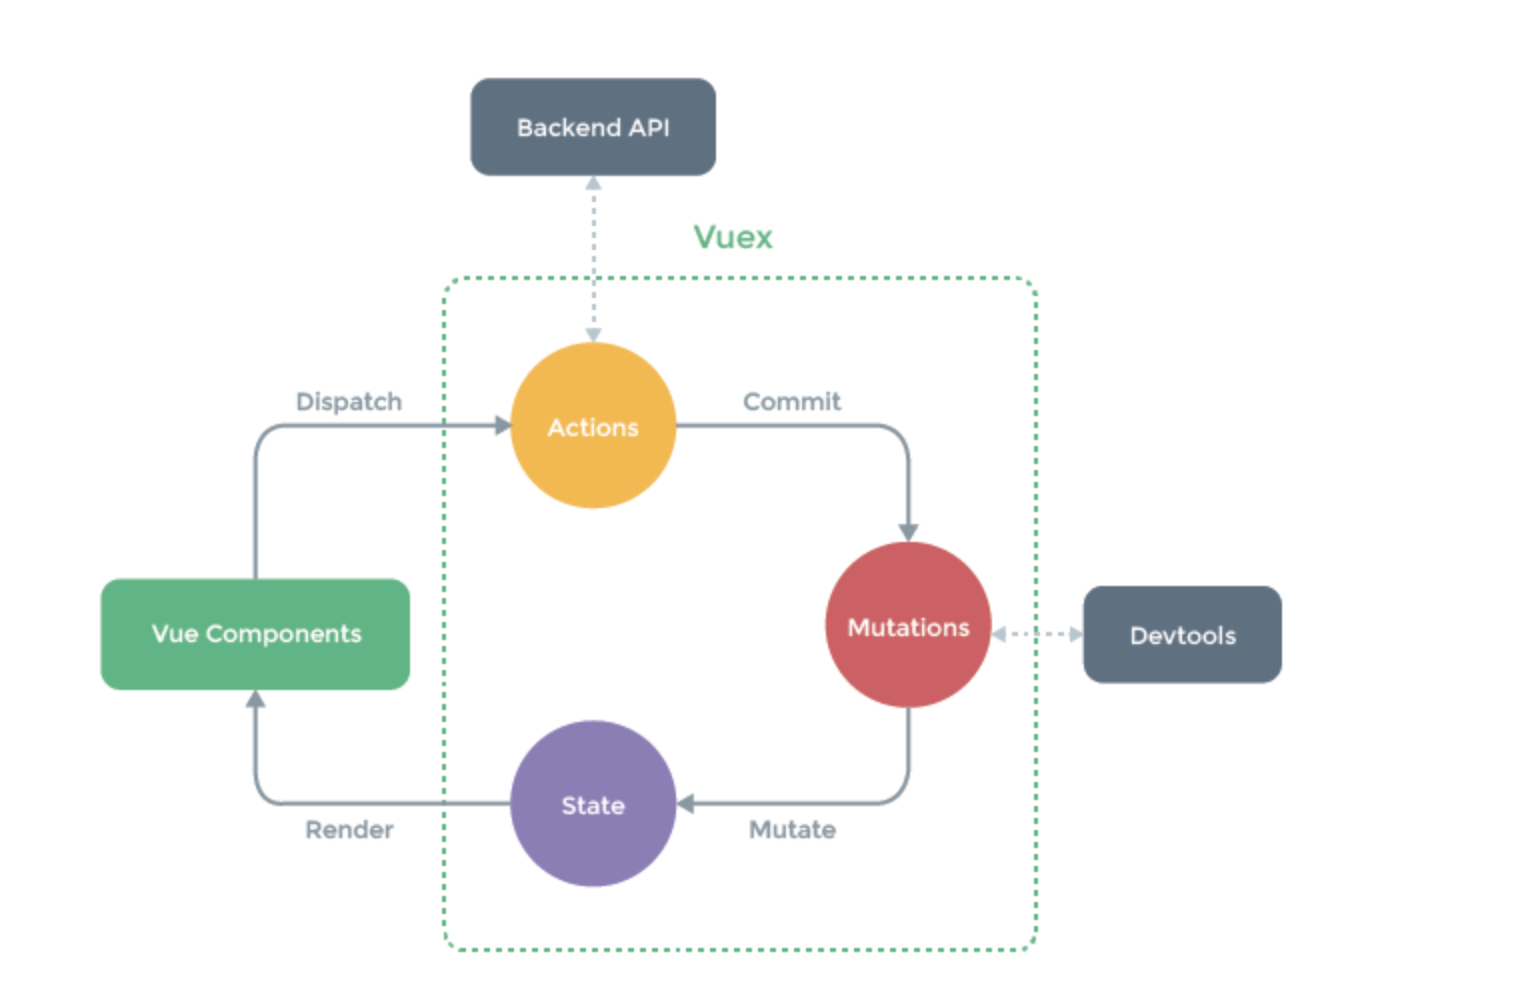
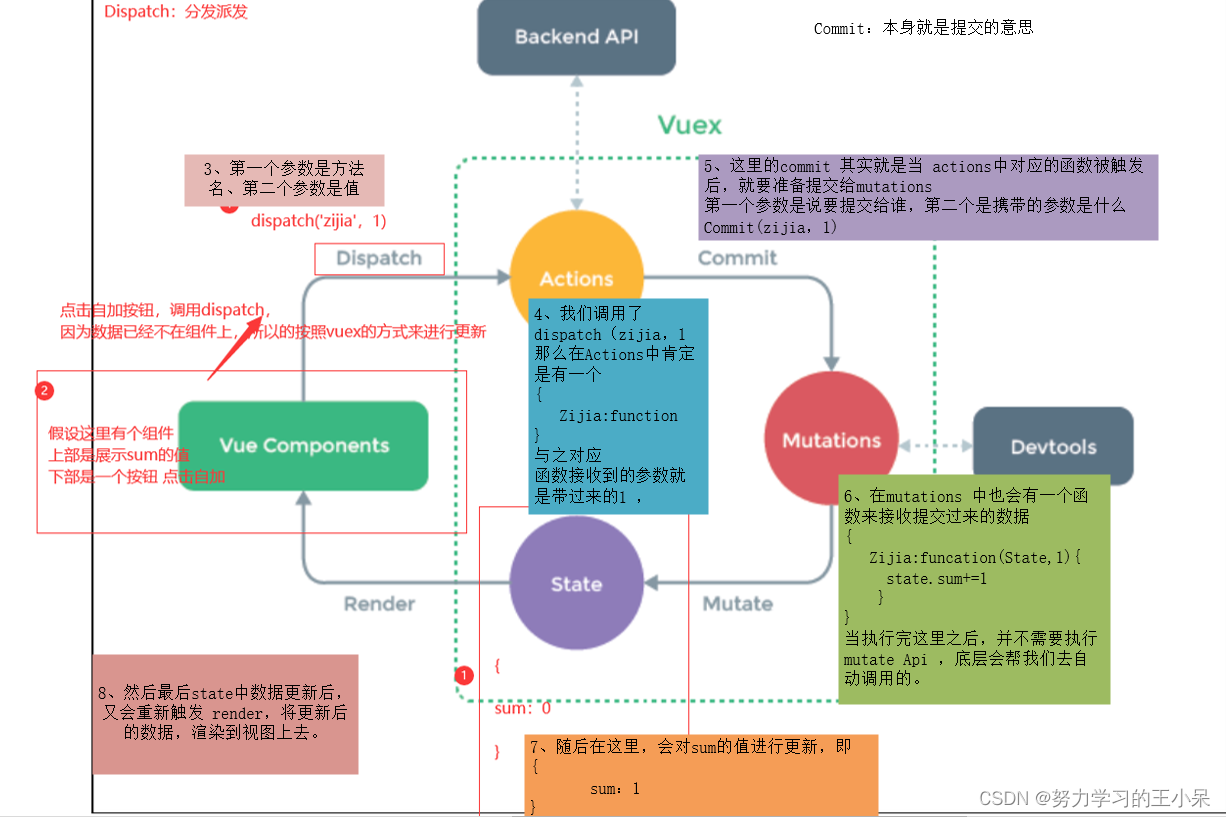
八 vuex的使用
1.概念
在Vue中实现集中式状态(数据)管理的一个Vue插件,对vue应用中多个组件的共享状态进行集中式的管理(读/写),也是一种组件间通信的方式,且适用于任意组件间通信。
2.何时使用?
多个组件需要共享数据时
3.搭建vuex环境
创建文件:src/store/index.js
   //引入Vue核心库
   import Vue from 'vue'
   //引入Vuex
   import Vuex from 'vuex'
   //应用Vuex插件
   Vue.use(Vuex)

   //准备actions对象——响应组件中用户的动作
   const actions = {}
   //准备mutations对象——修改state中的数据
   const mutations = {}
   //准备state对象——保存具体的数据
   const state = {}

   //创建并暴露store
   export default new Vuex.Store({
   	actions,
   	mutations,
   	state
   })
在main.js中创建vm时传入store配置项
   ......
   //引入store
   import store from './store'
   ......

   //创建vm
   new Vue({
   	el:'#app',
   	render: h => h(App),
   	store
   })
4.基本使用
初始化数据、配置actions、配置mutations,操作文件store.js
   //引入Vue核心库
   import Vue from 'vue'
   //引入Vuex
   import Vuex from 'vuex'
   //引用Vuex
   Vue.use(Vuex)

   const actions = {
       //响应组件中加的动作
   	jia(context,value){
   		// console.log('actions中的jia被调用了',miniStore,value)
   		context.commit('JIA',value)
   	},
   }

   const mutations = {
       //执行加
   	JIA(state,value){
   		// console.log('mutations中的JIA被调用了',state,value)
   		state.sum += value
   	}
   }

   //初始化数据
   const state = {
      sum:0
   }

   //创建并暴露store
   export default new Vuex.Store({
   	actions,
   	mutations,
   	state,
   })
组件中读取vuex中的数据:$store.state.sum
组件中修改vuex中的数据:$store.dispatch('action中的方法名',数据)或 $store.commit('mutations中的方法名',数据)
<template>
  <div>

    <hr>
    {{sum}}
    <button @click="handleClick">点我</button>
  </div>
</template>

<script>

export default {
  name: "App",
  data() {
    return {
      v:'xxx',
      sum:this.$store.state.sum
    };
  },
  methods:{
    handleClick(){
      // action中的方法名
      // this.$store.dispatch('jia',2)
      // console.log(this.$store.state.sum)

      //mutations中的方法名
      this.$store.commit('JIA',4)
      console.log(this.$store.state.sum)
    }
  }
};
</script>
备注:若没有网络请求或其他业务逻辑,组件中也可以越过actions,即不写dispatch,直接编写commit
九 Router使用
9.1 说明
- 官方提供的用来实现SPA 的vue 插件
- github: https://github.com/vuejs/vue-router
- 中文文档: http://router.vuejs.org/zh-cn/
- 下载:
npm install vue-router --save
//引入VueRouter
   import VueRouter from 'vue-router'
   //引入Luyou 组件
   import About from '../components/About'
   import Home from '../components/Home'

   //创建router实例对象,去管理一组一组的路由规则
   const router = new VueRouter({
   	routes:[
   		{
   			path:'/about',
   			component:About
   		},
   		{
   			path:'/home',
   			component:Home
   		}
   	]
   })

   //暴露router
   export default router
9.2 相关API
VueRouter(): 用于创建路由器的构建函数
new VueRouter({
// 多个配置项
})
路由配置
routes: [
	{ // 一般路由
		path: '/about',
		component: About
	},
	{ // 自动跳转路由
		path: '/',
		redirect: '/about'
	}
]
注册路由
import router from './router'
new Vue({
	router
})
使用路由组件标签
<router-link>: 用来生成路由链接
<router-link to="/xxx">Go to XXX</router-link>
<router-view>: 用来显示当前路由组件界面
<router-view></router-view>
9.3 路由嵌套
9.4 向路由组件传递数据
//1 路由配置
children: [
	{
	path: 'mdetail/:id',
	component: MessageDetail
	}
]
// 2 <router-link :to="'/home/message/mdetail/'+m.id">{{m.title}}</router-link>

// 3 this.$route.params.id
9.5 相关API
this.$router.push(path): 相当于点击路由链接(可以返回到当前路由界面)
this.$router.replace(path): 用新路由替换当前路由(不可以返回到当前路由界面)
this.$router.back(): 请求(返回)上一个记录路由
this.$router.go(-1): 请求(返回)上一个记录路由
this.$router.go(1): 请求下一个记录路由
9.6 多级路由
  routes:[
   	{
   		path:'/about',
   		component:About,
   	},
   	{
   		path:'/home',
   		component:Home,
   		children:[ //通过children配置子级路由
   			{
   				path:'news', //此处一定不要写:/news
   				component:News
   			},
   			{
   				path:'message',//此处一定不要写:/message
   				component:Message
   			}
   		]
   	}
   ]

// 跳转
<router-link to="/home/news">News</router-link>
9.7 命名路由(可以简化路由的跳转)
    {
      	path:'/demo',
      	component:Demo,
      	children:[
      		{
      			path:'test',
      			component:Test,
      			children:[
      				{
                name:'hello' //给路由命名
      					path:'welcome',
      					component:Hello,
      				}
      			]
      		}
      	]
      }
 <!--简化前,需要写完整的路径 -->
      <router-link to="/demo/test/welcome">跳转</router-link>

      <!--简化后,直接通过名字跳转 -->
      <router-link :to="{name:'hello'}">跳转</router-link>

      <!--简化写法配合传递参数 -->
      <router-link
      	:to="{
      		name:'hello',
      		query:{
      		   id:666,
             title:'你好'
      		}
      	}"
      >跳转</router-link>
9.8 router-link的replace属性
作用:控制路由跳转时操作浏览器历史记录的模式
浏览器的历史记录有两种写入方式:分别为push和replace,push是追加历史记录,replace是替换当前记录。路由跳转时候默认为push
如何开启replace模式:
9.10 编程式路由导航
//$router的两个API
   this.$router.push({
   	name:'xiangqing',
   		params:{
   			id:xxx,
   			title:xxx
   		}
   })

   this.$router.replace({
   	name:'xiangqing',
   		params:{
   			id:xxx,
   			title:xxx
   		}
   })
   this.$router.forward() //前进
   this.$router.back() //后退
   this.$router.go() //可前进也可后退
9.11 路由守卫
- 作用:对路由进行权限控制
- 分类:全局守卫、独享守卫、组件内守卫
全局守卫
// 该文件专门用于创建整个应用的路由器
import VueRouter from 'vue-router'
//引入组件
import About from '../pages/About'
import Home from '../pages/Home'
import News from '../pages/News'
import Message from '../pages/Message'
import Detail from '../pages/Detail'

//创建并暴露一个路由器
const router =  new VueRouter({
	routes:[
		{
			name:'guanyu',
			path:'/about',
			component:About,
			meta:{title:'关于'}
		},
		{
			name:'zhuye',
			path:'/home',
			component:Home,
			meta:{title:'主页'},
			children:[
				{
					name:'xinwen',
					path:'news',
					component:News,
					meta:{isAuth:true,title:'新闻'}
				},
				{
					name:'xiaoxi',
					path:'message',
					component:Message,
					meta:{isAuth:true,title:'消息'},
					children:[
						{
							name:'xiangqing',
							path:'detail',
							component:Detail,
							meta:{isAuth:true,title:'详情'},

							//props的第一种写法,值为对象,该对象中的所有key-value都会以props的形式传给Detail组件。
							// props:{a:1,b:'hello'}

							//props的第二种写法,值为布尔值,若布尔值为真,就会把该路由组件收到的所有params参数,以props的形式传给Detail组件。
							// props:true

							//props的第三种写法,值为函数
							props($route){
								return {
									id:$route.query.id,
									title:$route.query.title,
									a:1,
									b:'hello'
								}
							}

						}
					]
				}
			]
		}
	]
})

//全局前置路由守卫————初始化的时候被调用、每次路由切换之前被调用
router.beforeEach((to,from,next)=>{
	console.log('前置路由守卫',to,from)
	if(to.meta.isAuth){ //判断是否需要鉴权
		if(localStorage.getItem('name')==='lqz'){
			next()
		}else{
			alert('名不对,无权限查看!')
		}
	}else{
		next()
	}
})

//全局后置路由守卫————初始化的时候被调用、每次路由切换之后被调用
router.afterEach((to,from)=>{
	console.log('后置路由守卫',to,from)
	document.title = to.meta.title || 'lqz系统'
})

export default router
独享守卫
// 该文件专门用于创建整个应用的路由器
import VueRouter from 'vue-router'
//引入组件
import About from '../pages/About'
import Home from '../pages/Home'
import News from '../pages/News'
import Message from '../pages/Message'
import Detail from '../pages/Detail'

//创建并暴露一个路由器
const router =  new VueRouter({
	routes:[
		{
			name:'guanyu',
			path:'/about',
			component:About,
			meta:{title:'关于'}
		},
		{
			name:'zhuye',
			path:'/home',
			component:Home,
			meta:{title:'主页'},
			children:[
				{
					name:'xinwen',
					path:'news',
					component:News,
					meta:{isAuth:true,title:'新闻'},
					beforeEnter: (to, from, next) => {
						console.log('独享路由守卫',to,from)
						if(to.meta.isAuth){ //判断是否需要鉴权
							if(localStorage.getItem('name')==='lqz'){
								next()
							}else{
								alert('名不对,无权限查看!')
							}
						}else{
							next()
						}
					}
				},
				{
					name:'xiaoxi',
					path:'message',
					component:Message,
					meta:{isAuth:true,title:'消息'},
					children:[
						{
							name:'xiangqing',
							path:'detail',
							component:Detail,
							meta:{isAuth:true,title:'详情'},

						}
					]
				}
			]
		}
	]
})


export default router
组件内守卫
  //进入守卫:通过路由规则,进入该组件时被调用
   beforeRouteEnter (to, from, next) {
   },
   //离开守卫:通过路由规则,离开该组件时被调用
   beforeRouteLeave (to, from, next) {
   }


	//通过路由规则,进入该组件时被调用
		beforeRouteEnter (to, from, next) {
			console.log('About--beforeRouteEnter',to,from)
			if(to.meta.isAuth){ //判断是否需要鉴权
				if(localStorage.getItem('school')==='atguigu'){
					next()
				}else{
					alert('学校名不对,无权限查看!')
				}
			}else{
				next()
			}
		},

		//通过路由规则,离开该组件时被调用
		beforeRouteLeave (to, from, next) {
			console.log('About--beforeRouteLeave',to,from)
			next()
		}
9.12 路由器的两种工作模式
1 对于一个url来说,什么是hash值?—— #及其后面的内容就是hash值。
2 hash值不会包含在 HTTP 请求中,即:hash值不会带给服务器。
3 hash模式:
地址中永远带着#号,不美观 。
若以后将地址通过第三方手机app分享,若app校验严格,则地址会被标记为不合法。
兼容性较好。
4 history模式:
地址干净,美观 。
兼容性和hash模式相比略差。
应用部署上线时需要后端人员支持,解决刷新页面服务端404的问题
10 localStorage和sessionStorage
//存:
    var obj = {"name":"xiaoming","age":"16"}
    localStorage.setItem("userInfo",JSON.stringify(obj));

//取:
    var user = JSON.parse(localStorage.getItem("userInfo"))
//删除:
    localStorage.remove("userInfo);
//清空:
    localStorage.clear();
作者:liuqingzheng
出处:https://www.cnblogs.com/liuqingzheng/articles/16840373.html
版权:本作品采用「署名-非商业性使用-相同方式共享 4.0 国际」许可协议进行许可。


· go语言实现终端里的倒计时
· 如何编写易于单元测试的代码
· 10年+ .NET Coder 心语,封装的思维:从隐藏、稳定开始理解其本质意义
· .NET Core 中如何实现缓存的预热?
· 从 HTTP 原因短语缺失研究 HTTP/2 和 HTTP/3 的设计差异
· 使用C#创建一个MCP客户端
· 分享一个免费、快速、无限量使用的满血 DeepSeek R1 模型,支持深度思考和联网搜索!
· ollama系列1:轻松3步本地部署deepseek,普通电脑可用
· 基于 Docker 搭建 FRP 内网穿透开源项目(很简单哒)
· 按钮权限的设计及实现
2018-10-30 秒懂集群与分布式
2018-10-30 基于Python的轻量级RPC的实现