本文转自http://blog.csdn.net/dinko321/article/details/46739563
项目里面需要加载一个很大的地图,目测最少是4096x4096的分辨率。
先不考虑什么引擎最大支持多大的图啊,大图加载效率啊等等这些问题,光是4k x 4k的分辨率,ARGB8888,加载进去,就是64M的内存,这还只是一个背景。再来点其他七七八八的东西,轻松超过120,这个内存在某些设备上就已经很危险了。
为了实现这个目标,处理的方式大概有2种:
一、资源重用。也就是类似于tiled这种方法,把地图上面的一些图块,反复使用,通过有限的纹理,来拼接出地图。但是这种方法的确定是地图会比较死板
二、分块加载。就是把一个大图切成若干小块,每次只加载需要显示的图块。看上去很美,现在主要说这个。
先说切图,肯定是切小方块,按照二的幂的原则,一般有这么几个备选:32、64、128、256、512。
用切的图块来铺满一个屏幕,不一定能恰好填满,可能会多出一部分(少一部分就会留黑,肯定不行),从这个上面上来说,肯定是切的越小越好,因为这样就算有浪费,最多也就浪费一个图块的宽度。但是图切的太碎,会对渲染效率产生影响。从调试信息可以看到有个GLVerts,verts越多,显示效率就越低。
但是如果切太大,内存又会有影响,比如我切个512的方块,假设屏幕是960X640,那么极限情况下,最多会同时显示4块(请自行想象在田字格的中间放一个方框,方框就是屏幕),这样就达不到节约内存的目的。
一般128或者256应该就差不多了。
然后把大图切小,分别命名。这图怎么切,当然是叫美工用PS切啊,命名,手动啊。。。当然这是开玩笑,你要真这么弄,美工不把你砍死。。。作为程序员,就是要会偷懒嘛,写个程序就切了,python的。虽然我也不是很会python,只会基本语法。但是python库多啊
- import Image
- import sys
- import os.path
- from datetime import *
- import random
- import time
- IMAGE_PATH = "map.png"
- xIndex = 0
- yIndex = 0
- cropSize = 256
- xNum = 0
- yNum = 0
- im = Image.open(IMAGE_PATH) #打开图片句柄
- pSize = im.size
- xNum = pSize[0]/cropSize
- yNum = pSize[1]/cropSize
- print "size " ,xNum,' ',yNum
- for yIndex in range(yNum):
- for xIndex in range(xNum):
- print "pic : " , xIndex , "_" , yIndex
- box = (xIndex*cropSize,yIndex*cropSize,(xIndex+1)*cropSize,(yIndex+1)*cropSize) #设定裁剪区域
- region = im.crop(box) #裁剪图片,并获取句柄region
- name = "/Users/apple/Desktop/result/map%s_%s.png" % (xIndex,yNum-1-yIndex)
- region.save(name) #保存图片
- # xIndex = xIndex+1
- # yIndex = yIndex+1
- print int(time.time());
这样图就切好了,名字也起好了,而且还不用和美工撕逼或者装孙子。。。
再说铺砖,也就是把图块放在地图上的方法。
这里会有2个需要区别的东西,一个是坐标,就是offset的那个坐标。一个是index,就是图块的index。因为按照上面的图块命名,坐标是map0_0 ,map0_1这样的规则。
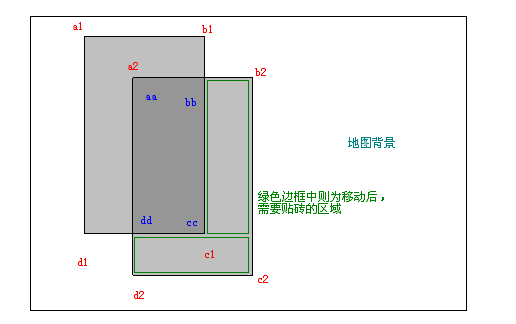
大概思路应该是这样的,首先,获取winSize,计算横竖2个方向需要多少图块才能铺满,向上取整。
- xTileNum = winSize.width/tileSize;
- yTileNum = winSize.height/tileSize;
- xTileNum+=1;
- yTileNum+=1;
然后,根据scrollView的offset,取得左下角那个图块的index,知道这一点应该用那一块来铺。
- Vec2 offset = view->getContentOffset();
- offset.x = fabsf(offset.x);
- offset.y = fabsf(offset.y);
- int xStartIdx = offset.x/tileSize;
- int yStartIdx = offset.y/tileSize;
然后,在横方向,和竖方向上,铺满
- for (int i = 0 ; i<xTileNum ; i++)
- {
- for (int j=0; j<yTileNum; j++)
- {
- int xIdx = xStartIdx+i;
- int yIdx = yStartIdx+j;
- char name[128];
- sprintf(name, "result/map%d_%d.png",xIdx,yIdx);
- Sprite* tile = Sprite::create(name);
- tile->ignoreAnchorPointForPosition(true);
- int posX = tileSize*xIdx;
- int posY = tileSize*yIdx;
- tile->setPosition(posX,posY);
- contentLayer->addChild(tile);
- }
- }
这样,就铺满一屏幕了。
然后来说说滚动的时候的处理方法。

- #include <algorithm>
- #include <unordered_map>
- #include <set>
- using namespace std;
- unordered_map<string, Sprite*> curTiles;
- set<string> curKeys;
- set<string> newKeys;
- // 统计需要显示的图块
- newKeys.clear();
- for (int i = 0 ; i<xTileNum ; i++)
- {
- for (int j=0; j<yTileNum; j++)
- {
- int xIdx = xStartIdx+i;
- int yIdx = yStartIdx+j;
- if (xIdx>15 || yIdx>15)
- {
- continue;
- }
- char name[128];
- sprintf(name, "result/map%d_%d.png",xIdx,yIdx);
- string key = string(name);
- newKeys.insert(key);
- }
- }
- set<string> results;
- //在旧集合中去掉新的集合的元素,得到该移除的部分
- set_difference(curKeys.begin(), curKeys.end(), newKeys.begin(), newKeys.end(), inserter(results, results.begin()));
- for (auto it=results.begin(); it!=results.end(); it++)
- {
- curTiles[*it]->removeFromParent();
- curTiles.erase(*it);
- }
- //在新集合中去掉旧的集合的元素,得到该添加的部分
- results.clear();
- set_difference(newKeys.begin(), newKeys.end(), curKeys.begin(), curKeys.end(), inserter(results, results.begin()));
- for (auto it=results.begin(); it!=results.end(); it++)
- {
- Sprite* tile = Sprite::create((*it).c_str());
- tile->ignoreAnchorPointForPosition(true);
- int xIdx = 0;
- int yIdx = 0;
- sscanf((*it).c_str(), "result/map%d_%d.png",&xIdx,&yIdx);
- int posX = tileSize*xIdx;
- int posY = tileSize*yIdx;
- tile->setPosition(posX,posY);
- contentLayer->addChild(tile);
- curTiles[*it] = tile;
- }
- curKeys = newKeys;
- newKeys.clear();
- Director::getInstance()->getTextureCache()->removeUnusedTextures();
再说效果。代码这就写完了,然后上甄姬测试吧。
- bool Sprite::initWithFile(const std::string& filename)
- {
- ... ...
- Texture2D *texture = Director::getInstance()->getTextureCache()->addImage(filename);
- ... ...
- }
- Texture2D * TextureCache::addImage(const std::string &path)
- {
- ... ...
- image = new (std::nothrow) Image();
- ... ...
- }
- -------1--------
- ------- time stamp : 1386769052
- -------2--------
- ------- time stamp : 1386769053
- -------a--------
- ------- time stamp : 1386769053
- -------b--------
- ------- time stamp : 1386769084
- -------a--------
- ------- time stamp : 1386769084
- -------b--------
- ------- time stamp : 1386769115
- -------a--------
- ------- time stamp : 1386769115
- -------b--------
- ------- time stamp : 1386769147
- -------a--------
- ------- time stamp : 1386769147
- -------b--------
- ------- time stamp : 1386769182
- cocos2d: TextureCache: removing unused texture: /private/var/mobile/Containers/Bundle/Application/C85C52CF-396B-4630-A4AE-11A412D8C060/Hello iOS.app/result/map10_3.png
- cocos2d: TextureCache: removing unused texture: /private/var/mobile/Containers/Bundle/Application/C85C52CF-396B-4630-A4AE-11A412D8C060/Hello iOS.app/result/map10_2.png
- cocos2d: TextureCache: removing unused texture: /private/var/mobile/Containers/Bundle/Application/C85C52CF-396B-4630-A4AE-11A412D8C060/Hello iOS.app/result/map10_0.png
- cocos2d: TextureCache: removing unused texture: /private/var/mobile/Containers/Bundle/Application/C85C52CF-396B-4630-A4AE-11A412D8C060/Hello iOS.app/result/map10_1.png
- -------3--------
- ------- time stamp : 1386769184
所以我觉得这种方式暂时是不靠谱的,还是乖乖用tiled去拼,或者分层来做吧。
PS:
其实还有一种做法,类似google map和百度地图那样,在滚动的时候不加载,滚动停了之后再加载。但是人家那是APP啊,游戏这样做你看效果如何。分分钟删游戏


