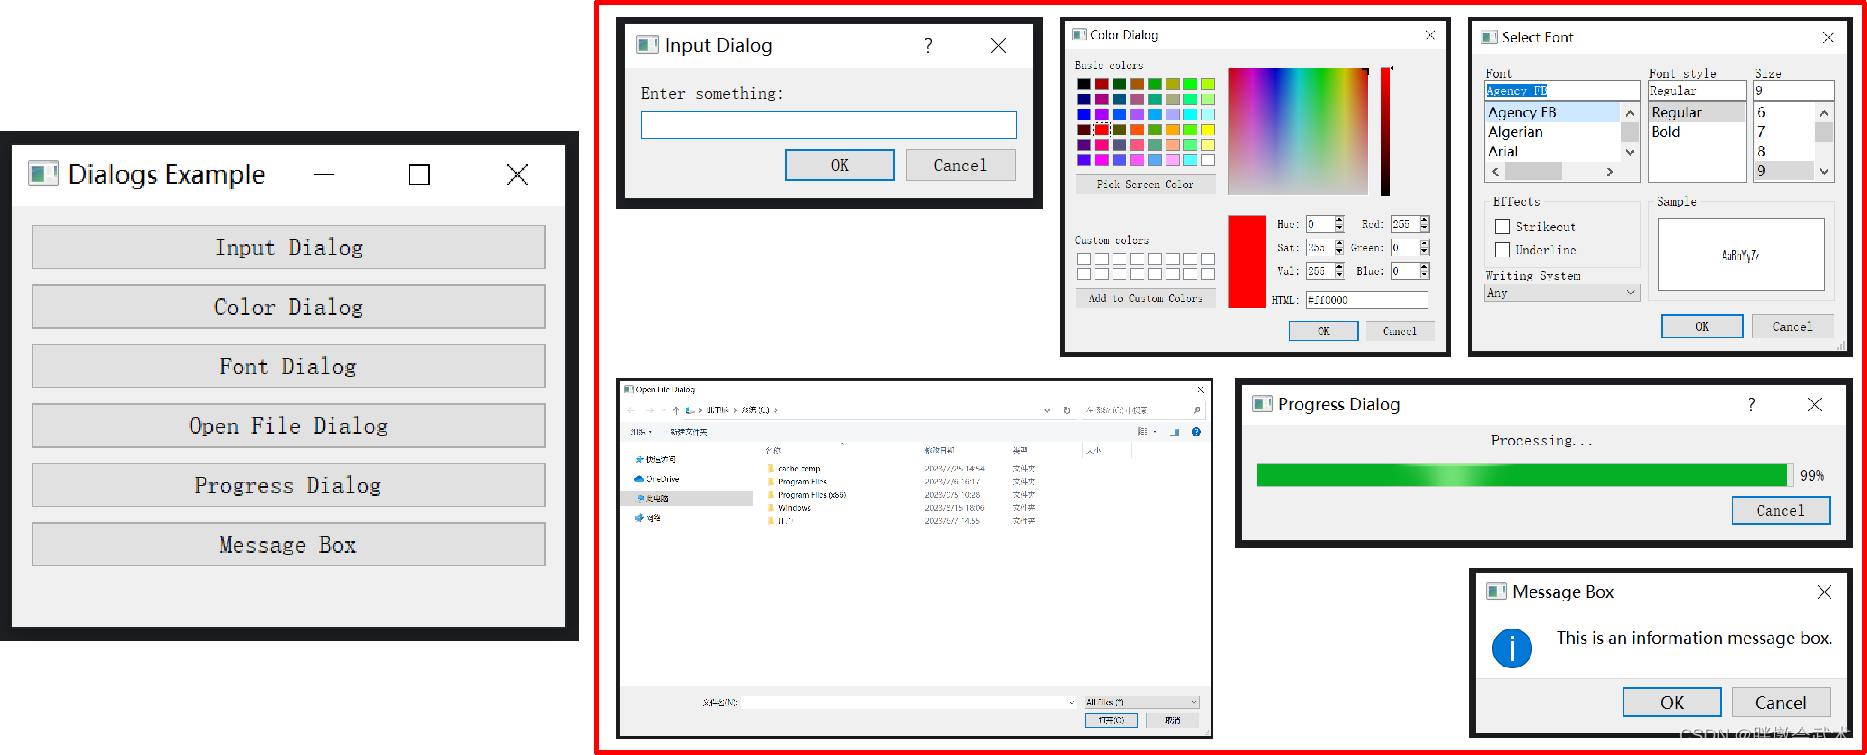
【对话框类 - 组件】输入对话框+颜色对话框+字体对话框+文件选择对话框+进度对话框+消息对话框:QInputDialog + QColorDialog + QFontDialog + QFileDialog + QProgressDialog + QMessageBox
  1 import sys
  2 from PyQt5.QtWidgets import QApplication, QMainWindow, QVBoxLayout, QWidget, QPushButton, QLabel, QInputDialog, QColorDialog, QFontDialog, QFileDialog, QProgressDialog, QMessageBox
  3 from PyQt5.QtCore import Qt
  4 from PyQt5.QtGui import QColor
  5
  6
  7 class MainWindow(QMainWindow):
  8     def __init__(self):
  9         super().__init__()
 10
 11         self.initUI()
 12
 13     def initUI(self):
 14         self.setWindowTitle("Dialogs Example")
 15         self.setGeometry(100, 100, 400, 300)
 16
 17         layout = QVBoxLayout()
 18
 19         # 显示输入对话框按钮
 20         input_btn = QPushButton("Input Dialog")
 21         input_btn.clicked.connect(self.show_input_dialog)
 22         layout.addWidget(input_btn)
 23
 24         # 颜色对话框按钮
 25         color_btn = QPushButton("Color Dialog")
 26         color_btn.clicked.connect(self.show_color_dialog)
 27         layout.addWidget(color_btn)
 28
 29         # 字体对话框按钮
 30         font_btn = QPushButton("Font Dialog")
 31         font_btn.clicked.connect(self.show_font_dialog)
 32         layout.addWidget(font_btn)
 33
 34         # 打开文件对话框按钮
 35         open_file_btn = QPushButton("Open File Dialog")
 36         open_file_btn.clicked.connect(self.show_file_dialog)
 37         layout.addWidget(open_file_btn)
 38
 39         # 进度对话框按钮
 40         progress_btn = QPushButton("Progress Dialog")
 41         progress_btn.clicked.connect(self.show_progress_dialog)
 42         layout.addWidget(progress_btn)
 43
 44         # 消息框按钮
 45         message_btn = QPushButton("Message Box")
 46         message_btn.clicked.connect(self.show_message_box)
 47         layout.addWidget(message_btn)
 48
 49         # 标签用于显示结果
 50         self.result_label = QLabel()
 51         layout.addWidget(self.result_label)
 52
 53         central_widget = QWidget()
 54         central_widget.setLayout(layout)
 55         self.setCentralWidget(central_widget)
 56
 57     def show_input_dialog(self):
 58         text, ok = QInputDialog.getText(self, "Input Dialog", "Enter something:")
 59         if ok and text:
 60             self.result_label.setText(f"Input: {text}")
 61         else:
 62             self.result_label.setText("Input Dialog Canceled")
 63
 64     def show_color_dialog(self):
 65         color = QColorDialog.getColor(QColor(255, 0, 0), self, "Color Dialog")
 66         if color.isValid():
 67             self.result_label.setStyleSheet(f"background-color: {color.name()}")
 68             self.result_label.setText(f"Selected Color: {color.name()}")
 69
 70     def show_font_dialog(self):
 71         font, ok = QFontDialog.getFont(self)
 72         if ok:
 73             self.result_label.setFont(font)
 74             self.result_label.setText(f"Selected Font: {font.family()}, {font.pointSize()}pt")
 75
 76     def show_file_dialog(self):
 77         file_name, _ = QFileDialog.getOpenFileName(self, "Open File Dialog", "", "All Files (*);;Text Files (*.txt)")
 78         if file_name:
 79             self.result_label.setText(f"Selected File: {file_name}")
 80
 81     def show_progress_dialog(self):
 82         progress_dialog = QProgressDialog("Processing...", "Cancel", 0, 100, self)
 83         progress_dialog.setWindowModality(Qt.WindowModal)
 84         progress_dialog.setWindowTitle("Progress Dialog")
 85
 86         for i in range(100):
 87             progress_dialog.setValue(i)
 88             if progress_dialog.wasCanceled():
 89                 break
 90
 91         self.result_label.setText("Progress Dialog Completed")
 92
 93     def show_message_box(self):
 94         msg_box = QMessageBox()
 95         msg_box.setIcon(QMessageBox.Information)
 96         msg_box.setWindowTitle("Message Box")
 97         msg_box.setText("This is an information message box.")
 98         msg_box.setStandardButtons(QMessageBox.Ok | QMessageBox.Cancel)
 99         result = msg_box.exec_()
100
101         if result == QMessageBox.Ok:
102             self.result_label.setText("Message Box: Ok button clicked")
103         else:
104             self.result_label.setText("Message Box: Cancel button clicked")
105
106
107 if __name__ == "__main__":
108     app = QApplication(sys.argv)
109     window = MainWindow()
110     window.show()
111     sys.exit(app.exec_())
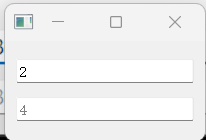
文本框 QLineEdit
(1)输入框2将根据输入框1的值,自动计算;
(2)若输入框2的值自定义,则自动计算功能不启用。
 1 import sys
 2 from PyQt5.QtWidgets import QApplication, QMainWindow, QLineEdit, QVBoxLayout, QWidget
 3
 4
 5 class MainWindow(QMainWindow):
 6     def __init__(self):
 7         super().__init__()
 8
 9         self.setWindowTitle("QLineEdit 信号示例")
10
11         self.line_edit_1 = QLineEdit(self)
12         self.line_edit_2 = QLineEdit(self)
13
14         self.is_programmatic_change = False
15         self.line_edit_1.textChanged.connect(self.on_text_changed)
16         self.line_edit_2.textChanged.connect(self.on_text_2_changed)
17
18         layout = QVBoxLayout()
19         layout.addWidget(self.line_edit_1)
20         layout.addWidget(self.line_edit_2)
21
22         container = QWidget()
23         container.setLayout(layout)
24         self.setCentralWidget(container)
25
26     def on_text_changed(self, text):
27         try:
28             value = int(text) + 2  # 根据输入框一的输入内容+2
29             self.is_programmatic_change = True
30             self.line_edit_2.setText(str(value))
31             self.is_programmatic_change = False
32         except ValueError:
33             # 如果转换失败(例如输入的不是数字),则清空第二个文本框
34             self.line_edit_2.clear()
35
36     def on_text_2_changed(self, text):
37         if self.is_programmatic_change:
38             self.line_edit_2.setStyleSheet("color: grey;")
39             print(f"输入框的值变化是由程序设置的,状态为{self.is_programmatic_change}")
40         else:
41             self.line_edit_2.setStyleSheet("color: black;")
42             print(f"输入框的值变化是由用户手动输入的,状态为{self.is_programmatic_change}")
43
44
45 if __name__ == '__main__':
46     app = QApplication(sys.argv)
47     window = MainWindow()
48     window.show()
49     sys.exit(app.exec_())
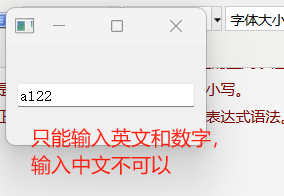
校验器 QRegExpValidator :用于限制用户在 QLineEdit 中输入的文本(英文 / 数字)
 1 import sys
 2 from PyQt5.QtWidgets import QApplication, QMainWindow, QVBoxLayout, QWidget, QLineEdit
 3 from PyQt5.QtCore import QRegExp
 4 from PyQt5.QtGui import QRegExpValidator
 5
 6
 7 class MainWindow(QMainWindow):
 8     def __init__(self):
 9         super().__init__()
10
11         layout = QVBoxLayout()
12
13         self.line_edit = QLineEdit(self)
14         self.line_edit.setPlaceholderText("Enter English and numbers only")
15
16         # english_only = QRegExp("[a-zA-Z]+")  # 创建一个正则表达式,用于匹配只包含英文字符的文本
17         # numbers_only = QRegExp("[0-9]+")  # 创建一个正则表达式,用于匹配只包含数字的文本
18         regex = QRegExp("[A-Za-z0-9]+")  # 创建一个正则表达式,只允许输入英文和数字
19
20         validator = QRegExpValidator(regex)
21         self.line_edit.setValidator(validator)
22
23         layout.addWidget(self.line_edit)
24
25         central_widget = QWidget()
26         central_widget.setLayout(layout)
27         self.setCentralWidget(central_widget)
28
29
30 if __name__ == "__main__":
31     app = QApplication(sys.argv)
32     window = MainWindow()
33     window.show()
34     sys.exit(app.exec_())
35
36 """##########################################################################
37 函数功能:QRegExp 类是 Qt 中用于处理正则表达式的类。
38 函数说明:QRegExp(pattern: str,
39                 caseSensitivity: Qt.CaseSensitivity = Qt.CaseSensitive,
40                 syntax: QRegExp.PatternSyntax = QRegExp.RegExp)
41 输入参数:
42         pattern             构造一个 QRegExp 对象,使用给定的正则表达式 pattern。
43         caseSensitivity     指定是否区分大小写,默认为区分大小写。
44         syntax              指定正则表达式的语法,默认为正则表达式语法。
45 """
46
47 """
48 函数功能:QRegExpValidator 类是 Qt 中用于输入验证的工具之一。它允许您使用正则表达式来限制用户在 QLineEdit 等控件中输入的文本。
49 函数说明:QRegExpValidator(regexp: QRegExp,
50                          parent: QObject = None)
51 输入参数:
52         regexp              构造一个 QRegExpValidator 对象,使用给定的正则表达式 regexp 进行验证。
53         parent              用于设置对象的父级。
54 """
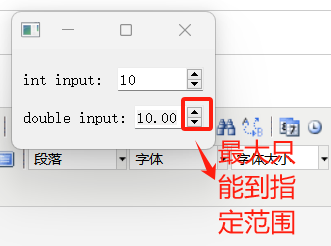
输入框 QSpinBox + QDoubleSpinBox(整数 + 浮点数):支持上下按钮调节
 1 import sys
 2 from PyQt5.QtWidgets import QApplication, QMainWindow, QVBoxLayout, QHBoxLayout, QWidget, QSpinBox, QDoubleSpinBox, QLabel
 3
 4
 5 class MainWindow(QMainWindow):
 6     def __init__(self):
 7         super().__init__()
 8
 9         # 使用 QSpinBox 限制整数范围
10         QSpinBox_label = QLabel("int input:")
11         int_spinbox = QSpinBox()
12         int_spinbox.setRange(0, 100)  # 限制范围:[0, 100]
13
14         # 使用 QDoubleSpinBox 限制浮点数范围
15         QDoubleSpinBox_label = QLabel("double input:")
16         double_spinbox = QDoubleSpinBox()
17         double_spinbox.setRange(0.0, 100.0)      # 限制范围:[0.0, 100.0]
18         double_spinbox.setDecimals(2)              # 保留2位小数
19
20         # 布局管理器
21         V_layout = QVBoxLayout()      # 垂直布局
22         H1_layout = QHBoxLayout()      # 水平布局
23         H2_layout = QHBoxLayout()      # 水平布局
24
25         H1_layout.addWidget(QSpinBox_label)
26         H1_layout.addWidget(int_spinbox)
27         V_layout.addLayout(H1_layout)
28         H2_layout.addWidget(QDoubleSpinBox_label)
29         H2_layout.addWidget(double_spinbox)
30         V_layout.addLayout(H2_layout)
31
32         # 将布局应用于主窗口的中心区域
33         central_widget = QWidget()
34         central_widget.setLayout(V_layout)
35         self.setCentralWidget(central_widget)
36
37
38 if __name__ == "__main__":
39     app = QApplication(sys.argv)
40     window = MainWindow()
41     window.show()
42     sys.exit(app.exec_())
打印日志 QTextEdit:获取当前时间 + 设置文本颜色
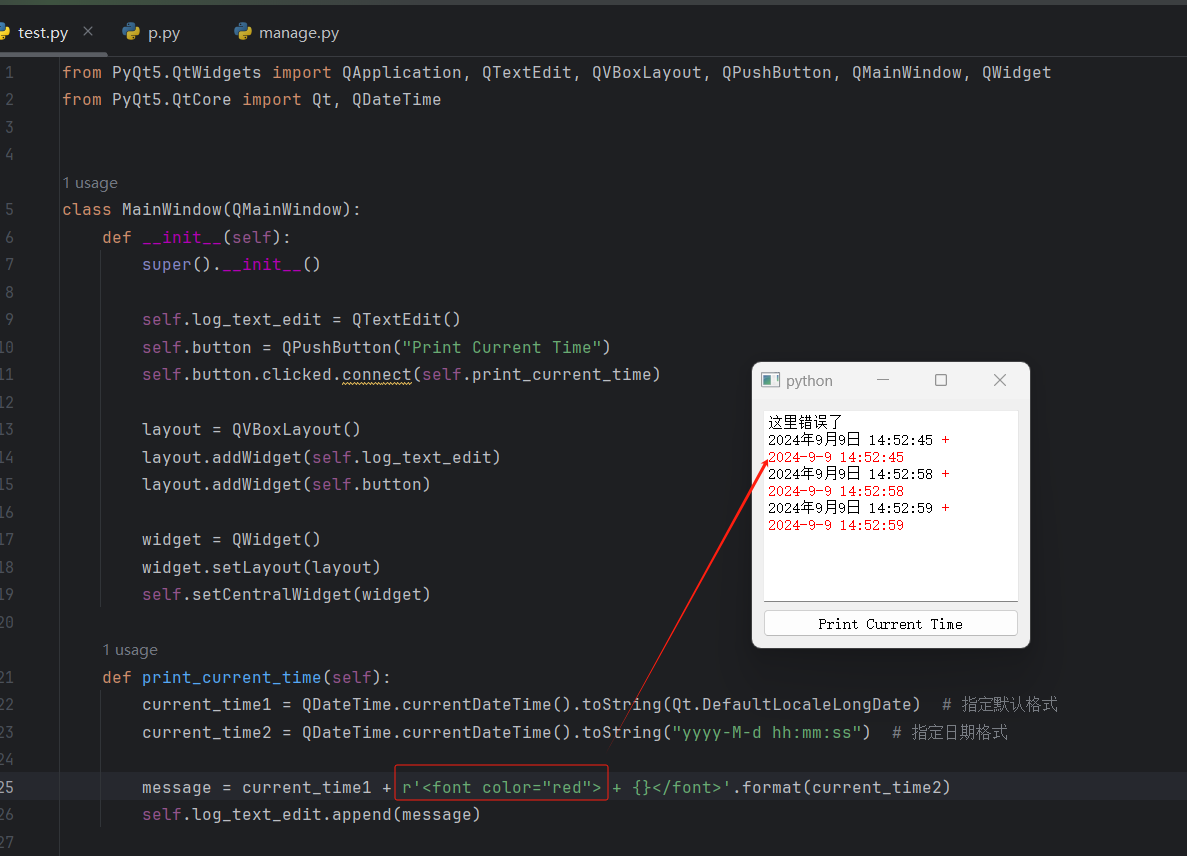
消息提示框 QMessageBox:信息 / 询问 / 警告 / 错误
 1 import sys
 2 from PyQt5.QtWidgets import QApplication, QMainWindow, QPushButton, QVBoxLayout, QWidget, QMessageBox
 3
 4
 5 class MainWindow(QMainWindow):
 6     def __init__(self):
 7         super().__init__()
 8
 9         info_button = QPushButton("Information")
10         question_button = QPushButton("Question")
11         warning_button = QPushButton("Warning")
12         critical_button = QPushButton("Critical")
13         info_button.clicked.connect(self.show_information)
14         question_button.clicked.connect(self.show_question)
15         warning_button.clicked.connect(self.show_warning)
16         critical_button.clicked.connect(self.show_critical)
17
18         layout = QVBoxLayout()
19         layout.addWidget(info_button)
20         layout.addWidget(question_button)
21         layout.addWidget(warning_button)
22         layout.addWidget(critical_button)
23
24         widget = QWidget()
25         widget.setLayout(layout)
26         self.setCentralWidget(widget)
27
28     def show_information(self):
29         QMessageBox.information(self, "Information", "这是一条提示信息.", QMessageBox.Ok, QMessageBox.Ok)
30
31     def show_question(self):
32         result = QMessageBox.question(self, "Question", "你想继续嘛?", QMessageBox.Yes | QMessageBox.No, QMessageBox.No)
33         if result == QMessageBox.Yes:
34             print("User clicked Yes")
35         else:
36             print("User clicked No")
37
38     def show_warning(self):
39         QMessageBox.warning(self, "Warning", "这是一条警告信息.", QMessageBox.Ok, QMessageBox.Ok)
40
41     def show_critical(self):
42         QMessageBox.critical(self, "Critical", "这是严重错误的.", QMessageBox.Ok, QMessageBox.Ok)
43
44
45 if __name__ == "__main__":
46     app = QApplication(sys.argv)
47     window = MainWindow()
48     window.show()
49     sys.exit(app.exec_())
50
51 """##########################################################################
52 from PyQt5.QtWidgets import QMessageBox
53
54 函数简介:用于显示消息框、询问框、警告框等用户交互提示框的类。
55 函数说明:
56         信息消息框        QMessageBox.information(parent, title, message, buttons, defaultButton)
57         询问消息框        QMessageBox.question(parent, title, message, buttons, defaultButton)
58         警告消息框        QMessageBox.warning(parent, title, message, buttons, defaultButton)
59         严重错误消息框     QMessageBox.critical(parent, title, message, buttons, defaultButton)
60 输入参数:
61         parent:         可选参数,父级窗口。
62         title:          消息框的标题。
63         message:        消息框中显示的消息文本。
64         buttons:        消息框中显示的按钮类型,如 QMessageBox.Yes、QMessageBox.No 等。
65         defaultButton:  可选参数,指定默认按钮。
66 ##########################################################################"""
用像素点绘制各种线
 1 用像素点绘制正弦曲线:drawPoint(x,y)
 2
 3 用像素点绘制直线:SolidLine
 4
 5 用像素点绘制虚线:DashLine
 6
 7 用像素点绘制点画虚线:DashDotDotLine
 8
 9 用像素点绘制点画虚线:DashDotDotLine
10
11 自定义:CustomDashLine
 1 """
 2 用像素点绘制正弦曲线
 3
 4 drawPoint(x,y)
 5 """
 6 # 绘制两个周期的正弦曲线  -2Π到2Π
 7
 8 import sys,math
 9 from PyQt5.QtWidgets import *
10 from PyQt5.QtGui import *
11 from PyQt5.QtCore import Qt
12
13 class DrawPoints(QWidget):
14     def __init__(self):
15         super(DrawPoints, self).__init__()
16         # 设置窗口的大小
17         self.resize(300,300)
18         # 设置窗口标题
19         self.setWindowTitle('在窗口上用像素点绘制2个周期的正弦曲线')
20
21     def paintEvent(self,event):
22         painter =QPainter()
23         painter.begin(self)
24         # 设置笔的颜色 固定 方法二
25         painter.setPen(Qt.blue)
26         # 获得窗口尺寸
27         size = self.size()
28         # 对水平轴进行循环,循环一千次
29         for i in range(1000):
30             x = 100 * (-1 + 2.0 * i/1000) + size.width()/2.0
31             # pi 指的是Π
32             y = -50 * math.sin((x - size.width()/2.0)* math.pi/50) + size.height()/2.0
33             painter.drawPoint(x,y)
34
35
36         painter.end()
37
38 # 防止别的脚本调用,只有自己单独运行时,才会执行下面代码
39 if __name__ == '__main__':
40     # app实例化,并传参
41     app = QApplication(sys.argv)
42     # 创建对象
43     main = DrawPoints()
44     # 创建窗口
45     main.show()
46     # 进入主循环,调用exit方法,确保主循环安全结束
47     sys.exit(app.exec_())
 1 """
 2 绘制不同类型的直线
 3
 4 """
 5 import sys,math
 6 from PyQt5.QtWidgets import *
 7 from PyQt5.QtGui import *
 8 from PyQt5.QtCore import Qt
 9
10 class DrawMultiLine(QWidget):
11     def __init__(self):
12         super(DrawMultiLine, self).__init__()
13         self.resize(300,300)
14         self.setWindowTitle('设置Pen的样式')
15
16     def paintEvent(self, event):
17         painter = QPainter()
18         painter.begin(self)
19
20         # 创建画笔   设置颜色,粗细  类型(实线,虚线)
21         pen = QPen(Qt.red,3,Qt.SolidLine)
22
23         # 设置对象
24         painter.setPen(pen)
25         # 绘图
26         painter.drawLine(20,40,250,40)
27
28         # 设置虚线
29         pen.setStyle(Qt.DashLine)
30         painter.setPen(pen)
31         painter.drawLine(20,80,250,80)
32
33
34         # 设置自定义
35         pen.setStyle(Qt.CustomDashLine)
36         pen.setDashPattern([1,2])
37         painter.setPen(pen)
38         painter.drawLine(20,200,20,200)
39
40         size = self.size()
41
42         # 绘制结束
43         painter.end()
44
45 # 防止其他脚本调用,只有运行该脚本时,才会执行下面代码
46 if __name__ == '__main__':
47     # app实例化,并传参
48     app = QApplication(sys.argv)
49     # 创建对象
50     main = DrawMultiLine()
51     # 创建窗口
52     main.show()
53     # 进入主循环,调用exit方法,保证主循环安全结束
54     sys.exit(app.exec_())
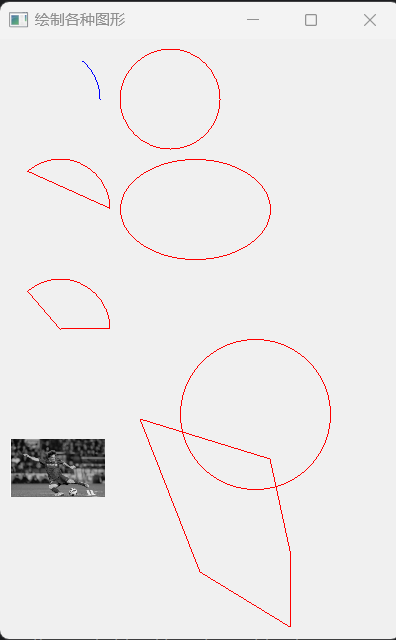
绘制各种图形
 1 """
 2 绘制各种图形
 3 弧 圆形 矩形(正方形) 多边形 绘制图像
 4 """
 5
 6 import sys, math
 7
 8 from PyQt5.QtWidgets import *
 9 from PyQt5.QtGui import *
10 from PyQt5.QtCore import *
11
12
13 class DrawAll(QWidget):
14     def __init__(self):
15         super(DrawAll, self).__init__()
16         self.resize(400, 600)
17         self.setWindowTitle('绘制各种图形')
18
19     # 定义事件
20     def paintEvent(self, event):
21         # 创建一个Qpainter对象
22         qp = QPainter()
23         # 绘制开始
24         qp.begin(self)
25
26         # 设置笔的颜色
27         qp.setPen(Qt.blue)
28
29         # 绘制弧
30         #  确定一个区域
31         rect = QRect(0, 10, 100, 100)
32         # alen:一个alen等于1/16度   所以表示45度,用45*16表示
33         #  画50度,用50*16表示  参数  起  终
34         qp.drawArc(rect, 0, 50 * 16)
35
36         # 通过弧绘制圆
37         #  更改笔的颜色
38         qp.setPen(Qt.red)
39         # 位置 从0 到360°
40         qp.drawArc(120, 10, 100, 100, 0, 360 * 16)
41
42         # 绘制带弦的弧
43         # 位置 从12°到130°
44         qp.drawChord(10, 120, 100, 100, 12, 130 * 16)
45
46         # 绘制扇形
47         #  位置  从12°到130°
48         qp.drawPie(10, 240, 100, 100, 12, 130 * 16)
49
50         # 椭圆
51         #  不需要指定开始角度和结束角度     宽和高不一样。 如果一样就成圆了
52         qp.drawEllipse(120, 120, 150, 100)
53         # 通过椭圆绘制圆   距窗口的宽  距窗口的高   宽  高
54         qp.drawEllipse(180, 300, 150, 150)
55
56         # 绘制五边形
57         #   需要指定五个点
58         point1 = QPoint(140, 380)
59         point2 = QPoint(270, 420)
60         point3 = QPoint(290, 512)
61         point4 = QPoint(290, 588)
62         point5 = QPoint(200, 533)
63
64         #   创建一个多边形的对象
65         polygon = QPolygon([point1, point2, point3, point4, point5])
66         #  开始绘制五边形
67         qp.drawPolygon(polygon)
68
69         # 绘制图像
70         #   装载图像
71         image = QImage('../controls/images/5.png')
72         #   指定绘制图像的区域   把图片缩小到原来的三分之一
73         #    距离窗口的宽度  距离窗口的高度   宽缩小三分之一  高缩小三分之一
74         rect = QRect(10, 400, image.width() / 3, image.height() / 3)
75         image.save('../controls/images/5.png')
76         # 开始绘制图像
77         qp.drawImage(rect, image)
78
79         # 绘制结束
80         qp.end()
81
82
83 # 防止其他脚本调用,只有当这个脚本自己运行时,才会调用下面代码
84 if __name__ == '__main__':
85     # app实例化,并传参
86     app = QApplication(sys.argv)
87     # 创建对象
88     main = DrawAll()
89     # 创建窗口
90     main.show()
91     # 进入主循环,调用exit函数,确保主循环安全结束
92     sys.exit(app.exec_())
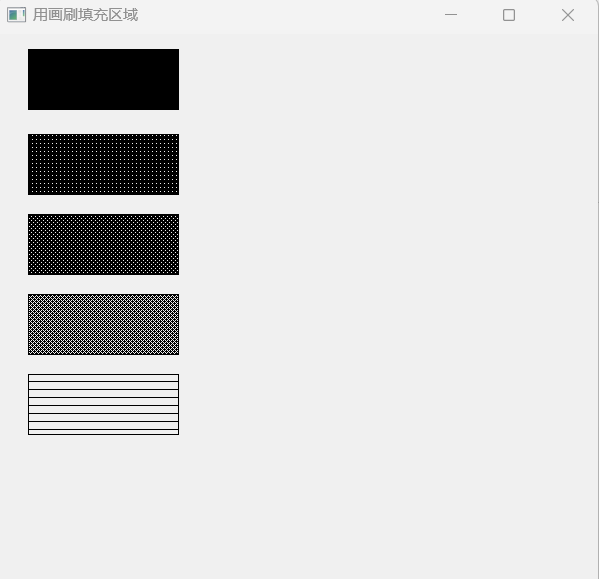
用画刷填充图形区域
 1 """
 2 用画刷填充图形区域
 3 """
 4
 5 import sys, math
 6 from PyQt5.QtWidgets import *
 7 from PyQt5.QtGui import *
 8 from PyQt5.QtCore import *
 9
10
11 class FillRect(QWidget):
12     def __init__(self):
13         super(FillRect, self).__init__()
14         # 设置窗口标题
15         self.setWindowTitle('用画刷填充区域')
16         # 设置窗口尺寸
17         self.resize(600, 600)
18
19     # 定义事件
20     def paintEvent(self, e):
21         # 创建QPainter对象
22         qp = QPainter()
23         # 绘制开始
24         qp.begin(self)
25         # 创建画刷对象  默认实心
26         brush = QBrush(Qt.SolidPattern)
27         # 设置画刷
28         qp.setBrush(brush)
29
30         # 绘制矩形,填充区域
31         #   距窗口的宽   距窗口的高    绘制矩形的宽   绘制矩形的高
32         qp.drawRect(30, 15, 150, 60)
33
34         # 创建画刷
35         brush1 = QBrush(Qt.Dense1Pattern)
36         # 设置画刷
37         qp.setBrush(brush1)
38         # 绘制矩形,填充区域
39         #   距窗口的宽   距窗口的高    绘制矩形的宽   绘制矩形的高
40         qp.drawRect(30, 100, 150, 60)
41
42         # 创建画刷
43         brush2 = QBrush(Qt.Dense2Pattern)
44         # 设置画刷
45         qp.setBrush(brush2)
46         # 绘制矩形,填充区域
47         #   距窗口的宽   距窗口的高    绘制矩形的宽   绘制矩形的高
48         qp.drawRect(30, 180, 150, 60)
49
50         # 创建画刷
51         brush3 = QBrush(Qt.Dense3Pattern)
52         # 设置画刷
53         qp.setBrush(brush3)
54         # 绘制矩形,填充区域
55         #   距窗口的宽   距窗口的高    绘制矩形的宽   绘制矩形的高
56         qp.drawRect(30, 260, 150, 60)
57
58         # 创建画刷
59         brush4 = QBrush(Qt.HorPattern)
60         # 设置画刷
61         qp.setBrush(brush4)
62         # 绘制矩形,填充区域
63         #   距窗口的宽   距窗口的高    绘制矩形的宽   绘制矩形的高
64         qp.drawRect(30, 340, 150, 60)
65
66         # 绘制结束
67         qp.end()
68
69
70 # 防止其他脚本调用,单独调用此脚本,才会执行下面代码
71 if __name__ == '__main__':
72     # app实例化,并传参
73     app = QApplication(sys.argv)
74     # 创建对象
75     main = FillRect()
76     # 创建窗口
77     main.show()
78     # 进入主循环,调用exit方法,确保主循环安全结束
79     sys.exit(app.exec_())
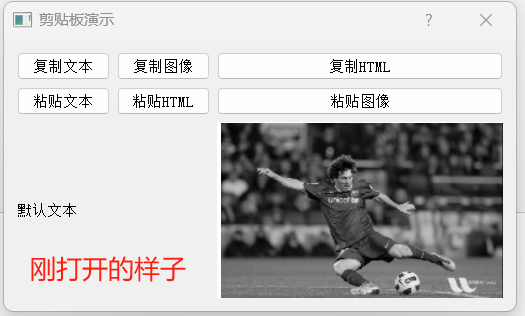
使用剪贴板
  1 """
  2 使用剪贴板
  3 """
  4 import sys, math
  5 from PyQt5.QtWidgets import *
  6 from PyQt5.QtGui import *
  7 from PyQt5.QtCore import *
  8
  9
 10 class ClipBoard(QDialog):
 11     def __init__(self):
 12         super(ClipBoard, self).__init__()
 13
 14         # 创建6个按钮组件
 15         textCopyButton = QPushButton('复制文本')
 16         textPasteButton = QPushButton('粘贴文本')
 17
 18         htmlCopyButton = QPushButton('复制HTML')
 19         htmlPasteButton = QPushButton('粘贴HTML')
 20
 21         imageCopyButton = QPushButton('复制图像')
 22         imagePasteButton = QPushButton('粘贴图像')
 23
 24         #  创建两个label控件,一个用来显示粘贴的文本   一个用来显示图像
 25         self.textLabel = QLabel('默认文本')
 26         self.imageLabel = QLabel('显示头像')
 27         self.imageLabel.setPixmap(QPixmap(r'C:\Users\19225\PycharmProjects\test\src\user\static\9.png'))
 28
 29         # 设置栅格布局
 30         layout = QGridLayout()
 31
 32         # 把控件添加到布局里
 33         # 第一行第一列
 34         layout.addWidget(textCopyButton, 0, 0)
 35         # 第一行第二列
 36         layout.addWidget(imageCopyButton, 0, 1)
 37         # 第一行第三列
 38         layout.addWidget(htmlCopyButton, 0, 2)
 39         # 第二行第一列
 40         layout.addWidget(textPasteButton, 1, 0)
 41         # 第二行第二列
 42         layout.addWidget(htmlPasteButton, 1, 1)
 43         # 第二行第三列
 44         layout.addWidget(imagePasteButton, 1, 2)
 45         # 第三行第一列   占一行占两列
 46         layout.addWidget(self.textLabel, 2, 0, 1, 2)
 47         # 第三行第三列
 48         layout.addWidget(self.imageLabel, 2, 2)
 49
 50         # 应用于栅格布局
 51         self.setLayout(layout)
 52
 53         # 绑定信号  槽
 54         # 分别为这六个按钮指定单击事件
 55         # 复制文本
 56         textCopyButton.clicked.connect(self.copyText)
 57         # 粘贴文本
 58         textPasteButton.clicked.connect(self.pasteText)
 59         # 复制HTML
 60         htmlCopyButton.clicked.connect(self.copyHtml)
 61         # 粘贴HTML
 62         htmlPasteButton.clicked.connect(self.pasteHtml)
 63         # 复制图像
 64         imageCopyButton.clicked.connect(self.copyImage)
 65         # 粘贴图像
 66         imagePasteButton.clicked.connect(self.pasteImage)
 67
 68         # 设置窗口标题
 69         self.setWindowTitle('剪贴板演示')
 70
 71     # 槽方法
 72     def copyText(self):
 73         # 设置剪切板
 74         clipboard = QApplication.clipboard()
 75         # 设置剪切板内容
 76         clipboard.setText('hello world')
 77
 78     def pasteText(self):
 79         # 设置剪切板
 80         clipboard = QApplication.clipboard()
 81         # 设置剪切板内容
 82         # 把剪切板的内容直接放到label里
 83         self.textLabel.setText(clipboard.text())
 84
 85     def copyHtml(self):
 86         # 获取数据类型
 87         mimeData = QMimeData()
 88         # 设置HTML
 89         mimeData.setHtml('<b>Bold and <font color=red>Red</font></b>')
 90         # 获得剪切板
 91         clipborad = QApplication.clipboard()
 92         # 在剪切板设置数据
 93         clipborad.setMimeData(mimeData)
 94
 95     def pasteHtml(self):
 96         # 获得剪切板
 97         clipboard = QApplication.clipboard()
 98         # 获得数据
 99         mimeData = clipboard.mimeData()
100         # 如果数据是html类型
101         if mimeData.hasHtml():
102             # 把html数据放在剪切板上
103             self.textLabel.setText(mimeData.html())
104
105     def copyImage(self):
106         # 设置剪切板
107         clipboard = QApplication.clipboard()
108         # 设置剪切板内容
109         clipboard.setPixmap(QPixmap(r'C:\Users\19225\PycharmProjects\test\src\user\static\6.jpg'))
110
111     def pasteImage(self):
112         # 设置剪切板
113         clipboard = QApplication.clipboard()
114         # 设置剪切板的内容
115         # 把剪切板的内容直接放到label里
116         self.imageLabel.setPixmap(clipboard.pixmap())
117
118
119 # 防止其他脚本调用,只有单独运行此脚本,才会调用下面代码
120 if __name__ == '__main__':
121     # app实例,并传参
122     app = QApplication(sys.argv)
123     # 创建对象
124     main = ClipBoard()
125     # 创建窗口
126     main.show()
127     # 执行主循环,调用exit方法,确保主循环安全退出
128     sys.exit(app.exec_())
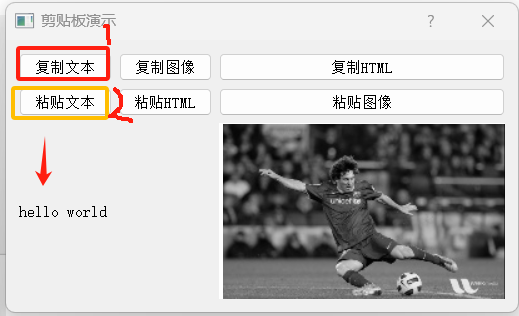
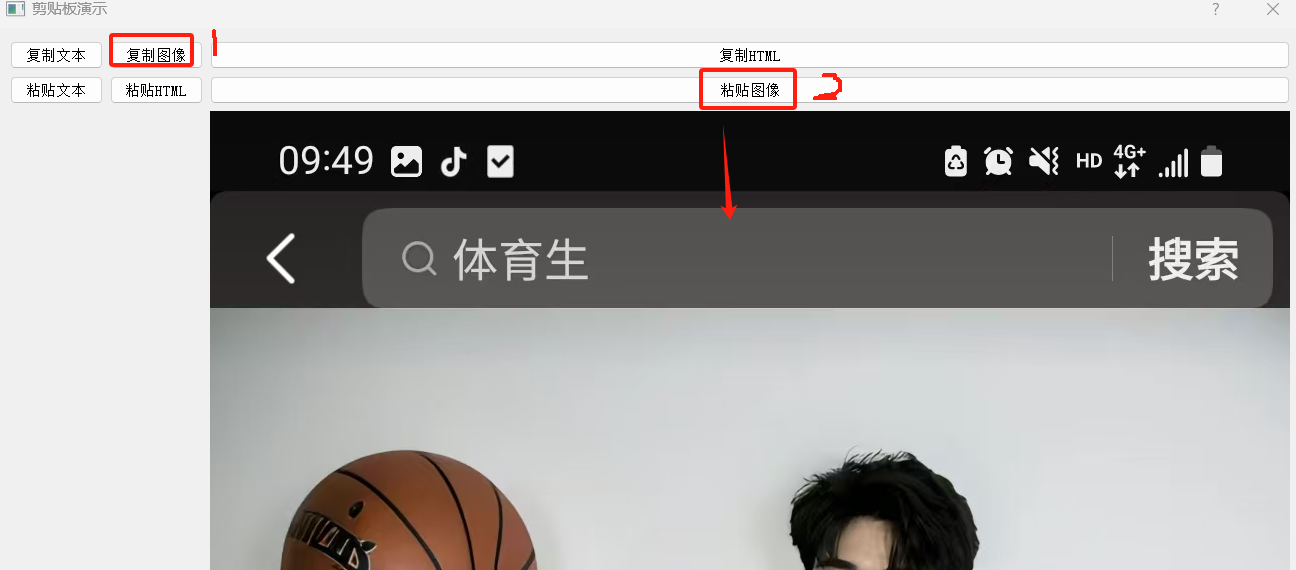
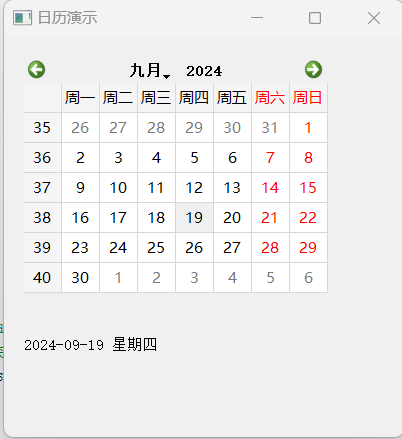
日历控件
 1 """
 2 日历控件
 3 QCalendarWidget
 4 """
 5 # 允许用户选择日期
 6 import sys
 7 from PyQt5.QtWidgets import *
 8 from PyQt5.QtGui import *
 9 from PyQt5.QtCore import *
10
11 class MyCalendar(QWidget):
12     def __init__(self):
13         super(MyCalendar, self).__init__()
14         self.initUI()
15
16     # 编写初始化方法,规范代码,初始化写在一个方法里
17     def initUI(self):
18         # 创建日历控件,全局的,在单击事件里面调用
19         self.cal = QCalendarWidget(self)
20         # 创建label控件,用于显示当前选择的日期
21         # 这个label用绝对布局
22         self.label = QLabel(self)
23         # 显示当前日期
24         date = self.cal.selectedDate()
25         self.label.setText(date.toString('yyyy-MM-dd dddd'))
26         # 移动label到相应的位置
27         self.label.move(20,300)
28         # 设置允许显示最小日期
29         self.cal.setMinimumDate(QDate(1988,1,1))
30         # 设置允许显示的最大日期
31         self.cal.setMaximumDate(QDate(2088,1,1))
32
33
34         # 绑定信号 槽
35         self.cal.clicked.connect(self.showDate)
36
37         # 以网格形式显示
38         self.cal.setGridVisible(True)
39
40         # 移动日历的位置  移动到左上角
41         self.cal.move(20,20)
42
43         # 设置窗口大小
44         self.resize(400,400)
45
46         # 设置标题
47         self.setWindowTitle('日历演示')
48     # 添加单击事件
49     # 槽
50     def showDate(self,date):
51         # 显示当前选择的日期
52         # 方式一  直接在事件里面获取
53         # self.label.setText((date.toString('yyyy-MM-dd dddd')))
54         # 方式二   直接通过日历,里面有个selcetedDate的方法获取
55         self.label.setText((self.cal.selectedDate().toString("yyyy-MM-dd dddd")))
56
57
58 # 防止其他脚本调用,只有单独运行,才会调用下面代码
59 if __name__ == '__main__':
60     # app实例化,传参
61     app = QApplication(sys.argv)
62     # 创建对象
63     main = MyCalendar()
64     # 创建窗口
65     main.show()
66     # 进入主循环,调用exit方法,确保主循环安全退出
67     sys.exit(app.exec_())
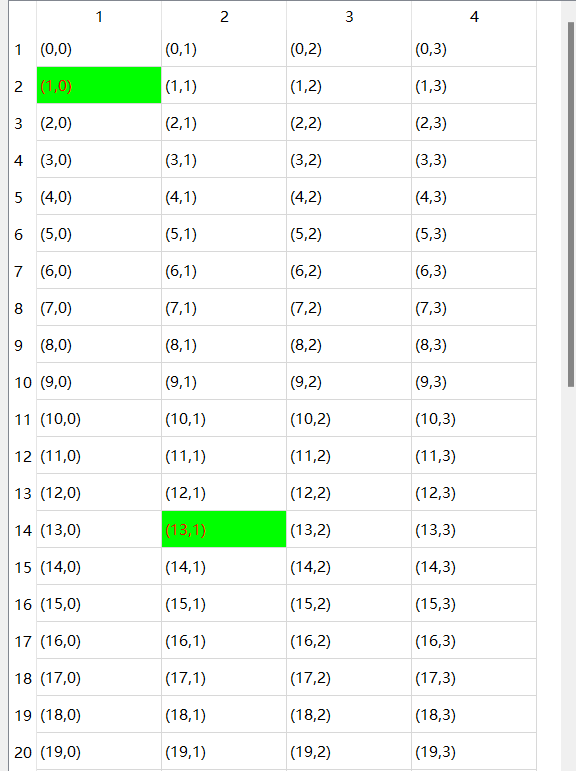
在表格中快速定位到特定的样式
 1 """
 2 在表格中快速定位到特定的样式
 3
 4 1. 数据的定位  findItems 返回一个列表   如果没查到,列表为空
 5 2.如果找到了满足条件的单元格,会定位到单元格所在的行 setSliderPosition(row)
 6
 7 # 三个步骤
 8 1.在表格里面显示很多的数据
 9 2.通过findItems来找到所有满足条件的单元格
10 3.通过setSliderPosition(row)定位到满足条件的这一行
11 """
12
13 import sys
14
15 from PyQt5 import QtCore
16 from PyQt5.QtWidgets import *
17 from PyQt5.QtCore import *
18 from PyQt5.QtGui import QColor,QBrush
19
20
21 class DataLocation(QWidget):
22     def __init__(self):
23         super(DataLocation, self).__init__()
24         self.initUI()
25
26     def initUI(self):
27         # 设置窗口标题
28         self.setWindowTitle('QTableWidget 例子')
29         # 设置窗口尺寸
30         self.resize(600,800)
31
32         # 创建水平布局
33         layout = QHBoxLayout()
34
35         # 创建QTableWidget控件
36         tableWidget = QTableWidget()
37         # 给tableWidget设置行
38         tableWidget.setRowCount(40)
39         #给tableWidget设置列
40         tableWidget.setColumnCount(4)
41
42         # 将控件添加到布局里
43         layout.addWidget(tableWidget)
44
45         # 对行循环 对列循环
46         for i in range(40):
47             for j in range(4):
48                 # 得到每个单元格的内容
49                 itemContent = '(%d,%d)' % (i,j)
50                 # 把内容放到表格中
51                 tableWidget.setItem(i,j,QTableWidgetItem(itemContent))
52
53         # 搜索满足条件的Cell
54         text = '(13,1)'
55         # 精确搜索
56         items = tableWidget.findItems(text,QtCore.Qt.MatchExactly)
57         if len(items) > 0:
58             items = items[0]
59             # 设置背景色
60             items.setBackground(QBrush(QColor(0,255,0)))
61             items.setForeground(QBrush(QColor(255,0,0)))
62
63             # 获得当前项所在的行
64             row = items.row()
65             # 定位到指定的行
66             # verticalScrollBar 获得滚动条
67             tableWidget.verticalScrollBar().setSliderPosition(row)
68         # 搜索满足条件的Cell
69         text = '(1'
70         # MatchStartsWit 以..开头
71         items = tableWidget.findItems(text, QtCore.Qt.MatchStartsWith)
72         if len(items) > 0:
73             items = items[0]
74             # 设置背景色
75             items.setBackground(QBrush(QColor(0, 255, 0)))
76             items.setForeground(QBrush(QColor(255, 0, 0)))
77
78             # 获得当前项所在的行
79             row = items.row()
80             # 定位到指定的行
81             # verticalScrollBar 获得滚动条
82             tableWidget.verticalScrollBar().setSliderPosition(row)
83
84         # 应用于布局
85         self.setLayout(layout)
86
87 if __name__ == '__main__':
88     # app实例化 传参
89     app = QApplication(sys.argv)
90     # 创建对象
91     example = DataLocation()
92     # 创建窗口
93     example.show()
94     # 进入主循环
95     sys.exit(app.exec_())
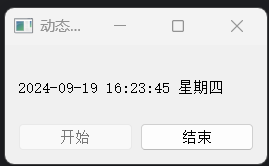
动态显示当前时间
 1 """
 2 动态显示当前时间
 3
 4 QTimer  定时器  每隔一定时间会调用一次
 5 QThread
 6
 7 多线程用于同时完成多个任务    在单CPU上是按顺序完成的(时间片切换),从宏观上来看,还是同时完成的
 8                          在多CPU上,是可以真正的同时完成
 9 """
10
11 import sys
12 from PyQt5.QtWidgets import QWidget, QPushButton, QApplication, QListWidget, QGridLayout, QLabel
13 from PyQt5.QtCore import QTimer, QDateTime
14
15
16 class ShowTime(QWidget):
17     def __init__(self, parent=None):
18         super(ShowTime, self).__init__(parent)
19         # 设置窗口标题
20         self.setWindowTitle("动态显示当前时间")
21
22         # 创建QLabel控件
23         self.label = QLabel('显示当前时间')
24         # 创建button按扭
25         self.startBtn = QPushButton('开始')
26         # 创建button按钮
27         self.endBtn = QPushButton('结束')
28
29         # 通过栅格布局,安排这三个控件的位置
30         layout = QGridLayout()
31
32         # 设置定时器对象
33         self.timer = QTimer()
34         # 时间的 信号 槽
35         self.timer.timeout.connect(self.showTime)
36
37         # 把这三个控件放到栅格布局里面
38         # 在第一行第一列   占用一行  占用两列
39         layout.addWidget(self.label, 0, 0, 1, 2)
40         # 在第二行第一列
41         layout.addWidget(self.startBtn, 1, 0)
42         # 在第二行第二列
43         layout.addWidget(self.endBtn, 1, 1)
44
45         # 开始控件的信号 槽
46         self.startBtn.clicked.connect(self.startTimer)
47         # 结束控件的信号 槽
48         self.endBtn.clicked.connect(self.endTimer)
49
50         # 应用于栅格布局
51         self.setLayout(layout)
52
53     # 槽方法
54     # 显示时间
55     def showTime(self):
56         # 获取当前的时间
57         time = QDateTime.currentDateTime()
58         # 设置时间显示
59         timeDisplay = time.toString("yyyy-MM-dd hh:mm:ss dddd")
60         self.label.setText(timeDisplay)
61
62     def startTimer(self):
63         # 开始时间 1s
64         self.timer.start(1000)
65         # 开始之后开始按钮关闭
66         self.startBtn.setEnabled(False)
67         # 开始之后关闭按钮开始
68         self.endBtn.setEnabled(True)
69
70     def endTimer(self):
71         self.timer.stop()
72         # 开始之后开始按钮开始
73         self.startBtn.setEnabled(True)
74         # 开始之后关闭按钮关闭
75         self.endBtn.setEnabled(False)
76
77
78 if __name__ == '__main__':
79     app = QApplication(sys.argv)
80     demo = ShowTime()
81     demo.show()
82     sys.exit(app.exec_())
让程序定时关闭
 1 """
 2 让程序定时关闭
 3
 4 QTimer.singleShot    在指定时间后只调用一次
 5
 6 """
 7
 8 import sys
 9 from PyQt5.QtWidgets import *
10 from PyQt5.QtCore import *
11
12 if __name__ == '__main__':
13     app = QApplication(sys.argv)
14
15     label = QLabel("<font color=red size=140><b>Hello World,窗口在5秒后自动关闭!</b></font>")
16     label.setWindowFlags(Qt.SplashScreen | Qt.FramelessWindowHint)
17     label.show()
18     # 设置五秒
19     QTimer.singleShot(5000, app.quit)
20
21     sys.exit(app.exec_())


【推荐】国内首个AI IDE,深度理解中文开发场景,立即下载体验Trae
【推荐】编程新体验,更懂你的AI,立即体验豆包MarsCode编程助手
【推荐】抖音旗下AI助手豆包,你的智能百科全书,全免费不限次数
【推荐】轻量又高性能的 SSH 工具 IShell:AI 加持,快人一步
· 阿里最新开源QwQ-32B,效果媲美deepseek-r1满血版,部署成本又又又降低了!
· 开源Multi-agent AI智能体框架aevatar.ai,欢迎大家贡献代码
· Manus重磅发布:全球首款通用AI代理技术深度解析与实战指南
· 被坑几百块钱后,我竟然真的恢复了删除的微信聊天记录!
· AI技术革命,工作效率10个最佳AI工具