【环境搭建】
node环境搭建
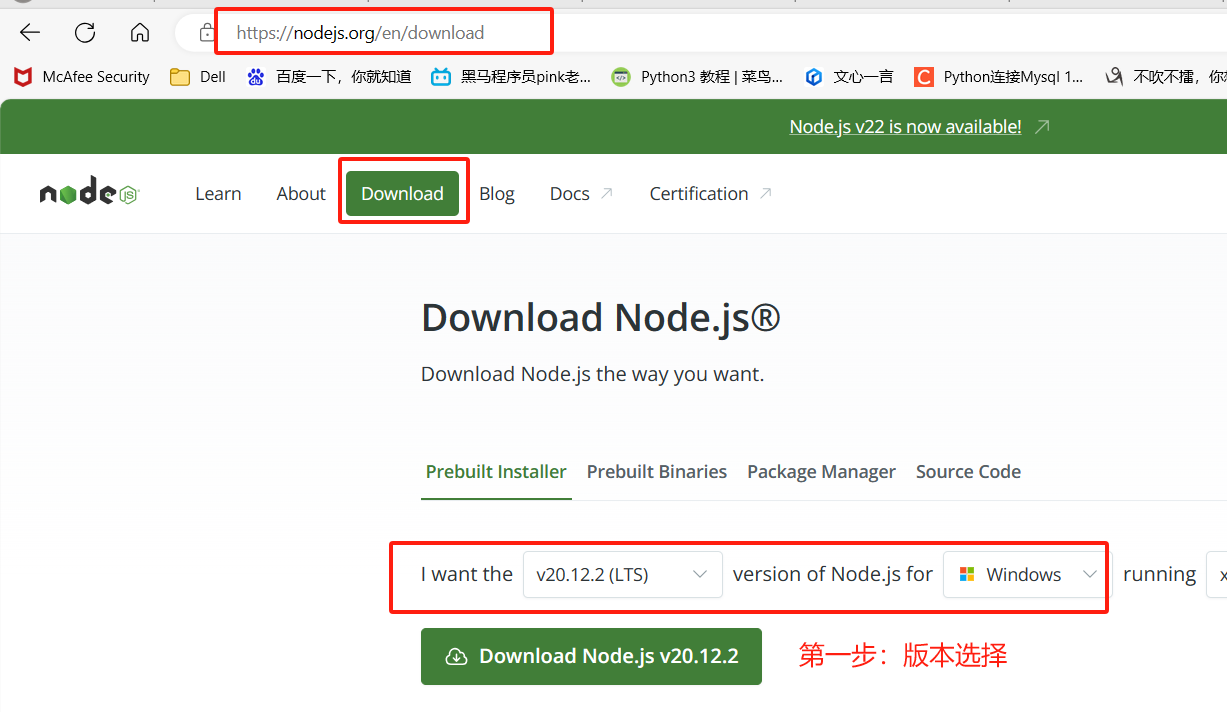
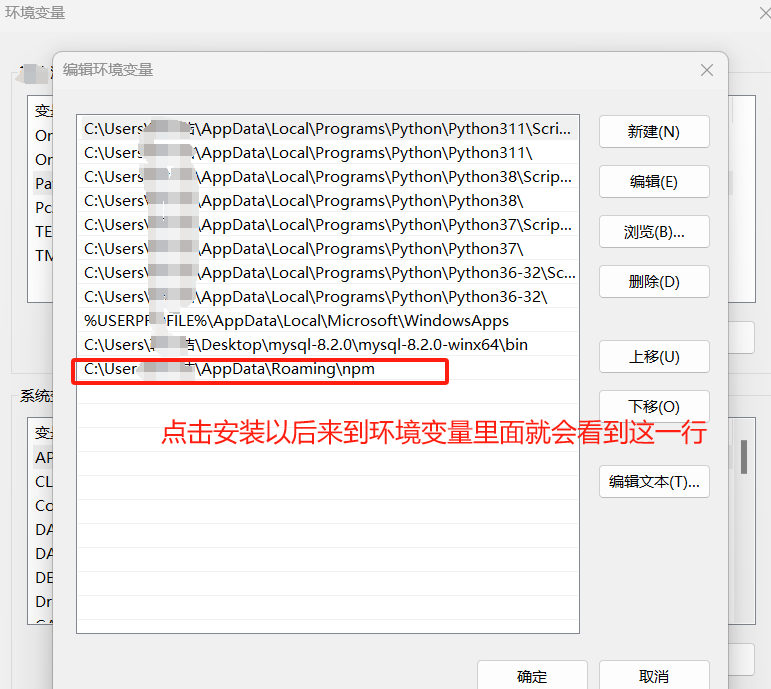
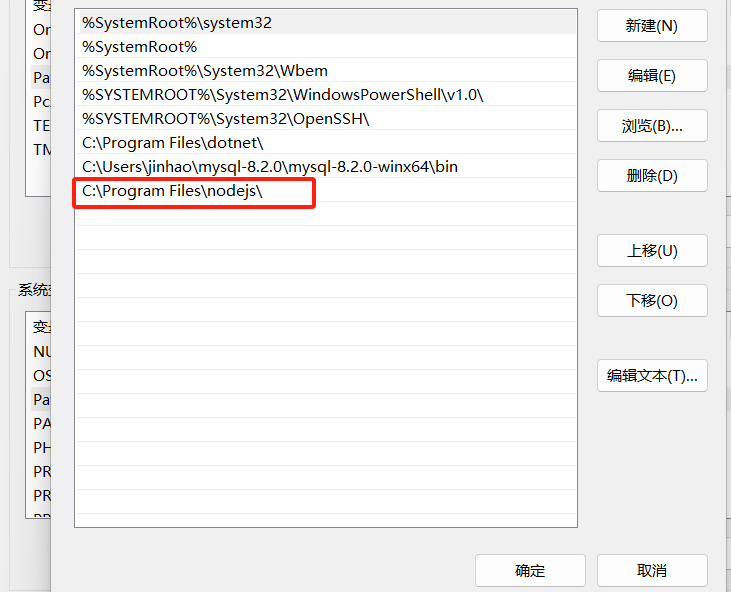
退出ctrl+c

--------------------------------------------------------------------------------------------------------------------------------------------------------------------------
vue环境搭建
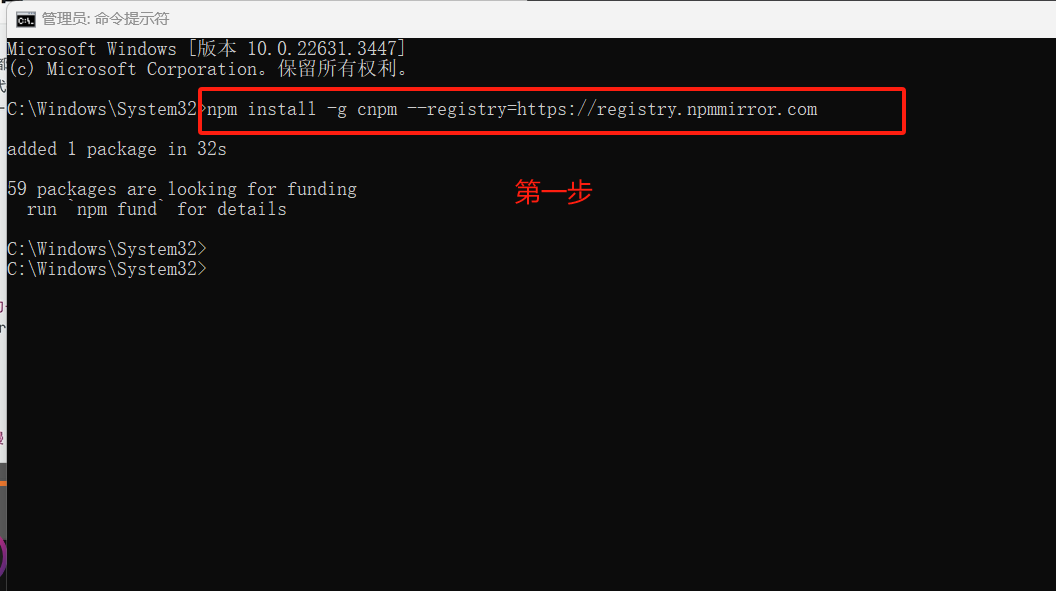




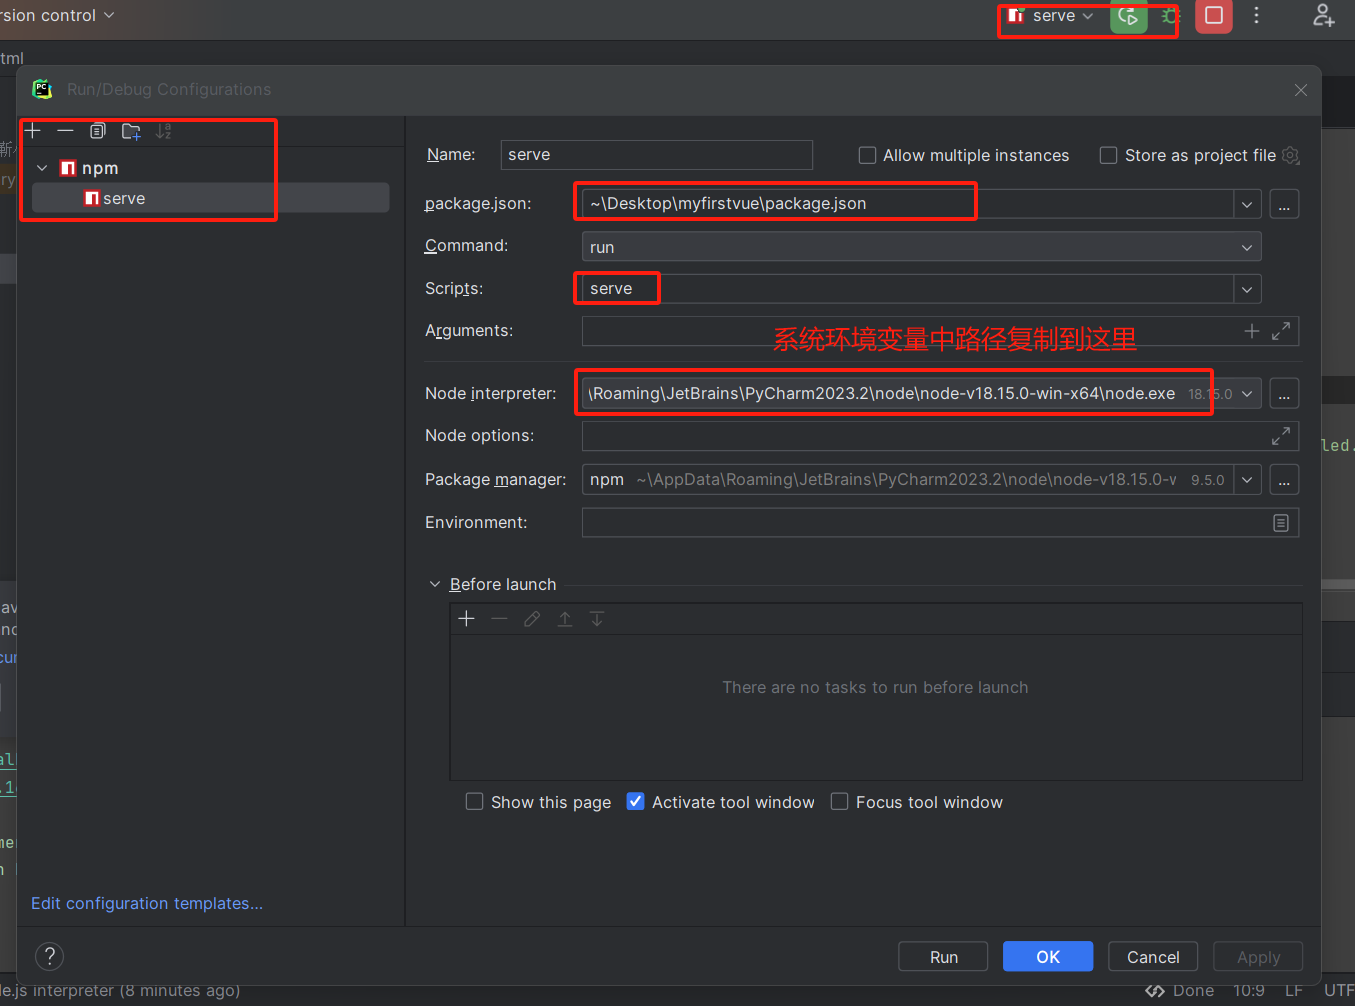
运行项目遇到的报错问题
===========================================================
总结
# 1 工程化---》创建vue项目
    -要按vue要求的套路写代码--》写的都是vue的东西
    -最终上线--》要编译---》把vue的代码--》编译成 html,css,js
    -创建工程,编译需要使用:nodejs--》webpack

# 2 安装node环境
    -官网下载一路下一步安装
    -两个命令
        npm---->pip
        node--->python

# 3 搭建vue的环境
    #1  装cnpm 这个包---》淘宝提供的--》以后有了它--》装模块 cnpm替代npm
    npm install -g cnpm --registry=https://registry.npmmirror.com
    ### 解决方案1:
    // 1. 清空缓存
    npm cache clean --force
    // 2. 关闭SSL验证
    npm config set strict-ssl false
    // 3. 安装
    到这里就可以正常使用npm命令安装需要的工具了。如(npm install -g cnpm   )

    ### 解决方案2:
    // 1. 清空缓存
    npm cache clean --force
    // 2. 切换新源
    npm config set registry https://registry.npmmirror.com
    // 3. 查看源是否设置成功
    npm config get registry
    // 4. 安装
    到这里就可以正常使用npm命令安装需要的工具了。如(npm install -g cnpm   )
 # 2 安装vue脚手架
    cnpm install -g @vue/cli

 # 3 装完脚手架,就会有个vue名令,通过vue命令创建vue项目
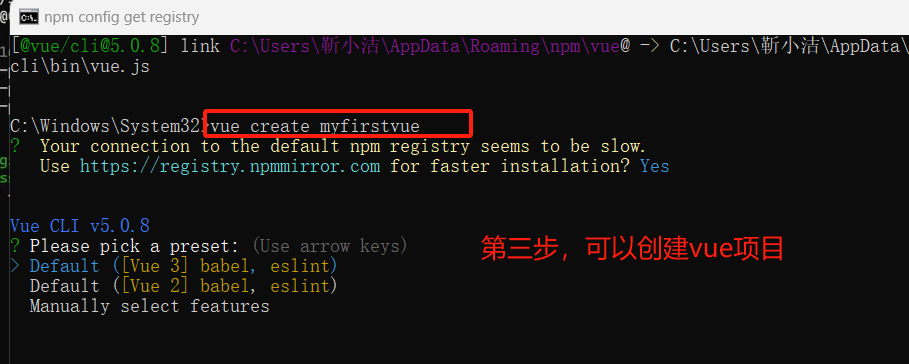
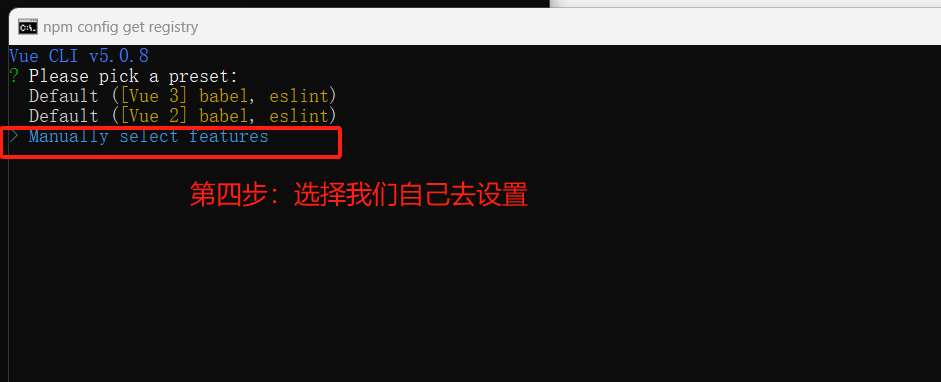
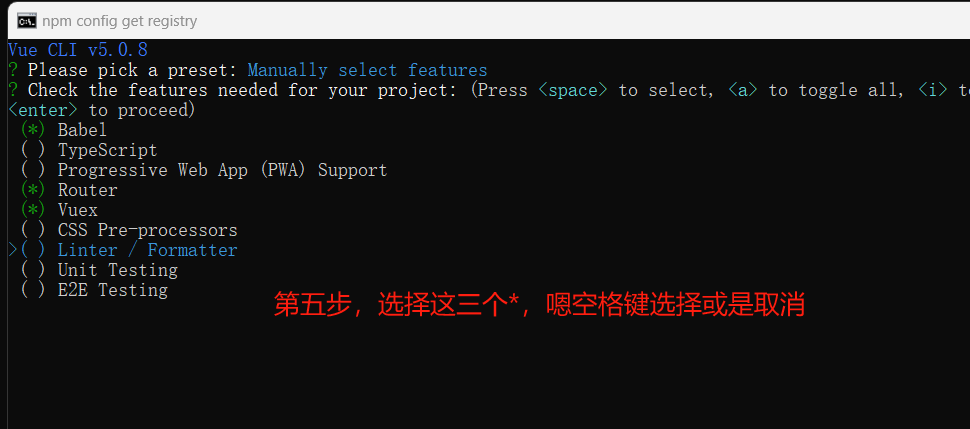
    vue create myfirstvue # 按下面步骤


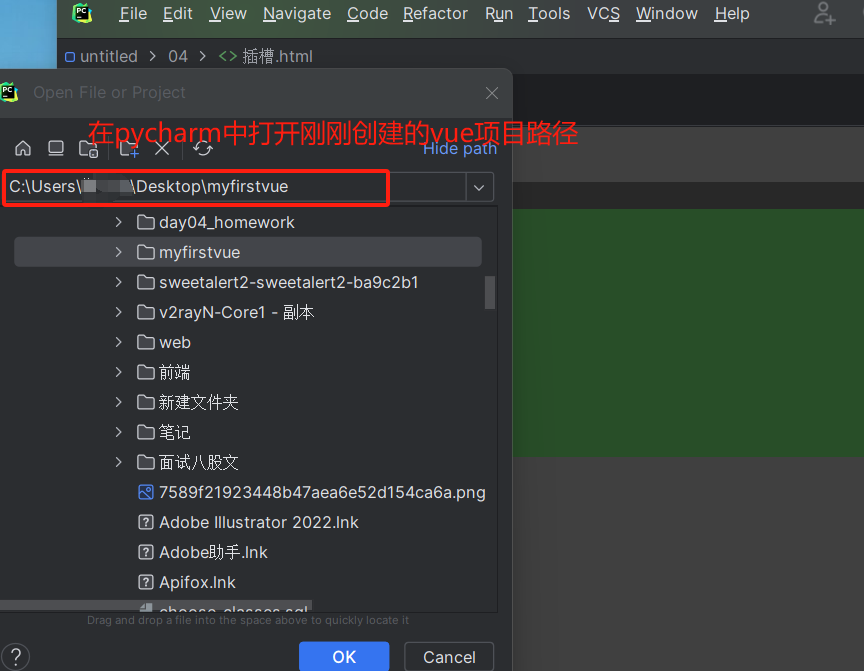
# 4 使用webstorm打开项目

# 5 运行项目
    -1 在命令行中[项目跟路径]:使用npm run serve
    -2 配置webstorm--》点绿色箭头执行
        新建一个npm命令--》执行 serve脚本
。
。
。
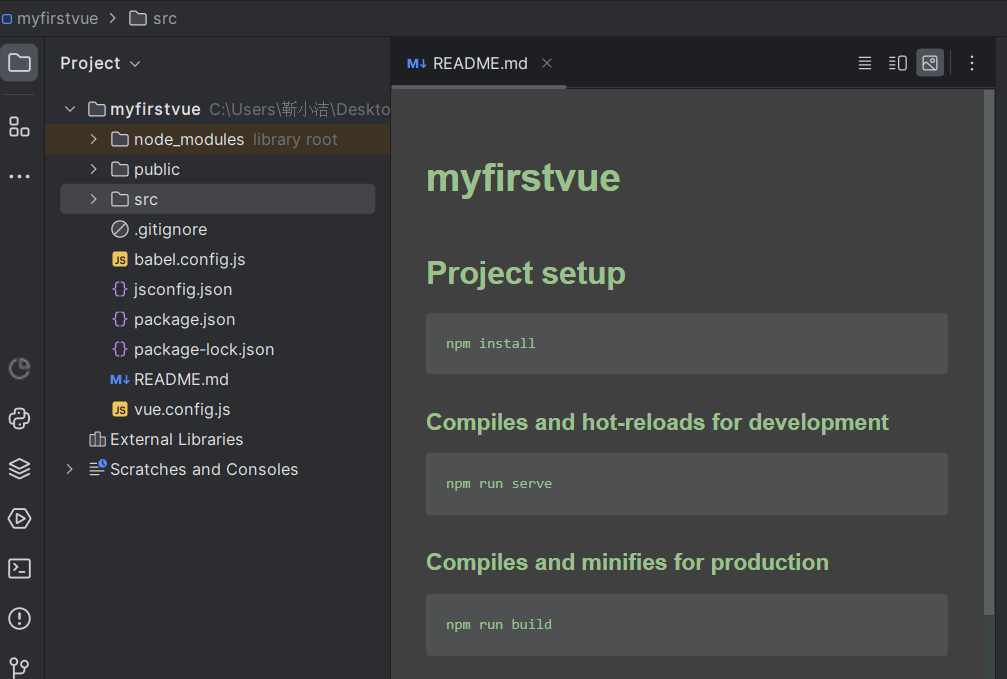
【vue项目目录结构】
 1 myfirstvue        # 项目名
 2     -node_modules # 等同于python的venv--》虚拟环境-->里面有很多js,项目的依赖-》可以删除---》项目就不能运行了--》在你本地--》cnpm install--》根据package.json项目的依赖,再重新安装--》又可以运行了
 3     -public       # 文件夹,一般不动
 4         -favicon.ico # 小图标
 5         -index.html  # spa--》单页面应用--》整个vue项目,就只有这一个html-如果禁用了js--》整个vue都用不了
 6
 7      -src        # 文件夹---》核心代码
 8         -assets  #文件夹,都放静态文件--》图片,css,js。。。
 9             -logo.png # 静态图片
10         -components  # 小组件,给页面组件使用
11             HelloWorld.vue # HelloWorld 组件
12         -views       # 页面组件,页面跳转,实现像 html跳转一样的效果
13             AboutView.vue # 关于页面
14             HomeView.vue  # 首页
15         -store            # vuex--》状态管理器
16             index.js
17         -router            # vue-router---》路由配置文件
18             index.js
19         -App.vue           # 根组件
20         -main.js           # 整个项目入口
21
22    -.gitignore    # git忽略文件,学了git就会了
23    -babel.config.js # 装了bable配置文件--》把高版本es语法转成es5
24    -jsconfig.json # 不管
25    -package.json  # 项目依赖文件--》项目依赖--》npm install--》根据他装
26    -package-lock.json # 锁定文件,之前项目中使用模块版本
27    -README.md     # 项目介绍
28    -vue.config.js # vue整体配置文件
29
。
。
。
【vue项目运行机制】
# 1 main.js--->指定了index.html--->id为app的div---》根App.vue 这个组件做了关联
# App是 个组件
new Vue({
  render: h => h(App)  # 代指 el
}).$mount('#app')

new Vue({
    el:'#app'
})
。
。
。
【组件写法】
 1 # template 写之前我们方在template标签的模版字符串
 2 <template>
 3   <div id="app">
 4     <h1>我是根组件</h1>
 5     <button @click="haneldShow">点我弹alert</button>
 6   </div>
 7 </template>
 8
 9 # script标签--》原来js代码都写在这里、
10 <script>
11 export default {
12   name: 'HelloWorld', // 组件名字
13   data() {
14     return {}
15   },
16   methods: {
17     haneldShow() {
18       alert('111')
19     }
20   }
21 }
22 </script>
23
24
25 #style
26 <style>
27
28 button{
29   background-color: aqua;
30 }
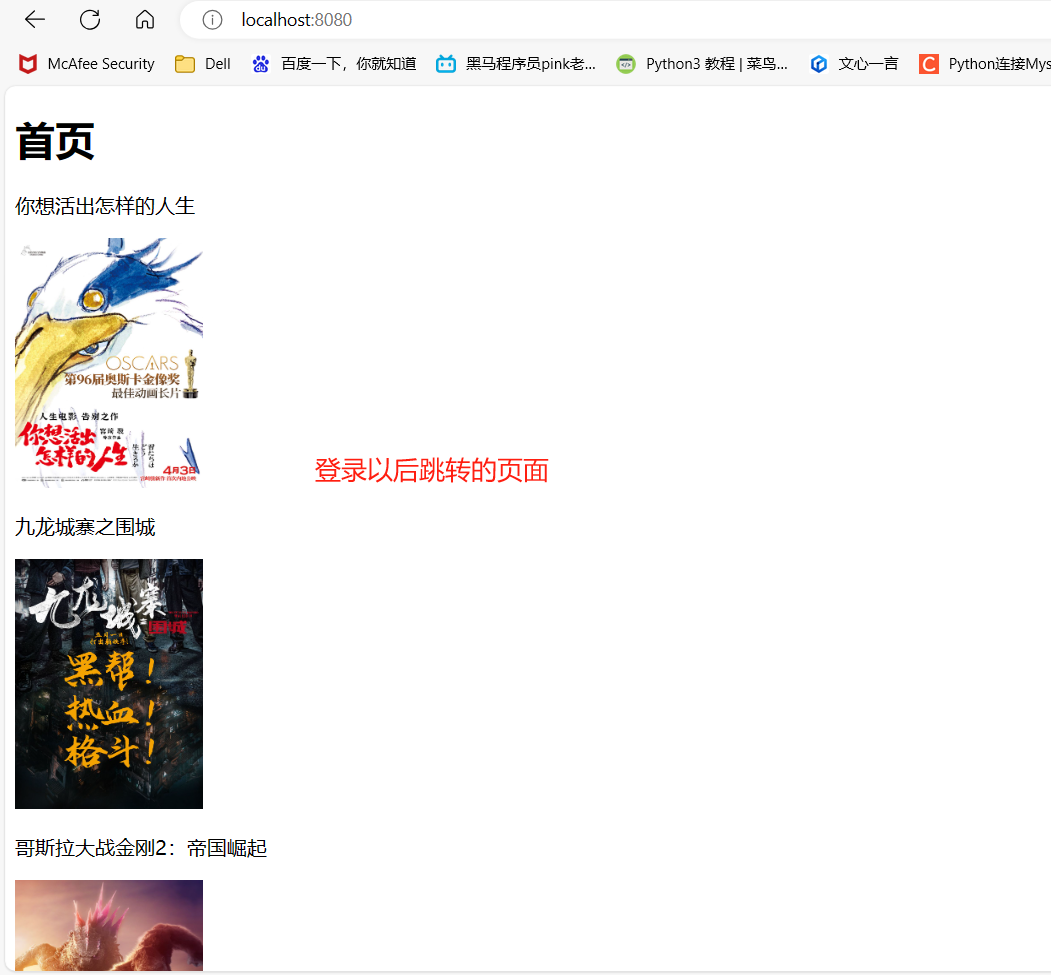
31 </style>
。
。
。
【ES6语法总结】
 1 # let 定义变量
 2 # const定义常量
 3 ------块级作用域----
 4 # var 以后尽量少用,函数作用域
 5
 6 # 在ES6之前,我们都是用var来声明变量,而且JS只有函数作用域和全局作用域,没有块级作用域,所以{}限定不了var声明变量的访问范围。
 7
 8 # ES6 新增了let命令,用来声明局部变量。它的用法类似于var,但是所声明的变量,只在let命令所在的代码块内有效,而且有暂时性死区的约束
 9
10
11
12 # "暂时性死区"(Temporal Dead Zone,简称 TDZ)是指在 ES6 中使用 let 或 const 声明变量时,变量存在但无法访问的区域。这种行为是为了在 JavaScript 中引入块级作用域而设计的。
13
14 # 在 JavaScript 中,使用 var 声明的变量在其声明语句之前就可以被访问,这种行为称为"变量提升"。而在使用 let 或 const 声明变量时,变量虽然存在于作用域中,但是在声明语句之前访问这些变量会导致引发 ReferenceError 异常。
15
16 # 暂时性死区的产生原因是,let 和 const 声明的变量在进入作用域时就已经被创建,并且被绑定到了该作用域中,但是在变量的声明语句之前,访问这些变量会进入暂时性死区,因为此时变量尚未初始化
。
1.1箭头函数
# 1 简化代码
# 2 箭头函数内部,没有自己的this---》使用上一级的
    let f=()=>{}

# 3 this指向问题
# 1 在全局上下文中,this 指向全局对象,在浏览器环境中通常是 window 对象,在 Node.js 中是 global 对象
    console.log(this) # window 对象

# 2 函数调用:
    # 2.1 如果函数作为普通函数调用,this 指向全局对象(在严格模式下为 undefined)
    # 2.2 如果函数作为对象的方法调用,this 指向调用该方法的对象。

# 3 构造函数:
    在构造函数中,this 指向新创建的实例对象

# 4 箭头函数:
箭头函数的 this 指向定义时所在的作用域的 this 值,而不是调用时的 this 值。换句话说,箭头函数的 this 是词法作用域,而不是动态作用域

# 5 DOM 事件处理函数:
在 DOM 事件处理函数中,this 指向触发事件的 DOM 元素

#6  ES6 类方法:
在 ES6 类方法中,this 指向调用该方法的对象实例
。
1.2 模版字符串
let a=`我的名字是:${name}`
1.3 解构赋值
#1 解构赋值允许从数组或对象中提取数据,并将其赋值给变量。
#2 解构赋值可以方便地交换变量的值,同时还支持默认值
 1 // 1 解对象
 2     let user = {name: 'lyf', age: 19, hobby: '烫头'}
 3     // let name=user.name
 4     // let age=user.age
 5     let {name,age,hobby,a=10} = user
 6     console.log(name,age,hobby,a)
 7 =========================================================
 8     // 2 解数组
 9     let l=[11,22,33]
10     let[a,b]=l
11     console.log(a,b) //11,22
12 ================================================
13     //3 结构函数返回值
14     function getuserInfo() {
15         return {name: 'lyf', age: 19, hobby: ['烫头', '喝酒']}
16     }
17
18     let {name1='1', hobby} = getuserInfo()
19     console.log(name1, hobby)  # 1 [ '烫头', '喝酒' ]
。
1.4 默认参数
# ES6 允许在函数参数中设置默认值,当调用函数时未提供参数时,将使用默认值
# 案例 function demo01(name,age=19) { console.log(name,age) } demo01('lqz')
。
1.5 展开运算
#1 展开运算符 ... 可以将可迭代对象(如数组、字符串、对象)展开为多个参数或元素。
#2 也可以用于函数参数

# 案例1
let a={age:19,hobby:'抽烟'}
let user={name:'lqz',age:20,...a}
console.log(user) // {name:'lqz',age:19,hobby:'抽烟'}


# 案例2
let l=[1,2,3]
let l1=[44,55,66,...l]
console.log(l1)

# 案例3
function demo01(a,...b){
    console.log(a)
    console.log(b)
}
demo01(1,2,34,4)
let l=[44,5,66,7]
demo01(...l)
。
1.6 模块化
 1 ***  默认导入导出语法(用的最多),只能导出一个,一般导出一个字典对象
 2     -导出语法
 3         export default 一般是个字典对象
  exportdefault {
    name,
    add
}
4 5 -导入语法 6 import 别名 from '路径' 7 以后 别名 就是 导入的对象 8 注意路径对应的是要导入文件路径,并给导入成功的文件对象起了一个别名 9 --------------------------------------------- 10 --------------------------------------------- 11 12 *** 命名导出导入法 13 14 -导出语法 可以导出多个 注意导出的变量与上面定义的变量名不能一样 15 export const name = '彭于晏' 16 export const add = (a, b) => { return a + b } 17 export const age = 19 18 19 -导入语法 20 import {name, add} from './lqz/s1' 21 console.log(name) 22 console.log(add(33, 44)) 23 24 --------------------------------------------- 25 --------------------------------------------- 26 27 *** 导入的简写形式 28 包下的 index.js文件,导入的时候可以省略,不用写到index.js的路径!!! 29 它等同于ptyhon的__init__.py 导入包名实际是导入的__init__.py文件 30 31 但是包下的文件只要不叫index.js,那么导入该文件的时候,都不能省略!! 32 33 34 -例如: 35 # 包名是lqz 包下有个index.js文件 36 # 导入的时候简写为 import lqz from './lqz'
。
。
。
【vue项目中,组件的使用】
 1 #### ##  1 创建组件Child## ## ## ## ## ## ##
 2
 3 <template>
 4   <div>
 5     <div class="top">
 6       <button>后退</button>
 7       <span @click="handleShow">{{ title }}</span>
 8       <button>前进</button>
 9     </div>
10
11   </div>
12
13 </template>
14
15
16 <script>
17 export default {
18   name: 'Child',
19   data() {
20     return {
21       title: '首页'
22     }
23   },
24   methods: {
25     handleShow() {
26       alert('1111')
27     }
28   }
29 }
30
31 </script>
32
33
34 <style scoped>
35 .top {
36   display: flex;
37   justify-content: space-between;
38 }
39 </style>
40
41 =================================================================
42 #### ##  2在其他组件中使用## ### ## ##### ##
43 <template>
44   <div id="app">
45     <h1>我是根组件</h1>
46     <button>点我弹alert</button>
47     <hr>
48     <Child></Child>
49   </div>
50 </template>
51 <script>
52  // @ 代指---》src文件夹
53 import Child from "@/components/Child.vue";
54 export default {
55   name: 'HelloWorld', //组件名字
56   components:{
57     Child  //注册局部组件
58   }
59 }
60 </script>
61
62 <style>
63 button{
64   background-color: aqua;
65 }
66 </style>
。
。
。
【vue-router简单使用】
 1 # 1 单页面应用,就无法实现页面的跳转
 2 # 2 借助于 vue-router-->实现组件切换--》效果就是页面跳转
 3
 4 # 3 使用
 5 ### 3.1 App.vue--->固定成
 6 <template>
 7   <div id="app">
 8     # 全局组件---》访问某个路径--》这个位置就替换成页面组件的内容
 9     <router-view></router-view>
10   </div>
11 </template>
12
13 ### 3.2 写页面组件:HomeView  AboutView
14 <template>
15   <div class="home">
16     <h1>首页</h1>
17   </div>
18 </template>
19
20 <script>
21 export default {
22   name: 'HomeView',
23 }
24 </script>
25 -----------------------------------------------
26 <template>
27   <div class="about">
28     <h1>This is an about page</h1>
29   </div>
30 </template>
31
32 ### 3.2 注册路由:router/index.js
33 Vue.use(VueRouter)
34
35 const routes = [
36   {
37     path: '/',
38     name: 'home',
39     component: HomeView
40   },
41       {
42     path: '/about',
43     name: 'about',
44     component: AboutView
45   }
46 ]
47
48 const router = new VueRouter({
49   mode: 'history',
50   base: process.env.BASE_URL,
51   routes
52 })
53
54 export default router
。
。
。
【案例:登陆跳转】
#1 首页---》按钮--》点击--》跳转到--》LoginView.vue---》写个登陆功能--》登陆成功--》跳转到FilmsView.vue--->如果登陆失败,提示错误
 后端
1 # 统一按如下方式解决跨域
 2     -1 安装
 3         pip3 install django-cors-headers
 4     -2 app中注册
 5         INSTALLED_APPS = [
 6             。。。
 7             'corsheaders',
 8         ]
 9     -3 中间件中注册
10         MIDDLEWARE = [
11
12             'corsheaders.middleware.CorsMiddleware',
13         ]
14     -4 配置文件中配置
15     # 允许跨域源
16     CORS_ORIGIN_ALLOW_ALL = True
17     # 允许的请求头
18     CORS_ALLOW_HEADERS = (
19         "accept",
20         "accept-encoding",
21         "authorization",
22         "content-type",
23         "dnt",
24         "origin",
25         "user-agent",
26         "x-csrftoken",
27         "x-requested-with",
28
29         # 额外允许的请求头
30         'token',
31     )
32 -----------------------------------------------------------
33 逻辑层
34 from django.shortcuts import render
35
36 # Create your views here.
37 from rest_framework.viewsets import ViewSet
38 from rest_framework.response import Response
39 import json
40
41
42 class UserView(ViewSet):
43     def create(self, request, *args, **kwargs):
44         username = request.data.get('username')
45         password = request.data.get('password')
46         if username == 'jh' and password == '123':
47             return Response({'code': 100, 'msg': '登陆成功', 'token': 'aa.bb.cc'})
48         else:
49             return Response({'code': 101, 'msg': '用户名或密码错误'})
50
51
52 class FilmsView(ViewSet):
53     def list(self, request, *args, **kwargs):
54         with open('./films.json', 'r', encoding='utf-8') as f:
55             res_dict = json.load(f)
56
57         return Response(res_dict)
58 ------------------------------------------------------------------
59 路由层
60 from rest_framework.routers import SimpleRouter
61
62 from app01.views import UserView,FilmsView
63
64 router = SimpleRouter()
65 router.register('user', UserView,'user')
66 router.register('films', FilmsView,'films')
67
68 urlpatterns = [
69
70 ]
71 urlpatterns += router.urls
。
前端
  1 HomeView.vue
  2
  3 <template>
  4   <div class="home">
  5     <h1>首页</h1>
  6     <div v-for="item in filmsList">
  7       <p>{{item.name}}</p>
  8       <p><img :src="item.poster" alt="" height="200px" width="150px"></p>
  9     </div>
 10   </div>
 11 </template>
 12
 13 <script>
 14 import axios from "axios";
 15 export default {
 16   name: 'HomeView',
 17   data(){
 18     return{
 19       filmsList:[]
 20     }
 21   },
 22
 23   created() {
 24     axios.get('http://127.0.0.1:8000/app01/films/').then(res=>{
 25       this.filmsList=res.data.result
 26     }).catch(err=>{
 27       alert('请联系管理员')
 28     })
 29   }
 30 }
 31 </script>
 32 ------------------------------------------------------------------------------
 33 LoginView.vue
 34 <template>
 35   <div class="about">
 36     <h1>登录</h1>
 37     <p>用户名:<input type="text" v-model="username"></p>
 38     <p>密码:<input type="password" v-model="password"></p>
 39     <p><button @click="handleLogin">登录</button></p>
 40   </div>
 41 </template>
 42
 43 <script>
 44 import axios from "axios";
 45
 46 export default {
 47   name: 'LoginView',
 48   data() {
 49     return {
 50       username: '',
 51       password: ''
 52     }
 53   },
 54   methods: {
 55     handleLogin() {
 56       axios.post(
 57           'http://127.0.0.1:8000/app01/user/',
 58           {
 59             username: this.username,
 60             password: this.password
 61           },
 62           {
 63             headers: {
 64               "Content-Type": 'application/json'
 65             }
 66           }).then(res => {
 67             console.log(res.data)
 68             if(res.data.code==100){
 69               // 跳转 首页
 70               this.$router.push('/')
 71             }else {
 72               alert(res.data.msg)
 73             }
 74       })
 75     }
 76   }
 77
 78 }
 79 </script>
 80
 81
 82
 83 <style scoped>
 84
 85 </style>
 86 --------------------------------------------
 87 router/index.js
 88 import Vue from 'vue'
 89 import VueRouter from 'vue-router'
 90 import HomeView from '../views/HomeView.vue'
 91 import AboutView from "@/views/AboutView.vue";
 92 import LoginView from "@/views/LoginView.vue";
 93
 94 Vue.use(VueRouter)
 95
 96 const routes = [
 97   {
 98     path: '/',
 99     name: 'home',
100     component: HomeView
101   },
102       {
103     path: '/about',
104     name: 'about',
105     component: AboutView
106   },
107     {
108     path: '/login',
109     name: 'login',
110     component: LoginView
111   }
112 ]
113
114 const router = new VueRouter({
115   mode: 'history',
116   base: process.env.BASE_URL,
117   routes
118 })
119
120 export default router
121
122
123 =============================
124 ps:前端后端必须都要启动才不会报错
。
。
。
【scoped】
 1 # 加在style上,表示样式只在当前vue中生效
 2 <template>
 3   <div id="app">
 4     <h1>xxx</h1>
 5     <router-view></router-view>
 6   </div>
 7 </template>
 8
 9
10 <style scoped>
11
12 h1 {
13   background-color: pink;
14   font-size: 60px;
15 }
16 </style>
。
。
。
【ref】
 1 AboutView.vue
 2
<template>
  <div class="about">
    <h1 ref="h1">This is an about page</h1>
    <Child ref="child"></Child>
    <button @click="handleShow">点我看控制台</button>
  </div>
</template>

<script>
import Child from "@/components/Child.vue";
export default {
  name: 'About',
  data(){
    return{name:'about里面有数据'}
  },
  methods:{
    handleShow(){
      console.log(this.$refs);
    }
  },
  components:{
    Child
  }
}
</script>
Child.vue
 1 <template>
 2   <div>
 3     <div class="top">
 4       <button>后退</button>
 5       <span @click="handleShow">{{ title }}</span>
 6       <button @click="handleLog">前进</button>
 7     </div>
 8
 9   </div>
10
11 </template>
12
13
14 <script>
15 export default {
16   name: 'Child',
17   data() {
18     return {
19       title: '首页'
20     }
21   },
22   methods: {
23     handleShow() {
24       alert('1111')
25     },
26     handleLog(){
27       console.log(this.$parent.name)
28     }
29   }
30 }
31
32 </script>
33
34
35 <style scoped>
36 .top {
37   display: flex;
38   justify-content: space-between;
39 }
40 </style>

父拿子,子拿父
。
。
。
【props】
 1 # 自定义属性--》在子组件中拿到父组件传入的变量
 2
 3 # 父组件中
 4  <Child ref="child" :myname="name"></Child>
 5
 6 # 子组件中
 7 export default {
 8   name: 'Child',
 9   data() {
10     return {
11       title: '首页'
12     }
13   },
14   props:['myname'],
15   methods: {
16     handleShow() {
17       alert('1111')
18     },
19     handlelog(){
20       console.log(this.$parent.name)
21       console.log(this.myname)
22     }
23   }
24 }
==========================================================================================
进阶版
# 1 方式一:
props:['myname'],
# 2 方式 二
props: {myname: String},
# 3 方式三
props: {
    myname: {
      type: String, //类型
      required: true, //必要性
      default: '老王' //默认值
    }
  },


