Python 第6周 模块
模块
模块,用一砣代码实现了某个功能的代码集合。
类似于函数式编程和面向过程编程,函数式编程则完成一个功能,其他代码用来调用即可,提供了代码的重用性和代码间的耦合。而对于一个复杂的功能来,可能需要多个函数才能完成(函数又可以在不同的.py文件中),n个 .py 文件组成的代码集合就称为模块
-
模块分为三种:
自定义模块 内置标准模块(又称标准库) 开源模块
import time
简单来说时间模块 有三种方式
时间戳
print(time.time()) unix元年开始时间是秒
结构化时间
print(time.localtime()) # 返回本地时间 的struct time对象格式
print(time.localtime().tm_year) #取的是年
print(time.gmtime())
print(time.asctime()) #返回时间格式"Fri Aug 19 11:14:16 2016",
>>> print(time.asctime(time.localtime()))
Mon Jun 5 18:02:12 2017
格式化
print(time.strftime(%Y-%m-%d %H:%M:%S))
日期字符串 转成 时间戳
str_2_struct = time.strptime("2017/06/05","%Y/%m/%d") #将 日期字符串 转成 struct时间对象格式
>>> struct1 = time.strptime("2017/06/05","%Y/%m/%d")
>>> print(struct1)
time.struct_time(tm_year=2017, tm_mon=6, tm_mday=5, tm_hour=0, tm_min=0, tm_sec=0, tm_wday=0, tm_yday=156, tm_isdst=-1)
要是没有指定,那么后面的值为0
struct_2_stamp=time.mktime(str_2_struct)# #将struct时间对象转成时间戳
print(time.strftime("%Y-%m-%d %H:%M:%S",time.gmtime()) ) #将utc struct_time格式转成指定的字符串格式
时间的加减
import datetime 要导入这个模块
>>> import datetime
>>> print(datetime.datetime.now()) #当前时间
2017-06-05 20:21:00.143852
>>> print(datetime.date.fromtimestamp(time.time())) #时间戳转换
2017-06-05
>>> print(datetime.datetime.now() + datetime.timedelta(3)) 加三天
2017-06-08 20:22:26.164496
>>> print(datetime.datetime.now() + datetime.timedelta(-3))
2017-06-02 20:22:37.509353
>>> print(datetime.datetime.now() + datetime.timedelta(hours=3)) #加3个小时
2017-06-05 23:22:45.255357
>>> print(datetime.datetime.now() + datetime.timedelta(minutes=30)) #加30分钟
2017-06-05 20:52:53.817488
| Directive | Meaning | Notes |
|---|
%a |
Locale’s abbreviated weekday name. |
|
%A |
Locale’s full weekday name. |
|
%b |
Locale’s abbreviated month name. |
|
%B |
Locale’s full month name. |
|
%c |
Locale’s appropriate date and time representation. |
|
%d |
Day of the month as a decimal number [01,31]. |
|
%H |
Hour (24-hour clock) as a decimal number [00,23]. |
|
%I |
Hour (12-hour clock) as a decimal number [01,12]. |
|
%j |
Day of the year as a decimal number [001,366]. |
|
%m |
Month as a decimal number [01,12]. |
|
%M |
Minute as a decimal number [00,59]. |
|
%p |
Locale’s equivalent of either AM or PM. |
(1) |
%S |
Second as a decimal number [00,61]. |
(2) |
%U |
Week number of the year (Sunday as the first day of the week) as a decimal number [00,53]. All days in a new year preceding the first Sunday are considered to be in week 0. |
(3) |
%w |
Weekday as a decimal number [0(Sunday),6]. |
|
%W |
Week number of the year (Monday as the first day of the week) as a decimal number [00,53]. All days in a new year preceding the first Monday are considered to be in week 0. |
(3) |
%x |
Locale’s appropriate date representation. |
|
%X |
Locale’s appropriate time representation. |
|
%y |
Year without century as a decimal number [00,99]. |
|
%Y |
Year with century as a decimal number. |
|
%z |
Time zone offset indicating a positive or negative time difference from UTC/GMT of the form +HHMM or -HHMM, where H represents decimal hour digits and M represents decimal minute digits [-23:59, +23:59]. |
|
%Z |
Time zone name (no characters if no time zone exists). |
|
%% |
A literal '%' character. |
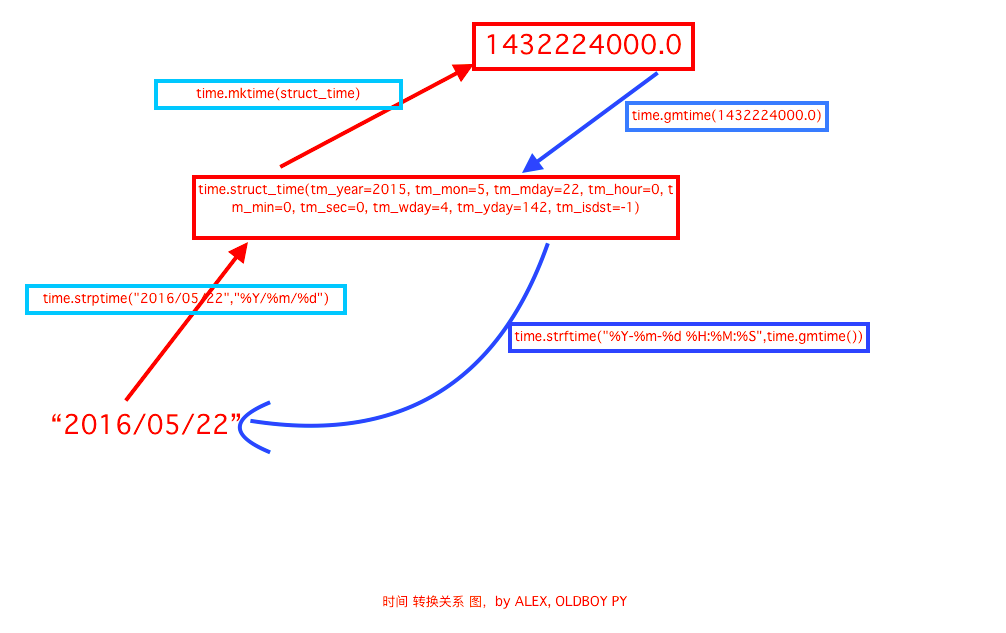
- 时间关系
![]()
random
就是一个生成随机数的
import random
print random.random() #获取一个小于1的浮点数
random.randint(1,10)#获取一个从1到10的整数
print random.uniform(0,2)#获取一个大于0小于2的浮点数
print random.randrange(1,10,4)#获取一个从1到10步长为4的随机数:
a=[1,2,3,4,5]
random.choice(a)#从列表a从随机取出一个元素
a=[1,2,3,4,5]
random.shuffle(a)#打乱列表a里元素的顺序
a=[1,2,3,4,5] #random.sample(a,3) #从指定序列中随机获取指定长度的片断
random.randint # random.randint(a, b),用于生成一个指定范围内的整数。其中参数a是下限,参数b是上限,生成的随机数n: a <= n <= b
random.randrange # random.randrange([start], stop[, step]),从指定范围内,按指定基数递增的集合中 获取一个随机数
-
例子: 随机生成验证码
def V_code(n=5):
import random
res=''
for i in range(n):
num = random.randrange(0,9)
alph= chr(random.randint(65,90))
choice=random.choice([num,alph])
res+=str(choice)
print (res)
V_code(6)
| 方法 | 说明 |
|---|
| os.mkdir |
创建目录 |
| os.rmdir |
删除目录 |
| os.rename |
重命名 |
| os.remove |
删除文件 |
| os.getcwd |
获取当前工作路径 |
| os.walk |
遍历目录 |
| os.path.join |
连接目录与文件名 |
| os.path.split |
分割文件名与目录 |
| os.path.abspath |
获取绝对路径 |
| os.path.dirname |
获取路径 |
| os.path.basename |
获取文件名或文件夹名 |
| os.path.splitext |
分离文件名与扩展名 |
| os.path.isfile |
判断给出的路径是否是一个文件 |
| os.path.isdir |
判断给出的路径是否是一个目录 |
| os.path.name |
给出你所 |
os.getcwd() 获取当前工作目录,即当前python脚本工作的目录路径
os.chdir("dirname") 改变当前脚本工作目录;相当于shell下cd
os.curdir 返回当前目录: ('.')
os.pardir 获取当前目录的父目录字符串名:('..')
os.makedirs('dirname1/dirname2') 可生成多层递归目录
os.removedirs('dirname1') 若目录为空,则删除,并递归到上一级目录,如若也为空,则删除,依此类推
os.mkdir('dirname') 生成单级目录;相当于shell中mkdir dirname
os.rmdir('dirname') 删除单级空目录,若目录不为空则无法删除,报错;相当于shell中rmdir dirname
os.listdir('dirname') 列出指定目录下的所有文件和子目录,包括隐藏文件,并以列表方式打印
os.remove() 删除一个文件
os.rename("oldname","newname") 重命名文件/目录
os.stat('path/filename') 获取文件/目录信息
os.sep 输出操作系统特定的路径分隔符,win下为"\\",Linux下为"/"
os.linesep 输出当前平台使用的行终止符,win下为"\t\n",Linux下为"\n"
os.pathsep 输出用于分割文件路径的字符串
os.name 输出字符串指示当前使用平台。win->'nt'; Linux->'posix'
os.system("bash command") 运行shell命令,直接显示
os.environ 获取系统环境变量
os.path.abspath(path) 返回path规范化的绝对路径
os.path.split(path) 将path分割成目录和文件名二元组返回
os.path.dirname(path) 返回path的目录。其实就是os.path.split(path)的第一个元素
os.path.basename(path) 返回path最后的文件名。如何path以/或\结尾,那么就会返回空值。即os.path.split(path)的第二个元素
os.path.exists(path) 如果path存在,返回True;如果path不存在,返回False
os.path.isabs(path) 如果path是绝对路径,返回True
os.path.isfile(path) 如果path是一个存在的文件,返回True。否则返回False
os.path.isdir(path) 如果path是一个存在的目录,则返回True。否则返回False
os.path.join(path1[, path2[, ...]]) 将多个路径组合后返回,第一个绝对路径之前的参数将被忽略
os.path.getatime(path) 返回path所指向的文件或者目录的最后存取时间
os.path.getmtime(path) 返回path所指向的文件或者目录的最后修改时间
其他的点下这里试试
例子:
import sys
import time
for i in range(50):
sys.stdout.write('请等待:%s\r' %("#"*i)) #直接打印在终端
time.sleep(0.1)
结果:
C:\Users\18010>python C:\Users\18010\Desktop\模拟sql.py
#################################################
"""建议在终端执行,"""
-
shutil 模块
高级的 文件、文件夹、压缩包 处理模块
从源src复制到dst中去。当然前提是目标地址是具备可写权限。抛出的异常信息为IOException. 如果当前的dst已存在的话就会被覆盖掉。
import shutil
import tarfile
shutil.copyfileobj(open('a.txt','r'),open('test1.py','w')) #拷贝文件的内容,如果哟了的话就覆盖
shutil.copyfile('test1.py','test2.py') #拷贝文件,
shutil.make_archive("name",'gztar', root_dir=(r'G:\老男孩培训(课上使用)\day06\练习使用')) ##这个是压缩目录用的,gztar 代表归档并压缩
##在已有的压缩文件下新添加新的目录
# t=tarfile.open('name.tar.gz','r')
# t.extractall('bbb')
# t.close()
简单点认识,json 可以被很多很多语言可以识别的类型.而pickle只能是pyhton可以识别的
序列化:
#序列化的过程:dic---->res=json.dumps(dic)---->f.write(res)
import json
dic={
'name':'alex',
'age':9000,
'height':'150cm',
}
res = json.dumps(dic)
with (open'a.json','w') as f:
f.write(res)
#反序列化
#序列化的过程:dic---->res=json.dumps(dic)---->f.write(res)
with open('a.json','r') as r:
dic=json.loads(r.read())
print(dic['name'])
json的便捷操作
import json
dic={
'name':'alex',
'age':9900,
'height':'150cm',
}
json.dump(dic,open('b.json','w'))
pickle 操作也差不多,但是他序列化完之后是byets类型
也就是说,pickle序列化之后,只能被python所识别
pickle.dumps() #以二进制的方式写文件
写的时候要用 wb写
读时候用rb
import pickle
>>> dic={'name':'alex','age':13}
>>> import pickle
>>> print(pickle.dumps(dic))
b'\x80\x03}q\x00(X\x04\x00\x00\x00nameq\x01X\x04\x00\x00\x00alexq\x02X\x03\x00\x00\x00ageq\x03K\ru.'
#序列化
# with open('a.pkl','wb') as f:
# f.write(pickle.dumps(dic))
#反序列化
# with open('a.pkl','rb') as f:
# d=pickle.loads(f.read())
# print(d,type(d))
简便操作
# dic={'name':'alex','age':13}
# pickle.dump(dic,open('b.pkl','wb'))
# res=pickle.load(open('b.pkl','rb'))
# print(res,type(res))
-
hashlib
#3.x里代替了md5模块和sha模块,主要提供 SHA1, SHA224, SHA256, SHA384, SHA512 ,MD5 算法
import hashlib
m = hashlib.md5()
m.update('hello'.encode('utf-8'))
m.update('world'.encode('utf-8'))
print(m.hexdigest())
如果一个文件很大的话,可以一行一行的来进行计算,最后的到的值,和整个文件的值一样.
import hashlib
m=hashlib.md5()
with open('a.txt','r',encoding='utf-8') as f:
for i in f.read:
m.update(m)
print(m.hexdigest())
加盐
import hashlib
m=hashlib.md5('yihangbailushangqingtian'.encode('utf-8'))
m.update('alex3714'.encode('utf-8'))
print(m.hexdigest())
还有hmac 和sha256 用法和MD5一样,不在解释
-
subporcess
ubprocess最简单的用法就是调用shell命令了,另外也可以调用程序,并且可以通过stdout,stdin和stderr进行交互
subprocess的主类
subprocess.Popen(
args,
bufsize=0,
executable=None,
stdin=None,
stdout=None,
stderr=None,
preexec_fn=None,
close_fds=False,
shell=False,
cwd=None,
env=None,
universal_newlines=False,
startupinfo=None,
creationflags=0)
args: 可以是字符串或者序列类型(如:list,元组),用于指定进程的可执行文件及其参数。如果是序列类型,第一个元素通常是可执行文件的路径。我们也可以显式的使用executeable参数来指定可执行文件的路径。
bufsize:指定缓冲。0 无缓冲,1 行缓冲,其他 缓冲区大小,负值 系统缓冲(全缓冲)
stdin, stdout, stderr分别表示程序的标准输入、输出、错误句柄。他们可以是PIPE,文件描述符或文件对象,也可以设置为None,表示从父进程继承。
preexec_fn只在Unix平台下有效,用于指定一个可执行对象(callable object),它将在子进程运行之前被调用。
Close_sfs:在windows平台下,如果close_
fds被设置为True,则新创建的子进程将不会继承父进程的输入、输出、错误管道。我们不能将close_fds设置为True同时重定向子进程的标准输入、输出与错误(stdin, stdout, stderr)。
shell设为true,程序将通过shell来执行。
cwd用于设置子进程的当前目录
env是字典类型,用于指定子进程的环境变量。如果env = None,子进程的环境变量将从父进程中继承。
Universal_newlines:不同操作系统下,文本的换行符是不一样的。如:windows下用'/r/n'表示换,而Linux下用'/n'。如果将此参数设置为True,Python统一把这些换行符当作'/n'来处理。startupinfo与createionflags只在windows下用效,它们将被传递给底层的CreateProcess()函数,用于设置子进程的一些属性,如:主窗口的外观,进程的优先级等等。
startupinfo与createionflags只在windows下有效,它们将被传递给底层的CreateProcess()函数,用于设置子进程的一些属性,如:主窗口的外观,进程的优先级等等。
Popen方法
Popen.poll():用于检查子进程是否已经结束。设置并返回returncode属性。
Popen.wait():等待子进程结束。设置并返回returncode属性。
Popen.communicate(input=None):与子进程进行交互。向stdin发送数据,或从stdout和stderr中读取数据。可选参数input指定发送到子进程的参数。Communicate()返回一个元组:(stdoutdata, stderrdata)。注意:如果希望通过进程的stdin向其发送数据,在创建Popen对象的时候,参数stdin必须被设置为PIPE。同样,如果希望从stdout和stderr获取数据,必须将stdout和stderr设置为PIPE。
Popen.send_signal(signal):向子进程发送信号。
Popen.terminate():停止(stop)子进程。在windows平台下,该方法将调用Windows API TerminateProcess()来结束子进程。
Popen.kill():杀死子进程。
Popen.stdin:如果在创建Popen对象是,参数stdin被设置为PIPE,Popen.stdin将返回一个文件对象用于策子进程发送指令。否则返回None。
Popen.stdout:如果在创建Popen对象是,参数stdout被设置为PIPE,Popen.stdout将返回一个文件对象用于策子进程发送指令。否则返回None。
Popen.stderr:如果在创建Popen对象是,参数stdout被设置为PIPE,Popen.stdout将返回一个文件对象用于策子进程发送指令。否则返回None。
Popen.pid:获取子进程的进程ID。
Popen.returncode:获取进程的返回值。如果进程还没有结束,返回None。
subprocess.call(*popenargs, **kwargs):运行命令。该函数将一直等待到子进程运行结束,并返回进程的returncode。文章一开始的例子就演示了call函数。如果子进程不需要进行交互,就可以使用该函数来创建。
subprocess.check_call(*popenargs, **kwargs):与subprocess.call(*popenargs, **kwargs)功能一样,只是如果子进程返回的returncode不为0的话,将触发CalledProcessError异常。在异常对象中,包括进程的returncode信息。
以上全是抄的
例子
import subprocess
# res = subprocess.Popen('dir',shell=True,stdout=subprocess.PIPE)
# print(res)
# print(res.stdout.read().decode('gbk')) #这个编码与你的系统有关,安装你的系统来
#
#模拟ls | grep 的功能
res1=subprocess.Popen(r'dir G:\课上使用\day06\练习使用',shell=True,stdout=subprocess.PIPE) ##这行过滤出来
res=subprocess.Popen(r'findstr txt*',shell=True,
stdin=res1.stdout,
stderr=subprocess.PIPE,
stdout=subprocess.PIPE)#这行来获取过滤的是txt的文件
print(res.stdout.read().decode('gbk'))
log模块是个很有用的东西.
很多程序都有记录日志的需求,并且日志中包含的信息即有正常的程序访问日志,还可能有错误、警告等信息输出,python的logging模块提供了标准的日志接口,你可以通过它存储各种格式的日志,logging的日志可以分为 debug(), info(), warning(), error() and critical() 5个级别,
#写入文件,但是会有个问题,比如我这个是windows平台的,默认是gbk编码,打开的话必须按照gbk来修改.没有办法按照utf-8来看.
#这个只是简单来定义,
# logging.basicConfig(filename='access.log',
# format='%(asctime)s - %(name)s - %(levelname)s -%(module)s: %(message)s',
# datefmt='%Y-%m-%d %H:%M:%S %p',
# level=40,
# )
#
# logging.debug('这个是debug的信息'.encode('utf-8'))
# logging.info('这个是info'.encode('utf-8'))
# logging.warning('这个是warning'.encode('utf-8'))
# logging.error('这个是error'.encode('utf-8'))
# logging.critical('这个hi是critical'.encode('utf-8'))
# logging.critical('这个hi是critical'.encode('utf-8'))
#可以用utf-8来查看的(毕竟这个编码广泛)
import logging
# 获取logger实例,如果参数为空则返回root logger
logger = logging.getLogger()
# 指定logger输出格式,
formatter = logging.Formatter('%(asctime)s %(levelname)-8s: %(message)s') #里面的变量底下会有说明
# 文件日志
file_handler = logging.FileHandler("test.log",encoding='utf-8') #在这里面指定编码
file_handler.setFormatter(formatter) # 用setFormatter指定输出格式
# 为logger添加的日志处理器
logger.addHandler(file_handler)
# 指定日志的最低输出级别,默认为WARN级别 ,若是指定了级别,则比他高的级别的报警就会写入文件
logger.setLevel(logging.INFO)
# 输出不同级别的log
logger.debug('这个是 debug info')
logger.info('这个是 information')
logger.warn('这个是 warning message')
logger.error('这个是 error message')
logger.fatal('这个是 fatal message, it is same as logger.critical')
logger.critical('这个是 critical message')
结果:
#################
2017-06-06 19:47:28,020 INFO : 这个是 information
2017-06-06 19:47:28,020 WARNING : 这个是 warning message
2017-06-06 19:47:28,020 ERROR : 这个是 error message
2017-06-06 19:47:28,020 CRITICAL: 这个是 fatal message, it is same as logger.critical
2017-06-06 19:47:28,020 CRITICAL: 这个是 critical message
#################
-
Formatter
这个是在指定日志格式的时候的变量 %(name)s Logger的名字 %(levelno)s 数字形式的日志级别 %(levelname)s 文本形式的日志级别 %(pathname)s 调用日志输出函数的模块的完整路径名,可能没有 %(filename)s 调用日志输出函数的模块的文件名 %(module)s 调用日志输出函数的模块名| %(funcName)s 调用日志输出函数的函数名| %(lineno)d 调用日志输出函数的语句所在的代码行 %(created)f 当前时间,用UNIX标准的表示时间的浮点数表示| %(relativeCreated)d 输出日志信息时的,自Logger创建以来的毫秒数| %(asctime)s 字符串形式的当前时间。默认格式是“2017-06-06 16:49:45,896”。逗号后面的是毫秒 %(thread)d 线程ID。可能没有 %(threadName)s 线程名。可能没有 %(process)d 进程ID。可能没有 %(message)s 用户输出的消息
-
Logging有如下级别: DEBUG,INFO,WARNING,ERROR,CRITICAL
默认级别是WARNING,logging模块只会输出指定level以上的log。
-
Handler 日志处理器
最常用的是StreamHandler和FileHandler, Handler用于向不同的输出端打log。 Logging包含很多handler, 可能用到的有下面几种
StreamHandler instances send error messages to streams (file-like objects). FileHandler instances send error messages to disk files. RotatingFileHandler instances send error messages to disk files, with support for maximum log file sizes and log file rotation. TimedRotatingFileHandler instances send error messages to disk files, rotating the log file at certain timed intervals. SocketHandler instances send error messages to TCP/IP sockets. DatagramHandler instances send error messages to UDP sockets. SMTPHandler instances send error messages to a designated email address.
如果你希望通过配置文件来管理logging,可以参考这个具体可以配置的项目请查阅官方文档。在log4net或者log4j中这是很常见的方式。
# logging.conf
[loggers]
keys=root
[logger_root]
level=DEBUG
handlers=consoleHandler
#,timedRotateFileHandler,errorTimedRotateFileHandler
#################################################
[handlers]
keys=consoleHandler,timedRotateFileHandler,errorTimedRotateFileHandler
[handler_consoleHandler]
class=StreamHandler
level=DEBUG
formatter=simpleFormatter
args=(sys.stdout,)
[handler_timedRotateFileHandler]
class=handlers.TimedRotatingFileHandler
level=DEBUG
formatter=simpleFormatter
args=('debug.log', 'H')
[handler_errorTimedRotateFileHandler]
class=handlers.TimedRotatingFileHandler
level=WARN
formatter=simpleFormatter
args=('error.log', 'H')
#################################################
[formatters]
keys=simpleFormatter, multiLineFormatter
[formatter_simpleFormatter]
format= %(levelname)s %(threadName)s %(asctime)s: %(message)s
datefmt=%H:%M:%S
[formatter_multiLineFormatter]
format= ------------------------- %(levelname)s -------------------------
Time: %(asctime)s
Thread: %(threadName)s
File: %(filename)s(line %(lineno)d)
Message:
%(message)s
datefmt=%Y-%m-%d %H:%M:%S
#以后你就可以这么使用了.当然也可以写个函数
import os
filepath = os.path.join(os.path.dirname(__file__), 'logging.conf')
logging.config.fileConfig(filepath)
return logging.getLogger()
-
configparser
使用ConfigParser模块读写ini文件 ConfigParserPython的ConfigParser Module中定义了3个类对INI文件进行操作。分别是RawConfigParser、ConfigParser、SafeConfigParser。模块所解析的ini配置文件是由多个section构成,每个section名用中括号‘[]’包含,每个section下可有多个配置项类似于key-value形式,例如:
[Server]
SvrInfo = test
Version = 1.1
[Client]
Version = 1.0
以configparser 为例 其操作基本分为三类:1)初始化;2)读取配置;3)写入配置。
- ConfigParser 初始化 使用ConfigParser 首选需要初始化实例,并读取配置文件: cf = ConfigParser.ConfigParser() cf.read("配置文件名")
-
基本的读取配置文件 .read(filename) 直接读取ini文件内容 .sections() 得到所有的section,并以列表的形式返回 .options(section) 得到该section的所有option .items(section) 得到该section的所有键值对 .get(section,option) 得到section中option的值,返回为string类型 .getint(section,option) 得到section中option的值,返回为int类型,还有相应的getboolean()和getfloat() 函数。
-
基本的写入配置文件 .add_section(section) 添加一个新的section .set( section, option, value) 对section中的option进行设置,需要调用write将内容写入配置文件。 .write(strout) 将对configparser类的修改写入
例子:test.log内容如下
[sec_a]
a_key1 = 20
a_key2 = 10
[sec_b]
b_key1 = 121
b_key2 = b_value2
b_key3 = $r
b_key4 = 127.0.0.1
>>> import configparser
>>> cf=configparser.ConfigParser() #初始化
>>> cf.read(r'C:\Users\18010\Desktop\test.log') #读取配置
['C:\\Users\\18010\\Desktop\\test.log']
>>> secs=cf.sections() # 读取里面的章节
>>> secs
['sec_a', 'sec_b']
>>> opts=cf.options('sec_a') #读取里面指定section的所有option
>>> opts
['a_key1', 'a_key2']
>>> kvs=cf.items('sec_a') #读取指定章节里面的items
>>> kvs
[('a_key1', '20'), ('a_key2', '10')]
修改:
>>> cf.set('sec_b','b_key3','new_value') #修改章节里面的key的值
>>> cf.add_section('a_new_section') #添加一个章节
>>> cf.set('a_new_section','name','liukang')
>>> cf.write(open(r'C:\Users\18010\Desktop\test.log','w')) #最后写入文件
>>>
#添加[add]
#cf.add_section("addd")
#cf.write(open("ConfigParser.conf","w"))
if cf.has_section("addd"):
print("有了 [addd] 了!")
else :
print("没有 [addd] !!现在开始写入:")
cf.add_section("addd")
cf.set("addd","addd1","addd1的值")
cf.set("addd","addd2","addd2的值")
cf.write(open("ConfigParser.conf","w"))
print("[addd] 写入完成")
#删除一个option
#cf.remove_opetion("del","del2")
#cf.write(open("ConfigParser.conf","w"))
if cf.has_option("del","del2"):
print("有del2,现在开始删除:")
cf.remove_option("del","del2");
cf.write(open("ConfigParser.conf","w"))
print(" [del]下的 del2 已经被删除!")
else :
print(" [del]下没有 del2了")
#删除section[dele]
#cf.remove_section("dele")
#cf.write(open("ConfigParser.conf","w"))
if cf.has_section("dele"):
print("有 [dele] 了,开始删除:")
cf.remove_section("dele")
cf.write(open("ConfigParser.conf","w"))
print("删除 [dele] 成功")
else:
print("没有[dele],不需处理!")


 浙公网安备 33010602011771号