

13-1 udp和internet层协议 13-2IP地址组成和分类13-4 网卡配置文件和命令 13-5 网络理由和配置 13-6 网桥技术
一、查看当前机器广播的地址和mac
[root@centos8 ~]#arp -n  查看当前机器的广播地址
[root@centos8 ~]#tcpdump -i eth0 arp -nn 抓包
[root@centos8 ~]#ip a a 10.0.0.100/24 dev eth0 添加多网卡命令
[root@centos8 ~]#arping 10.0.0.100   查看IP有没有被占用
二、查看相关包有没有安装

[root@centos8 ~]#rpm -q net-tools
centos8 加载网卡启动命令
[root@centos8 ~]#nmcli connection reload
[root@centos8 ~]#nmcli connection
[root@centos8 ~]#nmcli connection up ethX
配置DNS生效,查看文件
[root@centos8 ~]#cat /etc/resolv.conf
修改网卡名 两步
[root@centos8 ~]#vim /etc/default/grub   在rhgb行最后面添加net.ifnames=0
[root@centos8 /etc/default]#grub2-mkconfig -o /boot/grub2/grub.cfg
[root@centos8 ~]#reboot 重启
网卡增加IP地址多个
[root@centos8 ~]#cat /etc/sysconfig/network-scripts/ifcfg-eth0:1
三、路由
tcpdump -i eth0 -nn icmp   抓包
测试环境liunx当作路由器,需要开启转发功能
sysctl -a |grep ip_forward   (net.ipv4.ip_forward = 0 写进文件改成1)
vim /etc/sysctl.conf   写道这个文件里面永久保存
添加路由
route add -net 172.18.0.0./24 gw 192.168.10.201 dey eth1
四、多网卡bangding
主备网卡切换
[root@centos8 ~]#nmcli connection add con-name mybond0 ifname bond0 type bond mode active-backup ipv4.method manual ipv4.addresses 10.0.0.100/24 启动配置bond0
[root@centos8 ~]#nmcli connection add type bond-slave ifname eth1 master bond0 把eth1口绑定到bond0
[root@centos8 ~]#nmcli connection add type bond-slave ifname eth0 master bond0  把eth0口绑定到bond0
[root@centos8 /etc/sysconfig/network-scripts]#nmcli connection up bond-slave-eth0启用网卡
[root@centos8 /etc/sysconfig/network-scripts]#nmcli connection up bond-slave-eth1 启用网卡
[root@centos8 ~]#cat /proc/net/bonding/bond0   查看那个网卡是主
team方式实现主备网卡 多网卡绑定
[root@centos8 ~]#nmcli connection add type team con-name myteam0 ifname team0 config '{"runner":{"name":"loadbalance"}}' ipv4.addresses 10.0.0.100/24 ipv4.method manual
[root@centos8 ~]#nmcli con add con-name team0-eth1 type team-slave ifname eth1 master team0
[root@centos8 ~]#nmcli con add con-name team0-eth0 type team-slave ifname eth0 master team0
[root@centos8 ~]#nmcli connection
[root@centos8 ~]#nmcli con up team0-eth1
[root@centos8 ~]#nmcli con up team0-eth0
[root@centos8 ~]#teamdctl team0 state  查看网卡工作状态
五、网桥
需要安装包 centos7以上没有
[root@centos8 ~]#yum -y install bridge-utils
[root@centos8 ~]#brctl addbr br0
[root@centos8 ~]#brctl show  查看是否有
[root@centos8 ~]#brctl addif br0 eth0
[root@centos8 ~]#brctl addif br0 eth1
[root@centos8 ~]#ip link br0 up
以上命令是临时生效
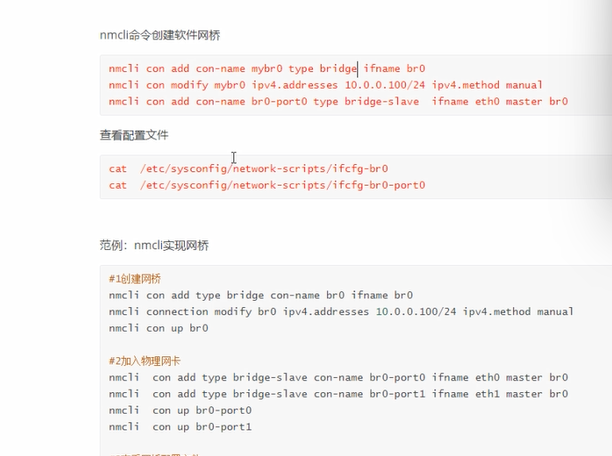 永久生效 需要写进配置中
六、黑客探索工具:nmap -sP -v 192.168.1.0/24 探索一个段IP地址


【推荐】国内首个AI IDE,深度理解中文开发场景,立即下载体验Trae
【推荐】编程新体验,更懂你的AI,立即体验豆包MarsCode编程助手
【推荐】抖音旗下AI助手豆包,你的智能百科全书,全免费不限次数
【推荐】轻量又高性能的 SSH 工具 IShell:AI 加持,快人一步
· 分享一个免费、快速、无限量使用的满血 DeepSeek R1 模型,支持深度思考和联网搜索!
· 基于 Docker 搭建 FRP 内网穿透开源项目(很简单哒)
· ollama系列1:轻松3步本地部署deepseek,普通电脑可用
· 按钮权限的设计及实现
· 25岁的心里话