linux系统中创建网络会话
网络回话:通俗讲是网络参数配置的清单,可以根据不同的使用环境切换网络参数配置。
以下实验使用一台虚拟机完成,PC1主机名:
1、查看网卡信息
[root@PC1 ~]# nmcli connection show
NAME         UUID                                  TYPE            DEVICE
eno16777728  d6f581bd-b571-43bf-bb9c-c37d935855ee  802-3-ethernet  eno16777728
2、查看当前网络的详细信息
[root@PC1 ~]# nmcli connection show eno16777728
connection.id:                          eno16777728
connection.uuid:                        d6f581bd-b571-43bf-bb9c-c37d935855ee
connection.interface-name:              --
connection.type:                        802-3-ethernet
connection.autoconnect:                 yes
connection.timestamp:                   1608343787
connection.read-only:                   no
connection.permissions:
connection.zone:                        --
connection.master:                      --
connection.slave-type:                  --
connection.secondaries:
connection.gateway-ping-timeout:        0
802-3-ethernet.port:                    --
802-3-ethernet.speed:                   0
802-3-ethernet.duplex:                  --
802-3-ethernet.auto-negotiate:          yes
802-3-ethernet.mac-address:             00:0C:29:66:37:F7
802-3-ethernet.cloned-mac-address:      --
802-3-ethernet.mac-address-blacklist:
802-3-ethernet.mtu:                     auto
802-3-ethernet.s390-subchannels:
802-3-ethernet.s390-nettype:            --
802-3-ethernet.s390-options:
ipv4.method:                            manual
ipv4.dns:
ipv4.dns-search:
ipv4.addresses:                         { ip = 192.168.10.10/24, gw = 0.0.0.0 }
ipv4.routes:
ipv4.ignore-auto-routes:                no
ipv4.ignore-auto-dns:                   no
ipv4.dhcp-client-id:                    --
ipv4.dhcp-send-hostname:                yes
ipv4.dhcp-hostname:                     --
ipv4.never-default:                     no
ipv4.may-fail:                          yes
ipv6.method:                            auto
ipv6.dns:
ipv6.dns-search:
ipv6.addresses:
ipv6.routes:
ipv6.ignore-auto-routes:                no
ipv6.ignore-auto-dns:                   no
ipv6.never-default:                     no
ipv6.may-fail:                          yes
ipv6.ip6-privacy:                       -1 (unknown)
ipv6.dhcp-hostname:                     --
GENERAL.NAME:                           eno16777728
GENERAL.UUID:                           d6f581bd-b571-43bf-bb9c-c37d935855ee
GENERAL.DEVICES:                        eno16777728
GENERAL.STATE:                          activated
GENERAL.DEFAULT:                        no
GENERAL.DEFAULT6:                       no
GENERAL.VPN:                            no
GENERAL.ZONE:                           --
GENERAL.DBUS-PATH:                      /org/freedesktop/NetworkManager/ActiveConnection/2
GENERAL.CON-PATH:                       /org/freedesktop/NetworkManager/Settings/0
GENERAL.SPEC-OBJECT:                    --
GENERAL.MASTER-PATH:                    --
IP4.ADDRESS[1]:                         ip = 192.168.10.10/24, gw = 0.0.0.0
IP6.ADDRESS[1]:                         ip = fe80::20c:29ff:fe66:37f7/64, gw = ::
3、分别创建公司和家庭应用场景的网络回话
[root@PC1 ~]# nmcli connection add con-name company ifname eno16777728 autoconnect no type ethernet ip4 192.168.10.111/24 gw4 192.168.10.1   ## 创建公司的网络会话,指定IP
Connection 'company' (fcfca9d7-a794-4e0c-b14c-6465de8e96c1) successfully added.
[root@PC1 ~]# nmcli connection add con-name house type ethernet ifname eno16777728    ##创建家庭网络会话,DHCP分配IP
Connection 'house' (be7d3869-bb1c-4938-ab69-84fc89dfd6be) successfully added.
4、查看设定的网络会话
[root@PC1 ~]# nmcli connection show
NAME         UUID                                  TYPE            DEVICE
house        be7d3869-bb1c-4938-ab69-84fc89dfd6be  802-3-ethernet  --
company      fcfca9d7-a794-4e0c-b14c-6465de8e96c1  802-3-ethernet  --
eno16777728  d6f581bd-b571-43bf-bb9c-c37d935855ee  802-3-ethernet  eno16777728
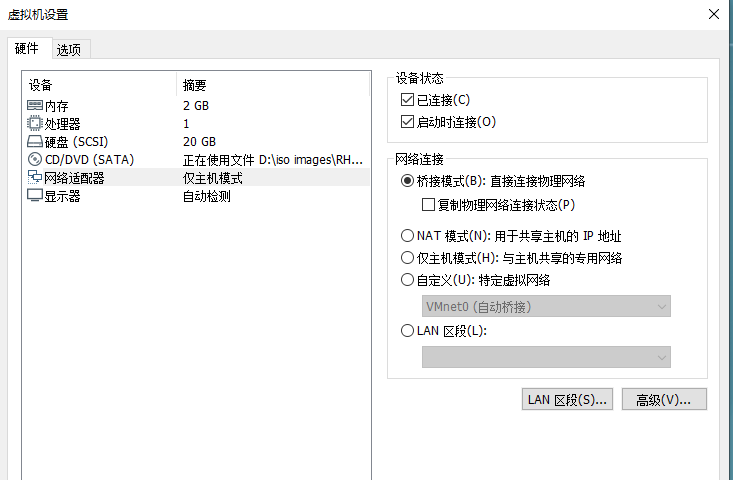
5、网络连接模式设置为桥接模式

6、 再次查看当前IP
[root@PC1 ~]# ifconfig |  head -n 5
eno16777728: flags=4163<UP,BROADCAST,RUNNING,MULTICAST>  mtu 1500
        inet 192.168.10.10  netmask 255.255.255.0  broadcast 192.168.10.255
        inet6 fe80::20c:29ff:fe66:37f7  prefixlen 64  scopeid 0x20<link>
        ether 00:0c:29:66:37:f7  txqueuelen 1000  (Ethernet)
        RX packets 150  bytes 22145 (21.6 KiB)
7、切换至家庭网络会话,并检查IP
[root@PC1 ~]# nmcli connection up house   ## 切换网络会话
Connection successfully activated (D-Bus active path: /org/freedesktop/NetworkManager/ActiveConnection/3)
[root@PC1 ~]# ifconfig | head -n 5    ## 查看IP(DHCP自动分配)
eno16777728: flags=4163<UP,BROADCAST,RUNNING,MULTICAST>  mtu 1500
        inet 192.168.3.19  netmask 255.255.255.0  broadcast 192.168.3.255
        inet6 fe80::20c:29ff:fe66:37f7  prefixlen 64  scopeid 0x20<link>
        ether 00:0c:29:66:37:f7  txqueuelen 1000  (Ethernet)
        RX packets 174  bytes 25168 (24.5 KiB)
8、切换至公司网络会话,并查看IP
[root@PC1 ~]# nmcli connection up company  ## 切换
Connection successfully activated (D-Bus active path: /org/freedesktop/NetworkManager/ActiveConnection/4)
[root@PC1 ~]# ifconfig | head -n 5  ## 查看IP
eno16777728: flags=4163<UP,BROADCAST,RUNNING,MULTICAST>  mtu 1500
        inet 192.168.10.111  netmask 255.255.255.0  broadcast 192.168.10.255
        inet6 fe80::20c:29ff:fe66:37f7  prefixlen 64  scopeid 0x20<link>
        ether 00:0c:29:66:37:f7  txqueuelen 1000  (Ethernet)
        RX packets 196  bytes 26698 (26.0 KiB)
以上实验实现了创建两个不同的网络会话,并进行了切换验证。


【推荐】国内首个AI IDE,深度理解中文开发场景,立即下载体验Trae
【推荐】编程新体验,更懂你的AI,立即体验豆包MarsCode编程助手
【推荐】抖音旗下AI助手豆包,你的智能百科全书,全免费不限次数
【推荐】轻量又高性能的 SSH 工具 IShell:AI 加持,快人一步
· 基于Microsoft.Extensions.AI核心库实现RAG应用
· Linux系列:如何用heaptrack跟踪.NET程序的非托管内存泄露
· 开发者必知的日志记录最佳实践
· SQL Server 2025 AI相关能力初探
· Linux系列:如何用 C#调用 C方法造成内存泄露
· 震惊!C++程序真的从main开始吗?99%的程序员都答错了
· 【硬核科普】Trae如何「偷看」你的代码?零基础破解AI编程运行原理
· 单元测试从入门到精通
· 上周热点回顾(3.3-3.9)
· winform 绘制太阳,地球,月球 运作规律