22-Spring-2(IOC+AOP)
1. 基于 XML 的自动装配#
- 手动赋值:通过 property 子标签
- 自动赋值(自动装配):通过 autowire 属性,只对自定义类型有效
="default|no"默认不开启,开启后若找不到则装配 null="byName"以属性名作为 id 去容器中找到一个组件给他赋值,car = ioc.getBean("car")="byType"以属性类型作为查找依据去容器中找组件,car = ioc.getBean(Car.class)="constructor"按照构造器赋值- 先按照有参构造器参数的类型进行匹配,匹配成功就装配该 bean,没有就直接装配 null
- 如果按照类型找到多个,再按照参数名作为 id 继续匹配,找到就装配,找不到就装配 null
<bean id="person" class="cn.edu.nuist.bean.Person" autowire="byType"></bean>
<!-- 属性类型如果是 List<Book>,则容器会把所有的 Book 封装成 List,赋值给该属性 -->
<bean id="book1" class="cn.edu.nuist.bean.Book">
    <property name="bookName" value="Call me by your name"></property>
</bean>

<bean id="book2" class="cn.edu.nuist.bean.Book">
    <property name="bookName" value="What does fox say"></property>
</bean>
2. SpEL#
SpEL(Spring Expression Language,Spring 表达式语言)支持运行时查询并可以操作对象图。和 JSP 页面上的 EL 表达式、Struts2 中用到的 OGNL 表达式一样,SpringEL 提供了一种强大的表达式语言,用于在 Spring 框架中配置文件、注解、XML 配置等地方实现动态的属性引用、条件判断、集合处理等功能。它的语法简洁而功能丰富,能够大大增强 Spring 应用的灵活性和可扩展性。
使用 #{…} 作为定界符,所有在大框号中的字符都将被认为是 SpEL 表达式。
- 字面量
- 字符串:
'Hello World',"Spring" - 数字:
100,3.14 - 布尔值:
true,false - null 值:
null
- 字符串:
- 变量引用
- 引用 Spring Bean 属性:
#{beanName.property} - 引用方法调用的返回值:
#{beanName.method()}
- 引用 Spring Bean 属性:
- 运算符
- 算术运算符:
+,-,*,/,% - 关系运算符:
==,!=,<,>,<=,>= - 逻辑运算符:
and,or,not
- 算术运算符:
- 条件运算符
- 三元条件运算符:
condition ? trueValue : falseValue
- 三元条件运算符:
- 类型运算符
- 类型转换:
#{(int) value}
- 类型转换:
- 集合处理
- 集合选择器:
#{list.![property]}- 从集合中选择某个属性形成新的集合 - 集合投影:
#{list.?[filter]}- 根据条件过滤集合元素
- 集合选择器:
- 字符串操作
- 字符串连接:
#{'Hello' + ' ' + 'World'}
- 字符串连接:
- 方法调用
- 调用 bean 方法:
#{beanName.methodName()}
- 调用 bean 方法:
- 条件表达式
- 条件判断:
#{condition ? trueValue : falseValue}
- 条件判断:
- 特殊变量
#this:当前对象#root:Root 对象,例如在方法调用时表示当前调用的方法参数
- SpEL 内置对象
systemProperties:系统属性对象systemEnvironment:系统环境对象#p0,#p1, ...:方法参数索引
示例1:
@Value("#{systemProperties['java.home']}")
private String javaHome;

@Value("#{T(java.lang.Math).PI * 2}")
private double twoPi;

@Value("#{order.totalPrice > 100 ? 'High value' : 'Low value'}")
private String orderValue;

@Value("#{user.firstName} #{user.lastName}")
private String fullName;

@Value("#{items.?[price > 50]}")
private List<Item> expensiveItems;

@Value("#{users.![firstName]}")
private List<String> userNames;

@Value("#{systemProperties['user.dir']}")
private String userDir;
示例2:
/**
 * # 号后面的内容可以被具体值替换
 */
@Slf4j
public class SpringELDemo {
    public static void main(String[] args) {
        String var = "#userid";

        SpelExpressionParser spelExpressionParser = new SpelExpressionParser();
        Expression expression = spelExpressionParser.parseExpression(var);

        EvaluationContext context = new StandardEvaluationContext();
        context.setVariable("userid", "1101");

        String s = expression.getValue(context).toString();

        System.out.println(s);

    }
}
3. 注解配置 bean#
相对于 XML 方式而言,通过注解的方式配置 bean 更加简洁和优雅,而且和 MVC 组件化开发的理念十分契合,是开发中常用的使用方式。
3.1 使用注解标识组件#
- 普通组件:@Component,标识一个受 Spring IOC 容器管理的组件
- 持久化层组件:@Respository,标识一个受 Spring IOC 容器管理的持久化层组件
- 业务逻辑层组件:@Service,标识一个受 Spring IOC 容器管理的业务逻辑层组件
- 表述层控制器组件:@Controller,标识一个受 Spring IOC 容器管理的表述层控制器组件
- 使用注解加入到容器中的组件和使用配置加入到容器中的组件默认行为一样的。
- 使用组件的简单类名首字母小写后得到的字符串作为 bean 的 id
- 组件的作用域,默认都是单例的
- 如何修改默认行为
- 通过组件注解的 value 属性指定 bean 的 id:
@Repository("bookdao") - 在组件注解上再增添一个注解
@Scope(value = "prototype")以修改组件作用域
- 通过组件注解的 value 属性指定 bean 的 id:
【注意】事实上 Spring 并没有能力识别一个组件到底是不是它所标记的类型,即使将 @Respository 注解用在一个表述层控制器组件上面也不会产生任何错误,所以 @Respository、@Service、@Controller 这几个注解仅仅是为了让开发人员自己明确当前的组件扮演的角色。
3.2 扫描注解#
组件被上述注解标识后还需要通过 Spring 进行扫描才能够侦测到。使用注解将组件快速加入到 IOC 容器中需要如下几步:
- 给要添加的组件上述 4 个注解的任何一个
- 告诉 Spring 自动扫描加了注解的组件
<!-- 1) 依赖 context 名称空间的 context: component-scan 自动扫描组件 2) base-package 属性指定一个需要扫描的基类包,Spring 容器将会扫描这个基类包及其子包中的所有类 3) 当需要扫描多个包时可以使用逗号分隔 4) 如果仅希望扫描特定的类而非基包下的所有类,使用 exclude 和 include --> <context:component-scan base-package="cn.edu.nuist"></context:component-scan> - 导入 aop.jar → 支持注解模式
扫描的时候可以按照指定 包含|排除 规则:
type="annotation" 按照注解进行排除,expression 属性指定注解的全类名
type="assignable" 按照类排除,expression 属性指定要排除的某个具体的类的全类名
type="aspectj" aspectj 表达式(用不到)
type="custom" 自定义一个 TypeFilter 实现类决定(用不到)
type="regex" 正则表达式(用不到)
<context:exclude-filter>子节点表示要排除在外的目标类<context:include-filter>子节点表示要包含的目标类。通常需要与use-default-filters属性配合使用才能够达到“仅包含某些组件”这样的效果。即:通过将use-default-filters属性设置为 false,禁用默认过滤器,然后扫描的就只是 include-filter 中的规则指定的组件了。<component-scan>下可以拥有若干个 include-filter 和 exclude-filter 子节点
3.3 组件自动装配#
3.3.1 需求#
Controller 组件中往往需要用到 Service 组件的实例,Service 组件中往往需要用到 Repository 组件的实例。Spring 可以通过注解的方式帮我们实现属性的装配。
3.3.2 实现依据#
在指定要扫描的包时,<context:component-scan> 元素会自动注册一个 bean 的后置处理器:AutowiredAnnotationBeanPostProcessor 的实例。该后置处理器可以自动装配标记了 @Autowired、@Resource 或 @Inject 注解的属性。
3.3.3 @Autowired#
- 构造器、普通字段(即使是 !public)、一切具有参数的方法都可以应用
@Autowired注解。@Target({ElementType.CONSTRUCTOR, ElementType.FIELD, ElementType.METHOD, ElementType.ANNOTATION_TYPE}) @Retention(RetentionPolicy.RUNTIME) @Documented public @interface Autowired { boolean required() default true; } - 首先会根据类型去容器找对应的组件,实现自动装配。若就找到 1 个,直接装配上。
@Autowired private BookService bookService; - 当 Spring 找不到匹配的 bean 装配属性时,会抛出异常
- 默认情况下,所有使用
@Autowired注解的属性都需要被设置。 - 若某一属性允许不被设置,可以设置
@Autowired注解的 required 属性为 false,如此一来,若找不到就直接装配 null。
- 默认情况下,所有使用
- 当 IOC 容器里存在多个类型兼容的 bean 时(BookService、BookServiceExt)
- 默认情况下,Spring 会尝试匹配 bean 的 id 值是否与变量名相同,如果相同则进行装配。
- 如果 bean 的 id 值不相同,通过类型的自动装配将无法工作。此时可以在
@Qualifier注解里提供 bean 的名称,而不是使用默认的变量名作为 id 查找。 - Spring 甚至允许在方法的形参上标注
@Qualifiter注解以指定注入 bean 的名称。@Autowired // 这个方法也会在 bean 创建的时候自动运行;方法上的每一个参数都会被自动注入值 public void func(BookDao bookDao, @Qualifier("bookServiceExt")BookService bookService) { System.out.println("func() 运行..." + bookDao + bookService); }
@Autowired、@Resource、@Inject 都是自动装配的意思
- @Autowired 是 Spring 的注解(离开 Spring 就没法用了)
- @Resource 是 Java 的标准;扩展性更强,如果切换成另一个容器框架,依旧可以被使用
- @Inject 是 EJB 环境下用的
4. Spring 单元测试#
使用 Spring 单元测试的步骤:
- 导包:spring-test-4.0.0.RELEASE.jar
- 使用
@ContextConfiguration来指定 Spring 配置文件的位置 @RunWith指定用哪种驱动进行单元测试- 默认就是
Junit @RunWith(SpringJUnit4ClassRunner.class)使用 Spring 的单元测试模块来执行标记了@Test注解的测试方法。以前 @Test 注解只由 Junit 执行
- 默认就是
@RunWith(SpringJUnit4ClassRunner.class)
@ContextConfiguration(locations="classpath:applicationcontext.xml")
public class SpringTest {

    @Autowired
    BookServlet bookServlet;
    @Autowired
    BookService bookService;
    @Autowired
    BookDao bookDao;

    @Test
    public void test() {
        System.out.println(bookServlet);
        System.out.println(bookService);
        System.out.println(bookDao);
    }
}
好处:不用 ioc.getBean() 获取组件了,在 Spring 单元测试中 @Autowired 即可,由 Spring 为我们自动装配。
5. 泛型依赖注入#
5.1 测试代码&效果#
- Dao
- BaseDao
// 定义基本的 CRUD 方法 public abstract class BaseDao<T> { public abstract void save(); } - UserDao
@Repository public class UserDao extends BaseDao<User> { @Override public void save() { System.out.println("userDao 保存用户"); } } - BookDao
@Repository
public class BookDao extends BaseDao<Book> {
    @Override
    public void save() {
        System.out.println("bookDao 保存图书");
    }
}
- BaseDao
- Service
- BaseService // 有继承关系,不用加组件注解也能对该字段注入。
public class BaseService<T> { @Autowired private BaseDao<T> baseDao; public void save() { System.out.println("自动注入的dao: " + baseDao); baseDao.save(); } } - BookService
@Service public class BookService extends BaseService<Book> {} - UserService
@Service
public class UserService extends BaseService<User> {}
- BaseService // 有继承关系,不用加组件注解也能对该字段注入。
- 测试
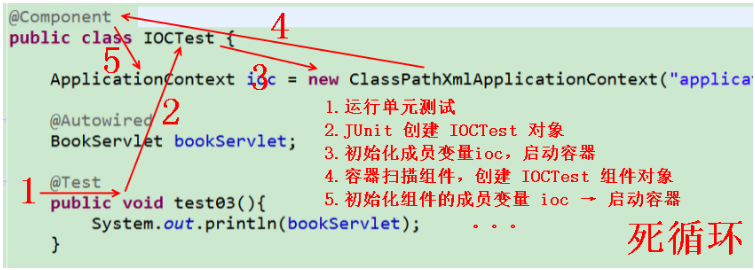
- 代码
public class IOCTest { ApplicationContext ioc = new ClassPathXmlApplicationContext("classpath:applicationContext.xml"); @Test public void test() { BookService bookService = ioc.getBean(BookService.class); UserService userService = ioc.getBean(UserService.class); bookService.save(); userService.save(); } } - 打印结果

- 代码
5.2 原理#
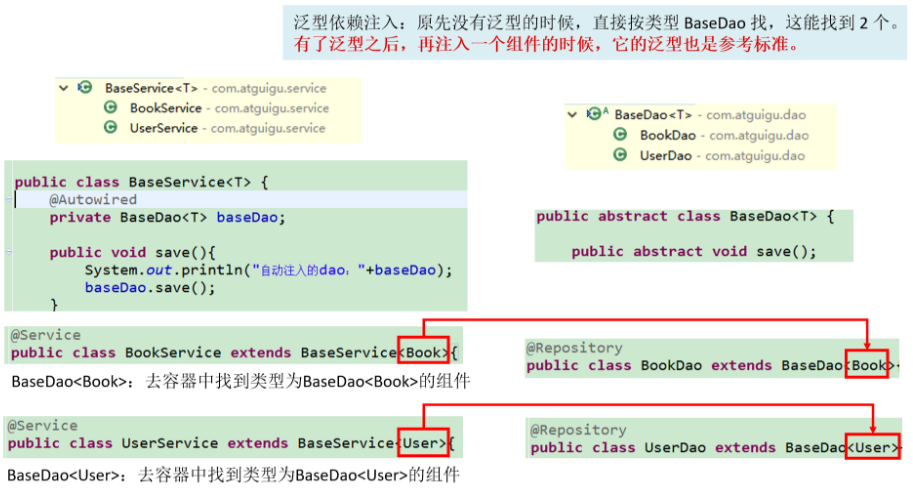
Spring 中可以使用 [带泛型的父类类型] 来确定子类的类型:
// cn.edu.nuist.service.BaseService<cn.edu.nuist.bean.Book>
System.out.println(bookService.getClass().getGenericSuperclass());
6. IOC 小结#
IOC 是个容器,帮我们管理所有的组件。依赖注入功能直接通过给组件增加 @Autowired 注解自动赋值实现。某个组件要使用 Spring 提供的更多功能(IOC,AOP ...),必须加入到容器中。
- 容器启动,创建所有单实例的 bean
- Autowired 自动装配的时候,是从容器中找符合要求的 bean
ioc.getBean("bookServlet")也是从容器中找这个 bean- 容器中包括了所有的 bean
- 调试 Spring 的源码,容器到底是什么?其实就是一个 Map
- 这个 Map 中保存所有创建好的 bean,并提供外界获取功能。
- 单实例的 bean 都保存到哪个 Map 中了 → 看源码
源码调试思路:
- 给 HelloWorld 每一个关键步骤打上断点,step into 进去
- 放行这个方法,看控制台,看 dubug 的每一个变量的变化
- 看方法注释,包括方法名
7. AOP#
Aspect Oriented Programming 面向切面编程。基于 OOP 基础之上的新的编程思想。指在程序运行期间,将某段代码(日志)动态的切入(不把日志代码写死在业务逻辑方法中)到指定方法(加减乘除)的指定位置(方法开始、结束、异常处)进行运行的一种编程方式。
使用场景:
- AOP 加日志保存到 DB
- AOP 做权限验证(安全检查)
- AOP 做安全检查
- AOP 做事务控制
7.1 AOP 专业术语#

类比数据库查询操作:连接点 <=> 表中的所有记录、切入点 <=> 想要查询到的记录、切入点表达式 <=> SQL
7.2 使用步骤#
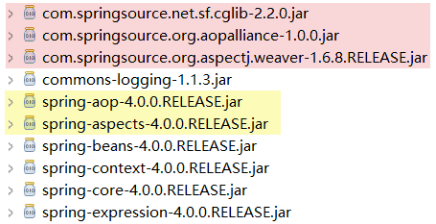
- 导包
- 写配置
- 将目标类和切面类(封装了通知方法)加入到 IOC 容器中
- 告诉 Spring 哪个是切面 → 给切面类加
@Aspect - 告诉 Spring 切面类里的每一个方法都是何时何地运行
- 配置
<aop:aspectj-autoproxy>。当 IOC 容器侦测到 bean 配置文件中的该元素时,会自动为与 AspectJ 切面匹配的 bean 创建代理
7.3 用 @AspectJ 声明切面#
- 要在 Spring 中声明 AspectJ 切面,只需要在 IOC 容器中将切面声明为 bean 实例。
- 当在 IOC 容器中初始化 AspectJ 切面之后,IOC 容器就会为那些与 AspectJ 切面相匹配的 bean 创建代理。
- 在 AspectJ 注解中,切面只是一个带有
@Aspect注解的 Java 类,它往往要包含很多通知(通知是标注有某种注解的简单的 Java 方法)。 - AspectJ 支持 5 种类型的通知注解
try{ @Before method.invoke(obj, args); @AfterReturning } catch(e) { @AfterThrowing } finally { @After }- @Before:前置通知,在方法执行之前执行
- @After:后置通知,在方法执行之后执行
- @AfterReturning:返回通知,在方法返回结果之后执行
- @AfterThrowing:异常通知,在方法抛出异常之后执行
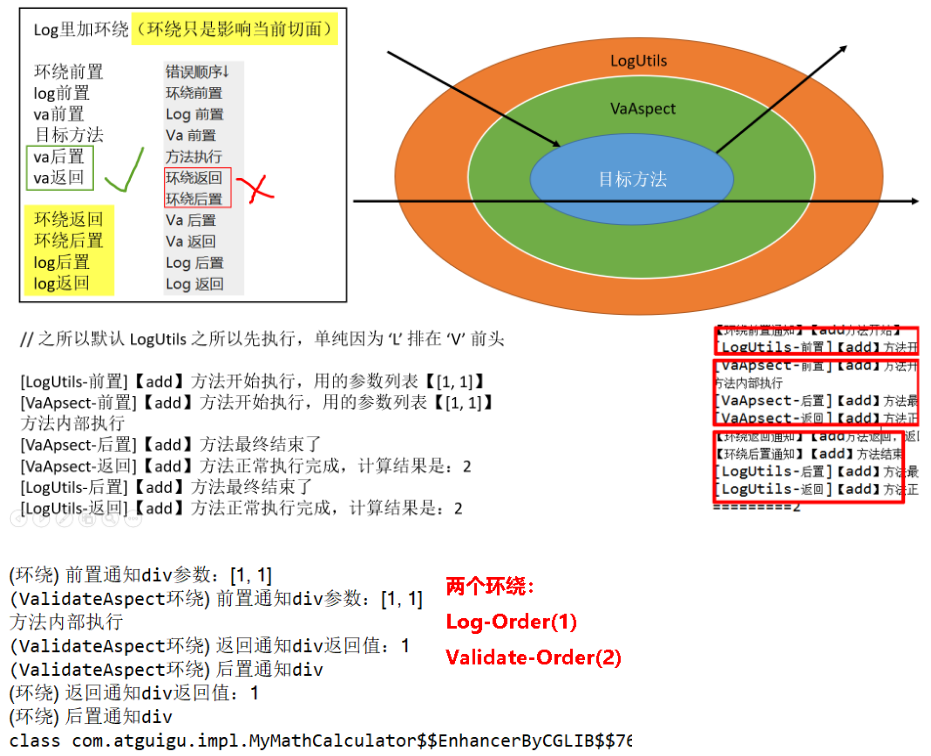
- @Around:环绕通知,围绕着方法执行
- 通知方法的执行顺序
- 正常执行:@Before(前置通知) → @After(后置通知) → @AfterReturning(正常返回)
- 异常执行:@Before(前置通知) → @After(后置通知) → @AfterThrowing(方法异常)
7.4 切入点表达式#
- 固定格式:
execution([访问权限符] 返回值类型 方法全类名(参数表)) - 通配符
*- 匹配一个或者多个字符,如
execution(public int com.atguigu.impl.MyMath*r.*(int, int)) - 匹配一个任意参数,如
execution(public int com.atguigu.impl.MyMath*.*(int, *))第一个是 int 类型,第二个参数任意类型 - 只能匹配一层路径,如
com.atguigu.*.MyMath - 权限位置
*不能用;public 是可选的
- 匹配一个或者多个字符,如
- 通配符
..- 匹配任意多个参数,任意类型参数
- 匹配任意多层路径,如
execution(public int com.atguigu..MyMath*.*(..));
- 记住 2 种
- 最精确的:
execution(public int com.atguigu.impl.MyMathCalculator.add(int,int)) - 最模糊的:
execution(* *.*(..))千万别写这种! 第二*因为是以*开头的,所以是匹配任意包下的任意类
- 最精确的:
- 操作符
&&、||、!- &&:我们要切入的位置满足这两个表达式,如
execution(public int com.atguigu..MyMath*.*(..))&&execution(* *.*(int,int)) - ||:满足任意一个表达式即可,如
execution(public int com.atguigu..MyMath*.*(..))&&execution(* *.*(int,int)) - !:只要不是这个位置都切入,如
!execution(public int com.atguigu..MyMath*.*(..))
- &&:我们要切入的位置满足这两个表达式,如
7.5 AOP 细节#
切面:
// 5. 抽取可重用的切入点表达式:
// 1) 声明一个没有实现的返回 void 的空方法
// 2) 给方法上标注 @Pointcut 注解
@Pointcut("execution(public int com.atguigu.impl.MyMathCalculator.*(..))")
public void myPoint() {}
// 想在执行目标方法之前运行;写切入点表达式
// 1. execution(访问权限符 返回值类型 方法签名)
@Before("myPoint()")
public static void logStart(JoinPoint joinPoint){
// 获取到目标方法运行时使用的参数
Object[] args = joinPoint.getArgs();
// 获取到方法签名
Signature signature = joinPoint.getSignature();
String name = signature.getName();
System.out.println("【"+name+"】方法开始执行,用的参数列表【"+Arrays.asList(args)+"】");
}
// 2. 告诉 Spring 用名为 ret 的形参来接收返回值:returning="ret"
// 想在目标方法正常执行完成之后执行
@AfterReturning(value="execution(public int com.atguigu..MyMath*.*(..))", returning="ret")
public static void logReturn(JoinPoint joinPoint, Object ret){
Signature signature = joinPoint.getSignature();
String name = signature.getName();
System.out.println("【"+name+"】方法正常执行完成,计算结果是:"+ret);
}
/*
* 3. 我们可以在通知方法运行的时候,拿到目标方法的详细信息;
* 1) 只需要为通知方法的参数列表上写一个参数:
* JoinPoint joinPoint:封装了当前目标方法的详细信息
* 2) 告诉 Spring 用名为 exception 的形参来接收异常
* throwing="exception":告诉 Spring 哪个参数是用来接收异常
* 3) Exception exception: 指明通知方法可以接收哪些异常
* 若抛出的异常不是形参指定类型,Spring 不会被调用;resulting 同理
*
* ajax 接受服务器数据
* $.post(url,function(abc) {
* alert(abc)
* })
*/
// 想在目标方法出现异常的时候执行
@AfterThrowing(value="execution(public int com.atguigu.impl.MyMathCalculator.*(..))"
, throwing="exception")
public static void logException(JoinPoint joinPoint, Exception exception) {
System.out.println("【"+joinPoint.getSignature().getName()+"】方法执行出现异常了"
+",异常信息是【"+exception+"】;这个异常已经通知测试小组");
}
/*
* 4. Spring 对通知方法的要求不严格,权限符、返回值、静态非静态不做限制。
* 唯一要求的就是方法的参数列表一定不能乱写!
* > 通知方法是 Spring 利用反射调用的,每次方法调用得确定这个方法的参数表的值!
* > 参数表上的每一个参数,Spring 都得知道是什么!
* > JoinPoint 类型的参数 Spring 认识;不知道的参数一定告诉 Spring 这是什么!
*/
// 想在目标方法结束的时候执行
@After("execution(public int com.atguigu.impl.MyMathCalculator.*(..))")
private int logEnd(JoinPoint joinPoint) {
System.out.println("【"+joinPoint.getSignature().getName()+"】方法最终结束了");
return 0;
}
// 6. 环绕通知 (四合一通知,手写版动态代理)
@Around("myPoint()")
public Object myRound(ProceedingJoinPoint pjp) {
Object ret = null;
Object[] args = pjp.getArgs();
String methodName = pjp.getSignature().getName();
try {
// @Before
System.out.println("(环绕) 前置通知" + methodName
+ "参数:" + Arrays.toString(args));
// 利用反射调用目标方法即可,如下方法等同 method.invoke()
ret = pjp.proceed(pjp.getArgs());
// @AfterReturning
System.out.println("(环绕) 返回通知" + methodName + "返回值:" + ret);
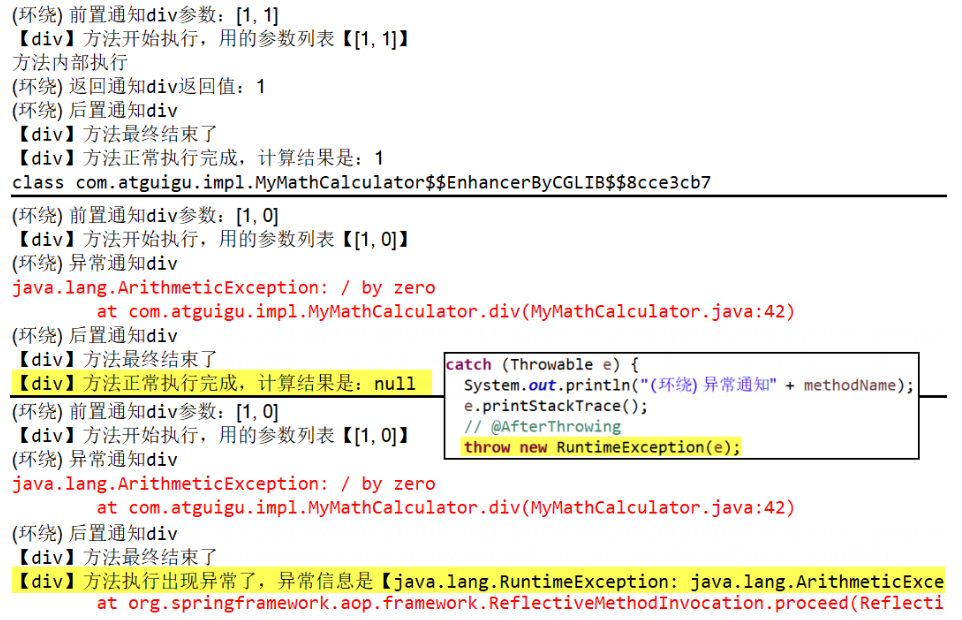
} catch (Throwable e) {
// @AfterThrowing
System.out.println("(环绕) 异常通知" + methodName);
e.printStackTrace();
// 如果不抛,普通通知不会知道目标方法调用抛异常了,继而就会去执行@AfterReturning
// throw new RuntimeException(e);
} finally {
// @After
System.out.println("(环绕) 后置通知" + methodName);
}
return ret;
}
测试:
@Test
public void test() {
    // 1. AOP的底层就是动态代理,代理对象和被代理对象的关联:实现了同一个接口。容器中保存的是
    // 目标对象的代理对象:$Proxy13。所以从容器中拿目标对象,一定用他的接口类型!不要用它本类
    // (Calculator) ioc.getBean("myMathCalculator");
    // Calculator bean = ioc.getBean(Calculator.class);
    // bean.add(2, 1);
    // System.out.println(bean); // com.atguigu.impl.MyMathCalculator@35d019a3
    // System.out.println(bean.getClass()); // class com.sun.proxy.$Proxy13

    // 2. 把切面类的 @Component 注掉,打印:class com.atguigu.impl.MyMathCalculator
    // 此时可按照组件类本类的 id 拿
    // Calculator bean2 = (Calculator) ioc.getBean("myMathCalculator");
    // System.out.println(bean2.getClass());
    // [结论] 没被切面切,创建原生对象;被切面切,创建代理对象

    // 3. 没有接口就是本类类型,由 cglib 帮我们创建好的代理对象
    // MyMathCalculator bean = ioc.getBean(MyMathCalculator.class);
    MyMathCalculator bean = (MyMathCalculator) ioc.getBean("myMathCalculator");
    bean.add(1, 2);
    System.out.println(bean.getClass());
    // class com.atguigu.impl.MyMathCalculator$$EnhancerByCGLIB$$fe279f42
}
控制台:
多切面运行顺序:
7.6 基于配置的 AOP#
<!-- Re: 基于注解的 AOP 步骤
1. 将目标类和切面类都加入到 IOC 容器中
2. 告诉 Spring 哪个是切面类:@Aspect
3. 在切面中使用 5 个通知注解来配置切面中这些通知方法都何时何地运行
4. 开启基于注解的 AOP 功能 (先导入 aop 名称空间)
    <aop:aspectj-autoproxy></aop:aspectj-autoproxy>
 -->

<!-- 基于配置的 AOP -->
<bean id="myMathCalculator" class="com.atguigu.impl.MyMathCalculator"></bean>
<bean id="validateAspect" class="com.atguigu.utils.ValidateAspect"></bean>
<bean id="logUtils" class="com.atguigu.utils.LogUtils"></bean>

<!-- 按照内部配置的顺序切 -->
<aop:config>
    <!-- 全局的切入点表达式 -->
    <aop:pointcut id="outerPointcut" expression
            ="execution(* com.atguigu.impl.MyMathCalculator.*(..))" />
    <!-- 指定切面 → @Aspect -->
    <aop:aspect ref="logUtils" order="3">
        <!-- 当前切面的切入点表达式,类比 @Pointcut -->
        <aop:pointcut id="innnerPointcut" expression
                ="execution(* com.atguigu.impl.MyMathCalculator.*(..))" />
        <!-- 普通通知 -->
        <aop:before method="logStart" pointcut-ref="innnerPointcut"/>
        <aop:after-returning method="logReturn" pointcut-ref="innnerPointcut"
                returning="result"/>
        <aop:after-throwing method="logException" pointcut-ref="innnerPointcut"
                throwing="exception"/>
        <aop:after method="logEnd" pointcut-ref="innnerPointcut"/>
        <!-- 环绕通知
        [前置]是按配置顺序!放在普通的前面,就先执行,放后边就后执行
        [后置]和[返回] 和注解版相同
        -->
        <aop:around method="myRound" pointcut-ref="innnerPointcut"/>
    </aop:aspect>
    <aop:aspect ref="validateAspect" order="1">
        <aop:before method="validateStart" pointcut-ref="outerPointcut"/>
        <aop:after-returning method="validateReturn" pointcut-ref="outerPointcut"
                returning="result"/>
        <aop:after-throwing method="validateException" pointcut-ref="outerPointcut"
                throwing="exception"/>
        <aop:after method="validateEnd" pointcut-ref="outerPointcut"/>
    </aop:aspect>
</aop:config>
8. 优雅重构缓存代码#
8.1 需求#
在实际开发过程中经常遇到如图这种‘先查缓存再查库’的代码,能不能把这样的代码统一封装一下?
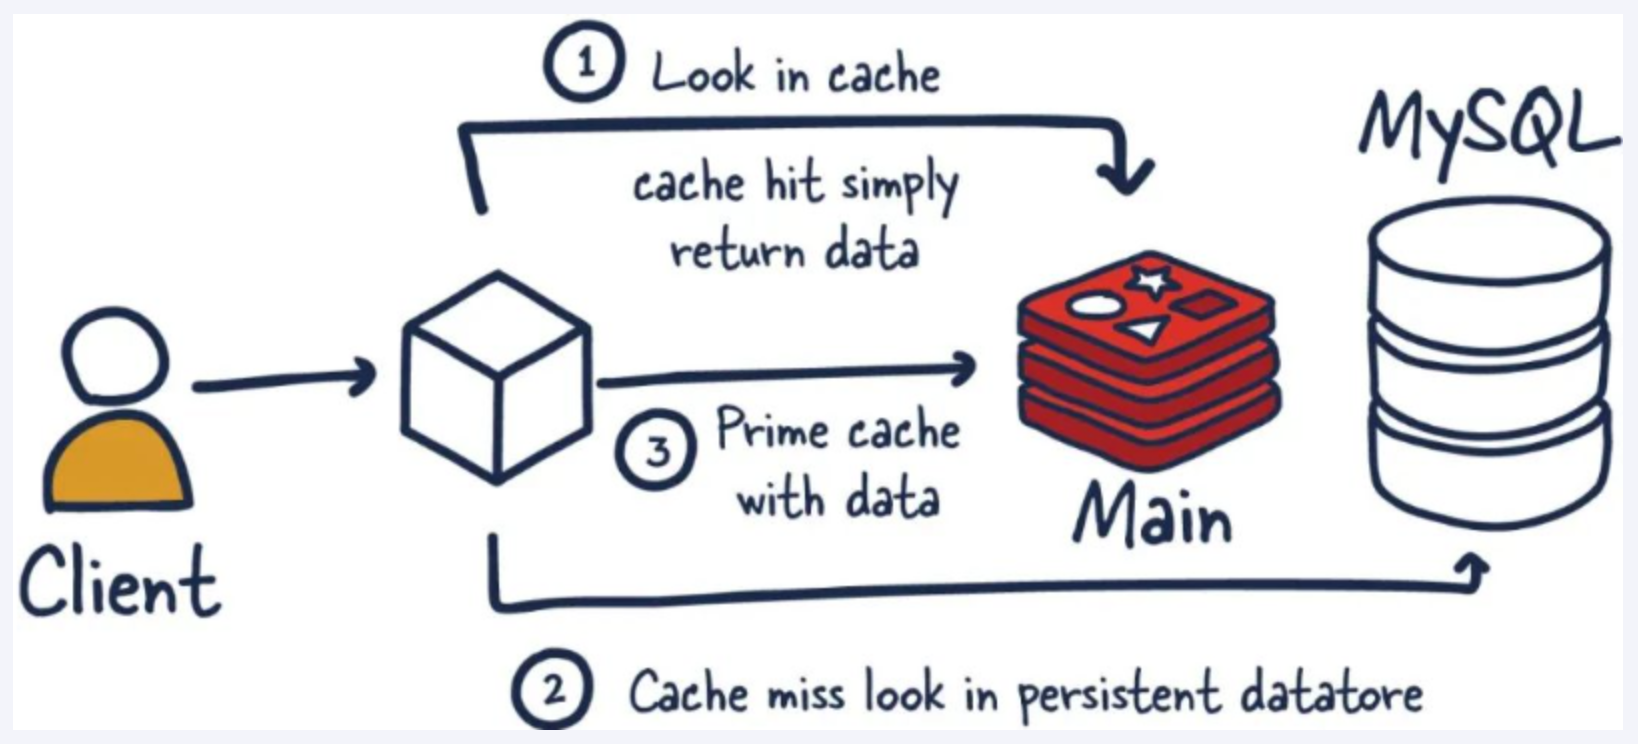
代码如下:
@Override
public User getUserById(Integer id) {
  User user = null;
  // 1 拼装缓存key
  String key = CACHE_KEY_USER + id;
  // 2 查询redis
  user = (User) redisTemplate.opsForValue().get(key);
  // 3 redis无,进一步查询mysql
  if (user == null) {
    // 3.1 从MySQL查出来
    user = this.userMapper.selectByPrimaryKey(id);
    // 3.2 MySQL有,Redis无
    if (user != null) {
      // 3.3 把MySQL捞到的数据写入Redis,方便下次查询能Redis命中。
      redisTemplate.opsForValue().set(key, user);
    }
  }
  // 4 Redis有,直接返回
  return user;
}
8.2 实现#
如何打造基础缓存查询组件?
二八原则,查询是最多的操作,要求查询部分变一行代码实现。

通过“热拔插 AOP + 反射 + 自定义 Redis 缓存注解 + SpEL”优雅重构缓存代码。
最终效果:
@Override
@MyRedisCache(keyPrefix = "user", matchValue = "#id")
public User getUserById(Integer id) {
  return userMapper.selectByPrimaryKey(id);
}
实现步骤:
(1)创建注解
@Target(ElementType.METHOD)
@Retention(RetentionPolicy.RUNTIME)
public @interface MyRedisCache {

    // 约等于键的前缀
    String keyPrefix();

    // SpringEL表达式,解析占位符对应的匹配value
    String matchValue();

}
(2)创建切面
@Slf4j
@Component
@Aspect
public class MyRedisCacheAspect {

    @Resource
    private RedisTemplate redisTemplate;

    /**
     * 配置织入点
     */
    @Pointcut("@annotation(com.atguigu.interview2.annotations.MyRedisCache)")
    public void cachePointCut() {
    }

    @Around("cachePointCut()")
    public Object doCache(ProceedingJoinPoint joinPoint) {
        Object result = null;

        /**
         *     @MyRedisCache(keyPrefix = "user", matchValue = "#id")
         *     public User getUserById(Integer id)
         *     {
         *         return userMapper.selectByPrimaryKey(id);
         *     }
         */

        try {
            // 1 获得重载后的方法名
            MethodSignature signature = (MethodSignature) joinPoint.getSignature();
            Method method = signature.getMethod();

            // 2 确定方法名后获得该方法上面配置的注解标签MyRedisCache
            MyRedisCache myRedisCacheAnnotation = method.getAnnotation(MyRedisCache.class);

            // 3 拿到了MyRedisCache这个注解标签,获得该注解上面配置的参数进行封装和调用
            String keyPrefix = myRedisCacheAnnotation.keyPrefix();
            String matchValueSpringEL = myRedisCacheAnnotation.matchValue();

            // 4 SpEL 解析器
            ExpressionParser parser = new SpelExpressionParser();
            Expression expression = parser.parseExpression(matchValueSpringEL);
            EvaluationContext context = new StandardEvaluationContext();

            // 5 获得方法里面的形参个数
            Object[] args = joinPoint.getArgs();
            DefaultParameterNameDiscoverer discoverer = new DefaultParameterNameDiscoverer();
            String[] parameterNames = discoverer.getParameterNames(method);
            for (int i = 0; i < parameterNames.length; i++) {
                log.info("Method's field&value: {}={}", parameterNames[i], args[i].toString());
                context.setVariable(parameterNames[i], args[i].toString());
            }

            // 6 通过上述,拼接Redis的最终key形式
            String key = keyPrefix + ":" + expression.getValue(context).toString();
            log.info("Final RedisKey: {}", key);

            // 7 先去Redis里面查询看有没有
            result = redisTemplate.opsForValue().get(key);
            if (result != null) {
                log.info("Redis Hit! Data={}", result);
                return result;
            }

            // 8 Redis里面没有才去找MySQL查询或进行后续业务逻辑 - 放行~
            result = joinPoint.proceed();

            // 9 MySQL步骤结束,还需要把结果存入Redis一次,缓存补偿
            if (result != null) {
                log.info("Redis Miss! Save Data To Redis: {}", result);
                redisTemplate.opsForValue().set(key, result);
            }
        } catch (Throwable throwable) {
            throwable.printStackTrace();
        }
        return result;
    }
}


【推荐】国内首个AI IDE,深度理解中文开发场景,立即下载体验Trae
【推荐】编程新体验,更懂你的AI,立即体验豆包MarsCode编程助手
【推荐】抖音旗下AI助手豆包,你的智能百科全书,全免费不限次数
【推荐】轻量又高性能的 SSH 工具 IShell:AI 加持,快人一步
· .NET Core 中如何实现缓存的预热?
· 从 HTTP 原因短语缺失研究 HTTP/2 和 HTTP/3 的设计差异
· AI与.NET技术实操系列:向量存储与相似性搜索在 .NET 中的实现
· 基于Microsoft.Extensions.AI核心库实现RAG应用
· Linux系列:如何用heaptrack跟踪.NET程序的非托管内存泄露
· TypeScript + Deepseek 打造卜卦网站:技术与玄学的结合
· Manus的开源复刻OpenManus初探
· AI 智能体引爆开源社区「GitHub 热点速览」
· 三行代码完成国际化适配,妙~啊~
· .NET Core 中如何实现缓存的预热?