30-赫夫曼编码
1. 基本介绍#
- 赫夫曼编码(Huffman Coding) 是 Huffman 于 1952 年提出一种编码方法,称之为最佳编码,属于一种程序算法。
- 赫夫曼编码是 {赫夫曼树} 在电讯通信中的经典的应用之一,赫夫曼编码广泛地用于数据文件压缩,其压缩率通常在 20%~90% 之间。赫夫曼码是可变字长编码(VLC) 的一种。
2. 通信领域中信息的处理方式#
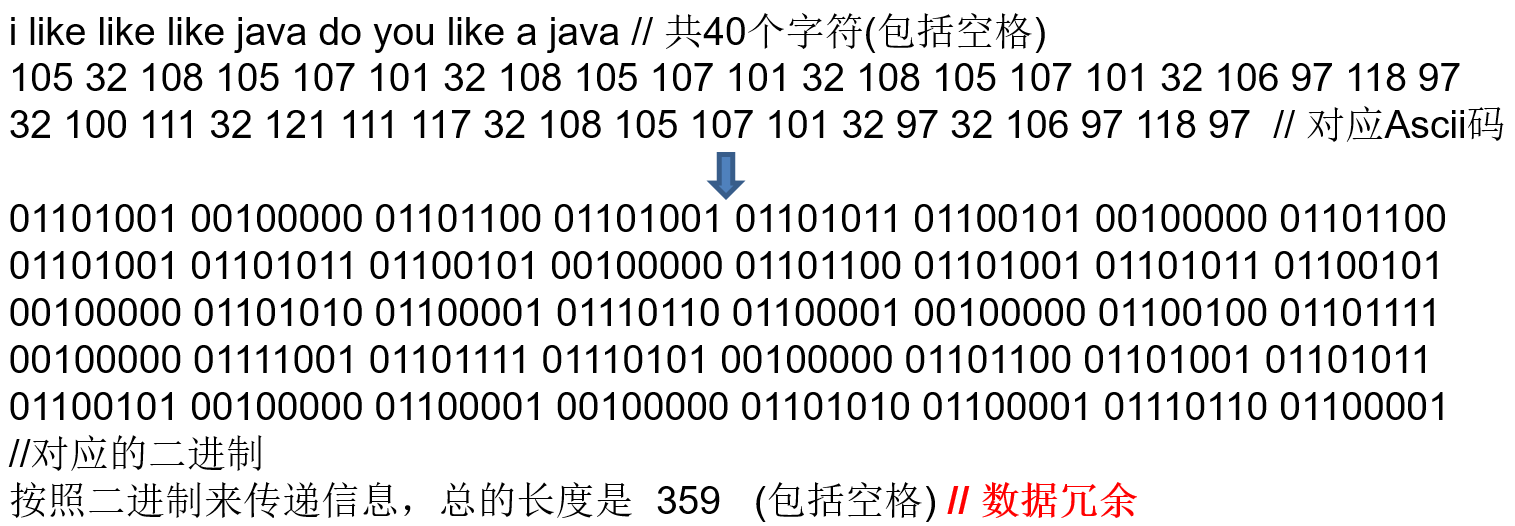
2.1 定长编码#
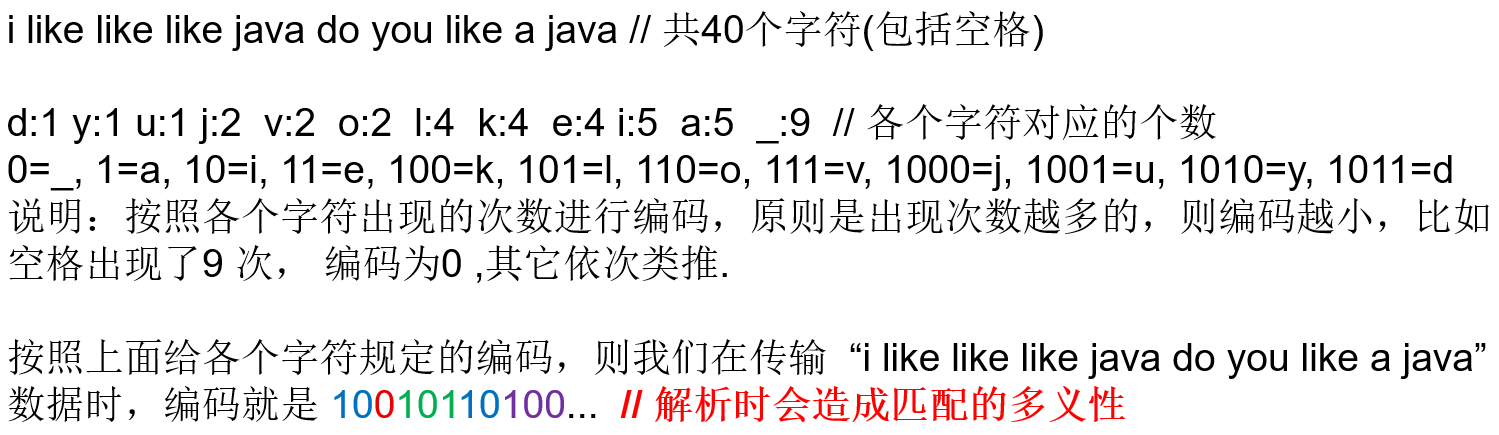
2.2 变长编码#
2.3 前缀编码(赫夫曼编码)#
每个字符的编码都不能是其他字符编码的前缀,符合此要求的编码叫做前缀编码, 即不能匹配到重复的编码。
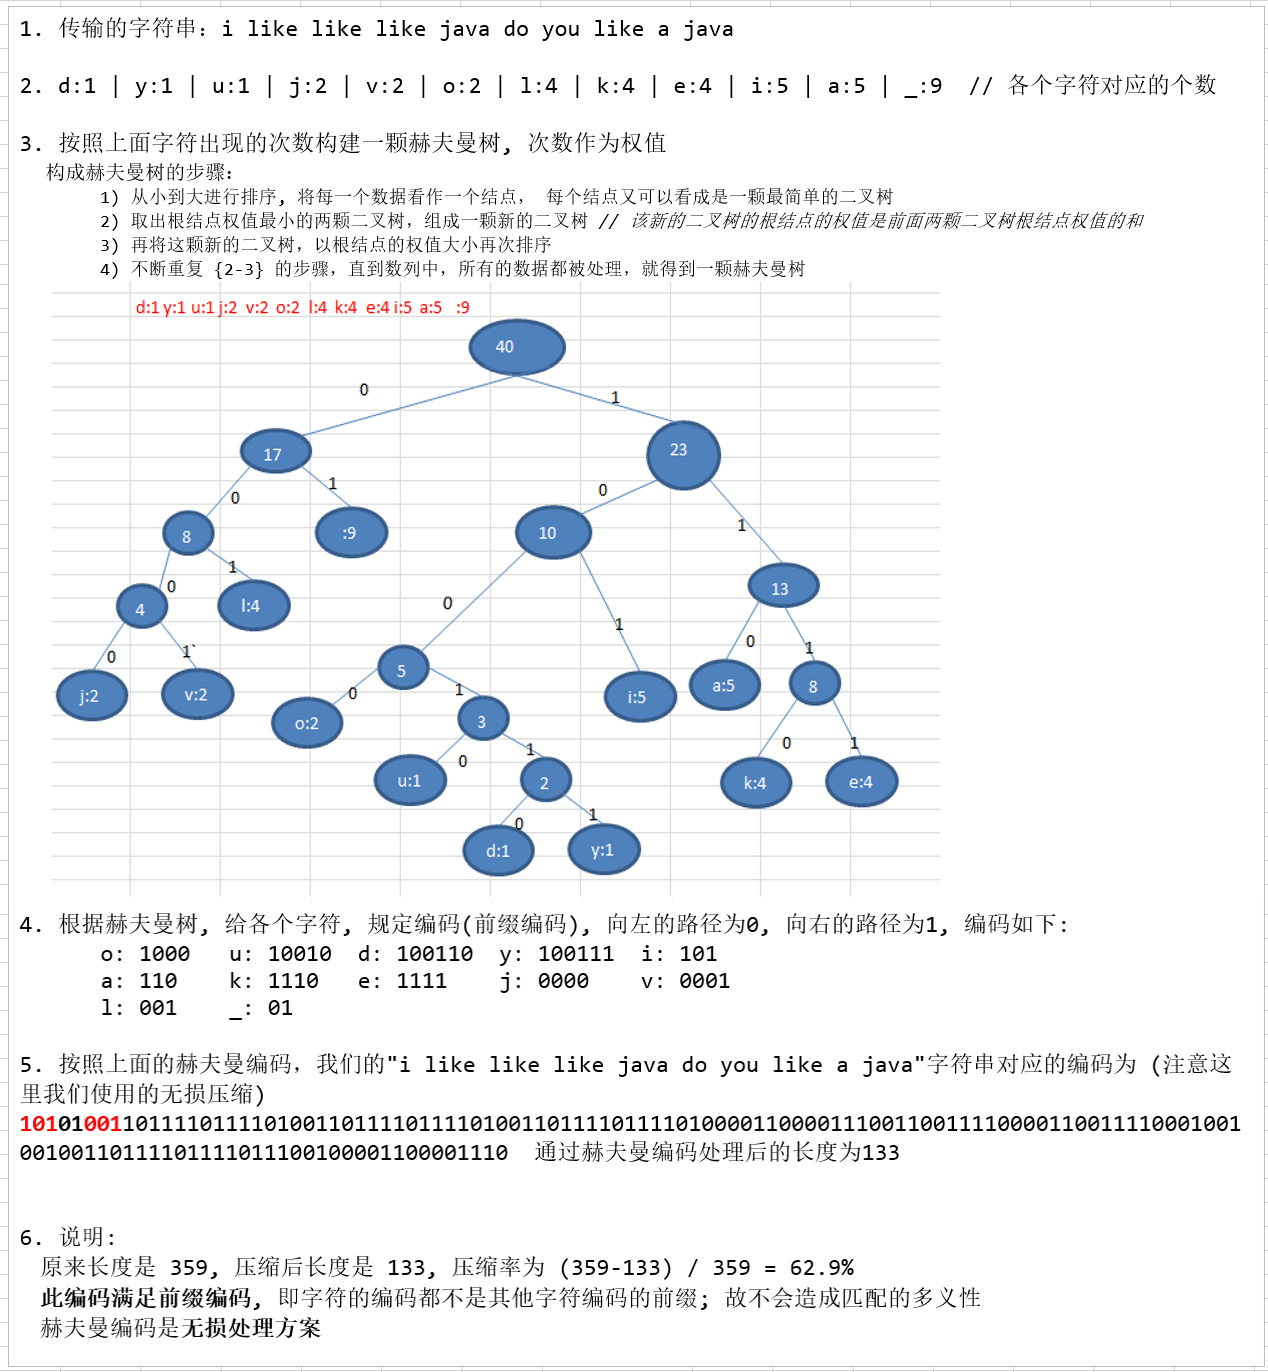
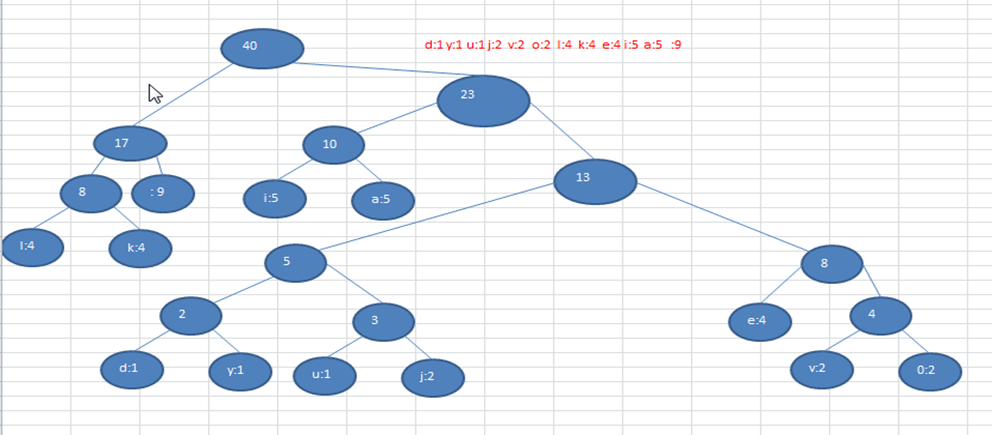
注意!根据排序方法不同,赫夫曼树也可能不太一样,继而对应的赫夫曼编码也不完全一样,但是 WPL 是一样的,都是最小的。比如,如果我们让每次生成的新的二叉树总是排在权值相同的二叉树的最后一个,则生成的二叉树:
3. 压缩~代码实现#
3.0 创建结点数据类型#
class Node implements Comparable<Node> {
    public Byte data; // 存放数据本身, 比如'a' = 97
    public int weight; // 权值, 表示字符(出现的次数)
    public Node left;
    public Node right;

    public Node(Byte data, int weight) {
        super();
        this.data = data;
        this.weight = weight;
    }

    public void preOrder() {
        System.out.println(this);
        if (this.left != null)
            this.left.preOrder();
        if (this.right != null)
            this.right.preOrder();
    }

    @Override
    public int compareTo(Node o) {
        return this.weight - o.weight;
    }

    @Override
    public String toString() {
        return "[data=" + data + ", weight=" + weight + "]";
    }
}
3.1 创建赫夫曼树#
- 节点的数据结构:Node
- 得到 String 对应的 byte[] 数组
- 编写方法,将准备构建赫夫曼树的 Node 结点放到一个 List 中
- 通过 List 创建对应的赫夫曼树
private static List<Node> getNodes(byte[] bytes) {
    // 1. 创建ArrayList
    ArrayList<Node> nodes = new ArrayList<Node>();

    // 2. 遍历bytes, 统计每个byte出现的次数 → map[key, value]
    Map<Byte, Integer> counts = new HashMap<>();
    for (byte b : bytes) {
        Integer count = counts.get(b);
        if (count == null) counts.put(b, 1);
        else counts.put(b, count+1);
    }

    // 3. 把 键值对 → Node, 并加入到 nodes
    for (Map.Entry<Byte, Integer> entry : counts.entrySet())
        nodes.add(new Node(entry.getKey(), entry.getValue()));

    return nodes;
}

private static Node createHuffmanTree(List<Node> nodes) {
    while(nodes.size() > 1) {
        // 排序, 小 → 大
        Collections.sort(nodes);
        // 取出权值最小的二叉树
        Node leftNode = nodes.get(0);
        // 取出权值次小的二叉树
        Node rightNode = nodes.get(1);
        // 构建新的二叉树
        Node parent = new Node(null, leftNode.weight + rightNode.weight);
        parent.left = leftNode;
        parent.right = rightNode;
        // 将处理过的二叉树移除出List
        nodes.remove(leftNode);
        nodes.remove(rightNode);
        // 将新的二叉树加入List
        nodes.add(parent);
    }
    return nodes.get(0);
}
3.2 生成赫夫曼编码表#
- 将赫夫曼编码表存放在 Map<Byte, String> 中 // e.g. 32=01, 97=100, 100=11000, ...
- 在生成编码表时, 需要拼接路径, 故还需要一个 StringBuilder 来存储叶子结点的路径。
static Map<Byte, String> huffmanCodes = new HashMap<>();

// 重载一下, 美观
private static void getCodes(Node root) {
    if (root == null) return;
    getCodes(root, "", new StringBuilder());
}

/**
 * 将传入的node结点以下的所有叶子结点的赫夫曼编码存放到huffmanCodes集合中
 * @param node 根结点
 * @param code 表示"路径"; 往左走, 即下到左子结点即为0; 往右走, 下到右子结点即为1
 * @param appendPath 用于拼接走过的路 (路径)
 */
private static void getCodes(Node node, String code, StringBuilder appendPath) {
    StringBuilder newPath = new StringBuilder(appendPath);
    // 将当前路径(是向左递归进入当前方法的, 还是向右递归进来的) 追加到 newPath
    newPath.append(code);
    if (node != null)
        // 判断当前node是否为叶子结点
        if (node.data == null) { // 非叶子结点
            // 向左递归, 继续找叶子结点
            getCodes(node.left, "0", newPath);
            // 向右递归, 继续找叶子结点
            getCodes(node.right, "1", newPath);
        } else { // 是叶子结点
            huffmanCodes.put(node.data, newPath.toString());
        }
}
3.3 字符串做赫夫曼编码#
- 得到字符串对应的 byte[] 数组
- 通过赫夫曼编码表将每一个 byte 映射的编码拼接成一个字符串 10101000101111111100100010...
- 8 位一组, 再构成一个 byte[] // afterCodeBytes[0] = 10101000(补码) → 10100111(反码) → 11011000(原码) = -88
private static byte[] zipData(byte[] contentBytes) {
    // 1. 利用赫夫曼编码表得到byte[] 经赫夫曼编码后的字符串
    StringBuilder codeStr = new StringBuilder();
    // 2. 遍历byte[], 拼接字符串
    for(byte b : contentBytes)
        codeStr.append(huffmanCodes.get(b));
    // 3. 8位一组构建byte[]
    // 3.1 统计字符个数, 确定byte[]长度
    int length = (codeStr.length() + 7) / 8;
    // 3.2 创建编码后的byte[]数组
    byte[] afterCodeBytes = new byte[length];
    int index = 0; // 记录byte的索引
    String str; // 临时存储截取到的8位
    // 3.3 往里装
    for(int i = 0; i < codeStr.length(); i += 8) {
        // 截取8位
        if (i+8 > codeStr.length()) // 末尾不够8位
            str = codeStr.substring(i); // 11100
        else str = codeStr.substring(i, i+8);
        // 转成byte, 放到数组里; 最后一次 = 28 (11100)
        afterCodeBytes[index++] = (byte) Integer.parseInt(str, 2);
    }
    return afterCodeBytes;
}
3.4 封装整个压缩过程#
public static byte[] huffmanZip(byte[] contentBytes) {
    // 1. 将byte[]转换成一个List
    List<Node> nodes = getNodes(contentBytes);
    // 2. 根据List创建赫夫曼树
    Node root = createHuffmanTree(nodes);
    // 3. 根据赫夫曼树创建对应的赫夫曼编码(huffmanCodes)
    getCodes(root);
    // 4. 根据赫夫曼编码对原始byte[]进行压缩, 得到压缩后的byte[]
    byte[] afterCodeBytes = zipData(contentBytes);
    return afterCodeBytes;
}
4. 解压~代码实现#
4.1 编码byte[] → 二进制字符串#
将压缩后的 byte[] 元素,挨个转成赫夫曼编码对应的二进制字符串。
[Integer] public static String toBinaryString(int i)以二进制形式返回一个整数参数的字符串形式toBinaryString((byte) 13)→ 1101toBinaryString((byte) -13)→ 11111111111111111111111111110011
- byte中的有效数据位数 要考虑到最后一个 byte 里面的 8 位不一定全是有效数据位。
- 由 toBinaryString 的例子可知,如果是正数且 8 位均为有效数据位,则要补足8位:按位对
256(1 0000 0000)进行或(OR)运算。 - 返回值(下面是有效数据位 8 位的情况;不足 8 位的直接返回即可)
- 负数,多太多了,可以直接截取后 8 位
- 正数,多 1 位 (256),也截取补足后的后 8 位
/**
 * byte → 二进制字符串
 * @param flag 标识本次的byte是否8位均为有效数据位
 * @param b 要转换的byte
 * @return 对应的二进制(补码)字符串
 */
private static String byteToBitString(boolean flag, byte b) {
    int i = b;
    if (flag) i |= 256; // 按位或256(1 0000 0000)

    String str = Integer.toBinaryString(i);

    if (flag) return str.substring(str.length() - 8);
    else return str;
}
4.2 二进制字符串 → 原始byte[]#
将二进制字符串再对照赫夫曼编码表转成原始数据对应的 byte[]。
/**
 * 对照param1, 对param2 进行解码
 * @param huffmanCodes 赫夫曼编码表
 * @param afterCodeBytes 编码后的byte数组
 * @return 原始数据对应的byte数组
 */
public static byte[] decode(Map<Byte, String> huffmanCodes, byte[] afterCodeBytes) {
    // 1. 先得到afterCodeBytes对应的二进制字符串
    StringBuilder builder = new StringBuilder();
    // 2. 将byte数组转成二进制字符串
    for (int i = 0 ; i < afterCodeBytes.length; i++) {
        // 最后一个字节, 无须补足 ~> zipData()
        boolean flag = (i == afterCodeBytes.length-1);
        builder.append(byteToBitString(!flag, afterCodeBytes[i]));
    }
    // 3. 把字符串按照指定的赫夫曼编码进行解码
    // 3.1 先把赫夫曼编码表 键-值 进行调换, 因为是解码, 是根据1010找对应的abcde, 理解?
    Map<String, Byte> map = new HashMap<>();
    for (Map.Entry<Byte, String> entry : huffmanCodes.entrySet())
        map.put(entry.getValue(), entry.getKey());
    // 3.2 创建集合, 存放原始数据数组的byte元素
    List<Byte> list = new ArrayList<>();
    int count;
    // i += count↘: 直接移动到下一个字符的开始位置
    for (int i = 0; i < builder.length(); i += count) {
        count = 1; // 跨度
        boolean flag = true;
        Byte b = null;
        while (flag) {
            // i不动, 让count递增, 直到截取的key与赫夫曼编码表的某一个键相匹配
            String key = builder.substring(i, i+count);
            b = map.get(key);
            if (b == null) // 说明没匹配到
                count++;
            else // 找到, 就退出while
                flag = false;
        }
        list.add(b);
    }
    // 当for循环结束, list中存放了原始字符串中所有的字符
    byte[] bytes = new byte[list.size()];
    // 4. 将list中的数据交接给byte[]
    for (int i = 0; i < list.size(); i++)
        bytes[i] = list.get(i);
    return bytes;
}
5. 文件压缩/解压#
- 读取文件(IO) → 得到赫夫曼编码表 → 压缩
- 读取压缩文件(数据和赫夫曼编码表) → 解压(文件恢复)
/**
 * 文件解压
 * @param zipFile 准备解压的文件
 * @param dstFile 解压到哪个位置
 */
public static void unZipFile(String zipFile, String dstFile) {
    FileInputStream fis = null;
    FileOutputStream fos = null;
    ObjectInputStream ois = null;
    try {
        fis = new FileInputStream(zipFile);
        // 创建和fis关联的对象输入流
        ois = new ObjectInputStream(fis);
        byte[] huffumanBytes = (byte[]) ois.readObject();
        Map<Byte, String> huffuman = (Map<Byte, String>) ois.readObject();
        // 获得解码后的源数据byte[]
        byte[] bytes = decode(huffuman, huffumanBytes);
        // 将byte[]写入到目标文件
        fos = new FileOutputStream(dstFile);
        fos.write(bytes);
    } catch (Exception e) {
        e.printStackTrace();
    } finally {
        try {
            fos.close();
            ois.close();
            fis.close();
        } catch (IOException e) {
            e.printStackTrace();
        }
    }
}

/**
 * 文件压缩
 * @param srcFile 要被压缩的文件的全路径
 * @param dstFile 压缩后存放的位置
 */
public static void zipFile(String srcFile, String dstFile) {
    FileInputStream fis = null;
    FileOutputStream fos = null;
    ObjectOutputStream oos = null;
    try {
        // 创建文件输入流
        fis = new FileInputStream(srcFile);
        // 创建一个和源文件大小一样的byte[]
        byte[] bytes = new byte[fis.available()];
        // 读取文件
        fis.read(bytes);
        // 获取经赫夫曼编码后的byte[]
        byte[] afterCodeBytes = huffmanZip(bytes);
        // 创建输出流, 存放压缩文件
        fos = new FileOutputStream(dstFile);
        // 创建一个和文件输出流关联的ObjectOutputStream
        oos = new ObjectOutputStream(fos);
        // 将 赫夫曼编码后的byte[] 写入文件
        oos.writeObject(afterCodeBytes);
        // 为了以后恢复源文件, 这里还要以对象流的方式将 赫夫曼编码 写入文件
        oos.writeObject(huffmanCodes);
    } catch (Exception e) {
        e.printStackTrace();
    } finally {
        try {
            fis.close();
            fos.close();
            oos.close();
        } catch (IOException e) {
            e.printStackTrace();
        }
    }
}
6. 压缩文件注意事项#
- 如果文件本身就是经过压缩处理的,那么使用赫夫曼编码再压缩效率不会有明显变化,比如视频,ppt ...
- 赫夫曼编码是按字节来处理的,因此可以处理所有的文件(二进制文件、文本文件 ...)。注意,如果一个文件中的内容,重复的数据不多,压缩效果也不会很明显。


【推荐】国内首个AI IDE,深度理解中文开发场景,立即下载体验Trae
【推荐】编程新体验,更懂你的AI,立即体验豆包MarsCode编程助手
【推荐】抖音旗下AI助手豆包,你的智能百科全书,全免费不限次数
【推荐】轻量又高性能的 SSH 工具 IShell:AI 加持,快人一步
· .NET Core 中如何实现缓存的预热?
· 从 HTTP 原因短语缺失研究 HTTP/2 和 HTTP/3 的设计差异
· AI与.NET技术实操系列:向量存储与相似性搜索在 .NET 中的实现
· 基于Microsoft.Extensions.AI核心库实现RAG应用
· Linux系列:如何用heaptrack跟踪.NET程序的非托管内存泄露
· TypeScript + Deepseek 打造卜卦网站:技术与玄学的结合
· Manus的开源复刻OpenManus初探
· AI 智能体引爆开源社区「GitHub 热点速览」
· 三行代码完成国际化适配,妙~啊~
· .NET Core 中如何实现缓存的预热?