IdentityServer4结合Mysql
上一篇:IdentityServer4使用OpenIdConnect实现单点登录。
前面写的示例中,IdeneityServer使用的是内存缓存的存储方式,所有的配置都写在Config.cs里。在实际应用中,应该使用数据库存储方式,方便随时配置,如添加新的用户、资源、客户端,也可以节省服务器内存。
本文从三个方面来实现IdentityServer4结合Mysql实现数据库存储方式,分别是客户端及资源数据、令牌及授权码数据以及用户数据。
一,准备内容
1,准备MySql数据库服务器,新建一个空的数据库
2,IdentityServer需要安装以下几个程序包。
IdentityServer4.EntityFramework
Microsoft.EntityFrameworkCore.Tools
Pomelo.EntityFrameworkCore.MySql(也可以用MySql官方程序包:MySql.Data.EntityFrameworkCore)
3,appsettings.json添加数据库连接字符串
{
  "ConnectionStrings": {
    "MySqlDbConnectString": "server=IP;userid=mysqlUserName;pwd=user's password;database=database name;connectiontimeout=30;Pooling=true;Max Pool Size=300; Min Pool Size=5;"
  }
}
二,客户端及资源的数据库存储
前面我们使用AddInMemory的方式加载配置数据
AddInMemoryIdentityResources(Config.GetIdentityResources())
AddInMemoryApiResources(Config.GetApis())
AddInMemoryClients(Config.GetClients())
把这三行代码注释掉,以下代码替换
  var connection = Configuration.GetConnectionString("MySqlDbConnectString");
            var builder = services.AddIdentityServer()
                //身份信息资源
                //.AddInMemoryIdentityResources(Config.GetIdentityResources())
                .AddConfigurationStore(opt =>
                {
                    opt.ConfigureDbContext = context =>
                    {
                        context.UseMySql(connection, sql =>
                        {
                            sql.MigrationsAssembly("IdentityServer");
                        });
                    };
                })
                .AddTestUsers(Config.GetUsers());}
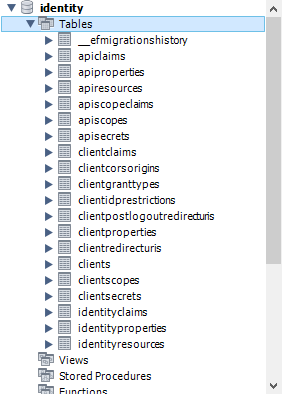
要从数据库查询配置数据,肯定得添加相应的数据表,把IdentityServer项目设为启动项目,打开程序包管理器控制台,设置控制台默认项目为IdentityServer,在控制台输入以下指令
PM> add-migration ConfigDbContext -c ConfigurationDbContext  -o Data/Migrations/IdentityServer/PersistedGrantDb
To undo this action, use Remove-Migration.
PM> update-database
Done.
-c ConfigurationDbContext是指定当前的数据库上下文。ConfigurationDbContext定义在命名空间: IdentityServer4.EntityFramework.DbContexts,和昨们使用CodeFirst一样,定义了客户端及资源的数据表及表关联。add-migration生成迁移变动记录,update-datase更新数据库到最新状态。

但是现在数据库中的客户端和资源数据都是为空的,需要把Config的配置数据添加到数据库,可以在Start.cs中添加方法进行数据库初始化
 private void InitializeDatabase(IApplicationBuilder app)
        {
            using (var serviceScope = app.ApplicationServices.GetService<IServiceScopeFactory>().CreateScope())
            {
                var context = serviceScope.ServiceProvider.GetRequiredService<ConfigurationDbContext>();
                if (!context.Clients.Any())
                {
                    foreach (var client in Config.GetClients())
                    {
                        context.Clients.Add(client.ToEntity());
                    }
                    context.SaveChanges();
                }

                if (!context.IdentityResources.Any())
                {
                    foreach (var resource in Config.GetIdentityResources())
                    {
                        context.IdentityResources.Add(resource.ToEntity());
                    }
                    context.SaveChanges();
                }

                if (!context.ApiResources.Any())
                {
                    foreach (var resource in Config.GetApis())
                    {
                        context.ApiResources.Add(resource.ToEntity());
                    }
                    context.SaveChanges();
                }
            }
        }
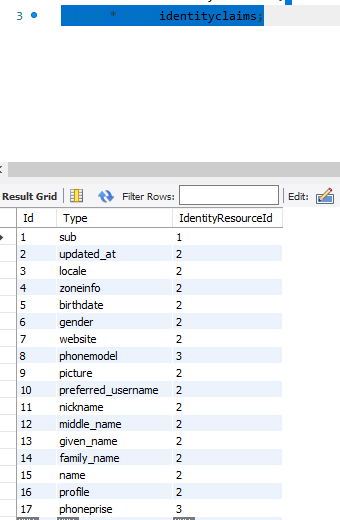
说明:利用app.ApplicationServices.GetService<IServiceScopeFactory>().CreateScope创建一个新的服务作用域与其他作用域隔离开,不影响其它作用域的上下文释放,操作实体更新数据库和我们平时用的一样。运行程序后,发现数据库已经有数据了

运行IdentityServer,IdentityMvc,IdentityApi三个程序进行测试

二,令牌和授权码的数据库存储
利用IIdentityServerBuilder的扩写方法AddOperationalStore
//客户端及资源数据库存储配置
                .AddConfigurationStore(opt =>
                {
                    opt.ConfigureDbContext = context =>
                    {
                        context.UseMySql(connection, sql =>
                        {
                            sql.MigrationsAssembly("IdentityServer");
                        });
                    };
                })
                //令牌及授权码数据库存储配置
                .AddOperationalStore(opt =>
                {
                    opt.ConfigureDbContext = context =>
                    {
                        context.UseMySql(connection, sql =>
                        {
                            sql.MigrationsAssembly("IdentityServer");
                        });
                    };
                    opt.EnableTokenCleanup = true;
                    opt.TokenCleanupInterval = 30;
                })
                .AddTestUsers(Config.GetUsers());
同样的,需要添加用来存储的数据表
PM> add-migration OperationContext -c PersistedGrantDbContext -o Data/Migrations/IdentityServer/OperationDb
Multiple startup projects set.
PM> update-database -c PersistedGrantDbContext
Done.
运行IdentityServer,IdentityMvc,IdentityApi三个程序进行测试

三,用户的数据库存储
IdentityServer4为IIdentityServerBuilder提供了支持客户端和资源数据库存储的AddConfigurationStore方法,支持令牌和授权码数据库存储的AddOperationalStore,但没有提供用户数据库存储的方法。不过提供了一个“IdentityDbContext”数据上下文。我们可以基于这个来实现。
新建一个Dbcontext,继承于IdentityDbContext。IdentityDbContext的set中已经加入了identity中用户和角色的相关实体。我们可以基于这些实体扩展,比如丰富用户实体的数据内容。
1,建立需要扩展的实体类。如:
    public class LiujbUser:IdentityUser
    {
        //实体自定义字段
        public string Custom { get; set; }
    }
2,将自定义的实体加入到Dbcontext的Set集合中
 public class ApplicationDbContext: IdentityDbContext
    {
        public DbSet<LiujbUser> LiujbUsers { get; set; }
        public ApplicationDbContext(DbContextOptions<ApplicationDbContext> opt) : base(opt) { }
    }
3,将自定义的数据库上下文在startup中注册
 services.AddDbContext<ApplicationDbContext>(opt => {
                opt.UseMySql(Configuration.GetConnectionString("UserConnection"));
            });
4,更改Identity中关于用户和角色的处理到Entityframework
  services.AddIdentity<LiujbUser, IdentityRole>()
                .AddEntityFrameworkStores<ApplicationDbContext>()
                .AddDefaultTokenProviders();
5,用add-migration init -c ApplicationDbContext -o Data/Migrations/IdentityServer/AppDb 以及update-database -c ApplicationDbContext 更新用户到数据库

6,在数据库初始方法中添加Config类中的用户初始化数据
private void InitializeDatabase(IApplicationBuilder app)
        {
            using (var serviceScope = app.ApplicationServices.GetService<IServiceScopeFactory>().CreateScope())
            {
                var applicationDbContext= serviceScope.ServiceProvider.GetRequiredService<ApplicationDbContext>();

                IdentityRole role = null;
            if (!applicationDbContext.Roles.Any())
            {
                role = new IdentityRole()
                {
                    Name = "admin",
                    NormalizedName = "admin"
                };
                applicationDbContext.Roles.Add(role);
            }
            else
            {
                role = applicationDbContext.Roles.Where(r => r.Name.Equals("Admin")).SingleOrDefault();
            }
            if (!applicationDbContext.Users.Any())
            {
                var user = new LiujbUser()
                {
                    UserName = "administrator",
                    PasswordHash = "admin123456".Sha256(),
                    Email = "liujb@xx.com",
                    NormalizedUserName = "admin"
                };
                applicationDbContext.UserClaims.Add(new IdentityUserClaim<string>()
                {
                    ClaimType = ClaimTypes.Country,
                    ClaimValue ="CSC",
                    UserId = user.Id
                });
                applicationDbContext.Set<LiujbUser>().Add(user);
                if (role != null)
                {
                    applicationDbContext.UserRoles.Add(new IdentityUserRole<string>()
                    {
                        RoleId = role.Id,
                        UserId = user.Id
                    });
                }

            }
            await applicationDbContext.SaveChangesAsync(); } }
 }
Identity封闭了两个管理类UserManager和RoleManager,对用户和角色的操作进行了封装,使用更为方便。


