
二、C++核心编程
一、内存分区模型
c++在执行时,将内存大方向划分为4个区域
- 代码区:存放函数体的二进制代码,由操作系统进行管理
- 全局区:存放全局变量和静态变量以及常量
- 栈区:由编译器自动分配释放,存放函数的参数值,局部变量等
- 堆区:由程序员分配和释放,若程序员不释放,程序结束时由操作系统回收
内存四区意义:
不同区域存放的数据,赋予不同的生命周期,给我们更大的灵活编程
1、程序运行前
在程序编译后,生成exe可执行程序,未执行该程序前,会分为两个区域
1.1、代码区:
存放CPU执行的机器指令
特点:
- 代码区是共享的,共享的目的是对于频繁执行的程序,只需要在内存中有一份代码即可
- 代码区是只读的,使其只读的原因是防止程序意外的修改了它的指令
1.2、全局区:
全局变量和静态变量存放在此
全局区还包含了常量区:字符串常量和const修饰的全局常量
特点:该区域的数据在程序结束后由操作系统释放
#include <iostream>
using namespace std;
// 全局变量
int g_a = 10;

// const修饰的全局变量
const int c_g_a = 10;

int main()
{
	// 普通局部变量
	int l_a = 10;

	// 静态变量
	static int s_a = 10;

	/*常量:包括字符串常量和const修饰的变量*/
	// 字符串常量 用双引号引起来的都叫字符串常量
	"hello word";

	// const修饰的局部变量
	const int c_l_a = 10;

	cout << "局部变量l_a的地址: " << (int)&l_a << endl;
	cout << "全局变量g_a的地址: " << (int)&g_a << endl;
	cout << "静态变量g_a的地址: " << (int)&s_a << endl;
	cout << "字符串常量的地址: " << (int)&"hello word" << endl;
	cout << "const修饰的全局常量的地址:" << (int)&c_g_a << endl;
	cout << "const修饰的局部常量的地址:" << (int)&c_l_a << endl;

	return 0;
}
打印结果
局部变量l_a的地址: -1885340796
全局变量g_a的地址: -485240832
静态变量g_a的地址: -485240828
字符串常量的地址: -485249800
const修饰的全局常量的地址:-485250128
const修饰的局部常量的地址:-1885340764
总结:
- 全局区存放全局变量、静态变量、字符串常量、const修饰的全局常量
2、程序程序运行后
2.1、栈区
由编译器自动分配释放,存放函数的参数值,局部变量,形参等
注意:一定不能返回局部变量的地址,栈区开辟的数据由编译器自动释放(局部变量被放在栈区,函数运行完后会被释放,返回的局部变量地址就不指向定义时的值了)
示例
#include <iostream>
using namespace std;
int* func() {
	int a = 10;
	// 局部变量被放在栈区,函数运行完后会被释放,返回的局部变量地址就不指向定义时的值了
	return &a;
}

int main()
{
	int* p = func();
	cout << *p << endl;

	return 0;
}
2.2、堆区
由程序员分配释放,若程序员不释放,程序结束时由操作系统回收
在c++中主要利用new在堆区开辟数据
示例
#include <iostream>
using namespace std;
int* func() {
	// new关键字可以将数据开辟到堆区
	// 返回的是一个地址,直接用指针接收即可
	int *p = new int(10);
	return p;
}

int main()
{
	int* p = func();
	cout << *p << endl;
	cout << *p << endl;
	cout << *p << endl;
	cout << *p << endl;

	return 0;
}
3、new操作符
语法:
- 在堆区开辟数据:
new 数据类型(初始值) - 在堆区开辟数组:
new 数组类型[数组元素个数] - 释放堆区数据:
delete 数据 - 释放堆区数组:
delete [] 数组地址
注意:
- new关键字可以将数据开辟到堆区
- new关键字开辟堆区后返回的是一个地址,直接用指针接收即可
示例
#include <iostream>
using namespace std;

// new关键字的基本语法
int* func() {
	// new关键字可以将数据开辟到堆区
	// 返回的是一个地址,直接用指针接收即可
	int *p = new int(10);
	return p;
}

// 在堆区开辟数组
void func2() {
	// 5表示数组中有5个元素
	int *arr = new int[5];
	for (int i = 0; i < 5; i++) {
		arr[i] = i + 10;  // 给数组5个元素赋值  10~14
	}

	// 释放堆区数组
	// 释放数组的时候在delete后面加一个[]才可以
	delete[] arr;
}

int main()
{
	int* p = func();
	cout << *p << endl;
	cout << *p << endl;
	cout << *p << endl;
	// 利用delete释放堆区数据
	delete p;
	cout << *p << endl;  // 内存已被释放,再访问就是非法操作,会报错

	return 0;
}
二、引用
1、引用的基本使用
作用:给变量起别名
语法:数据类型 &别名 = 原名
注意:别名和原名都是指向同一个内存地址
示例
#include <iostream>
using namespace std;

int main()
{
	int a = 10;
	int& b = a;
	cout << "没有改变b之前" << endl;
	cout << "a = " << a << endl;
	cout << "b = " << b << endl;

	b = 100;
	cout << "改变b之后" << endl;
	cout << "a = " << a << endl;
	cout << "b = " << b << endl;


	return 0;
}
2、引用的注意事项
- 引用必须要初始化
- 引用初始化后不可以再改变
- 引用必须引用一个合法的内存空间
示例
#include <iostream>
using namespace std;

int main()
{
	int a = 10;
	int c = 20;
	int& b;  // 这样是错误的,引用必须初始化

	int& d = a;
	int& d = c;  // 这也是错误的,引用初始化后就不可以再更改

	return 0;
}
3、引用做函数参数
作用:函数传参时,可以利用引用来让形参修饰实参
优点:可以简化指针修饰实参,通过引用参数产生的效果同安地址传递是一样的,语法也更清晰明了一些
示例
#include <iostream>
using namespace std;

// 引用传递
void func(int &a) {
	a++;
	cout << "引用传递函数中的a = " << a << endl;
}

int main()
{
	int a = 1;
	cout << "调用引用传递函数前的a = " << a << endl;
	func(a);
	cout << "调用引用传递函数后的a = " << a << endl;

	return 0;
}
4、引用做函数的返回值
作用:引用是可以作为函数的返回值的
注意:不要返回局部变量引用
用法:函数的调用可以作为左值(必须是返回引用)(可以改变返回值的值)
语法:函数类型 & 函数名(){return 数据;}
不要返回局部变量引用
#include <iostream>
using namespace std;

// 返回局部变量引用
int& func() {
	int a = 10;
	return a;
}

int main()
{
	// 用变量接收,是开辟了一个新的内存地址用来存放a的值
	// int res = func();
	// 用引用接收,就是接收了a的地址,多了一个指向a的地址的变量
	int &res = func();
	// 局部变量在函数使用完后会被释放
	// 第一次可以正常返回,因为编译器做了保留
	cout << res << endl;
	// 再调用就会返回乱码
	cout << res << endl;
	cout << res << endl;
	cout << res << endl;

	return 0;
}
函数的调用可以作为左值(等号左边的值)
#include <iostream>
using namespace std;

// 返回引用
int& func() {
	// 将局部变量改成静态变量,被存放在全局区,就不会在函数结束时被释放
	static int a = 10;
	return a;
}

int main()
{
	// 使用引用接收
	int& res = func();
	cout << res << endl;

	// 如果函数做左值,那么必须返回引用
	// 可以改变返回值的值
	func() = 1000;
	cout << res << endl;

	return 0;
}
5、引用的本质
本质:引用的本质在c++内部实现就是一个指针常量
int& b = a;等价于int * const b = &a;
#include <iostream>
using namespace std;

// 发现是引用,转换为:int * const a;
void func(int& b) {
	b = 200; // a是引用,转换为:*b = 200;
}

int main()
{
	int a = 10;

	// 自动转化为:int * const res = &a;
	// 指针常量是指针指向不可更改,也说明为什么引用不可更改
	int& res = a;
	cout << a << endl;  // 10

	// 发现res是引用,编译器自动转换为:*res = 100;
	res = 100;
	cout << a << endl;  // 100

	// int * const a = &a;
	func(a);
	cout << a << endl;  // 200

	return 0;
}
6、常量引用
作用:常量引用主要用来修饰形参,防止误操作
在函数引用形参列表中,可以加const修饰形参,防止形参误操作
#include <iostream>
using namespace std;

// 发现是引用,转换为:int * const a;
void print_value(const int& a) {
	// a = 200;  // 不可以修改,防止误操作
	cout << a << endl;
}

int main()
{
	// 引用本身需要一个合法的内存空间
	// int& res = 10;
	// 加入const就可以了,也就是常量引用,编译器优化代码为:int temp = 10;const int& res = temp;
	const int& res = 10;  // 编译器帮我们设立了一个临时的变量temp

	// res = 200;  // 加入const后就不可以修改值了

	// 函数中利用常量引用防止误操作修改实参
	print_value(res);

	return 0;
}
三、函数高级
1、函数的默认参数
在c++中,函数的形参是可以有默认值的
语法:返回值类型 函数名(参数类型 形参 = 默认参数){}
注意:
- 如果某个位置已经有了默认参数,那么从这个位置往后,从左到右都必须有默认值
- 如果函数声明有默认参数,那么函数的实现就不能有默认参数
语法示例:
#include <iostream>
using namespace std;

// 形参的默认参数
int func(int a = 10, int b = 10) {
	return a + b;
}

int main()
{
	int a = 100;
	// 当函数形参有默认值时,可以不传实参
	int res = func();
	cout << res << endl;

	// 当函数形参有默认值时,形参的值以传的实参的值为主
	int res = func(a);
	cout << res << endl;

	return 0;
}
注意点一示例:如果某个位置已经有了默认参数,那么从这个位置往后,从左到右都必须有默认值
#include <iostream>
using namespace std;


// 这样写会报错,a给了默认参数,那么a后面的所有值都要给默认参数
int func(int a = 10, int b) {
	return a + b;
}

// 正确写法
int func(int a = 10, int b = 10) {
	return a + b;
}

int main()
{


	return 0;
}
注意点二示例:如果函数声明有默认参数,那么函数的实现就不能有默认参数;函数的实现有默认参数,函数的声明就不能有默认参数
#include <iostream>
using namespace std;
// 声明函数有了默认值
int func(int a = 10, int b = 20);

// 实现函数的时候又加默认值就会报错
int func(int a = 10, int b = 20) {
	return a + b;
}

// 声明和实现只能一个有默认值
int func(int a, int b) {
	return a + b;
}

int main()
{


	return 0;
}
2、函数占位参数
c++中的函数形参列表中可以有占位符,用来做占位,调用函数时必须填补改位置
语法:返回值类型 函数名 (数据类型){}
注意:占位符也可以有默认参数
语法示例
#include <iostream>
using namespace std;

// 函数的占位参数,只写一个数据类型,不用写变量
void func(int) {
	cout << "this is func" << endl;
}

int main()
{
	// 调用有占位符的函数必须给占位参数进行填补
	func(10);

	return 0;
}
占位符也可以有默认参数
#include <iostream>
using namespace std;

// 占位符也可以有默认参数
void func(int = 10) {
	cout << "this is func" << endl;
}

int main()
{
	// 占位符参数有默认参数时可以不给该参数传值
	func();

	// 占位符参数有默认参数时也可以给该参数传值,值以传的实参为主
	func(20);

	return 0;
}
3、函数的重载
3.1、函数重载概述
作用:函数名可以相同,提高复用性,根据参数的不同调用不同的函数
函数重载满足条件
- 同一个作用域下
- 函数名相同
- 函数参数类型不同 或者 个数不同 或者 顺序不同
注意:函数的返回值不可以作为重载的条件
示例
#include <iostream>
using namespace std;
// 都在同一作用域下:全局区

// 函数的重载
void func() {
	cout << "函数func()的调用" << endl;
}
// 个数不同
void func(int a) {
	cout << "函数func(int a)的调用" << endl;
}
// 类型不同
void func(double a) {
	cout << "函数func(double a)的调用" << endl;
}
// 个数不同
void func(int a, double b) {
	cout << "函数func(int a, double b)的调用" << endl;
}
// 顺序不同
void func(double a, int b) {
	cout << "函数func(double a, int b)的调用" << endl;
}

int main()
{
	func();
	func(10);
	func(3.14);
	func(10, 3.14);
	func(3.14, 10);

	return 0;
}
函数的返回值不可以作为重载的条件
#include <iostream>
using namespace std;

// 下面两个函数只是返回值类型不同,不可以作为重载的条件,会报错
int func() {
	return 10;
}
double func() {
	return 3.14;
}

int main()
{
	func();

	return 0;
}
3.2、函数重载的注意事项
- 引用作为重载条件
- 写重载时要尽量避免默认参数
引用作为重载条件
#include <iostream>
using namespace std;
// 引用可以作为重载的条件
// 无const
void func(int& a) {
	cout << "func(int& a)" << endl;
}
// 有const
void func(const int& a) {
	cout << "func(int& a)" << endl;
}

int main()
{
	int a = 10;
	func(a);  // 会调用无const的函数,因为变量a属于可读可写的

	func(10);  // 会调用有const的函数,因为常量10属于可读不可写的

	return 0;
}
写重载时要尽量避免默认参数
#include <iostream>
using namespace std;

// 两个函数在重载的定义上没有问题,但是调用时会出现二义性
void func(int a) {
	cout << "func(int a)" << endl;
}
void func(int a ,int b = 10) {
	cout << "func(int a ,int b = 10)" << endl;
}

int main()
{
	// 碰到默认参数产生二义性,因为两个函数都可以只传一个实参
	// 所以写重载时要尽量避免默认参数
	func(10);

	return 0;
}
四、类和对象
c++面向对象的三大特性:封装、继承、多态
c++认为万事万物皆为对象,对象上有其属性和行为
1、封装
1.1、封装的意义
- 将属性和行为作为一个整体,表现生活中的事物
- 将属性和行为加以权限控制
封装的简单使用
在设计类时,属性和行为写在一起,表现事物
语法:class 类名 { 访问权限 : 属性 / 行为 };
注意:类中的属性和行为(方法)都统称为成员
属性:成员属性、成员变量
行为:成员函数、成员方法
实例:设计一个园类,求一个园的周长
#include <iostream>
using namespace std;
// 定义常量 π
const double PI = 3.14;

// 封装一个园的类
class Cirle {

public: // 访问权限:公共访问

	// 属性
	// 圆的半径
	int r;

	// 行为
	// 圆的周长函数
	double calculateZC() {
		return 2 * PI * r;
	}
};

int main()
{
	// 实例化对象
	Cirle c1;

	// 给实例化出来的对象属性赋值
	c1.r = 10;

	// 对象调用类中的行为
	cout << "园的周长为:" << c1.calculateZC() << endl;

	return 0;
}
示例二:设计一个学生类,属性有姓名和学号,可以给姓名和学号赋值,并且打印学生信息
方法一:
#include <iostream>
#include <string>
using namespace std;

// 创建学生类
class Student {
public: // 公共权限
	// 姓名
	string name;
	// 学号
	int id;

	// 打印学生信息
	void print_stu() {
		cout << "学生的姓名为:" << name
			<< "\t学生的学号为:" << id << endl;
	}
};

int main()
{
	// 实例化对象
	Student stu1;
	// 给对象赋值
	stu1.name = "刘杰";
	stu1.id = 22;
	// 调用类中的方法打印学生信息
	stu1.print_stu();

	return 0;
}
方法二:
#include <iostream>
#include <string>
using namespace std;

// 创建学生类
class Student {
public: // 公共权限
	// 成员属性
	string s_name;
	int s_id;

	// 获取学生信息的方法
	void set_stu(string name,int id) {
		s_name = name;
		s_id = id;
	}

	// 打印学生信息的方法
	void print_stu() {
		cout << "学生的姓名为:" << s_name
			<< "\t学生的学号为:" << s_id << endl;
	}
};

int main()
{
	// 实例化对象
	Student stu1;
	// 调用类中的获取学生信息的方法
	stu1.set_stu("答复", 2);
	// 调用类中的打印学生信息的方法
	stu1.print_stu();

	return 0;
}
封装的权限控制
类在设计时,可以把属性和行为放在不同权限下加以控制
访问权限有三种:
- public 公共权限(类内和类外都可以访问)
- protected 保护权限(类内可以访问,类外不可以访问,子可以访问)
- private 私有权限(类内可以访问,类外不可以访问,子类不可以访问)
示例:
#include <iostream>
#include <string>
using namespace std;

class Person {
	// 1. public           公共权限(类内和类外都可以访问)
	// 2. protected     保护权限(类内可以访问,类外不可以访问,子可以访问)
	// 3. private          私有权限(类内可以访问,类外不可以访问,子类不可以访问)

public:
	// 姓名  都可以访问到
	string name;

protected:
	// 汽车  可以让子类访问到
	string cat = "拖拉机";

private:
	// 银行卡密码  除了自己谁都不能访问
	int password  = 112233;

public:
	void func() {
		cout << "姓名:" << name << "\t汽车:" << cat << "\t银行卡密码:" << password << endl;
	}
};

int main()
{
	Person p1;
	p1.name = "刘杰";
	p1.func();
	p1.cat;  // 不可访问
	p1.password;  // 不可访问

	return 0;
}
1.2、struct和class的区别
struct和class都可以表示一个类,他们唯一的区别就是默认的访问权限不同
- struct的默认权限是公共权限
- class的默认权限是私有权限
示例:
#include <iostream>
using namespace std;

class C1 {
	int a1;
};

struct C2 {
	int a2;
};

int main()
{
	C1 c1;
	//c1.a1 = 10; // 报错,不可访问,这是私有的

	struct C2 c2;
	c2.a2 = 10;  // 可以访问,默认公共属性

	return 0;
}
1.3、成员属性设为私有
优点1:将所有成员属性设置为私有,可以自己控制读写权限
优点2:对于写权限,我们可以检测数据的有效性(也就是用户给成员属性传的值是否符合要求)
示例
#include <iostream>
#include <string>
using namespace std;

class Person {
private:
	// 可读可写
	string name;
	// 只读
	int age = 18;
	// 只写
	int password;

public:
	// 姓名即开放写接口也开放读接口
	void set_name(string u_name) {
		name = u_name;
	}
	string show_name() {
		return name;
	}

	// 年龄只开放读的接口
	int show_age() {
		return age;
	}

	// 密码只开放写入的接口
	void set_password(int u_password) {
		password = u_password;
	}

};

int main()
{
	Person p1;
	// 调用姓名写接口
	p1.set_name("张三");
	// 调用姓名读接口
	p1.show_name();
	// 调用年龄读接口
	p1.show_age();
	// 调用密码写接口
	p1.set_password(111);

	return 0;
}
1.4、封装的案例
设计立方体类
设计立方体类(Cube)
求立方体的面积和体积
分别用全局函数和成员函数判断两个立方体的体积是否相等
#include <iostream>
#include <string>
using namespace std;

class Cube {
private:
	// 长
	int len = 0;
	// 高
	int height = 0;
	// 宽
	int width = 0;

public:
	// 获取立方体长宽高的方法
	void set_LWH(int u_len, int u_width, int u_height) {
		if (u_len <= 0 || u_width <= 0 || u_height <= 0) {
			cout << "长宽高的值不可以为0或负数" << endl;
			return;
		}
		len = u_len;
		height = u_height;
		width = u_width;
	}
	// 打印立方体的长宽高
	void show_LWH() {
		if (len == 0 || height == 0 || width == 0) {
			cout << "还没有给立方体的长宽高设置赋值" << endl;
			return;
		}
		cout << "长:" << len << "\t宽:" << width << "\t高:" << height << endl;
	}
	// 获取立方体的面积
	int cube_C() {
		return 2 * len + 2 * width + 2 * height;
	}
	// 获取立方体的体积
	int cube_S() {
		return len * width * height;
	}
	// 成员函数判断两个立方体的体积是否相等
	// 只用传一个值就行了,把调用该方法的对象跟传入的对象做比较
	void is_cube_volume(Cube &c) {
		if (cube_S() == c.cube_S()) {
			cout << "立方体的体积相等" << endl;
			return;
		}
		cout << "立方体的体积不相等" << endl;
	}
};

// 全局函数判断两个立方体的体积是否相等
void is_volume(Cube &c1, Cube &c2) {
	if (c1.cube_S() == c2.cube_S()) {
		cout << "立方体的体积相等" << endl;
		return;
	}
	cout << "立方体的体积不相等" << endl;
}

int main()
{
	Cube c1;
	Cube c2;
	c1.set_LWH(12, 120, 12);
	c2.set_LWH(12, 12, 12);

	cout << "立方体c1的面积为:" << c1.cube_C() << endl;
	cout << "立方体c2的体积为:" << c1.cube_S() << endl;

	// 调用全局函数
	is_volume(c1, c2);

	// c1调用类中比较体积的方法,并把c2传进去
	c1.is_cube_volume(c2);
	// c2调用类中比较体积的方法,并把c1传进去
	c2.is_cube_volume(c1);

	return 0;
}
点和园的关系
在类中,我们可以让另一个类作为本类中的成员
设计一个园类,和一个点类,计算点和园的关系
当点的到圆心的距离等于圆的半径时,点在圆上;大于半径时,点在园外;小于半径时,点在园内
形式一:写在一个文件中
#include <iostream>
using namespace std;
class Point {
private:
	// 点的x坐标
	int x_coordinate;
	// 点的y坐标
	int y_coordinate;

public:
	// 设置点的坐标
	void set_coordinate(int x, int y) {
		x_coordinate = x;
		y_coordinate = y;
	}
	// 获取点的x坐标
	int show_x() {
		return x_coordinate;
	}
	// 获取点的y坐标
	int show_y() {
		return y_coordinate;
	}
};

class Circle {
private:
	// 园的半径
	int radius;
	// 圆心,通过点类实例化出来的一个点作为圆心
	Point center;

public:
	// 设置半径
	void set_radius(int u_radius) {
		radius = u_radius;
	}
	// 设置圆心
	void set_center(Point &u_center) {
		center = u_center;
	}
	// 获取半径
	int show_radius() {
		return radius;
	}
	// 获取圆心
	Point show_center() {
		return center;
	}
};

// 判断点与园的关系的函数
// 点到点的距离公式为:(x1-x2)^2 + (y1-y2)^2,最后再开根号
void is_pointORcircle(Point& p, Circle& c) {
	// res表示(x1-x2)^2 + (y1-y2)^2
	int res = (p.show_x() - c.show_center().show_x()) * (p.show_x() - c.show_center().show_x())
		+ (p.show_y() - c.show_center().show_y()) * (p.show_y() - c.show_center().show_y());
	// 比较点到点的距离与圆的半径,因为开根号不好用式子表示,所以将两边同时乘平方
	if (res == c.show_radius() * c.show_radius()) {
		cout << "点在园上" << endl;
	}
	else if (res < c.show_radius() * c.show_radius()) {
		cout << "点在园内" << endl;
	}
	else if (res > c.show_radius() * c.show_radius()) {
		cout << "点在园外" << endl;
	}
}

int main()
{
	// 通过点的类实例化一个点出来作为园的圆心
	Point center;
	// 设置圆心的x、y坐标
	center.set_coordinate(10, 0);

	// 实例化园的对象
	Circle c;
	// 将之前实例化完成的点的对象传进去
	c.set_center(center);
	// 设置圆的半径
	c.set_radius(10);

	// 随便实例化一个点的对象
	Point p1;
	p1.set_coordinate(10, 9);

	// 调用点与园的关系的函数,传入点的对象和圆的对象
	is_pointORcircle(p1, c);

	return 0;
}
形式二:进行分文件编写
头文件1:点类头文件.h
// 防止头文件重复包含
#pragma once
#include <iostream>
using namespace std;

// 创建关于点的类
class Point {
private:
	// 点的x坐标
	int x_coordinate;
	// 点的y坐标
	int y_coordinate;

public:
	// 声明设置点的坐标的函数
	void set_coordinate(int u_x, int u_y);
	// 声明获取点的x坐标的函数
	int show_x();
	// 声明获取点的y坐标的函数
	int show_y();
};
头文件2:园类头文件.h
// 防止头文件重复
#pragma once

#include <iostream>
#include "点类头文件.h"
using namespace std;

// 定义园的类
class Circle {
private:
	// 圆的半径
	int radius;
	// 一个类中,可以让其他类作为本类的成员
	Point center;

public:
	// 声明设置半径的函数
	void set_radius(int u_radius);

	// 声明获取半径的函数
	int show_radius();

	// 声明设置圆心的函数
	// 在主函数中先实例化一个点的对象出来,再将这个点的对象传进来
	void set_center(Point center);

	// 声明获取圆心的函数,返回值是一个点的对象
	Point show_center();
};
源文件1:点.cpp
// 导入头文件
#include "点类头文件.h"

// 定义设置点的坐标的函数
// Point::表示该函数是在Point这个类的作用域当中的,以下同理
void Point::set_coordinate(int u_x, int u_y) {
	x_coordinate = u_x;
	y_coordinate = u_y;
}

// 定义获取点的x坐标的函数
int Point::show_x() {
	return x_coordinate;
}

// 定义获取点的y坐标的函数
int Point::show_y() {
	return y_coordinate;
}
源文件2:园.cpp
#include "园类头文件.h"

// 定义设置园的半径的函数
// Circle::表示该函数是在Point这个类的作用域当中的,以下同理
void Circle::set_radius(int u_radius) {
	radius = u_radius;
}

// 定义获取园的半径的函数
int Circle::show_radius() {
	return radius;
}

// 定义设置园的圆心的函数
// 在主函数中先实例化一个点的对象出来,再将这个点的对象传进来
void Circle::set_center(Point u_center) {
	center = u_center;
}

// 定义获取圆心的函数
// 将实例化的点的对象返回出去
Point Circle::show_center() {
	return center;
}
源文件3:主函数.cpp
#include <iostream>
// 导入头文件
#include "园类头文件.h"
#include "点类头文件.h"
using namespace std;

// 判断点与园的关系的函数
// 点到点的距离公式为:(x1-x2)^2 + (y1-y2)^2,最后再开根号
void is_pointORcircle(Point &p, Circle &c) {
	// res表示(x1-x2)^2 + (y1-y2)^2
	int res = (p.show_x() - c.show_center().show_x())* (p.show_x() - c.show_center().show_x())
		+ (p.show_y() - c.show_center().show_y()) * (p.show_y() - c.show_center().show_y());
	// 比较点到点的距离与圆的半径,因为开根号不好用式子表示,所以将两边同时乘平方
	if (res == c.show_radius() * c.show_radius()) {
		cout << "点在园上" << endl;
	}
	else if (res < c.show_radius() * c.show_radius()) {
		cout << "点在园内" << endl;
	}
	else if (res > c.show_radius() * c.show_radius()) {
		cout << "点在园外" << endl;
	}
}

int main() {
	// 通过点的类实例化一个点出来作为园的圆心
	Point center;
	// 设置圆心的x、y坐标
	center.set_coordinate(10, 0);

	// 实例化园的对象
	Circle c;
	// 将之前实例化完成的点的对象传进去
	c.set_center(center);
	// 设置圆的半径
	c.set_radius(10);

	// 随便实例化一个点的对象
	Point p1;
	p1.set_coordinate(10, 10);

	// 调用点与园的关系的函数,传入点的对象和圆的对象
	is_pointORcircle(p1, c);

	return 0;
}
1.5、类的声明和成员函数的类外定义
#include <iostream>
using namespace std;

// 类的声明,可以先不写类的具体实现,只是告诉编译器有这个类的存在,在后面的代码中出现该类名不要报错
class Person;

class Person {
public:
	// 现在类中声明该函数,在类外去实现它
	Person();
};

// 类外写成员函数,只需要在函数名前面写类名加两个冒号,告诉这个函数是Person类作用域下的
Person::Person() {
	cout << "Person类的构造函数" << endl;
}

int main()
{


	system("pause");
	return 0;
}
2、对象的初始化和清理
- 在生活中购买的电子产品基本会有出厂设置,在某一天我们不用的时候会删除一些自己信息数据保证安全
- c++中的面向对象来源生活,每个对象也都会有初始设置以及对象销毁前的清理数据的设置
2.1、构造函数和析构函数
对象的初始化和清理也是两个非常重要的安全问题
- 一个对象或者变量没有初始状态,对其使用的后果是未知的
- 使用一个对象或者变量,没有及时清理,也会造成一定的安全问题
c++利用构造函数和析构函数解决上述问题,这两个函数会被编译器制动调用,完成对藏初始化和清理工作。
对象的初始化和清理时编译器强制要求我们做的事情,因此如果我们不提供构造和析构,编译器会提供他自己的构造和析构函数,只不过他们两个都是空实现(就是函数体中是空的)
- 构造函数:主要用于创建对象时为对象的成员属性赋值,构造函数由编译器自动调用,无需手动调用
- 析构函数:主要用于对象销毁前,执行一些清理工作
构造函数
语法:类名(){}
注意:
- 没有返回值,也不用写void
- 函数名与类名相同
- 构造函数可以有参数,可以发生重载
- 创建对象的时候,构造函数会自动调用,而且只会调用一次
析构函数
语法:~类名(){}
注意:
- 没有返回值,也不用写void
- 函数名就是在类名前面加~
- 构造函数不可以有参数
- 销毁对象时,析构函数会自动调用,而且只会调用一次
示例
#include <iostream>
using namespace std;

class Person {
public:
    // 构造函数
	Person() {
		cout << "Person的构造函数被调用" << endl;
	}

	// 析构函数
	~Person() {
		cout << "Person的析构函数被调用" << endl;
	}
};

void func() {
	// 该对象在栈区,函数运行完毕就会被销毁
	Person p;
}

int main()
{
	func();

	system("pause");
	return 0;
}
2.2、构造函数的分类及调用
两种分类方式:
- 按参数分为:有参构造(默认构造)和无参构造
- 按类型分为:普通构造和拷贝构造
三种调用方式:
- 括号法
- 显示法
- 隐式转换法
构造函数的分类及写法
#include <iostream>
using namespace std;

class Person {
public:
	// 无参构造  又称默构造
	Person() {
		cout << "无参构造调用" << endl;
	}

	// 有参构造  给成员属性设置初始值
	Person(int a) {
		age = a;
		cout << "有参构造调用" << endl;
	}

	// 拷贝构造
	// 加const是为了防止误操作修改了被拷贝的对象的成员属性
	// 记得要用引用的方式传递被拷贝的对象
	Person(const Person& p) {
		age = p.age;
		cout << "拷贝构造调用" << endl;
	}

private:
	int age;
};

int main()
{


	system("pause");
	return 0;
}
构造函数的三种调用方式
括号法:常用的方式
#include <iostream>
using namespace std;

class Person {
public:
	Person() {
		cout << "无参构造调用" << endl;
	}

	Person(int a) {
		age = a;
		cout << "有参构造调用" << endl;
	}

	Person(const Person& p) {
		age = p.age;
		cout << "拷贝构造调用" << endl;
	}

private:
	int age;
};

int main()
{
	/*括号法调用构造函数*/

	// 调用无参构造函数
	// 调用无参构造函数不能加括号,如果加了括号编译器就会认为这是一个函数的声明:Person p1();
	Person p1;

	// 调用有参函数,直接传入构造函数需要传入的值
	Person p2(10);

	// 调用拷贝函数,把实例化出来的对象当实参传入进去
	Person p3(p2);

	system("pause");
	return 0;
}
显示法
#include <iostream>
using namespace std;

class Person {
public:
	Person() {
		cout << "无参构造调用" << endl;
	}

	Person(int a) {
		age = a;
		cout << "有参构造调用" << endl;
	}

	Person(const Person& p) {
		age = p.age;
		cout << "拷贝构造调用" << endl;
	}

private:
	int age;
};

int main()
{
	/*显示法调用构造函数*/

	Person p1;

	// 调用有参构造
	// Person(10)单独写出来是匿名对象,当前行运行结束后,会被编译器立马析构
	Person p2 = Person(10);

	// 调用拷贝函数
	Person p3 = Person(p2);

	system("pause");
	return 0;
}
隐式转换法
#include <iostream>
using namespace std;

class Person {
public:
	Person() {
		cout << "无参构造调用" << endl;
	}

	Person(int a) {
		age = a;
		cout << "有参构造调用" << endl;
	}

	Person(const Person& p) {
		age = p.age;
		cout << "拷贝构造调用" << endl;
	}

private:
	int age;
};

int main()
{
	/*隐式转换法调用构造函数*/

	Person p1;

	// 调用有参构造  编译器会自动转变为:Person p2 = Person(10)
	Person p2 = 10;

	// 调用拷贝构造  编译器会自动转变为:Person p3 = Person(p3)
	Person p3 = p2;


	system("pause");
	return 0;
}
2.3、拷贝构造函数调用时机
- 使用一个已经创建完毕的对象来初始化一个新对象
- 值传递的方式给函数传值
- 以值传递返回局部对象
使用一个已经创建完毕的对象来初始化一个新对象
#include <iostream>
using namespace std;

class Person {
public:
	Person() {
		cout << "无参构造函数" << endl;
	}
	Person(int u_age) {
		age = u_age;
		cout << "有参构造函数" << endl;
	}
	Person(Person& p) {
		age = p.age;
		cout << "拷贝构造函数" << endl;
	}
	~Person() {
		cout << "析构函数" << endl;
	}

private:
	int age;
};

int main()
{
	// 使用一个已经创建好的对象来初始化一个对象
	Person p1(10);
	Person p2(p1);

	system("pause");
	return 0;
}
值传递的方式给函数传值
#include <iostream>
using namespace std;

class Person {
public:
	Person() {
		cout << "无参构造函数" << endl;
	}
	Person(int u_age) {
		age = u_age;
		cout << "有参构造函数" << endl;
	}
	Person(Person& p) {
		age = p.age;
		cout << "拷贝构造函数" << endl;
	}
	~Person() {
		cout << "析构函数" << endl;
	}

private:
	int age;
};

void func(Person p) {
	// 在函数内对传进来的对象进行任何操作都不会影响到被拷贝的对象
}

int main()
{
	Person p1(10);
	// 因为是值传递,也就是把p1拷贝了一份再传给函数
	func(p1);

	system("pause");
	return 0;
}
以值传递返回局部对象
#include <iostream>
using namespace std;

class Person {
public:
	Person() {
		cout << "无参构造函数" << endl;
	}
	Person(int u_age) {
		age = u_age;
		cout << "有参构造函数" << endl;
	}
	Person(Person& p) {
		age = p.age;
		cout << "拷贝构造函数" << endl;
	}
	~Person() {
		cout << "析构函数" << endl;
	}

private:
	int age;
};

Person func() {
	Person p;
	// 值传递返回对象时,会把要传递的对象拷贝一份
	return p;
}

int main()
{
	func();

	system("pause");
	return 0;
}
2.4、构造函数的构造规则
在默认情况下,c++编译器至少给一个类添加3个函数
- 默认构造函数(无参,函数体为空)
- 默认析构函数(无参,函数体为空)
- 默认拷贝构造函数,对属性进行值拷贝
构造函数调用规则如下
- 如果用户定义有参函数,c++不在提供默认无参构造,但是会提供默认拷贝构造函数
- 如果用户定义拷贝构造函数,c++不再提供其他构造函数
如果用户定义有参函数,c++不在提供默认无参构造,但是会提供默认拷贝构造
#include <iostream>
using namespace std;

class Person {
public:
	Person(int u_age) {
		age = u_age;
		cout << "有参构造函数" << endl;
	}

	int age;
};

int main()
{
	Person p;  // 报错:类Person不存在默认构造函数

	Person p1(22);
	Person p2(p1);
	// 下面两个打印结果一样,都为22,说明编译器提供了默认拷贝构造函数
	cout << "p1的年龄为" << p1.age << endl;
	cout << "p2的年龄为" << p2.age << endl;

	system("pause");
	return 0;
}
如果用户定义拷贝函数,c++不再提供其他构造函数
#include <iostream>
using namespace std;

class Person {
public:
	Person(const Person &p) {
		age = p.age;
	}

	int age;
};

int main()
{
	Person p;  // 报错:类Person不存在默认构造函数

	Person p1(22);  // 报错:没有参与匹配的构造函数


	system("pause");
	return 0;
}
2.5、深拷贝与浅拷贝
浅拷贝:简单的等号赋值操作
深拷贝:在堆区重新申请空间,进行拷贝操作
注意:如果属性有在堆区开辟的,一定要自己提供拷贝构造函数,防止浅拷贝带来的问题
示例
#include <iostream>
using namespace std;

class Person {
public:
	// 有参构造函数
	Person(int u_age, int u_height) {
		age = u_age;
		// 将该属性开辟到堆区,由程序员手动释放
		height = new int(u_height);
	}

	// 拷贝构造函数  由属性开辟到堆区的时候一定要自己提供拷贝构造函数,防止浅拷贝带来的问题
	Person(const Person& p) {
		// 浅拷贝,直接用等号赋值
		age = p.age;
		// height = p.height;  这是编译器默认拷贝构造函数的写法,是浅拷贝
		// 这样写会让两个对象的属性指向同一个堆区地址,导致在释放堆区数据的时候同一个堆区地址会被连续释放两次,从而导致非法操作

		// 将拷贝的属性在堆区中开辟一个新的地址
		height = new int(*p.height);
	}

	// 析构函数
	~Person() {
		// 判断堆区中的属性是否为空
		if (height != NULL) {
			// 释放堆区中的数据
			delete height;
			// 防止野指针的出现
			height = NULL;
		}
		cout << "析构函数调用" << endl;
	}


	int age;
	// 该属性要开辟到堆区,所以要用指针接收
	int* height;
};

void func() {
	Person p1(18, 180);
	Person p2(p1);

	cout << "p1的年龄为:" << p1.age << "  p1的身高为:" << *p1.height << endl;
	cout << "p2的年龄为:" << p2.age << "  p2的身高为:" << *p2.height << endl;
}

int main()
{
	func();

	system("pause");
	return 0;
}
2.6、初始化列表
作用:用来初始化属性
语法:构造函数():属性1(值1),属性2(值2),属性3(值3)...{}
#include <iostream>
using namespace std;

class Person {
public:
	// 传统初始化属性
	Person(int u_a, int u_b, int u_c) {
		a = u_a;
		b = u_b;
		c = u_c;
	}

	// 初始化列表初始化属性
	Person(int u_a, int u_b, int u_c) :a(u_a), b(u_b), c(u_c) {}

	int a;
	int b;
	int c;
};


int main()
{
	Person p1(1,2,3);
	cout << p1.a << "\t" << p1.b << "\t" << p1.c << endl;

	system("pause");
	return 0;
}
2.7、类对象作为成员
c++类中的成员可以是另一个类的对象,该成员称之为对象成员
例如
class A{}
calss B{
    A a;
}
B类中有对象A作为成员,A为对象成员
那么当创建B对象时
构造函数的调用顺序是:先调用对象成员中的构造函数,再调用本类中的构造函数
析构函数的调用顺序是:先调用本类中的析构函数,再调用对象成员中的析构函数
#include <iostream>
#include <string>
using namespace std;
// 手机类
class Phone {
public:
	// 初始化列表的方式给属性设置初始值
	Phone(string u_phone_name, int u_phone_price):phone_name(u_phone_name), phone_price(u_phone_price) {
		cout << "phone手机类构造函数调用" << endl;
	}

	~Phone() {
		cout << "phone手机类析构函数调用" << endl;
	}

	// 手机品牌
	string phone_name;
	// 手机价格
	int phone_price;
};

// 人类
class Person {
public:
	// 初始化列表
	// 初始化列表的方式为对象成员初始化属性:phone(phone_name, phone_price)
	// 其内部原理为:Phone phone = (phone_name, phone_price)  隐式转换法
	// 这样就可以初始化两个类
	Person(string u_name, string phone_name, int phone_price):name(u_name), phone(phone_name, phone_price){
		cout << "person人类构造函数调用" << endl;
	}

	~Person() {
		cout << "Person析构人类函数调用" << endl;
	}

	string name;
	Phone phone;
};

void func() {
	Person p("刘杰", "华为荣耀", 1999);
	cout << "姓名:" << p.name << "\t手机品牌:" << p.phone.phone_name << "\t手机价格:" << p.phone.phone_price << endl;
}

int main()
{
	func();
	/*
	打印结果

	phone手机类构造函数调用
	person人类构造函数调用
	姓名:刘杰      手机品牌:华为荣耀      手机价格:1999
	Person析构人类函数调用
	phone手机类析构函数调用
	*/

	system("pause");
	return 0;
}
2.8、静态成员
静态成员就是在成员变量和成员函数前加上关键字static,称为静态成员
静态成员分为:
-
静态成员变量
特点:
- 在编译阶段分配内存,也就是存在全局区
- 类内声明,类外定义
- 所有对象共享一份数据
- 可以通过对象访问该数据也可以通过类名访问
- 静态变量也是有访问权限的
-
静态成员函数
特点:
- 所有对象共享一个函数
- 静态成员函数只能访问静态成员变量
- 有访问权限
- 可以通过对象访问也可以通过类名访问
静态成员变量
示例
#include <iostream>
using namespace std;


class Person {
public:
	// 1、静态成员的类内声明
	static int a;

private:
	static int b;
};
// 1、静态成员的类外定义
int Person::a = 100;
int Person::b = 1000;


int main()
{
	Person p1;
	Person p2;
	// 2、静态成员变量的值是共享的,一个对象改变,其他对象访问到的数据也会改变
	cout << "p2没有改变静态成员变量前的p1:" << p1.a << endl;

	p2.a = 300;
	// 2、静态成员变量的值是共享的,一个对象改变,其他对象访问到的数据也会改变
	cout << "p2改变静态成员变量后的p1:" << p1.a << endl;

	// 3、两种访问静态成员变量的方法
	// 通过对象访问
	cout << p.a << endl;
	// 通过类名访问
	cout << Person::a << endl;

	// 4、静态成员变量也是有访问权限的
	cout << Person::b << endl;  // 报错:不可访问,在私有权限下

	system("pause");
	return 0;
}
静态成员函数
#include <iostream>
using namespace std;


class Person {
public:
	static void func() {
		// 静态成员函数只能访问静态成员变量
		a = 100;

		// 报错:非静态成员引用必须与特定对象相对
		b = 200;

		cout << "静态成员函数的调用" << endl;
	}

	static int a;
	int b;
};


int main()
{
	Person p;
	// 对象可以调用静态成员函数
	p.func();

	// 类名也可以调用静态成员函数
	Person::func();

	system("pause");
	return 0;
}
3、c++对象模型和this指针
3.1、成员变量和成员函数分开存储
在c++中,类内的成员变量和成员函数分开存储
只有非静态成员属性是属于类对象上的
空对象占用的内存空间为:1
c++编译器会给每个空对象也分配一个字节空间,是为了区分空对象所在内存的位置
每个空对象都有一个独一无二的内存地址
#include <iostream>
using namespace std;
class Person {

};

void func() {
	Person p;
	// 空对象占用的内存空间为:1
	cout << sizeof(p) << endl;
}

int main()
{
	func();

	system("pause");
	return 0;
}
只有非静态成员属性是属于类对象上的
class Person {
	// 非静态成员属性  属于类对象上
	int a;

	// 静态成员属性  不属于类对象上
	static int b;

	// 非静态成员函数  不属于类对象上
	void c() {

	}

	// 静态成员函数  不属于类对象上
	static void d() {

	}
};
3.2、this指针的概念
每一个非静态成员函数只会诞生一份函数实例,也就是说多个同类型的对象会共用一块代码,c++通过提供特殊的对象指针,this指针解决上述问题
this指针是隐含在每一个非静态成员函数内的一种指针
this指针指向被调用的成员函数所属的对象的地址
作用:
- 当形参和成员变量同名时,可用this指针来区分
- 在类的非静态成员函数中返回对象本身,可使用return *this,再用引用接收
this指向类内数据变量
#include <iostream>
using namespace std;


class Person {
public:
	Person(int age) {
		this->age = age;
	}

	int age;
};

int main()
{
	Person p(10);
	cout << p.age << endl;

	system("pause");
	return 0;
}
this返回对象本身
#include <iostream>
using namespace std;


class Person {
public:
	Person(int money) {
		this->money = money;
	}

	// 想要返回调用该函数的对象本身,记得使用引用返回
	// 当我们使用值返回时(就是Person前不加&的时候),通过拷贝构造函数的调用时机可以知道:值传递返回对象时,会把要传递的对象拷贝一份一模一样的
	Person& money_add(Person& p) {
		this->money += p.money;
		// 当对象调用该函数时,this就是指向该对象的地址,加*解引用返回对象本身
		return *this;
	}

	int money;
};

int main()
{
	Person p1(100);
	Person p2(100);

	// 链式编程思想
	// 函数的返回值是调用对象的本身,就可以无限的调用下去
	p2.money_add(p1).money_add(p1).money_add(p1);
	cout << "p2账号的钱还有" << p2.money << endl;


	system("pause");
	return 0;
}
3.3、空指针访问成员函数
c++中空指针也是可以调用成员函数的,但是要注意有没有用到this指针
如果用到this指针,就要加以判断,保证程序不会崩溃
空指针不能调用用到this指针的成员函数
#include <iostream>
using namespace std;


class Person {
public:
	void show_age() {
		// 报错:this不能为nullptr
		// 在调用age属性时,其实是默认加了this->的:this->age
		// 所以this指向的是一个空的对象,访问不到任何东西,从而导致程序崩溃
		cout << "年龄为:" << age << endl;
	}

	void show() {
		cout << "没有用到this指针时,空指针也是可以调用成员函数的" << endl;
	}


	int age;
};

int main()
{
	Person * p = NULL;
	// 不会报错,因为没有用到this指针
	p->show();
	// 报错,用到了this指针
	p->show_age();


	system("pause");
	return 0;
}
防止空指针调用带来问题,可以加一个判断
#include <iostream>
using namespace std;


class Person {
public:
	void show_age() {
		// 空指针访问该函数时直接结束函数,避免程序崩溃
		if (this == NULL) {
			return;
		}
		cout << "年龄为:" << age << endl;
	}

	void show() {
		cout << "没有用到this指针时,空指针也是可以调用成员函数的" << endl;
	}


	int age;
};

int main()
{
	Person * p = NULL;
	p->show();
	p->show_age();


	system("pause");
	return 0;
}
3.6、this指针的本质
this指针的本质是一个指针常量,指针指向不可修改
3.5、const修饰成员函数
常函数:
- 成员函数后加const,我们就称这个函数为:常函数
- 常函数内不可以修改成员属性
- 如果成员属性在声明时加上 mutable 关键字,就可以在常函数中修改该属性
常对象:
- 声明对象前加const,我们称该对象为常对象
- 常对象只能修改被mutable修饰过的属性
- 常对象只能调用常函数
示例:
#include <iostream>
using namespace std;


class Person {
public:
	void func() const {
		// age = 10;  // 报错:表达式必须是可修改的左值
		// this指针是隐含在每一个非静态成员函数内的一种指针
		// this的本质是指针常量,不可修改指针指向
		// 所以age = 10;的本质是  Person * const this->age = 10;
		// 想要指针指向的值也不可修改,就把他变为:const Person * const this->age;
		// 也就是在成员函数后面加上const,所以age = 10会报错

		b = 100;
	}

	void func1(){

	}

	int age;
	mutable int b;  // 加上关键字mutable后,即使在常函数中也可以修改这个值
};

int main()
{
	const Person p;  // 在对象前面加const,变为常对象
	p.age = 10;  // 报错:常对象只能修改被mutable修饰过属性
	p.func1();  // 报错:常对象只能调用常函数

	p.b = 20;
	p.func();
	p.age;  // 可以查看,但是不能修改

	system("pause");
	return 0;
}
4、友元
那生活中的例子来说,家里的客厅类似公共权限(public),谁都可以访问,卧室就类似私有权限(private),只有我能进去,但是我也可以给我的好朋友权限,让他也能进去,给我好朋友的权限就类似友元
在程序里,有些私有属性想让类外特殊的一些函数或者类进行访问,就需要用到友元
友元的目的就是让一个函数或者类访问另一个类中私有成员
友元的关键字为:friend
友元的三种实现方式
- 全局函数做友元
- 类做友元
- 成员函数做友元
4.1、全局函数做友元
在类中写上全局函数的声明,并且在前面加上friend关键字,可以不用写在public权限中
friend void func1();
示例
#include <iostream>
#include <string>
using namespace std;

// 房子类
class Home {
	// 告诉编译器,func1和func2这个两个全局函数是Home的好朋友,可以访问他的私有权限中的内容
	// 把函数的声明写在类中,并且在前加上friend关键字,可以不用写在public权限后
	friend void func1();
	friend void func2(Home &h);

public:
	// 初始化成员属性
	Home() {
		sitting_room = "客厅";
		bed_room = "卧室";
	}

public:
	// 客厅,公共的
	string sitting_room;

private:
	// 卧室,私有权限
	string bed_room;
};

void func1() {
	Home h;
	cout << "好朋友func1正在访问:" << h.bed_room << endl;
}

void func2(Home& h) {
	cout << "好朋友func2正在访问:" << h.bed_room << endl;
}

int main()
{
	func1();

	Home hhh;
	func2(hhh);

	system("pause");
	return 0;
}
4.2、类做友元
在类中写上类的声明,并且在前面加上friend关键字,可以不用写在public权限中
friend class GoodFirend;
示例
#include <iostream>
#include <string>
using namespace std;

// 创建一个房子类
class Home {
	// 告诉编译器,GoodFirend这个类是我的好朋友,给他权限访问我这个类中的私有属性
	friend class GoodFirend;

public:
	// 初始化属性
	Home() {
		living_room = "客厅";
		bed_room = "卧室";
	}

	// 客厅:公共属性
	string living_room;

private:
	// 卧室:私有属性
	string bed_room;
};

class GoodFirend {
public:
	GoodFirend() {
		// 通过房子类创建一个对象,将其放到堆区中
		home = new Home;
	}

	// 访问房子类中的属性的函数
	void visitor() {
		cout << "好朋友类正在访问:" << home->living_room << endl;
		cout << "好朋友类正在访问:" << home->bed_room << endl;
	}

	// new操作符创建的对象要用指针接收
	Home* home;
};

int main()
{
	GoodFirend gf;
	gf.visitor();

	system("pause");
	return 0;
}
4.3、成员函数做友元
- 程序是一行一行往下运行的,在调用某个函数的时候要看看该函数是否在之前定义或者声明过
- 一个类要调用另一个类做成员,也要看看另一个类的构造函数是否在之前定义或者声明过
在类中声明另一个类的成员函数为友元要注意该成员函数一定要声明或者定义在类的前面
#include <iostream>
#include <string>
using namespace std;
/// <summary>
/// 程序是一行一行往下运行的,在调用某个函数的时候要看看该函数是否在之前定义或者声明过
/// 一个类要调用另一个类做成员,也要看看另一个类的构造函数是否在之前定义或者声明过
/// </summary>

class Home;

// 好朋友类
class GoodFriend {
public:
	GoodFriend();

	void visitor_public();

    // 该函数要声明或定义在Home类前,避免
	void visitor_private();

	Home* home;
};

// 房子类
class Home {
    // 在类中声明另一个类的成员函数为友元要注意该成员函数一定要声明或者定义在类的前面
	// 告诉编译器,GoodFriend类中的成员函数visitor_private可以访问本类中的私有权限
	friend void GoodFriend::visitor_private();

public:
	Home();

	string living_room;
private:
	string bed_room;
};

/*类外定义函数*/
// 初始化Home类中的属性
Home::Home() {
	living_room = "客厅";
	bed_room = "卧室";
}

// 在GoodFriend类中创建一个Home类的对象在堆区中
GoodFriend::GoodFriend() {
	home = new Home;
}
// 只能访问Home类的对象的公共属性
void GoodFriend:: visitor_public() {
	cout << home->living_room << endl;
}
// 可以访问Home类的对象的私有属性
void GoodFriend:: visitor_private() {
	cout << home->bed_room << endl;
}

int main()
{
	GoodFriend gf;
	gf.visitor_private();

	system("pause");
	return 0;
}
4.4、类内写全局函数
一般来说,类内的函数都是属于类的成员,但是如果在函数前加上friend关键字修饰,那么该函数就变为了全局函数
他可以调用该类中的私有属性,不可以使用this指针
#include <iostream>
#include <string>
using namespace std;

class Person
{
	// 函数前加上friend关键字修饰,那么该函数就变为了全局函数
	friend void print_person(Person& p)
	{
		this->m_age;  // 报错:这是一个全局函数了,无法使用this指针
		cout << "姓名:" << p.m_name << "  年龄:" << p.m_age << endl;
	}

public:
	Person(int age, string name)
	{
		this->m_age = age;
		this->m_name = name;
	}

private:
	int m_age;
	string m_name;
};

void test()
{
	Person p(22, "张三");

    // 调用类内中的全局函数
	print_person(p);
}

int main()
{
	test();

	return 0;
}
5、运算符重载
运算符重载的概念:对已有的运算符重新定义,赋予其另一种功能,以适应不同的数据类型
5.1、算术运算符重载
作用:让自定义类型的数据可以进行运算
注意:
- 算术运算符【*】、【/】、【%】 、【+】、【-】,均可以使用下面方法.
- 不要滥用重载,让操作与符号匹配
- 实现运算符重载的函数,可以是成员函数,也可以是全局函数
例如:
Person p1(100); // p1有100元
Person p2(50); // p2有50元

// 现在我们要创建一个p3,要求他有p1和p2人民币的总和
Person p3 = p1 + p2;
不使用运算符重载的方式
// 先创建两个Person类的对象p1和p2,并初始化成员属性a和b
// 最后再创建对象p3,让p3的a的值为p1和p2的a的值相加
class Person{
public:
    int a;

    // 如果直接使用Person p3 = p1 + p2 是肯定不行的,所以我们就需要写一个成员函数
    Person add(Person &p){
        Person temp;
        temp.a = this->a + p.a;
        temp.b = this->b + p.b;
        return temp;
	}
};

Person p1;
p1.a = 100;

Person p2;
p2.a = 50;

// 这样我们就可以实现类似Person p3 = p1 + p2的情况了
Person p3 = p1.add(p2);
但是编译器提供了更加简单的方法,把实现自定义算术运运算符的函数名统一命名为operator,而且也可以简化调用函数的方式为:Person p3 = p1+p2
示例:
使用成员函数的方式
#include <iostream>
using namespace std;

class Person {
public:
    int a;

    // 成员函数的运算符重载方式
    Person operator+(Person& p) {
        // 创建一个临时的对象
        Person temp;
        // 给临时对象的属性a赋值
        temp.a = this->a + p.a;
        // 返回值的方式会触发拷贝构造函数复制一个新的对象返回
        return temp;
    }
};

void func() {
    Person p1;
    p1.a = 10;

    Person p2;
    p2.a = 20;

    // Person p3 = p1.operator+(p2);  这是下面式子的本质写法
    Person p3 = p1 + p2;  // 使用了编译器提供的函数名,可以简化上面的式子
    cout << "p3的a为:" << p3.a << endl;
}

int main()
{
    func();

	system("pause");
	return 0;
}
使用全局函数的方式
#include <iostream>
using namespace std;

class Person {
public:
    int a;
};

// 需要传入两个对象
Person operator+(Person& p1, Person& p2) {
    Person temp;
    temp.a = p1.a + p2.a;
    return temp;
}

void func() {
    Person p1;
    p1.a = 10;

    Person p2;
    p2.a = 20;

    // Person p3 = operator+(p1, p2);  这是下面式子的本质写法
    Person p3 = p1 + p2;  // 使用了编译器提供的函数名,可以简化上面的式子
    cout << "p3的a为:" << p3.a << endl;
}

int main()
{
    func();

	system("pause");
	return 0;
}
运算符重载也可以发生函数重载
#include <iostream>
using namespace std;

class Person {
public:
    int a;
};

/*根据传入类型的不同调用不同的函数,节省变量名*/
// 对象加对象
Person operator+(Person& p1, Person& p2) {
    Person temp;
    temp.a = p1.a + p2.a;
    return temp;
}
// 对象减整形
Person operator-(Person& p, int num) {
    Person temp;
    temp.a = p.a - num;
    return temp;
}

void func() {
    Person p1;
    p1.a = 10;

    Person p2;
    p2.a = 20;

    // Person p3 = operator+(p1, p2);  这是下面式子的本质写法
    Person p3 = p1 + p2;  // 使用了编译器提供的函数名,可以简化上面的式子
    cout << "p3的a为:" << p3.a << endl;

    // Person p4 = operator-(p3, 10);  这是下面式子的本质写法,与上面发生函数重载
    Person p4 = p3 - 10;
    cout << "p4的a为:" << p4.a << endl;
}

int main()
{
    func();

	system("pause");
	return 0;
}
5.2、左移运算符重载
作用:左移运算符的重载可以帮助我更好的输出自定义的数据类型,可以做到简洁,在不浪费多行代码的情况下,使用函数来输出类中的成员属性数据
左移运算符的重载只能在全局函数定义
首先我们先创建一个类
class Person{
public:
    Person(int a, int b){
        this->m_a = a;
        this->m_b = b;
    }

private:
    int m_a;
    int m_b;
};
既然要输出成员属性,那为什么不把左移运算符重载函数写在类中做成员函数,主要是因为这样会出现如下异常情况
ostream& operator<<(cout){}
当实例化出来的对象p调用该方法时,就会出现:p << cout; 这种情况,当cout出现在左移运算符的右边时,就会出现编译错误,所以左移运算符的重载只能用全局函数来实现
左移运算符重载的定义方式
- 通过看cout的定义源码可知,ostream是cout的数据类型,属于标准输出流,所以要完成左移运算符的重载,就必须设置返回值为标准输出流ostream
- 因为全局只能有一个cout对象,所以返回值要加上引用&,确保不会出现新的cout对象
- 返回值必须返回一个cout对象,来确保可以进行链式编程,以及endl换行
实现如下
ostream& operator<<(ostream& cout, 类名& 对象名){
    cout << "要输出的成员属性" << 对象名.成员属性;
    return cout;
}
具体案例实现
#include <iostream>
#include <string>
using namespace std;

class Person {
    // 成员属性在私有权限中,让左移重载成为类的友元
    friend ostream& operator<<(ostream& cout, Person& p);

public:
    // 初始化属性
    Person(int a, int b, string name) {
        this->a = a;
        this->b = b;
        this->name = name;
    }

private:
    string name;
    int a;
    int b;
};

// 左移运算符重载
// 返回类型用引用,保证全局只有一个cout对象
ostream& operator<<(ostream& cout, Person &p) {
    cout << p.name << "的a值为:" << p.a << "\tb值为:" << p.b << endl;
    // 返回本体,保证链式编程
    return cout;
}


int main()
{
    Person p(10,20,"liu");

    // 通过左移运算符的重载,可以直接输出p对象所含的成员属性
    // 他的本质是:operator<<(cout, p) << endl;
    cout << p << endl;

	system("pause");
	return 0;
}
5.3、递增运算符重载
注意:左移运算符重载与递增运算符重载的一起使用的时候,左移运算符中接收对象时不能使用引用,要用值传递的方式(详细见案例中的注释)
首先我们看看a++和++a的区别
int a = 0;

// 前置运算符
cout << ++a << endl;
cout << a << enl;
// 输出结果为1和1,先赋值,在输出

// 后置运算符
cout << a++ << endl;
cout << a << endl;
// 输出结果为0和1,先输出,在赋值
由上可知,递增运算符分为前置递增和后置递增
前置递增函数
先创建一个类
class MyInt {
public:
	// 初始化a的值
	MyInt(int a) {
		m_a = a;
	}

private:
	int m_a;
};
类内实现
// 前置递增
// 这里引用返回是为了更好的实现函数功能,方便二次重载递增,也就是++(++a),不返回引用则无法实现连续递增
MyInt& operator++() {
    // 先进行自增
    m_a++;
    // 再把本体返回,且这里面的属性:m_a已经自增过
    return *this;
}
类外实现
MyInt& operator++(MyInt& a) {
    a.m_a++;
    return a;
}
后置递增函数
类内实现
// 后置递增
// 在括号中使用占位符int,表示这是一个后置递增,用于区分前置递增
// 这里不使用引用是因为temp是一个临时的局部变量,存储在栈区,在函数运行完后会被回收
// 也因此也不能进行连续的递增:(a++)++
MyInt operator++(int) {
    // 创建一个临时的对象来保存当前对象的转态
    MyInt temp = *this;
    // 再让当前对象中的属性:m_a自增
    m_a++;
    // 返回临时的对象,此时对象中的属性:m_a还是没自增前的,然后被左移重载输出出来
    // 这样就实现了先输出在赋值的效果
    return temp;
}
类外实现
MyInt operator++(MyInt& a, int) {
	MyInt temp = a;
	a.m_a++;
	return temp;
}
案例实现
#include<iostream>
using namespace std;

class MyInt {
	friend ostream& operator<<(ostream& cout, MyInt a);

public:
	// 初始化a的值
	MyInt(int a) {
		m_a = a;
	}

	// 前置递增
	// 这里引用返回是为了更好的实现函数功能,方便二次重载递增,也就是++(++a),不返回引用则无法实现连续递增
	MyInt& operator++() {
		// 先进行自增
		m_a++;
		// 再把本体返回,且这里面的属性:m_a已经自增过
		return *this;
	}

	// 后置递增
	// 在括号中使用占位符int,表示这是一个后置递增,用于区分前置递增
	// 这里不使用引用是因为temp是一个临时的局部变量,存储在栈区,在函数运行完后会被回收
	// 也因此不能进行连续的递增
	MyInt operator++(int) {
		// 创建一个临时的对象来保存当前对象的转态
		MyInt temp = *this;
		// 再让当前对象中的属性:m_a自增
		m_a++;
		// 返回临时的对象,此时对象中的属性:m_a还是没自增前的,然后被左移重载输出出来
		// 这样就实现了先输出在赋值的效果
		return temp;
	}

private:
	int m_a;
};

// 这里的左移运算符重载接收对象不使用引用是为了兼容后置递增重载,因为他返回的对象在自增函数完成后就被回收了,再去引用就成了非法操作
ostream& operator<<(ostream& cout, MyInt a) {
	cout << a.m_a << endl;
	return cout;
}


int main() {
	MyInt a(0);
    // 要想直接输出对象中属性的数据,就要重载一个左移运算符
	cout << ++(++a) << endl;
	cout << a << endl;

	MyInt b(0);
	cout << b++ << endl;
	cout << b << endl;

	system("pause");
	return 0;
}
5.4、赋值运算符重载
c++编译器至少给一个类添加4个函数
- 默认构造函数(无参,函数体为空)
- 默认析构函数(无参,函数体为空)
- 默认拷贝构造函数,对属性进行值拷贝
- 赋值运算符 operator=,对属性进行值拷贝
为什么要重载赋值运算符
如果类中有属性指向堆区,做赋值操作时就会出现深浅拷贝的问题
编译器默认的赋值运算符是就行浅拷贝,直接让两个数据相等:p1.age = p2.age
这样就会让两个对象的age指针指向同一个地址
当我们在析构函数中释放数据时,同一个地址会被释放两次,从而导致程序崩溃
因此我们需要重载赋值运算符,让两个指针指向不同的地址,也就是进行深拷贝
#include<iostream>
using namespace std;

class Person {
public:
	Person(int age) {
		// 将数据开辟到堆区
		this->age = new int(age);
	}
	~Person() {
		// 当堆区中的数据不为空时
		if (this->age != NULL) {
			// 释放堆区数据
			delete age;
			// 防止野指针
			age = NULL;
		}
	}

	// 该数据存放在堆区,用指针接收
	int *age;
};

void func() {
	Person p1(18);
	Person p2(28);

	// 这里使用的是编译器默认的赋值运算符,直接让两个数据相等:p1.age = p2.age,这是浅拷贝
	// 这样就会让两个对象的age指针指向同一个地址
	// 当我们在析构函数中释放数据时,同一个地址会被释放两次,从而导致程序崩溃
	// 因此我们需要重载赋值运算符,让两个指针指向不同的地址,也就是进行深拷贝
	p2 = p1;
	cout << "p1->age:" << *p1.age << endl;
	cout << "p2->age:" << *p2.age << endl;
}

int main() {
	func();

	return 0;
}
案例
#include<iostream>
using namespace std;

class Person {
public:
	Person(int age) {
		// 将数据开辟到堆区
		this->age = new int(age);
	}
	~Person() {
		// 当堆区中的数据不为空时
		if (this->age != NULL) {
			// 释放堆区数据
			delete age;
			// 防止野指针
			age = NULL;
		}
	}

    // 赋值运算符重载
	Person& operator=(Person& p) {
		// 先释放当前对象在堆区的数据
		if (this->age != NULL) {
			delete age;
			age = NULL;
		}
		// 再在堆区重新申请一个内存空间,并用*age接收
		this->age = new int(*p.age);
		// 返回对象本体,并用引用接收,方便进行链式编程:p3 = p2 = p1
		return *this;
	}

	// 该数据存放在堆区,用指针接收
	int *age;
};

void func() {
	Person p1(18);
	Person p2(28);
    Person p3(44);

	p2 = p1;
    p3 = p2 = p1;
	cout << "p1->age:" << *p1.age << endl;
	cout << "p2->age:" << *p2.age << endl;
    cout << "p3->age:" << *p3.age << endl;
}

int main() {
	func();

	return 0;
}
5.5、关系运算符重载
关系运算符【==】、【!=】、【>】 、【<】、【>=】、【<=】,均可以使用下面方法.
例如:想判断两个对象的全部属性是否一致时
#include<iostream>
#include<string>
using namespace std;

class Person {
public:
	Person(string name, int age) {
		this->name = name;
		this->age = age;
	}

	bool operator==(Person& p) {
		if (this->name == p.name && this->age == p.age) {
			return true;
		}
		else{
			return false;
		}
	}

private:
	string name;
	int age;
};

void func() {
	Person p1("刘杰", 18);
	Person p2("刘杰", 18);
	Person p3("张三", 18);

	if (p1 == p2) {
		cout << "p1和p2是同一个人" << endl;
	}
	else {
		cout << "p1和p2不是同一个人" << endl;
	}

	if (p1 == p3) {
		cout << "p1和p3是同一个人" << endl;
	}
	else {
		cout << "p1和p3不是同一个人" << endl;
	}
}

int main() {

	func();

	return 0;
}
5.6、函数调用运算符重载
- 函数调用运算符()也可以重现
- 由于重载后使用的方式非常象函数的使用,因此称为仿函数
- 仿函数没有固定写法,非常灵活
函数名为:operator()
他可以无参也可以有参,可以没有返回值,也可以有返回值
在后面的std中会用到很多
没有固定写法,非常灵活
#include<iostream>
using namespace std;

class Person {
public:
	Person(int a) {
		this->a = a;
	}

	// 可以没形参,可以没返回值
	void operator()() {
		cout << "属性值为:" << this->a << endl;
	}

	// 可以有形参
	void operator()(int a) {
		cout << "把属性乘以" << a <<"的结果为:" << this->a * a << endl;
	}

	// 可以有返回值
	bool operator()(int a, int b) {
		if (a == b) {
			return true;
		}
		else {
			return false;
		}
	}
	int a;
};

int main() {

	Person p(10);

	// 无参无返
	p();

	// 有参无返
	p(10);

	// 有参有返
	if (p(10, 20)) {
		cout << "两个数相等" << endl;
	}
	else {
		cout << "两个数不相等" << endl;
	}


	return 0;
}
匿名对象
类名直接加括号调用构造函数,并且没有变量接收
- 在当前行运行完后会被马上释放
#include<iostream>
using namespace std;

class Person {
public:
	Person(int a) {
		this->a = a;
	}

	void operator()() {
		cout << "属性值为:" << this->a << endl;
	}

	~Person() {
		cout << "析构函数调用" << endl;
	}

	int a;
};

int main() {

	// 匿名对象,类名直接加括号调用构造函数,并且没有变量接收
	Person(10)();
	cout << "匿名对象的下一行代码" << endl;

	return 0;
}
/*打印结果:
属性值为:10
析构函数调用
匿名函数的下一行代码
*/
6、继承
面向对象的三大特性之一
下级别成员除了拥有上一级的共性,还有自己的特性
例如:我们定义一个男人类和一个女人类
// 男人类
class Man{
public:
    string name;  // 姓名
    int age;  // 年龄

    // 睡觉的方法
    void sleep(){
        cout << "睡觉" << endl;
    }
    // 吃饭的方法
    void eat(){
        cout << "吃饭" << endl;
    }
    // 打篮球的方法
    void play_backetball(){
        cout << "打篮球" << endl;
    }
};

// 女人类
class Woman{
    string name;  // 姓名
    int age;  // 年龄

    // 睡觉的方法
    void sleep(){
        cout << "睡觉" << endl;
    }
    // 吃饭的方法
    void eat(){
        cout << "吃饭" << endl;
    }
    // 做美甲
    void manicure(){
        cout << "做美甲" << endl;
    }
};
我们发现两个类有很多相同的方法和属性,那么我们就可以考虑吧把这些重复的属性和方法归拢起来在写一个类:人类
class Person{
    string name;  // 姓名
    int age;  // 年龄

    // 睡觉的方法
    void sleep(){
        cout << "睡觉" << endl;
    }
    // 吃饭的方法
    void eat(){
        cout << "吃饭" << endl;
    }
};
最后我们再让男人类和女人类继承人类,这样可以减少代码的重复
6.1、继承的基础语法
语法:class 子类 : 继承方式 父类
子类也被称为派生类
父类也被称为基类
#include<iostream>
using namespace std;

// 父类
class Person {
public:
    string name;  // 姓名
    int age;  // 年龄

    // 睡觉的方法
    void sleep() {
        cout << "睡觉" << endl;
    }
    // 吃饭的方法
    void eat() {
        cout << "吃饭" << endl;
    }
};

// 继承的语法:class 子类 : 继承方式 父类
// 人类的子类:男人类
class Man :public Person {
public:
    // 打篮球的方法
    void play_backetball() {
        cout << "打篮球" << endl;
    }
};

// 人类的子类:女人类
class Woman :public Person {
public:
    // 做美甲
    void manicure() {
        cout << "做美甲" << endl;
    }
};

int main() {

    Man m;
    m.sleep();
    m.eat();
    m.play_backetball();

    Woman w;
    w.sleep();
    w.eat();
    w.manicure();

	return 0;
}
总结:
继承的好处:可以减少重复的代码
class A : public B;
A类称为子类或者派生类
B类称为父类或者基类
派生类中的成员包含两大部分:
一类是从父类继承过来的,一类是自己增加的成员
从父类继承过来的表现其共性,而新增的成员体现了其个性
6.2、继承方式
继承语法:class 子类 : 继承方式 父类
继承方式一共有三种
- 公共继承
- 保护继承
- 私有继承
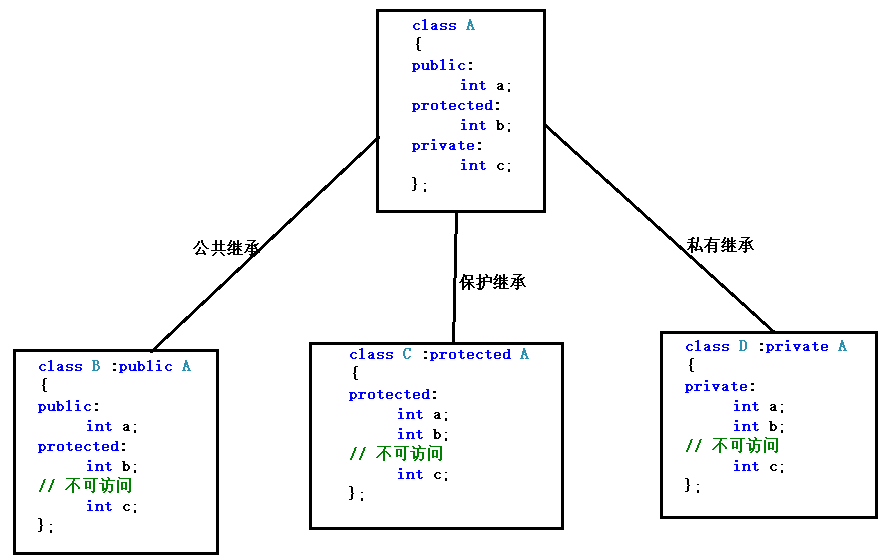
上图的含义:
- 父类私有权限中的成员,子类无论以何种方式继承,子类都无法访问到
- 公共继承:子类继承父类公共权限和保护权限下的成员,并且在子类中这些成员的权限不变
- 保护继承:子类继承父类公共权限和保护权限下的成员,但是这些成员的权限全部变为保护
- 私有继承:子类继承父类公共权限和保护权限下的成员,但是这些成员的权限全部变为私有
6.3、继承中的对象模型
从父类继承过来的成员,那些属于子类对象中?
其实所有的成员都会被继承下去,只是被隐藏了,我们看不到而已
通过代码验证
示例
#include<iostream>
using namespace std;

class A
{
public:
	int a;
protected:
	int b;
private:
	int c;  // 私有成员只是被隐藏了,但是还是会被继承下去
};

class B :public A {
public:
	int d;
};

void func() {
	cout << "子类B所占的字节大小为:" << sizeof(B) << endl;  // 占用16个字节
}

int main()
{
	func();

	return 0;
}
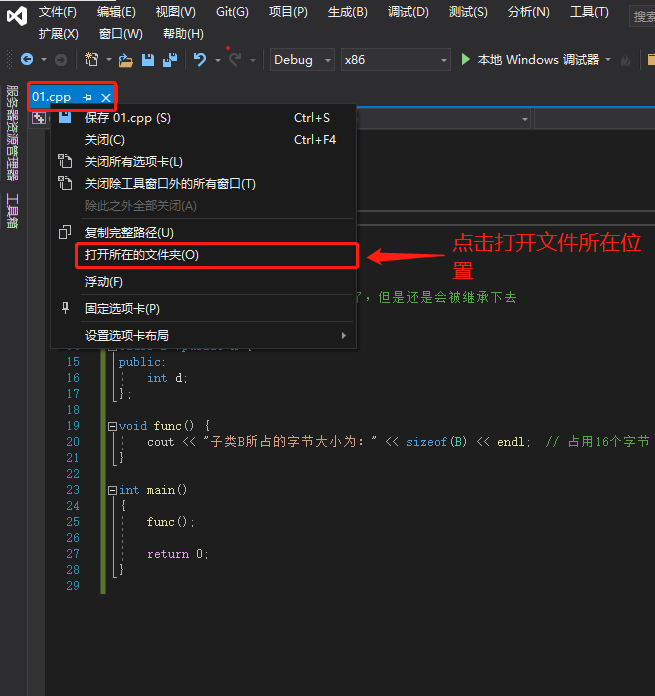
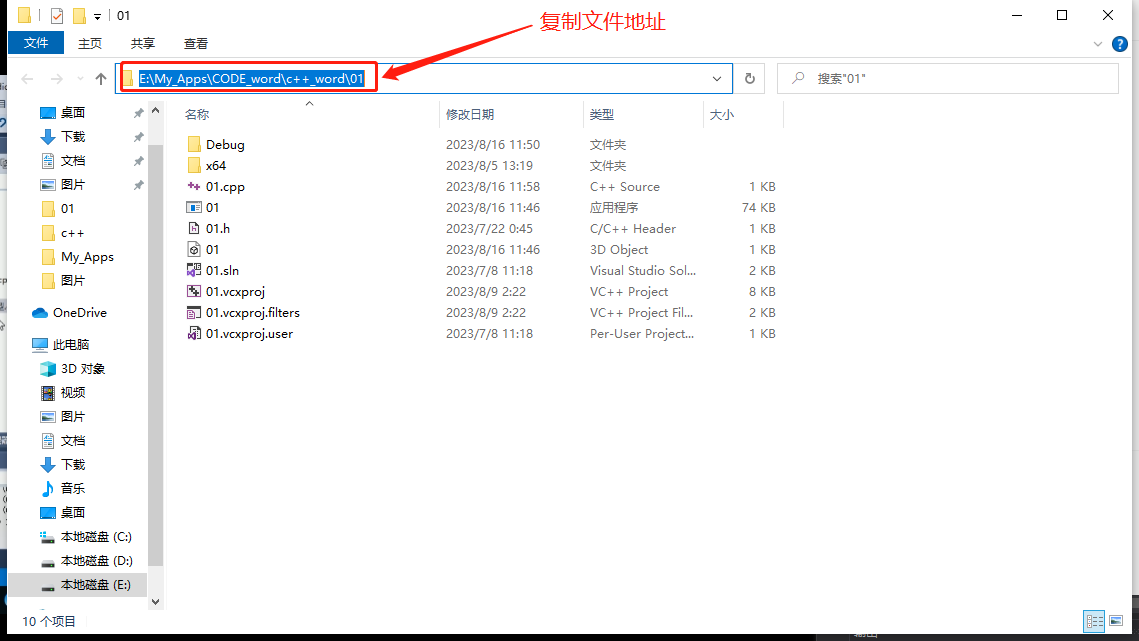
通过vs提供的工具验证
我们除了利用代码查看以外,还可以利用vs提供的工具查看:
打开开发工具命令提示符

进入后的界面如下:
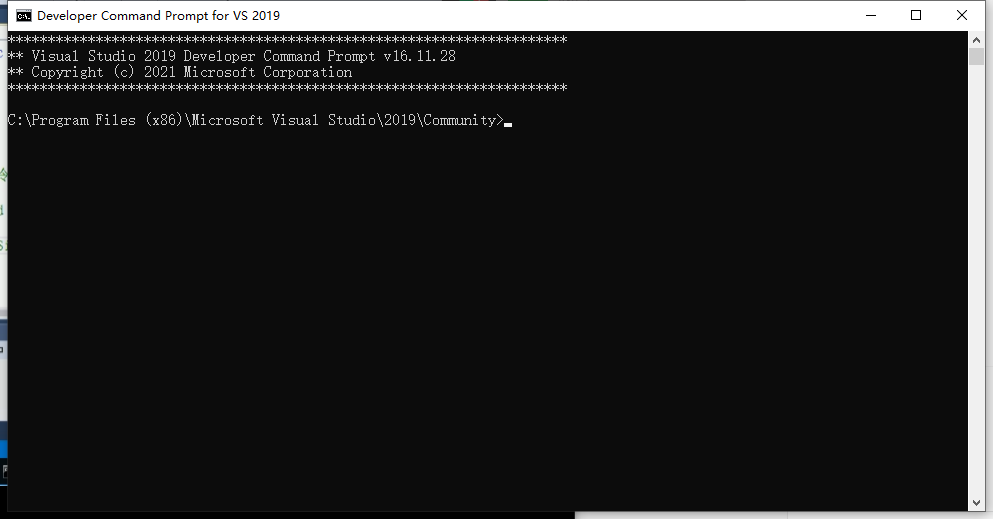
再打开vs
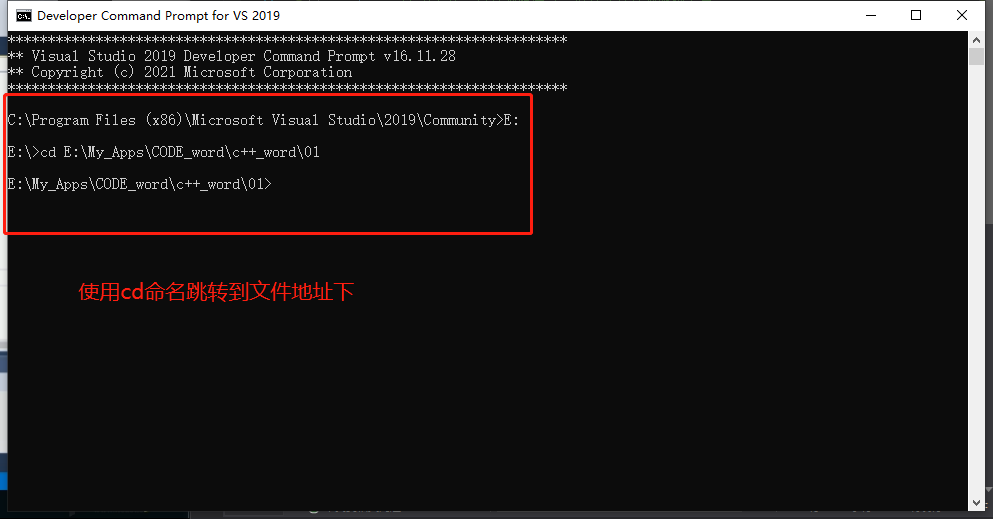
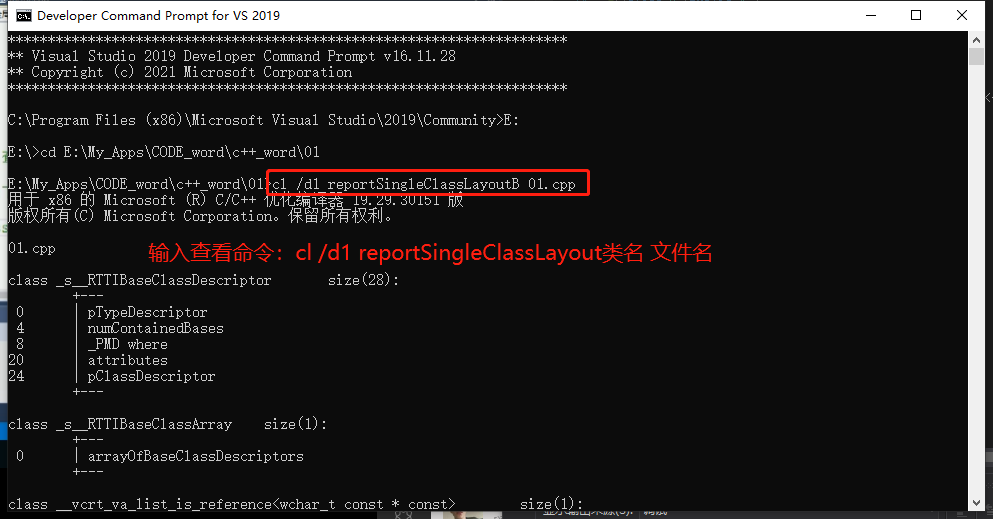
命令:cl /d1 reportSingleClassLayout
输入文件名的时候,可以先输入前几个,再使用tab键补全

6.4、继承中构造和析构的顺序
子类继承父类后,创建子类对象时,也会调用父类的构造函数
- 继承中,先调用父类的构造函数,在调用子类的构造函数;析构时先析构子类,再析构父类,与构造相反
示例
#include<iostream>
using namespace std;

class Base {
public:
	Base() {
		cout << "父类的构造" << endl;
	}
	~Base() {
		cout << "父类的析构" << endl;
	}
};

class Son :public Base {
public:
	Son() {
		cout << "子类的构造" << endl;
	}
	~Son() {
		cout << "子类的析构" << endl;
	}
};

void func() {
	Son s;
}

int main()
{
	func();

	return 0;
}

打印的结果
/*
父类的构造
子类的构造
子类的析构
父类的析构
*/
6.5、继承中同名成员处理方式
如果子类与父类出现同名成员,我们该如何访问
总结:
- 子类对象可以直接访问到子类中同名成员
- 子类对象加上父类的作用域可以访问到父类同名成员
- 当子类与父类拥有同名的成员函数,子类会隐藏父类中同名成员函数,加作用域可以访问到父类中同名成员函数
属性同名处理
#include<iostream>
using namespace std;

class Base
{
public:
	Base() {
		m_a = 100;
	}

	int m_a;
};

class Son :public Base
{
public:
	Son() {
		m_a = 500;
	}

	int m_a;
};

void func() {
	Son s;
	// 子类中的同名属性直接访问即可
	cout << "子类Son中的m_a:" << s.m_a << endl;
	// 父类中的同名属性加上作用域即可访问
	cout << "父类Base中的m_a:" << s.Base::m_a << endl;
}

int main()
{
	func();

	return 0;
}
同名成员函数处理
如果子类与父类出现同名成员函数,那么子类的同名成员函数会隐藏掉父类中所有同名成员函数
如果想访问到父类中被隐藏的同名函数,加个作用域就好了
#include<iostream>
using namespace std;

class Base
{
public:
	void func() {
		cout << "Base -> func" << endl;
	}
};

class Son :public Base
{
public:
	void func() {
		cout << "Son -> func" << endl;
	}
};

void func() {
	Son s;
	s.func();
    // 访问父类同名函数加上作用域
	s.Base::func();
}

int main()
{
	func();

	return 0;
}
6.6、继承中同名的静态成员处理方式
静态成员和非静态成员出现同名,处理方式一致
- 访问子类同名成员,直接访问即可
- 访问父类同名成员,加上作用域即可
#include<iostream>
using namespace std;

class Base
{
public:
	static int m_a;

	void static func() {
		cout << "Base -> func" << endl;
	}
};

class Son :public Base
{
public:
	static int m_a;

	void static func() {
		cout << "Son -> func" << endl;
	}
};
// 静态成员赋值
int Base::m_a = 100;
int Son::m_a = 200;

void func()
{
	Son s;
	cout << "通过对象调用静态成员:" << endl;
	// 子类直接调用即可
	cout << "Son -> m_a:" << s.m_a << endl;
	// 加一个作用域即可调用
	cout << "Base -> m_a:" << s.Base::m_a << endl;

	// 子类直接调用即可
	s.func();
	// 加作用域调用
	s.Base::func();


	cout << "通过类名调用静态成员:" << endl;
	// 子类直接调用
	cout << "Son -> m_a:" << Son::m_a << endl;
	// 第一个双冒号表示类名访问,第二个双冒号表示作用域
	cout << "Base -> m_a:" << Son::Base::m_a << endl;

	// 子类直接调用
	Son::func();
	// 第一个双冒号表示类名访问,第二个双冒号表示作用域
	Son::Base::func();
}

int main()
{
	func();

	return 0;
}
6.7、多继承语法
c++允许一个类继承多个类
语法:class 子类 : 继承方式 父类1 , 基础方式 父类2 , ...
注意:多继承中如果父类中出现了同名的情况,子类使用时要加作用域
#include<iostream>
using namespace std;

class Base1
{
public:
	int m_a;

	Base1() {
		m_a = 100;
	}
};

class Base2
{
public:
	int m_a;

	Base2() {
		m_a = 200;
	}
};

// 可以继承多个父类,但是不建议
class Son :public Base1, public Base2
{
public:
	int b;
};

void func() {
	Son s;
	// 当父类中有同名属性时,要加作用域访问
	cout << "Base1::m_a = " << s.Base1::m_a << endl;
	cout << "Base2::m_a = " << s.Base2::m_a << endl;
}

int main()
{
	func();

	return 0;
}
6.8、菱形继承
(1)概念:
两个派生类继承同一个基类
又有某个类同时继承这个两个派生类
这种继承被称为菱形继承,或者砖石继承
菱形继承经典案例:
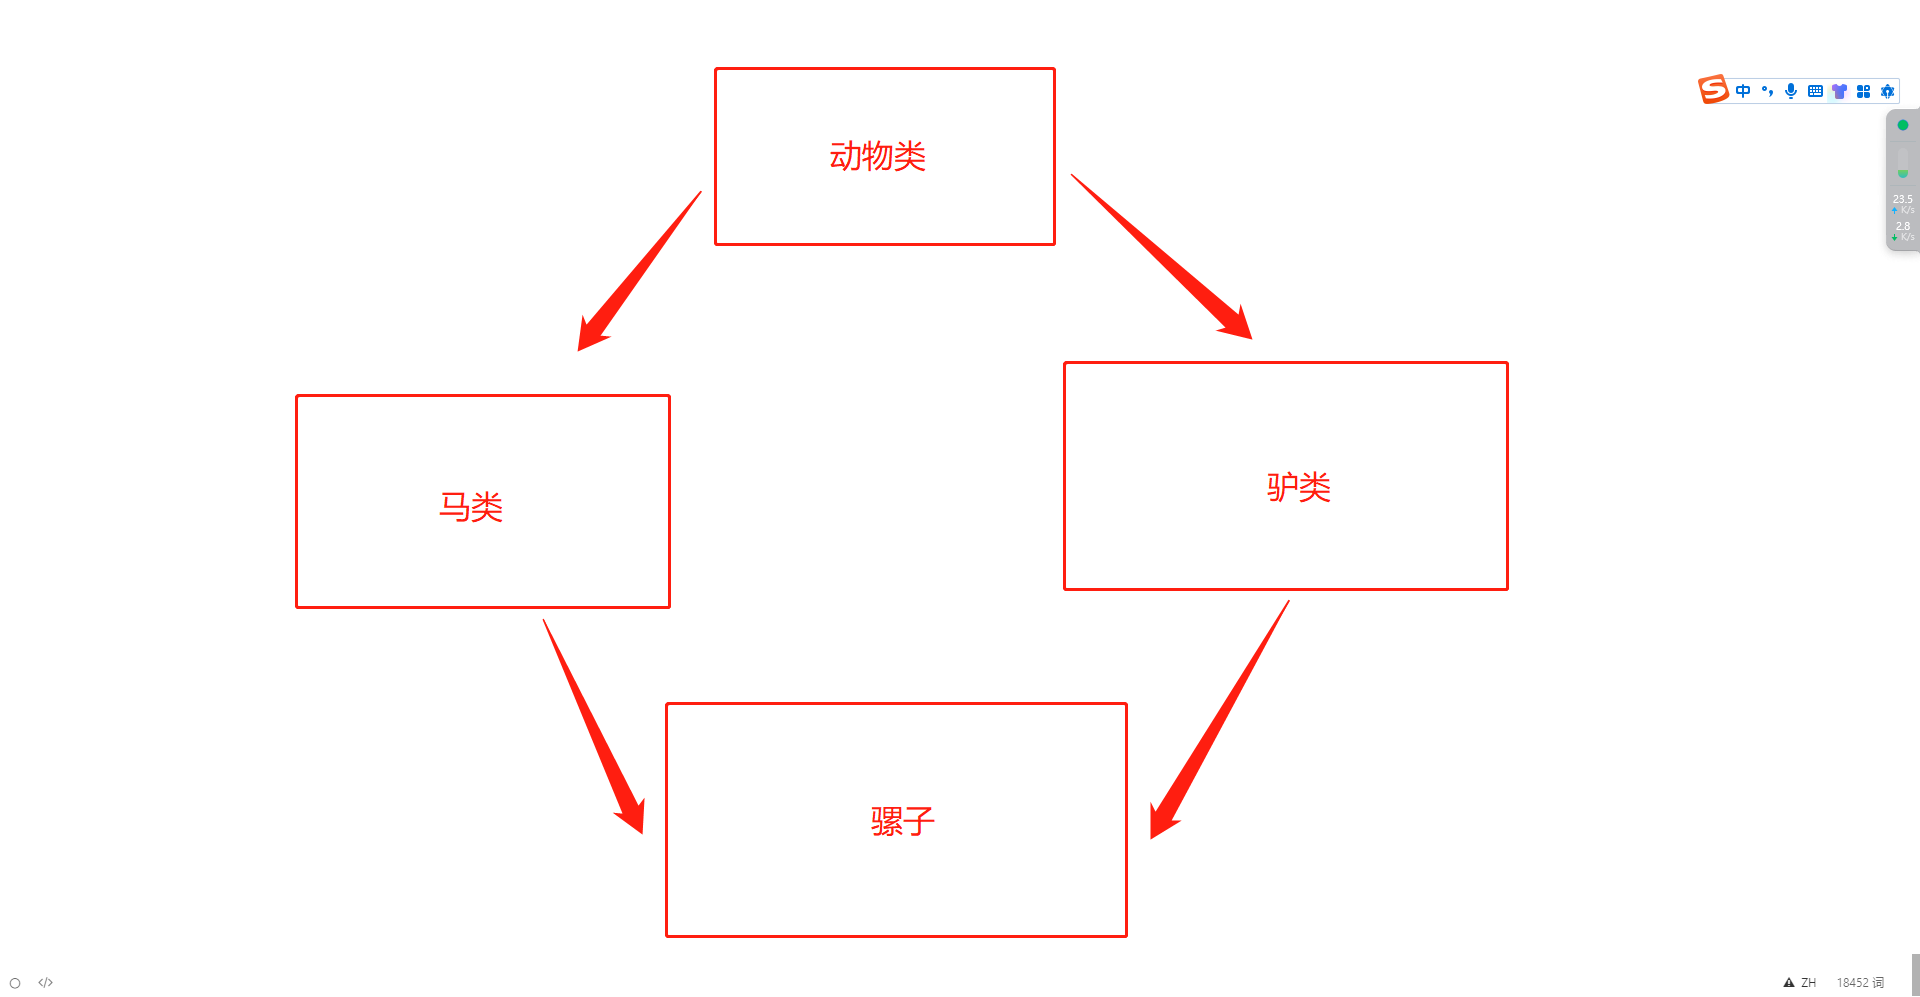
(2)菱形继承出现的问题
- 马继承了动物的属性,驴也继承了动物的属性,当骡子使用属性时会产生二义性
- 骡子继承自动物类的属性继承了相同的两份,会造成资源浪费,我们只需要一份
解决问题一:
#include<iostream>
using namespace std;

// 动物类
class Animal
{
public:
	int age;
};

// 马类
class Horse :public Animal{};

// 驴类
class Donkey :public Animal{};

// 骡子类
class Mule :public Horse, public Donkey{};

void func() {
	Mule m;
	// 当菱形继承时,父类会有相同的数据
	// 这时候访问该属性就会产生二义性,要加一个作用域区分
	m.Horse::age = 10;
	m.Donkey::age = 20;
	cout << "Horse::age = " << m.Horse::age << endl;
	cout << "Donkey::age = " << m.Donkey::age << endl;
}

int main()
{
	func();

	return 0;
}
解决问题二:
虚继承
利用虚继承,可以解决菱形继承时把一份数据继承两份,造成资源浪费的问题
在继承之前加上关键字 virtual 就变为虚继承了,他继承的父类就称为虚基类
虚基类中的数据就变为所有类对象共享的了,都指向同一个内存空间
#include<iostream>
using namespace std;

// 动物类
class Animal
{
public:
	int age;
};

// 利用虚继承 解决菱形继承的问题
// 在继承之前加上关键字 virtual 就变为虚继承了
// 他的父类(Animal)就称为虚基类
// 马类
class Horse :virtual public Animal {};

// 驴类
class Donkey :virtual public Animal {};

// 骡子类
class Mule :public Horse, public Donkey {};

void func() {
	Mule m;

	// 当我们使用虚继承后,age这个数据就相当于共享的数据了,都是操作的同一个内存空间
	m.Horse::age = 10;
	m.Donkey::age = 20;
	cout << "Horse::age = " << m.Horse::age << endl;
	cout << "Donkey::age = " << m.Donkey::age << endl;
	cout << "m.age = " << m.age << endl;
	/*打印结果:都是20*/
}

int main()
{
	func();

	return 0;
}
6.9、虚继承剖析
使用虚继承之前的对象模型
可以非常清楚的发型同一份数据被存了两次

使用虚继承之后的对象模型
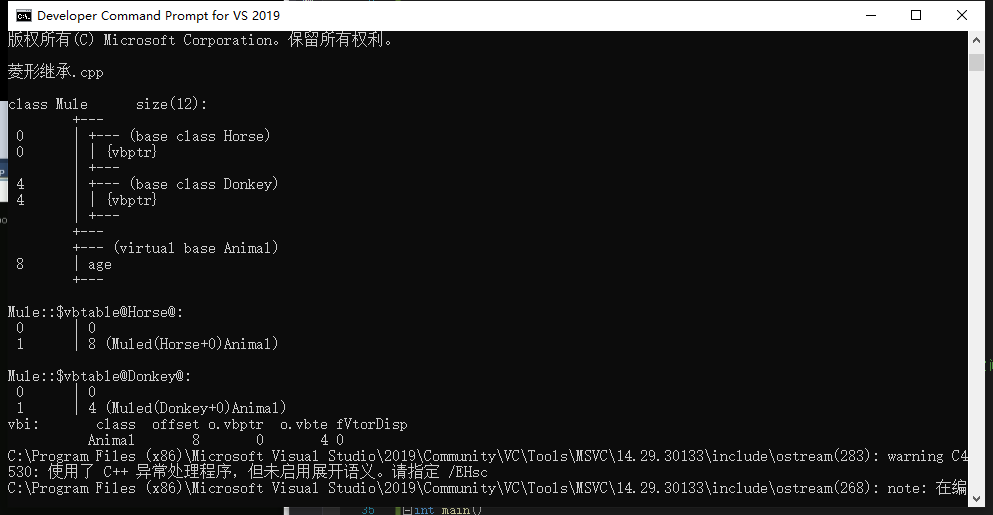
虚继承相关解析
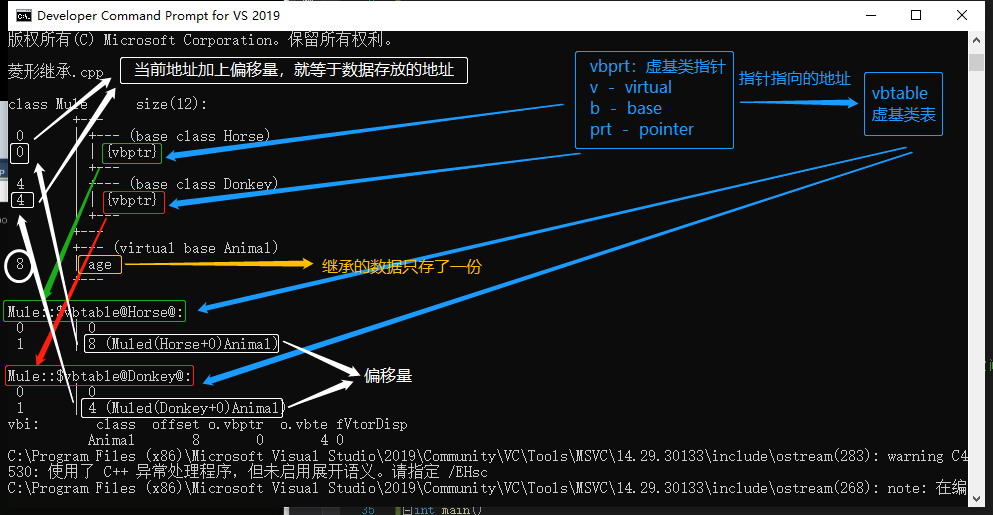
- 使用虚继承之后,子类存的不再是具体的数据,而是vbprt,中文叫虚基类指针
- 虚基类指针指向的是一个叫vbtable(虚基类表)的地址,里面记录的是偏移量
- 每个类的vbprt都对应一个地址,用这个地址加上虚基类表中的偏移量,就得到了具体数据存放的地址
- 例如上图中:Horse对应的地址是0,加上偏移量8,就找到了位于地址8的age属性数据;Donkey对应的地址是4,加上偏移量4,也找到了位于地址8的age属性数据
7、多态
7.1、多态的基本概念与使用
多态分为两类
- 静态多态:函数重载和运算符重载属于静态多态,复用函数名
- 动态多态:派生类和虚函数实现运行时多态
静态多态和动态多态的区别
- 静态多态的函数地址早绑定 - 编译阶段确定函数地址
- 动态多态的函数地址晚绑定 - 运行阶段确定函数地址
地址早绑定
在编译阶段就已经确定了函数地址,不管什么对象来调用都是运行这个函数地址
#include<iostream>
using namespace std;

// 动物类
class Animal
{
public:
	void speak()
	{
		cout << "动物在说话" << endl;
	}
};

// 猫类
class Cat :public Animal
{
public:
	void speak()
	{
		cout << "猫在说话" << endl;
	}
};

// 这种写法是地址早绑定,在编译阶段就确定函数地址了
// 执行说话的函数
void do_speak(Animal& animal) // Animal & animal = cat;
{
	// c++中允许父类与子类之间的对象转换,不需要强制转换
	// 父类的引用或者指针可以直接指向子类的地址
	// 也就是猫类实例化出来的对象在调用该函数
	// 但是这种写法是地址早绑定,在编译阶段就确定了函数地址,是动物类下的speak函数
	// 所以不管传什么对象进来,调用的都是动物类下的speak函数
	animal.speak();
}

void func()
{
	Cat cat;
	do_speak(cat);
}

int main()
{
	func();
    /*打印结果*/
    // 动物在说话

	return 0;
}
地址晚绑定:动态多态
动态多态满足条件:
- 有继承关系
- 子类重新父类的虚函数
虚函数:在函数返回值前加上 virtual 关键字virtual 返回值类型 函数名(){}
重写:函数的返回值、函数名、形参列表都完全相同
动态多态的使用:父类的引用或者指针,执行子类对象
#include<iostream>
using namespace std;

// 动物类
class Animal
{
public:
	// 虚函数
	virtual void speak()
	{
		cout << "动物在说话" << endl;
	}
};

// 猫类
class Cat :public Animal
{
public:
	// 函数的重写:函数的返回值、函数名、参数列表都完全想同
	void speak()
	{
		cout << "猫在说话" << endl;
	}
};

// 狗类
class Dog :public Animal
{
public:
	// 函数的重写:函数的返回值、函数名、参数列表都完全想同
	void speak()
	{
		cout << "狗在说话" << endl;
	}
};

/*动态多态满足条件*/
// 1、有继承关系
// 2、子类重写父类的虚函数

/*动态多态的使用*/
// 父类的指针或者引用,执行子类对象

// 执行说话的函数
// 使用虚函数后,就不能提前知道函数地址了,动态多态
// 会根据传入的对象来确定调用哪个函数
void do_speak(Animal& animal) // Animal & animal = cat;  父类的引用执行子类对象
{
	// c++中允许父类与子类之间的对象转换,不需要强制转换
	// 父类的引用或者指针可以直接指向子类的地址
	// 也就是猫类实例化出来的对象在调用该函数
	animal.speak();
}

void func()
{
	Cat cat;
	do_speak(cat);

	Dog dog;
	do_speak(dog);
}

int main()
{
	func();
    /*打印结果*/
    // 猫在说话
    // 狗在说话

	return 0;
}
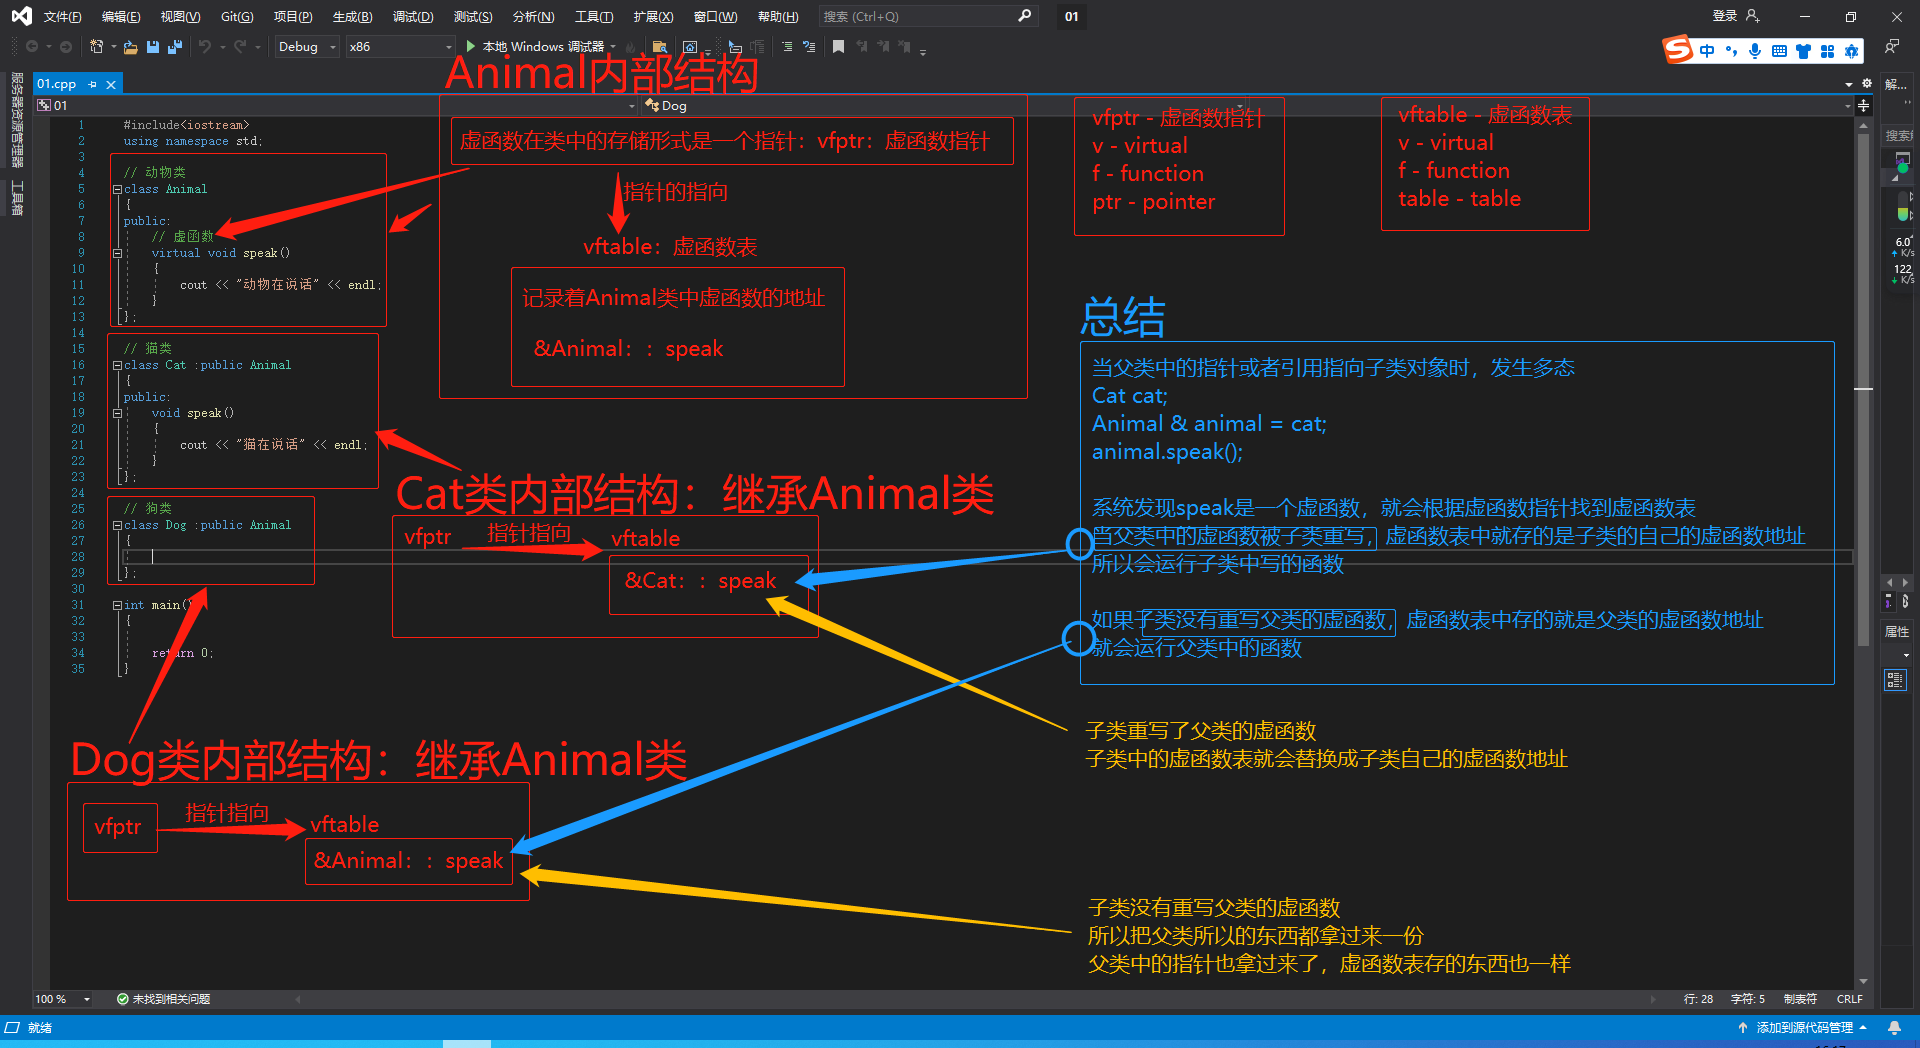
动态多态的原理剖析
-
虚函数会在类中存一个虚函数指针,指向虚函数表,其中存是虚函数的地址
-
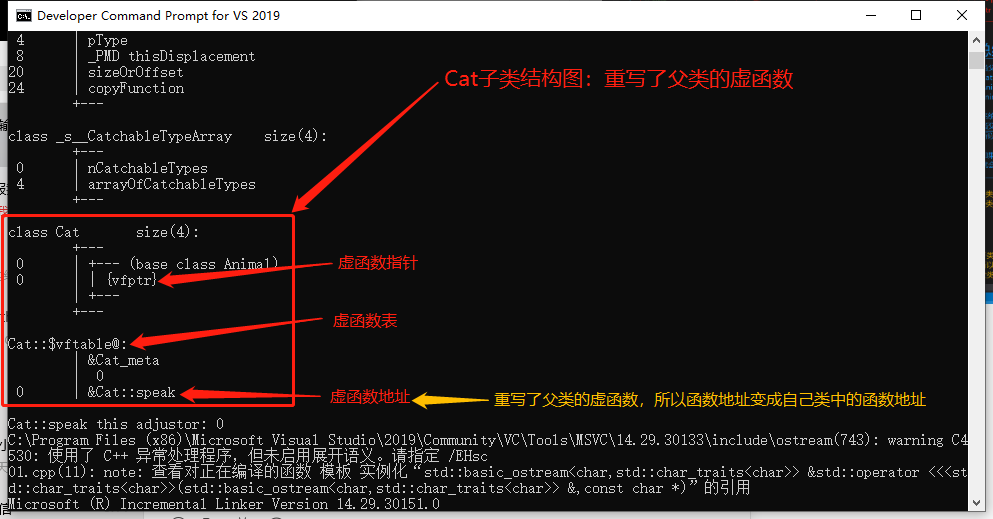
当子类重写父类的虚函数时,子类的虚函数表中存的函数地址就变成了子类的函数地址
-
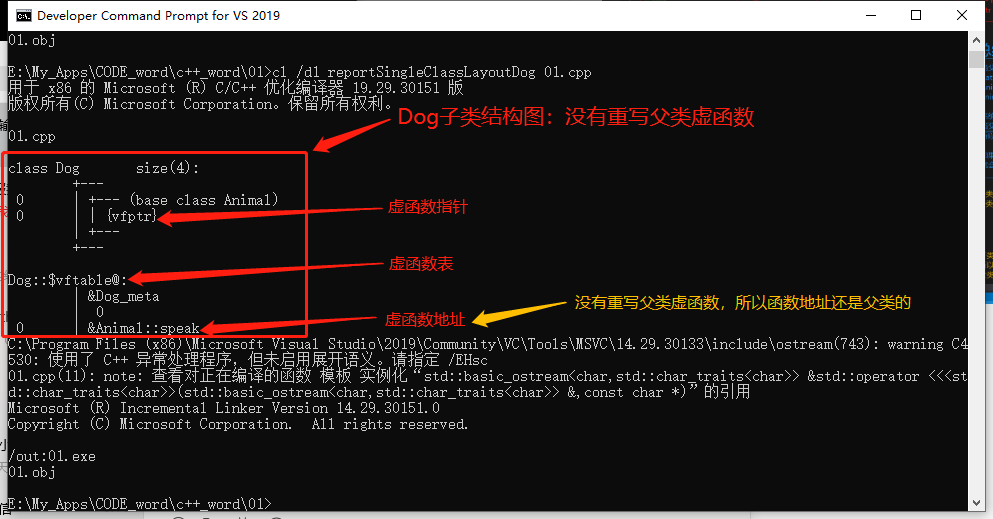
如果子类没有重写父类的虚函数,子类的虚函数表中存的还是父类的虚函数地址
-
父类的引用或者指针指向子类对象时,会到子类的虚函数表中找虚函数地址,再调用其中的函数地址,存的是子类自己的就调用子类中的函数,存的是父类的就调用父类中的函数
代码图解
使用工具查看
父类结构图

子类Dog结构图:没有重写父类虚函数
子类Cat结构图:重写了父类虚函数
7.2、多态案例一:计算器类
案例描述:
分别利用普通写法和多态技术,设计实现两个整形的数进行运算的计算机类
多态的优点:
- 代码组织结构清晰
- 可读性强
- 利于前期和后期的扩展及维护
普遍实现
#include<iostream>
#include<string>
using namespace std;

class Computer
{
public:
	int m_num1;
	int m_num2;

	int get_result(string oper)
	{
		if (oper == "+")
		{
			return m_num1 + m_num2;
		}
		else if (oper == "-")
		{
			return m_num1 - m_num2;
		}
		else if (oper == "*")
		{
			return m_num1 * m_num2;
		}
		// 如果要添加新功能就要修改源码
	}
};

void func()
{
	Computer c;
	c.m_num1 = 10;
	c.m_num2 = 34;
	cout << c.m_num1 << "*" << c.m_num2 << "=" << c.get_result("*") << endl;
	cout << c.m_num1 << "-" << c.m_num2 << "=" << c.get_result("-") << endl;
	cout << c.m_num1 << "+" << c.m_num2 << "=" << c.get_result("+") << endl;
}

int main()
{

	func();

	system("pause");
	return 0;
}
多态实现
方法一:父类用引用接收子类对象的方法
#include<iostream>
#include<string>
using namespace std;

// 多态实现
// 代码组织结构清晰,可读性强,利于前期和后期的扩展及维护

// 抽象计算机基类
class Computing
{
public:
	int m_num1;
	int m_num2;

	// 虚函数  运算函数
	virtual int operation()
	{
		return 0;
	}
};

// 计算机加法类
class Sum :public Computing
{
	// 关键字virtual可加可不加
	virtual int operation()
	{
		return m_num1 + m_num2;
	}
};

// 计算机减法类
class Sub :public Computing
{
	virtual int operation()
	{
		return m_num1 - m_num2;
	}
};

// 计算机乘法类
class Take :public Computing
{
	virtual int operation()
	{
		return m_num1 * m_num2;
	}
};

// 用父类的引用接收传入进来的子类对象,实现动态多态
int oper(Computing& computing)
{
	return computing.operation();
}

void func()
{
	Take t;
	t.m_num1 = 10;
	t.m_num2 = 20;

	Sum sum;
	sum.m_num1 = 10;
	sum.m_num2 = 20;

	Sub sub;
	sub.m_num1 = 10;
	sub.m_num2 = 20;

	cout << t.m_num1 << "*" << t.m_num2 << "=" << oper(t) << endl;
	cout << sum.m_num1 << "+" << sum.m_num2 << "=" << oper(sum) << endl;
	cout << sub.m_num1 << "-" << sub.m_num2 << "=" << oper(sub) << endl;
}

int main()
{
	func();

	system("pause");
	return 0;
}
方法二:父类用指针接收子类对象
#include<iostream>
#include<string>
using namespace std;

// 多态实现
// 代码组织结构清晰,可读性强,利于前期和后期的扩展及维护

// 抽象计算机基类
class Computing
{
public:
	int m_num1;
	int m_num2;

	// 虚函数  运算函数
	virtual int operation()
	{
		return 0;
	}
};

// 计算机加法类
class Sum :public Computing
{
	// 关键字virtual可加可不加
	virtual int operation()
	{
		return m_num1 + m_num2;
	}
};

// 计算机减法类
class Sub :public Computing
{
	virtual int operation()
	{
		return m_num1 - m_num2;
	}
};

// 计算机乘法类
class Take :public Computing
{
	virtual int operation()
	{
		return m_num1 * m_num2;
	}
};

void func()
{

	// 使用父类创建子类对象在堆区中
	Computing* abc = new Sum;
	abc->m_num1 = 10;
	abc->m_num2 = 10;
	cout << abc->m_num1 << "+" << abc->m_num2 << "=" << abc->operation() << endl;
	// 释放堆区数据
	delete abc;

	// 堆区数据被释放但是内存空间还在,所以可以不用再重新创建指针对象
	abc = new Sub;
	abc->m_num1 = 10;
	abc->m_num2 = 10;
	cout << abc->m_num1 << "-" << abc->m_num2 << "=" << abc->operation() << endl;
	delete abc;

	abc = new Take;
	abc->m_num1 = 10;
	abc->m_num2 = 10;
	cout << abc->m_num1 << "*" << abc->m_num2 << "=" << abc->operation() << endl;
	delete abc;
}

int main()
{
	func();

	system("pause");
	return 0;
}
7.3、纯虚函数与抽象类
在多态中,通常父类中虚函数的实现是毫无意义的,主要都是调用子类中重写的函数
因此我们可以将虚函数改为纯虚函数
语法:virtual 返回值类型 函数名 (形参列表) = 0;
当类中有了纯虚函数,这个类就被称为抽象类
抽象类特点:
- 无法实例化对象
- 子类必须重写抽象类中的纯虚函数,否则也属于抽象类
示例
#include<iostream>
using namespace std;

class Base
{
public:
	virtual void func() = 0;
};

class Son :public Base
{
public:
	void add() {

	}
};

void func()
{
	Base b;  // 报错:抽象类不可以创建对象

	Base* b =new Son;  // 报错:子类不重写父类中的纯虚函数,那么子类也是抽象类
}

int main()
{
	func();

	system("pause");
	return 0;
}
7.4、多态案例二:制作饮品
案例描述:
制作饮品的大致流程为:煮水 - 冲泡 - 倒入杯中 - 加入辅料
利用多态实现案例,提供抽象制作饮品的基类,提供子类制作茶和咖啡
#include<iostream>
using namespace std;

// 制作饮料的抽象类
class DoDrink
{
public:
	// 纯虚函数,抽象类
	// 煮水
	virtual void boil_water() = 0;
	// 冲泡
	virtual void brew() = 0;
	// 倒入杯中
	virtual void decant_tumbler() = 0;
	// 加入辅料
	virtual void join_accessory() = 0;

	// 开始制作饮品
	void initiate_do_drink() {
		boil_water();
		brew();
		decant_tumbler();
		join_accessory();
	}
};

class DoCoffee :public DoDrink
{
public:
	// 重写父类的纯虚函数
	void boil_water()
	{
		cout << "把水煮开" << endl;
	}
	void brew()
	{
		cout << "沸水中加咖啡粉" << endl;
	}
	void decant_tumbler()
	{
		cout << "倒入星巴克杯子中" << endl;
	}
	void join_accessory()
	{
		cout << "加入白糖、牛奶等辅料" << endl;
	}
};

class DoTea :public DoDrink
{
public:
	// 重写父类的纯虚函数
	void boil_water()
	{
		cout << "把水煮开" << endl;
	}
	void brew()
	{
		cout << "沸水中加入茶叶" << endl;
	}
	void decant_tumbler()
	{
		cout << "倒入茶杯中" << endl;
	}
	void join_accessory()
	{
		cout << "加入枸杞等辅料" << endl;
	}
};

// 制作饮品的接口,用父类指针接收子类对象
void do_work(DoDrink* abs)
{
	// 多态,只需要调用一个接口,根据传进来的对象不同调用不同的功能
	abs->initiate_do_drink();
	// 释放堆区数据
	delete abs;
}

void func()
{
	// 制作咖啡
	do_work(new DoCoffee);
	cout << "---------------------" << endl;
	// 制作茶
	do_work(new DoTea);
}

int main()
{
	func();

	return 0;
}
7.5、虚析构和纯虚析构
作用:
虚析构函数是为了避免内存泄漏,而且是当子类中会有指针成员时才会使用的到。也就是说虚析构函数使得在删除指向子类对象的基类指针时,可以调用子类的析构函数达到释放子类中堆区数据的目的,从而防止内存泄漏
语法:
虚析构:virtual ~类名(){};
纯虚析构:
声明:
virtual ~类名() = 0;实现:
类名::~类名(){};
注意:
如果是纯虚析构函数,该类就属于抽象类,无法实例化对象,而且需要具体的函数实现
删除指向子类对象的基类指针时,无法调用子类的析构函数
一般类中的析构函数里面都是存放释放内存的代码
所以当无法调用子类的析构函数时,就会造成内存泄漏,如下所示
#include<iostream>
using namespace std;

class Base
{
public:
	Base()
	{
		cout << "Base构造函数调用" << endl;
	}
	~Base()
	{
		cout << "Base虚析构函数调用" << endl;
	}
};

class Son :public Base
{
public:
	Son(int a)
	{
		cout << "Son构造函数调用" << endl;
		this->a = new int(a);
	}
	~Son()
	{
		if (a != NULL) {
			delete a;
			a = NULL;
			cout << "Son析构函数调用" << endl;
		}
	}

	int* a;
};

void func()
{
	// 父类指针指向子类对象
	Base* b = new Son(10);
    // 释放父类指针时无法调用子类析构函数,从而造成内存泄漏问题
	delete b;
}

int main()
{
	func();


	// 打印结果
	/*
	Base构造函数调用
	Son构造函数调用
	Base析构函数调用
	*/

	return 0;
}
想要解决上述问题,把父类的析构函数变成虚析构函数即可
就是在父类的析构函数前加上关键字 virtual,如下
#include<iostream>
using namespace std;

class Base
{
public:
	Base()
	{
		cout << "Base构造函数调用" << endl;
	}
	// 虚析构函数
	virtual ~Base()
	{
		cout << "Base虚析构函数调用" << endl;
	}
};

class Son :public Base
{
public:
	Son(int a)
	{
		cout << "Son构造函数调用" << endl;
		this->a = new int(a);
	}
	~Son()
	{
		if (a != NULL) {
			delete a;
			a = NULL;
			cout << "Son析构函数调用" << endl;
		}
	}

	int* a;
};

void func()
{
	// 父类指针指向子类对象
	Base* b = new Son(10);
	// 释放父类指针时成功调用子类的析构函数
	delete b;
}

int main()
{
	func();

	// 打印结果
	/*
	Base构造函数调用
	Son构造函数调用
	Son析构函数调用
	Base析构函数调用
	*/

	return 0;
}
纯虚析构函数
就是把虚析构函数分为声明和实现两步,作用都是一样的
#include<iostream>
using namespace std;

class Base
{
public:
	Base()
	{
		cout << "Base构造函数调用" << endl;
	}
	// 纯虚析构函数的声明
	virtual ~Base() = 0;
};

class Son :public Base
{
public:
	Son(int a)
	{
		cout << "Son构造函数调用" << endl;
		this->a = new int(a);
	}
	~Son()
	{
		if (a != NULL) {
			delete a;
			a = NULL;
			cout << "Son析构函数调用" << endl;
		}
	}

	int* a;
};

// 纯虚析构函数的实现
Base::~Base()
{
	cout << "Base的纯虚析构函数调用" << endl;
}

void func()
{
	// 父类指针指向子类对象
	Base* b = new Son(10);
	// 释放父类指针时成功调用子类的析构函数
	delete b;
}

int main()
{
	func();

	// 打印结果
	/*
	Base构造函数调用
    Son构造函数调用
    Son析构函数调用
    Base的纯虚析构函数调用
	*/

	return 0;
}
7.6、多态案例三:电脑组装
案例描述:
假设电脑组成部件为:CPU、显卡、内存
将每个零件封装出抽象类,并且提供不同厂商生产的不同零件,例如Intel和AMD
创建电脑类提供让电脑工作的函数,并且调用每个零件工作的接口
测试时组装三台不同的电脑进行工作
案例实现:
#include<iostream>
using namespace std;

// cpu基类
class CPU
{
public:
	// cpu计算虚函数
	virtual void computer() = 0;
};

// 显卡基类
class Card
{
public:
	// 显卡开始工作的虚函数
	virtual void reveal() = 0;
};

// 内存基类
class Memory
{
public:
	// 内存开始存储的虚函数
	virtual void store() = 0;
};

// Intel的cpu类
class IntelCPU :public CPU
{
public:
	// Intel的CPU开始工作
	void computer()
	{
		cout << "Intel厂商的CPU开始计算了" << endl;
	}
};

// Intel的显卡类
class IntelCard :public Card
{
public:
	// Intel的显卡开始工作
	void reveal()
	{
		cout << "Intel厂商的显卡开始工作了" << endl;
	}
};

// Intel的内存类
class IntelMemory :public Memory
{
public:
	// Intel的内存开始工作
	void store()
	{
		cout << "Intel厂商的内存开始存储数据了" << endl;
	}
};

// Amd的cpu类
class AmdCPU :public CPU
{
public:
	// AMD的CP开始工作
	void computer()
	{
		cout << "Amd厂商的CPU开始计算了" << endl;
	}
};

// Amd的显卡类
class AmdCard :public Card
{
public:
	// AMD的显卡开始工作
	void reveal()
	{
		cout << "Amd厂商的显卡开始工作了" << endl;
	}
};

// Amd的内存类
class AmdMemory :public Memory
{
public:
	// AMD的内存开始工作
	void store()
	{
		cout << "Amd厂商的内存开始存储数据了" << endl;
	}
};

// 电脑类
class Computer
{
public:
	// 构造函数,接收三个具体厂商生产出来的零件的指针
	Computer(CPU* cpu, Card* card, Memory* memory)
	{
		this->m_cpu = cpu;
		this->m_card = card;
		this->m_memory = memory;
	}

	// 电脑开始工作的函数
	void use_computer()
	{
		// 多态,根据传进来的对象的不同,调用不同的函数
		m_cpu->computer();
		m_card->reveal();
		m_memory->store();
	}

	// 析构函数,释放内存
	~Computer()
	{
		if (m_cpu != NULL)
		{
			delete m_cpu;
			m_cpu = NULL;
		}

		if (m_card != NULL)
		{
			delete m_card;
			m_card = NULL;
		}

		if (m_memory != NULL)
		{
			delete m_memory;
			m_memory = NULL;
		}
	}

private:
	// 指针接收传进来的对象指针
	CPU* m_cpu;
	Card* m_card;
	Memory* m_memory;
};

void func()
{
	// 父类指针指向子类对象,发生多态
	CPU* i_cpu = new IntelCPU;
	Card* i_card = new IntelCard;
	Memory* i_memory = new IntelMemory;
	cout << "第一台电脑开始工作:" << endl;
	// 第一种为构造函数传参的方式:先实例化具体的对象,再用变量接收,最后传入函数中
	Computer c1(i_cpu, i_card, i_memory);
	c1.use_computer();
	cout << "----------------------------" << endl;

	cout << "第二台电脑开始工作:" << endl;
	// 第二种为构造函数传参的方式:直接当实参传入
	Computer c2(new AmdCPU, new AmdCard, new AmdMemory);
	c2.use_computer();
	cout << "----------------------------" << endl;

	cout << "第三台电脑开始工作:" << endl;
	Computer c3(new AmdCPU, new IntelCard, new AmdMemory);
	c3.use_computer();
	cout << "----------------------------" << endl;

}

int main()
{
	func();

	return 0;
}
五、文件操作
程序运行时产生的数据都属于零时数据,程序一旦运行结束都会被释放,通过文件可以将数据持久化
c++中对文件操作需要包含头文件<fstream>
文件类型分为两种
- 文本文件:文件以文本的ASCLL码形式存储在计算机中
- 二进制文件:文件以文本的二进制形式存储在计算中,用户一般不能直接读懂他们
操作文件三大类
- ofstream:写操作
- ifstream:读操作
- fstram:读写操作
1、文本文件
1.1、写文件
写文件的步骤如下:
-
包含头文件
include
-
创建流对象
ofstream ofs;
注意:ofs是一个对象名,可以自己命名
-
打开文件
ofs.open("文件路径", 打开方式);
-
写数据
ofs << "写入的数据";
-
关闭文件
ofs.close();
文件打开方式
| 打开方式 | 解释 |
|---|---|
| ios::in | 为读文件而打开文件 |
| ios::out | 为写文件而打开文件 |
| ios::ate | 初始位置:文件尾 |
| ios::app | 追加文件写方 |
| ios::trunc | 如果文件存在先删除,在创建 |
| ios::binary | 二进制方式 |
注意:文件打开方式可以配合使用,利用 | 操作符
例如:用二进制的方式写文件ios::binary | ios::out
示例
#include<iostream>
#include<string>

// 进行文件操作记得包含头文件
#include<fstream>
using namespace std;

void test()
{
	// 创建流对象,写操作
	ofstream ofs;

	// 打开文件test,为该文件进行写操作
	ofs.open("test.txt", ios::out);

	// 写入内容
	ofs << "刘杰你好帅" << endl;
	ofs << "简直是我的男神" << endl;

	// 关闭文件
	ofs.close();
}

int main()
{

	test();

	return 0;
}
1.2、读文件
读文件与写文件步骤相似,但是读取的方式相对较多
读文件步骤如下:
-
包含头文件
include
-
创建流对象
ifstream ifs;
注意:ifs是一个对象名,可以自己命名
-
打开文件
ifs.open("文件路径", 打开方式);
-
判断文件是否打开成功
注意:if_open()函数可以判断文件是否打开,返回bool类型
if( ! ifs.is_open() )
{
cout << "文件打开失败" << endl;
return;
}
-
读数据
公有四种读数据方式,如下
-
关闭文件
ifs.close();
第一种读数据方式:直接读全部数据
注意:当申请的临时内存小于读取的内容时程序会崩溃
不能读取空格
#include<iostream>
#include<string>

// 进行文件操作记得包含头文件
#include<fstream>
using namespace std;

void test()
{
	// 流对象:读操作
	ifstream ifs;

	// 打开文件test,打开方式:读操作
	ifs.open("test.txt", ios::in);

	// ifs对象中的成员函数is_open()可以判断文件是否被打开,返回bool值类型
	if (!ifs.is_open())
	{
		cout << "打开文件失败" << endl;
		return;
	}

	// 第一种读文件的方式
	// 申请空间:临时申请一个1024字节的空间(该空间叫:buffer),并且初始化为0
	char buf[1024] = { 0 };
	// 使用右移运算符将文件内容读取到buf中
    // 当读到头了就会返回false,结束while循环
	while (ifs >> buf)
	{
		// 再将buf中的数据打印出来
		cout << buf << endl;
		// 读取的内容中有空格或者回车都会进行一次endl换行
		//
		// 例如文件内容:
		/*
		12 34
		56 7 8
		*/

		// 读取的结果:
		/*
		12
		34
		56
		7
		8
		*/
	}

    // 记得关闭文件
	ifs.close();
}

int main()
{

	test();

	return 0;
}
第二种读数据方式:使用getline按行读
getline()函数是istream类中的一个成员函数,在使用他时,需要使用istream的对象cin来调用它。getline(char* s, streamsize n),作用是从istream中读取至多n个字符保存在s对应的数组中,即使还没有读过n个字符,只要遇上换行符就停止读取
#include<iostream>
#include<string>

#include<fstream>
using namespace std;

void test()
{
	ifstream ifs;

	ifs.open("test.txt", ios::in);

	if (!ifs.is_open())
	{
		cout << "打开文件失败" << endl;
		return;
	}

	// 第二种读数据的方式
	// 创建临时内存
	char buf[1024] = { 0 };
	// getline(char* s, streamsize n)
	// 从ifs中读取至多n个字符保存在s对应的数组中
	// 即使还没有读到第n个字符,只要遇上换行符就停止读取
	while (ifs.getline(buf, sizeof(buf)))
	{
		cout << buf << endl;
	}
	ifs.close();
}

int main()
{

	test();

	return 0;
}
第三种读数据的方式:字符串读取,逐行读取
getline()函数当全局函数使用:getline(basic_istream, basic_string)
需要两个参数:基础数据流和一个字符串容器
#include<iostream>
#include<string>

#include<fstream>
using namespace std;

void test()
{
	ifstream ifs;

	ifs.open("test.txt", ios::in);

	if (!ifs.is_open())
	{
		cout << "打开文件失败" << endl;
		return;
	}

	// 第三种方式
	// 准备好一个字符串容器
	string buf;
	// getline作为全局函数,需要两个参数:基础数据流(ifs)和字符串容器(buf)
	// 一行一行的读取数据
	while (getline(ifs, buf))
	{
		cout << buf << endl;
	}
	ifs.close();
}

int main()
{

	test();

	return 0;
}
第四种读数据的方式:逐字符的读取,效率低
使用get()函数,他会一个字符一个字符的读取数据流中的数据
再把读到的字符赋值给字符变量,在while循环中打印出来
最后判断字符变量是否等于EOF(EOF是文件尾部的标志),等于EOF就结束循环
#include<iostream>
#include<string>

#include<fstream>
using namespace std;

void test()
{
	ifstream ifs;

	ifs.open("test.txt", ios::in);

	if (!ifs.is_open())
	{
		cout << "打开文件失败" << endl;
		return;
	}

	// 第四种方式
	// 先准备一个字符容器
	char c;
	// get()函数会一个字符一个字符的读取数据流中的数据,然后赋值给c
	// 最后再判断一下是否读到文件尾了
	// EOF全名叫end of file,文件的尾部的一个标志
	while ((c = ifs.get()) != EOF)
	{
		cout << c;
	}
	ifs.close();
}

int main()
{

	test();

	return 0;
}
2、二进制文件
使用二进制存储不仅节约空间,便于检索,还可以操作自定义的数据类型
参考地址:
C++二进制文件读写(read和write)详解 (biancheng.net)
2.1、写文件
二进制方式写文件主要利用流对象调用成员函数write
write函数原型:ostream & write(const char* _str, streamsize_Count);
参数解释:
- 第一个参数需要指向char类型的指针
- 第二个参数需要一个整形
语法:文件流对象.write( (const char*)&变量名, sizeof(变量名) )
我们进行写操作时默认是写入文本文件,想要写入二进制文件,第一步就是以二进制模式打开文件:ios::binary
例如:
file.open("test.txt", ios::out | ios::binary);
ostream和ofstream类的成员函数write可用于将二进制数据写入文件或其他输出流。要调用该函数,需要指定一个缓冲区的地址,该缓冲区包含一个要写入的字节数组和一个指示要写入多少字节的整数:
write(addr_buffer, number_bytes)
write成员函数不会区分缓冲区中的整形、浮点型或其他类型;他只是将缓冲区视为一个字节数组。由于c++不支持指向字节的指针,因此write函数原型指定缓冲区的地址是指向char的指针
// write函数原型
ostream & write(const char* _str, streamsize_Count);
// 第一个参数需要指向char类型的指针
// 第二个参数需要一个整形
这就意味着我们调用write时,需要将传入的数据地址强转成char的指针
// 第一种强转方法:reinterpret_cast<TargetType>(value);
double d = 44.5;
// 定义一个char指针
char * pc;
// 将指向double地址的指针强转成指向char的常量指针
pc = reinterpret_cast<const char *>(&d);

// 第二种强转方式
pc = (const char*)&d;
示例:
#include<iostream>
#include<fstream>
#include<string>
using namespace std;

class Person
{
public:
    // 最好使用字符数组来存字符串,因为底层是c写的,使用string可能会出现问题
	char name[64];
	int age;
};

void test()
{
	// 流对象:写操作
	ofstream ofs;
	// 第一种打开文件的方式:可以不用写open,内部自动调用
	// ofstream ofs("binary3.txt", ios::out | ios::binary);

	// 打开文件,写操作,二进制形式
	// 第二种打开文件的方式
	ofs.open("binary3.txt", ios::out | ios::binary);

	// 初始化成员属性
	Person p = {"刘杰", 23};

	// 写入数据
	// write函数第一个参数需要的是字符型常量指针,第二个是传入的数据长度
	// 第一张强转方式:
	// ofs.write(reinterpret_cast<const char*>(&p), sizeof(Person));
	// 第二种强转方式:
	ofs.write((const char*)&p, sizeof(Person));

	ofs.close();
}

int main()
{
	test();

	return 0;
}
2.2、读文件
二进制方式读文件主要利用流对象调用成员函数read
read函数原型:istream & read(char* _Str, streamsize_Count)
参数解释:
- 第一个参数需要指向char类型的指针
- 第二个参数需要一个整形,告诉编译器要读取的字节长度
语法:文件流对象.read( (char*)&接收数据的变量, sizeof(接收数据的变量) )
在 istream 和 ifstream 类中有一个read成员函数,它可以用来读取使用 write 写入的二进制数据。它釆用了两个形参,一个是字节读取后将要存储的缓冲区的地址,另外一个是要读取的字节数:
read(add_buffer, number_bytes)
调用read,同样必须 将缓冲区的地址解释为指向 char 的指针。
// 第一种强转方法:reinterpret_cast<TargetType>(value);
double d = 44.5;
// 定义一个char指针
char * pc;
// 将指向double地址的指针强转成指向char的常量指针
pc = reinterpret_cast<const char *>(&d);

// 第二种强转方式
pc = (const char*)&d;
示例:
#include<iostream>
#include<fstream>
using namespace std;

class Person
{
public:
	char name[64];
	int age;
};

void test()
{
	// 以二进制的方式打开文件
	ifstream ifs("binary.txt", ios::in | ios::binary);

	// 判断文件是否打开成功
	if (!ifs.is_open())
	{
		cout << "文件打开失败" << endl;
		return;
	}

	// 创建变量接收文件中的数据
	Person ppp;

	// 必须要将read函数存储数据的缓冲区的地址指向强转为char的指针
	// 这里使用另一种方式强转:reinterpret_cast<TargetType>(value);
	// 第一个参数需要字符指针,第二参数是要读取的字节数
	ifs.read(reinterpret_cast<char*>(&ppp), sizeof(ppp));

	cout << "姓名:" << ppp.name << "\t年龄:" << ppp.age << endl;

	// 关闭文件
	ifs.close();
}

int main()
{
	test();

	return 0;
}
3、判断文件是否为空
EOF:文件尾部的标志
使用 eof()函数,返回bool值,如果文件为空,则返回true。
当一个文件为空的时候,里面只有一个EOF字符,我们把他读取走后,再使用eof()函数就可以判断文件是否为空
ifstream ifs;
ifs.open("test.txt", ios::in);
char ch;
ifs >> ch;
if (ifs.eof())
{
    cout << "该文件为空" << endl;
}
else
{
    cout << "该文件不为空" << endl;
}
4、把读取的字符在读回去
使用putback函数
使用方法:输入文件流.putback(要读回去的字符);
示例:
ifstream ifs;
ifs.open("test.txt", ios::in);
char ch;
ifs >> ch;
if (ifs.eof())
{
    cout << "该文件为空" << endl;
}
else
{
    cout << "该文件不为空" << endl;
}

// 把读出来判断文件是否为空的字符在读回去,这样如果文件有内容,我们读取的时候就不会少一个字符了
ifs.putback(ch);
六、职工管理系统
1、创建管理类
管理类负责的内容
- 与用户的沟通菜单界面
- 对职工增删改查的操作
- 与文件的读写交互
1.1、创建文件
在头文件和源文件下分别创建administrator.h和administrator.cpp
1.2、头文件administrator.h
// 防止头文件重复添加
#pragma once

// 输入输出流的头文件
#include <iostream>

// 标准命名空间
using namespace std;

// 管理类
class Administrator
{
public:
	// 构造函数声明
	Administrator();

	// 析构函数声明
	~Administrator();
};
1.3、源文件administrator.cpp
// 引入头文件
#include "administrator.h"

Administrator::Administrator()
{

}

Administrator::~Administrator()
{

}
2、菜单功能
作用:与用户沟通的界面
2.1、添加成员函数
在管理类Administrator中添加成员函数void menu();
// 防止头文件重复添加
#pragma once

// 输入输出流的头文件
#include <iostream>

// 标准命名空间
using namespace std;

class Administrator
{
public:
	// 构造函数
	Administrator();

	// 析构函数
	~Administrator();

	// 菜单展示
	void menu();
};
2.2、菜单功能实现
在管理类源文件中实现功能
void Administrator::menu()
{
	cout << "-------------职工管理系统-------------" << endl;
	cout << "==============1-添加职工==============" << endl;
	cout << "==============2-展示职工==============" << endl;
	cout << "==============3-删除职工==============" << endl;
	cout << "==============4-修改职工==============" << endl;
	cout << "==============5-查找职工==============" << endl;
	cout << "==============6-职工排序==============" << endl;
	cout << "==============7-清空数据==============" << endl;
	cout << "==============8-退出系统==============" << endl;
	cout << "======================================" << endl;
}
2.3、在main函数 中测试函数功能
#include <iostream>
#include "administrator.h"
using namespace std;

int main()
{
    // 创建管理者对象
	Administrator admin;
    // 调用展示菜单函数
	admin.menu();

	system("pause");
	return 0;
}
3、退出功能
3.1、提供功能接口
在main函数中提供分支选择,提供每个功能接口
#include <iostream>
#include "administrator.h"
using namespace std;

int main()
{
	// 创建管理者对象
	Administrator admin;
	while (true)
	{
		// 调用展示菜单功能
		admin.menu();
		cout << "输入要操作的内容" << endl;

		// 获取用户输入的内容
		int choice;
		cin >> choice;

		// 根据用户的选择执行不同的功能
		switch (choice)
		{
		case 1:  // 添加职工
			break;
		case 2:  // 展示职工
			break;
		case 3:  // 删除职工
			break;
		case 4:  // 修改职工
			break;
		case 5:  // 查找职工
			break;
		case 6:  // 职工排序
			break;
		case 7:  // 清空数据
			break;
		case 8:  // 退出系统
			break;
		default:
			cout << "输入正确的序号" << endl;
			system("pause");
			break;
		}
		system("cls");
	}

	system("pause");
	return 0;
}
3.2、实现退出功能
在管理类中提供成员函数的声明和实现void exit_system()
// 退出系统
void Administrator::exit_system() {
	cout << "感谢使用" << endl;
	// 直接退出当前程序
	exit(0);
}
3.3、功能测试
case 8:  // 退出系统
    admin.exit_system();
    break;
4、创建职工类
4.1、创建职工抽象类
假设职工有三个部门:销售部门、生产部门、研发部门
将三个部门抽象到一个类中,利用多态管理不同部门
每个部门的职工属性有:职工编号、职工姓名、职工所在部门
职工的行为有:岗位职责描述,获取岗位名称
在头文件夹下创建文件worker.h头文件,并写如下代码
#pragma once
#include <iostream>
#include <string>
using namespace std;

// 职工抽象类
class Worker
{
public:
	// 显示个人信息的纯虚函数
	virtual void show_staff() = 0;

	// 获取岗位名称的纯虚函数
	virtual string get_dep() = 0;

	// 职工编号
	int m_id;
	// 职工姓名
	string m_name;
	// 职工部门
	int m_did;
};
4.2、生产销售部门类
生产部门继承职工抽象类,并重写父类中的纯虚函数
在头文件和源文件中分别创建:production.h和production.cpp
production.h文件代码如下
#pragma once
#include <iostream>
#include "worker.h"
using namespace std;

// 生产部门类
class Production :public Worker
{
public:
	Production(int id, string name, int did);

	// 重写父类纯虚函数
	void show_staff();

	// 重写父类纯虚函数
	string get_dep();
};
production.cpp文件代码如下
#include "production.h"

Production::Production(int id, string name, int did)
{
	this->m_id = id;
	this->m_name = name;
	this->m_did = did;
}

void Production::show_staff()
{
	cout << "职工编号:" << this->m_id
		<< "\t职工姓名:" << this->m_name
		<< "\t职工部门:" << this->get_dep() << endl;
}

string Production::get_dep()
{
	return string("生产部门");
}
4.3、创建销售部门类
销售部门继承职工抽象类,并重写父类中的纯虚函数
在头文件和源文件中分别创建:market.h和market.cpp
market.h文件代码如下
#pragma once
#include <iostream>
#include "worker.h"
using namespace std;

class Market :public Worker
{
public:
	Market(int id, string name, int did);

	void show_staff();

	string get_dep();
};
market.cpp文件代码如下
#include "market.h"

Market::Market(int id, string name, int did)
{
	this->m_id = id;
	this->m_name = name;
	this->m_did = did;
}

void Market::show_staff()
{
	cout << "职工编号:" << this->m_id
		<< "\t职工姓名:" << this->m_name
		<< "\t职工部门:" << this->get_dep() << endl;
}

string Market::get_dep()
{
	return string("销售部门");
}
4.4、创建研发部门类
研发部门继承职工抽象类,并重写父类中的纯虚函数
在头文件和源文件中分别创建:study.h和study.cpp
study.h文件代码如下
#pragma once
#include <iostream>
#include "worker.h"
using namespace std;

class Study :public Worker
{
public:
	Study(int id, string name, int did);

	void show_staff();

	string get_dep();
};
study.cpp文件代码如下
#include "study.h"

Study::Study(int id, string name, int did)
{
	this->m_id = id;
	this->m_name = name;
	this->m_did = did;
}

void Study::show_staff()
{
	cout << "职工编号:" << this->m_id
		<< "\t职工姓名:" << this->m_name
		<< "\t职工部门:" << this->get_dep() << endl;
}

string Study::get_dep()
{
	return string("研发部门");
}
5、添加职工
功能:添加职工,并且保存到文件中
5.1、功能分析
用户在批量创建职工时可能会创建不同种类的职工
如果想将所有不同种类的职工都放入到一个数组中,就只能把所有职工的指针放到一个数组中
这些职工又有同一个父类,让父类指针指向开辟在堆区的子类地址,所以可以将数组的类型设置为父类的指针,也就是:worker*
如果我们想在函数运行完后继续使用该数组,就将数组维护到堆区中,因为数组类型是worker*,所以开辟到堆区时要用变量名 worker** 来接收:
worke** = new worke*[number]
如下图所示:
5.2、功能实现
在administrator.h中添加成员属性:员工数组的指针和记录文件中的人数个数
// 记录员工数量
int staff_num;

// 员工数组的指针
Worker** staff_list;
在administrator的构造函数中初始化成员属性
Administrator::Administrator()
{
	// 职工总人数
	staff_num = 0;
	// 职工数组
	staff_list = NULL;
}
在administrator.h中添加成员函数
// 添加职工
void add_staff();
在administrator.cpp中实现该成员函数
// 添加职工
void Administrator::add_staff()
{
	// 职工编号
	int id;
	// 职工姓名
	string name;
	// 职工部门,用数字代替
	int did;
	cout << "输入员工编号" << endl;
	cin >> id;
	// 判断职工id是否重复,重复添加则退出函数
    // 函数定义在下面的功能中
	if (this->is_staff(id))
	{
		cout << "员工编号不可重复添加" << endl;
		return;
	}

	// 新的职工人数等于原有的职工人加上用户要添加的职工人数
	int new_num = this->staff_num + 1;

	// 开辟新空间,与我们定义的存放职工指针的数组类型一样
	// 主要用来存放新添加的职工指针
	Worker** new_list = new Worker * [new_num];

	// 当旧的职工数组不为空时,要把旧的职工数组中的员工添加到新的职工数组中
	if (staff_list != NULL)
	{
		for (int i = 0; i < this->staff_num; i++)
		{
			// 把旧数组中的职工按原位置放到新的数组中
			new_list[i] = this->staff_list[i];
		}
	}
	cout << "输入员工姓名" << endl;
	cin >> name;
	cout << "选择员工部门:" << endl;
	cout << "1、销售部门:" << endl;
	cout << "2、生产部门:" << endl;
	cout << "3、研发部门:" << endl;
	cin >> did;

	// 先让抽象类指向空,方便一会指向子类对象
	Worker* worker = NULL;
	switch (did)
	{
	case 1:
		// 父类指针指向子类对象
		worker = new Market(id, name, 1);
		break;
	case 2:
		worker = new Production(id, name, 2);
		break;
	case 3:
		worker = new Study(id, name, 3);
		break;
	default:
		break;
	}
	// 把添加好的职工放到新的职工数组中
	new_list[this->staff_num] = worker;

	// 把旧的职工数组释放掉
	delete[] this->staff_list;

	// 更改职工人数
	this->staff_num = new_num;

	// 把新的职工数组指向改为旧的职工数组
	this->staff_list = new_list;

	// 调用保存文件功能
	this->save();

	// 文件是否为空的标志更新为不为空
	this->is_file_null = false;

	cout << "成功添加 1 个员工" << endl;

}
在administrator的析构函数中释放堆区数据
// 析构函数
Administrator::~Administrator()
{
	// 清空堆区职工数组
	if (this->staff_list != NULL)
	{
		// 把数组中的每个元素都置空
		for (int i = 0; i < this->staff_num; i++)
		{
			if (this->staff_list[i] != NULL)
			{
				delete this->staff_list[i];
				// 数组置空
				this->staff_list[i] = NULL;
			}
		}
	}
}
6、文件交互-写文件
功能描述:对文件进行读写
在添加功能中,我们只是将所有的数据添加到内存中,一旦程序结束就无法保存
因此需要一个与文件交互的功能,对于文件进行读写操作
6.1、设定文件路径
将我们的文件路径添加到administrator.h中,添加一个宏常量,并且包含头文件
#include <fstream>
#define FILENAME "staff_file.txt"
6.2、成员函数声明
在administrator.h中声明成员函数:void save()
// 保存文件
void save();
6.3、成员函数实现
// 保存文件
void Administrator::save()
{
	ofstream ofs;
	ofs.open(FILENAME, ios::out);
	for (int i = 0; i < staff_num; i++)
	{
		ofs << this->staff_list[i]->m_id << " "
			<< this->staff_list[i]->m_name << " "
			<< this->staff_list[i]->m_did << endl;
	}
	ofs.close();
}
6.4、测试添加职工功能和文件交互功能
把保存文件的功能在成功添加职工后调用
// 把旧的职工数组释放掉
delete[] this->staff_list;

// 把新的职工数组指向改为旧的职工数组
this->staff_list = new_list;

// 更改职工人数
this->staff_num = new_num;

// 保存文件
this->save();

cout << "成功添加" << add_num << "个员工" << endl;
7、文件交互-读文件
功能描述:将文件中的内容读取到程序中
上面实现了把职工数据保存到文件中,但是在下一次程序运行时没有将文件中的内容读取到程序中
在构造函数初始化数据的情况分为三种
- 第一次使用,文件未创建
- 文件存在,但是数据被用户清空
- 文件存在,并且保存有职工数据
7.1、文件未创建
在administrator.h添加成员属性,标志文件是否为空
	// 标志文件是否为空,treu文件为空,false文件不为空
	bool is_file_null;
修改administrator.cpp中的构造函数
Administrator::Administrator()
{
	ifstream ifs;
	ifs.open(FILENAME, ios::in);

	// 当文件不存在时
	if (ifs.is_open())
	{
		// 初始化职工总人数为0
		this->staff_num = 0;
		// 初始化职工数组为空
		this->is_file_null = NULL;
		// 初始化文件为空的标志
		this->is_file = true;
		// 关闭文件
		ifs.close();
		return;
	}
}
7.2、文件存在但是数据为空
写在admin的构造函数中
// 当文件存在但是数据为空
	char ch;
	// 读出文件中的第一个字符,因为每个文件尾部都有一个结束符:EOF,所以没有数据的文件把他读取出来后文件才为空
	ifs >> ch;
	// 当文件中没有数据时eof函数返回true
	if (ifs.eof())
	{
		cout << "文件为空" << endl;
		// 初始化职工总人数为0
		this->staff_num = 0;
		// 初始化职工数组为空
		this->staff_list = NULL;
		// 初始化文件为空的标志
		this->is_file_null = true;
		// 关闭文件
		ifs.close();
		return;
	}
7.3、文件存在且保存有数据
1、获取文件中的职工人数
在admin类中声明函数int get_staff()
	// 获取文件中的职工人数
	int get_staff();
实现get_staff函数
// 获取文件中职工人数
int Administrator::get_staff()
{
	// 读取文件内容
	ifstream ifs;
	ifs.open(FILENAME, ios::in);

	// 存储读的每一行数据
	string buf;
	// 统计职工人数
	int num = 0;
	while (getline(ifs, buf))
	{
		// 没读一行职工人数加一
		num++;
	}
	// 关闭文件
	ifs.close();
	return num;
}
初始化职工人数的成员属性,写在admin构造函数中
	// 当文件中有数据时
	// 调用统计统计职工人数的函数,初始化职工人数的成员属性
	this->staff_num = this->get_staff();
2、初始化职工数组中的内容
在admin类中添加读取文件数据到职工数组的成员函数
	// 初始化职工数组
	void init_staff();
实现成员函数
// 将文件中的数据读到职工数组中
void Administrator::init_staff()
{
	// 读取文件
	ifstream ifs;
	ifs.open(FILENAME, ios::in);

	// 记录员工id
	int id;
	// 员工姓名
	string name;
	// 员工部门
	int did;

	// 记录职工数组的索引位置
	int num = 0;

	// 按元素直接读,用空格或者换行分隔开,ifs>>  输入的内容是空格或换行直接的内容,再赋值给变量名
	// 如文件中的内容是:123 456 789。
	// 那么读出来后再赋值就是:id = 123, name = 456, did = 789
	// 每连续读三个元素就后就开始一次循环
	while (ifs >> id && ifs >> name && ifs >> did)
	{
		Worker* worker = NULL;
		switch (did)
		{
		case 1:
			// 父类指针指向子类对象
			worker = new Market(id, name, did);
			break;
		case 2:
			worker = new Production(id, name, did);
			break;
		case 3:
			worker = new Study(id, name, did);
			break;
		default:
			break;
		}
		this->staff_list[num] = worker;
		num++;
	}
}
在admin的构造函数中添加代码
// 当文件中有数据时
	// 调用统计统计职工人数的函数,初始化职工人数的成员属性
	this->staff_num = this->get_staff();

	// 将职工数组列表开辟到堆区中,否则调用下面函数时文件中数据没有地方存
	this->staff_list = new Worker * [this->staff_num];
	// 调用读取文件数据到职工数组的函数,记得先把堆区的空间开辟好
	this->init_staff();
	// 初始化文件是否为空的标志为false
	this->is_file_null = false;
7.4、Administrator构造函数完成上述操作后的样式
// 构造函数
Administrator::Administrator()
{
	ifstream ifs;
	ifs.open(FILENAME, ios::in);

	// 当文件不存在时
	if (!ifs.is_open())
	{
		cout << "没有文件" << endl;
		// 初始化职工总人数为0
		this->staff_num = 0;
		// 初始化职工数组为空
		this->staff_list = NULL;
		// 初始化文件为空的标志
		this->is_file_null = true;
		// 关闭文件
		ifs.close();
		return;
	}

	// 当文件存在但是数据为空
	char ch;
	// 读出文件中的第一个字符,因为每个文件尾部都有一个结束符:EOF,所以没有数据的文件把他读取出来后文件才为空
	ifs >> ch;
	// 当文件中没有数据时eof函数返回true
	if (ifs.eof())
	{
		cout << "文件为空" << endl;
		// 初始化职工总人数为0
		this->staff_num = 0;
		// 初始化职工数组为空
		this->staff_list = NULL;
		// 初始化文件为空的标志
		this->is_file_null = true;
		// 关闭文件
		ifs.close();
		return;
	}


	// 当文件中有数据时
	// 调用统计统计职工人数的函数,初始化职工人数的成员属性
	this->staff_num = this->get_staff();

	// 将职工数组列表开辟到堆区中,否则调用下面函数时文件中数据没有地方存
	this->staff_list = new Worker * [this->staff_num];
	// 调用读取文件数据到职工数组的函数,记得先把堆区的空间开辟好
	this->init_staff();
	// 初始化文件是否为空的标志为false
	this->is_file_null = false;
}
8、显示职工
在admin类中声明和实现显示职工的成员函数
// 展示职工
void Administrator::show_staffs() {
	// 判断文件内容是否为空或者文件不存在
	if (this->is_file_null)
	{
		cout << "当前还没有职工信息,快去添加把" << endl;
		return;
	}

	// 循环取出职工数组中的职工对象地址
	for (int i = 0; i < this->staff_num; i++)
	{
		this->staff_list[i]->show_staff();
	}
}
9、删除职工
先在admin类中声明和实现:判断职工是否存在的函数
// 判断职工是否存在
bool Administrator::is_staff(int id) {
	for (int i = 0; i < this->staff_num; i++)
	{
		if (this->staff_list[i]->m_id == id)
		{
			// 在职工数组中找到该职工
			return true;
		}
	}
	return false;
}
再声明和实现删除功能的函数
// 删除职工
void Administrator::delete_staff() {
	// 判断文件是否为空或不存在
	if (this->is_file_null) {
		cout << "文件不存在或者文件为空" << endl;
		return;
	}

	cout << "输入要删除的职工id" << endl;
	int choice;
	cin >> choice;
	// 判断职工是否存在
	if (!this->is_staff(choice))
	{
		cout << "职工不存在" << endl;
		return;
	}
	// 职工存在
	for (int i = 0; i < this->staff_num; i++)
	{
		// 找到与用户输入的id一致的职工
		if (staff_list[i]->m_id == choice)
		{
			// 从要删除的职工这个元素开始循环,从0开始,循环元素总数减当前元素的索引再减1次
			for (int j = 0; j < this->staff_num - i - 1; j++)
			{
				// 把数组中的元素前移,把要删除的元素覆盖掉,就完成了删除数组中的元素
				this->staff_list[i + j] = this->staff_list[i + j + 1];
			}
			// 更新职工总数,减一
			this->staff_num--;
			// 保存数组中的数据到文件中
			this->save();
			// 判断当前职工人数是否为0,如果为0就更新文件是否为空的属性状态为true
			if (this->staff_num == 0)
			{
				this->is_file_null = true;
			}
			cout << "删除成功" << endl;
			return;
		}
	}
}
10、修改职工
在admin类中声明和实现修改职工函数
// 修改职工
void Administrator::date_staff() {
	if (this->is_file_null)
	{
		cout << "文件未创建或没有员工数据" << endl;
	}
	int choice;
	cout << "输入要修改的职工编号" << endl;
	cin >> choice;
	for (int i = 0; i < this->staff_num; i++)
	{
		if (this->staff_list[i]->m_id == choice)
		{
			// 职工编号
			int id;
			// 职工姓名
			string name;
			// 职工部门,用数字代替
			int did;
			// 先让抽象类指向空,方便一会指向子类对象
			Worker* worker = NULL;
			cout << "输入员工编号" << endl;
			cin >> id;
			cout << "输入员工姓名" << endl;
			cin >> name;
			cout << "选择员工部门:" << endl;
			cout << "1、销售部门:" << endl;
			cout << "2、生产部门:" << endl;
			cout << "3、研发部门:" << endl;
			cin >> did;
			switch (did)
			{
			case 1:
				// 父类指针指向子类对象
				worker = new Market(id, name, did);
				break;
			case 2:
				worker = new Production(id, name, did);
				break;
			case 3:
				worker = new Study(id, name, did);
				break;
			default:
				break;
			}
			this->staff_list[i] = worker;
			this->save();
			cout << "修改成功" << endl;
			return;
		}
		else
		{
			cout << "职工不存在" << endl;
			return;
		}
	}
}
11、查找职工
在admin类中声明和实现函数
void Administrator::find_staff() {
	// 判断文件是否存在或者数据是否为空
	if (this->is_file_null)
	{
		cout << "当前没有职工信息" << endl;
		return;
	}

	// 按姓名查找职工时判断是否在数组中找到职工,找到职工后改为true
	bool flag = false;

	cout << "1、按职工编号查找" << endl;
	cout << "2、按职工姓名查找" << endl;
	int choice;
	cin >> choice;
	// 按编号查找职工
	if (choice == 1)
	{
		cout << "输入职工编号" << endl;
		int id;
		cin >> id;
		for (int i = 0; i < this->staff_num; i++)
		{
			if (this->staff_list[i]->m_id == id)
			{
				cout << "当前职工信息如下:" << endl;
				staff_list[i]->show_staff();
				return;
			}
		}
		cout << "*********没有找到该职工*********" << endl;
		return;
	}
	// 按姓名查找职工
	else if (choice == 2)
	{
		cout << "输入职工姓名" << endl;
		string name;
		cin >> name;
		for (int i = 0; i < this->staff_num; i++)
		{
			if (this->staff_list[i]->m_name == name)
			{
				cout << "职工信息如下:" << endl;
				staff_list[i]->show_staff();
				// 找到职工了,改为true
				flag = true;
			}
		}

		// 判断是否按姓名找到职工
		if (flag)
		{
			cout << "----------已显示所有该姓名职工信息----------" << endl;
			return;
		}
		else if (!flag)
		{
			cout << "*********没有找到该职工*********" << endl;
			return;
		}
	}
}
12、排序职工
在admin类中声明和实现成员函数
void Administrator::sort_staff() {
	// 判断文件是否存在或者为空
	if (this->is_file_null)
	{
		cout << "当前没有职工数据,无法排序" << endl;
		return;
	}

	cout << "1、升序排列" << endl;
	cout << "2、降序排列" << endl;
	cout << "选择要进行排列的方式" << endl;
	// 获取用户选择的排序方式
	int choice;
	cin >> choice;

	// 当用户的选择既不是1也不是2时退出程序
	if (choice != 1 && choice != 2)
	{
		cout << "输入正确的编号" << endl;
		return;
	}

	// 选择排序
	// 循序数组中的每一个值,都对其进行一次比较
	for (int i = 0; i < this->staff_num; i++)
	{

		// 假设当前的最大值或者最小值为索引i的元素
		int min_or_max = i;

		// 把当前要排序的值与后面所有的值进行比较,第一次循环把最大或者最小值放在索引0的位置
		// 第二次循环把第二大或第二小的值放在索引1的位置,以此类推
		for (int j = i + 1; j < this->staff_num;j++)
		{

			// 用户选择1,升序排列
			if (choice == 1)
			{

				// 当前认定的最小值比另一个值要大时,交换在数组中的位置
				if (this->staff_list[min_or_max]->m_id > this->staff_list[j]->m_id)
				{
					// 改变假设最小值的索引为j元素
					min_or_max = j;
				}
			}
			else if (choice == 2)
			{

				// 当前认定的最大值比另一个值要小时,交换在数组中的位置
				if (this->staff_list[min_or_max]->m_id < this->staff_list[j]->m_id)
				{
					// 改变假设最大值的索引为j元素
					min_or_max = j;
				}
			}

			// 当前的索引与之前假设的最大或者最小值的索引不一样,说明程序找到了比之前假设的最大值或者最小值更大或者更小的值
			if (min_or_max != i)
			{
				// 交换元素位置
				Worker* worker = NULL;
				worker = this->staff_list[min_or_max];
				this->staff_list[min_or_max] = this->staff_list[i];
				this->staff_list[i] = worker;
			}
		}
	}
	cout << "排序成功" << endl;
	this->save();
}
13、清空文件
在admin类中声明和实现该成员函数
// 清空数据
void Administrator::empty_data() {
	// 判断文件是否存在或是否为空
	if (this->is_file_null)
	{
		cout << "当前没有职工数据,无需清空" << endl;
		return;
	}
	cout << "确定清空?" << endl;
	cout << "1、确定" << endl;
	cout << "2、取消" << endl;
	int choice;
	cin >> choice;

	// 确定清空
	if (choice == 1)
	{
		ofstream ofs;
		// iOS::trunc  当若文件存在则删除在创建
		ofs.open(FILENAME, ios::trunc);
		ofs.close();

		// 清空堆区职工数组
		if (this->staff_list != NULL)
		{
			// 把数组中的每个元素都置空
			for (int i = 0; i < this->staff_num; i++)
			{
				if (this->staff_list[i] != NULL)
				{
					delete this->staff_list[i];
					// 数组置空
					this->staff_list[i] = NULL;
				}
			}
			// 修改未文件转态为空或文件不存在
			this->is_file_null = true;
			// 职工人数归零
			this->staff_num = 0;
			cout << "清空成功" << endl;
			return;
		}
	}
	else if(choice == 2)
	{
		cout << "取消成功" << endl;
		return;
	}
	else
	{
		cout << "输入正确的编号" << endl;
		return;
	}
}
14、源码
头文件
administrator.h
// 防止头文件重复添加
#pragma once

// 输入输出流的头文件
#include <iostream>

// 标准命名空间
using namespace std;
#include "worker.h"
#include <fstream>
#define FILENAME "staff_file.txt"

class Administrator
{
public:
	/*成员属性*/
	// 记录员工数量
	int staff_num;

	// 员工数组的指针
	Worker** staff_list;

	// 标志文件是否为空,treu文件为空,false文件不为空
	bool is_file_null;


	/*成员函数*/
	// 构造函数
	Administrator();

	// 获取文件中的职工人数
	int get_staff();

	// 初始化职工数组
	void init_staff();

	// 判断职工是否存在的函数
	bool is_staff(int id);

	// 菜单展示
	void menu();

	// 添加职工
	void add_staff();

	// 保存文件
	void save();

	// 展示职工
	void show_staffs();

	// 删除职工
	void delete_staff();

	// 修改职工
	void date_staff();

	// 查找职工
	void find_staff();

	// 排序职工
	void sort_staff();

	// 清空数据
	void empty_data();

	// 退出系统
	void exit_system();

	// 析构函数
	~Administrator();
};
market.h
#pragma once
#include <iostream>
#include "worker.h"
using namespace std;

class Market :public Worker
{
public:
	Market(int id, string name, int did);

	void show_staff();

	string get_dep();
};
production.h
#pragma once
#include <iostream>
#include "worker.h"
using namespace std;

// 销售部门类
class Production :public Worker
{
public:
	Production(int id, string name, int did);

	// 重写父类纯虚函数
	void show_staff();

	// 重写父类纯虚函数
	string get_dep();
};
study.h
#pragma once
#include <iostream>
#include "worker.h"
using namespace std;

class Study :public Worker
{
public:
	Study(int id, string name, int did);

	void show_staff();

	string get_dep();
};
worker.h
#pragma once
#include <iostream>
#include <string>
using namespace std;

class Worker
{
public:
	// 显示个人信息
	virtual void show_staff() = 0;

	// 获取岗位名称
	virtual string get_dep() = 0;

	// 职工编号
	int m_id;
	// 职工姓名
	string m_name;
	// 职工部门
	int m_did;
};
源文件
administrator.cpp
#include "administrator.h"
#include "worker.h"
#include "study.h"
#include "production.h"
#include "market.h"
#include <string>

// 构造函数
Administrator::Administrator()
{
	ifstream ifs;
	ifs.open(FILENAME, ios::in);

	// 当文件不存在时
	if (!ifs.is_open())
	{
		// 初始化职工总人数为0
		this->staff_num = 0;
		// 初始化职工数组为空
		this->staff_list = NULL;
		// 初始化文件为空的标志
		this->is_file_null = true;
		// 关闭文件
		ifs.close();
		return;
	}

	// 当文件存在但是数据为空
	char ch;
	// 读出文件中的第一个字符,因为每个文件尾部都有一个结束符:EOF,所以没有数据的文件把他读取出来后文件才为空
	ifs >> ch;
	// 当文件中没有数据时eof函数返回true
	if (ifs.eof())
	{
		// 初始化职工总人数为0
		this->staff_num = 0;
		// 初始化职工数组为空
		this->staff_list = NULL;
		// 初始化文件为空的标志
		this->is_file_null = true;
		// 关闭文件
		ifs.close();
		return;
	}


	// 当文件中有数据时
	// 调用统计统计职工人数的函数,初始化职工人数的成员属性
	this->staff_num = this->get_staff();

	// 将职工数组列表开辟到堆区中,否则调用下面函数时文件中数据没有地方存
	this->staff_list = new Worker * [this->staff_num];
	// 调用读取文件数据到职工数组的函数,记得先把堆区的空间开辟好
	this->init_staff();
	// 初始化文件是否为空的标志为false
	this->is_file_null = false;

	ifs.close();
}

// 菜单展示
void Administrator::menu()
{
	cout << "-------------职工管理系统-------------" << endl;
	cout << "==============1-添加职工==============" << endl;
	cout << "==============2-展示职工==============" << endl;
	cout << "==============3-删除职工==============" << endl;
	cout << "==============4-修改职工==============" << endl;
	cout << "==============5-查找职工==============" << endl;
	cout << "==============6-职工排序==============" << endl;
	cout << "==============7-清空数据==============" << endl;
	cout << "==============8-退出系统==============" << endl;
	cout << "======================================" << endl;
}

// 添加职工
void Administrator::add_staff()
{
	// 职工编号
	int id;
	// 职工姓名
	string name;
	// 职工部门,用数字代替
	int did;
	cout << "输入员工编号" << endl;
	cin >> id;
	// 判断职工id是否重复,重复添加则退出函数
	if (this->is_staff(id))
	{
		cout << "员工编号不可重复添加" << endl;
		return;
	}

	// 新的职工人数等于原有的职工人加上用户要添加的职工人数
	int new_num = this->staff_num + 1;

	// 开辟新空间,与我们定义的存放职工指针的数组类型一样
	// 主要用来存放新添加的职工指针
	Worker** new_list = new Worker * [new_num];

	// 当旧的职工数组不为空时,要把旧的职工数组中的员工添加到新的职工数组中
	if (staff_list != NULL)
	{
		for (int i = 0; i < this->staff_num; i++)
		{
			// 把旧数组中的职工按原位置放到新的数组中
			new_list[i] = this->staff_list[i];
		}
	}
	cout << "输入员工姓名" << endl;
	cin >> name;
	cout << "选择员工部门:" << endl;
	cout << "1、销售部门:" << endl;
	cout << "2、生产部门:" << endl;
	cout << "3、研发部门:" << endl;
	cin >> did;

	// 先让抽象类指向空,方便一会指向子类对象
	Worker* worker = NULL;
	switch (did)
	{
	case 1:
		// 父类指针指向子类对象
		worker = new Market(id, name, 1);
		break;
	case 2:
		worker = new Production(id, name, 2);
		break;
	case 3:
		worker = new Study(id, name, 3);
		break;
	default:
		cout << "没有该部门,添加失败" << endl;
		return;
		break;
	}
	// 把添加好的职工放到新的职工数组中
	new_list[this->staff_num] = worker;

	// 把旧的职工数组释放掉
	delete[] this->staff_list;

	// 更改职工人数
	this->staff_num = new_num;

	// 把新的职工数组指向改为旧的职工数组
	this->staff_list = new_list;

	// 调用保存文件功能
	this->save();

	// 文件是否为空的标志更新为不为空
	this->is_file_null = false;

	cout << "成功添加 1 个员工" << endl;

}

// 保存文件
void Administrator::save()
{
	ofstream ofs;
	ofs.open(FILENAME, ios::out);
	for (int i = 0; i < staff_num; i++)
	{
		ofs << this->staff_list[i]->m_id << " "
			<< this->staff_list[i]->m_name << " "
			<< this->staff_list[i]->m_did << endl;
	}
	ofs.close();
}

// 获取文件中职工人数
int Administrator::get_staff()
{
	// 读取文件内容
	ifstream ifs;
	ifs.open(FILENAME, ios::in);

	// 存储读的每一行数据
	string buf;
	// 统计职工人数
	int num = 0;
	while (getline(ifs, buf))
	{
		// 没读一行职工人数加一
		num++;
	}
	// 关闭文件
	ifs.close();
	return num;
}

// 将文件中的数据读到职工数组中
void Administrator::init_staff()
{
	// 读取文件
	ifstream ifs;
	ifs.open(FILENAME, ios::in);

	// 记录员工id
	int id;
	// 员工姓名
	string name;
	// 员工部门
	int did;

	// 记录职工数组的索引位置
	int num = 0;

	// 按元素直接读,用空格或者换行分隔开,ifs>>  输入的内容是空格或换行直接的内容,再赋值给变量名
	// 如文件中的内容是:123 456 789。
	// 那么读出来后再赋值就是:id = 123, name = 456, did = 789
	// 每连续读三个元素就后就开始一次循环
	while (ifs >> id && ifs >> name && ifs >> did)
	{
		Worker* worker = NULL;
		switch (did)
		{
		case 1:
			// 父类指针指向子类对象
			worker = new Market(id, name, did);
			break;
		case 2:
			worker = new Production(id, name, did);
			break;
		case 3:
			worker = new Study(id, name, did);
			break;
		default:
			break;
		}
		this->staff_list[num] = worker;
		num++;
	}
}

// 展示职工
void Administrator::show_staffs() {
	// 判断文件内容是否为空或者文件不存在
	if (this->is_file_null)
	{
		cout << "当前还没有职工信息,快去添加把" << endl;
		return;
	}

	// 循环取出职工数组中的职工对象地址
	for (int i = 0; i < this->staff_num; i++)
	{
		this->staff_list[i]->show_staff();
	}
}

// 删除职工
void Administrator::delete_staff() {
	// 判断文件是否为空或不存在
	if (this->is_file_null) {
		cout << "文件不存在或者文件为空" << endl;
		return;
	}

	cout << "输入要删除的职工id" << endl;
	int choice;
	cin >> choice;
	// 判断职工是否存在
	if (!this->is_staff(choice))
	{
		cout << "职工不存在" << endl;
		return;
	}
	// 职工存在
	for (int i = 0; i < this->staff_num; i++)
	{
		// 找到与用户输入的id一致的职工
		if (staff_list[i]->m_id == choice)
		{
			// 从要删除的职工这个元素开始循环,从0开始,循环元素总数减当前元素的索引再减1次
			for (int j = 0; j < this->staff_num - i - 1; j++)
			{
				// 把数组中的元素前移,把要删除的元素覆盖掉,就完成了删除数组中的元素
				this->staff_list[i + j] = this->staff_list[i + j + 1];
			}
			// 更新职工总数,减一
			this->staff_num--;
			// 保存数组中的数据到文件中
			this->save();
			// 判断当前职工人数是否为0,如果为0就更新文件是否为空的属性状态为true
			if (this->staff_num == 0)
			{
				this->is_file_null = true;
			}
			cout << "删除成功" << endl;
			return;
		}
	}
}

// 修改职工
void Administrator::date_staff() {
	if (this->is_file_null)
	{
		cout << "文件未创建或没有员工数据" << endl;
	}
	int choice;
	cout << "输入要修改的职工编号" << endl;
	cin >> choice;
	for (int i = 0; i < this->staff_num; i++)
	{
		if (this->staff_list[i]->m_id == choice)
		{
			// 职工编号
			int id;
			// 职工姓名
			string name;
			// 职工部门,用数字代替
			int did;
			// 先让抽象类指向空,方便一会指向子类对象
			Worker* worker = NULL;
			cout << "输入员工编号" << endl;
			cin >> id;

			if (this->is_staff(id) && staff_list[i]->m_id != id)
			{
				cout << "修改失败,职工编号不可重复" << endl;
				return;
			}
			cout << "输入员工姓名" << endl;
			cin >> name;
			cout << "选择员工部门:" << endl;
			cout << "1、销售部门:" << endl;
			cout << "2、生产部门:" << endl;
			cout << "3、研发部门:" << endl;
			cin >> did;
			switch (did)
			{
			case 1:
				// 父类指针指向子类对象
				worker = new Market(id, name, did);
				break;
			case 2:
				worker = new Production(id, name, did);
				break;
			case 3:
				worker = new Study(id, name, did);
				break;
			default:
				break;
			}
			this->staff_list[i] = worker;
			this->save();
			cout << "修改成功" << endl;
			return;
		}
		else
		{
			cout << "职工不存在" << endl;
			return;
		}
	}
}

// 判断职工是否存在
bool Administrator::is_staff(int id) {
	for (int i = 0; i < this->staff_num; i++)
	{
		if (this->staff_list[i]->m_id == id)
		{
			// 在职工数组中找到该职工
			return true;
		}
	}
	return false;
}

// 查找职工
void Administrator::find_staff() {
	// 判断文件是否存在或者数据是否为空
	if (this->is_file_null)
	{
		cout << "当前没有职工信息" << endl;
		return;
	}

	// 按姓名查找职工时判断是否在数组中找到职工,找到职工后改为true
	bool flag = false;

	cout << "1、按职工编号查找" << endl;
	cout << "2、按职工姓名查找" << endl;
	int choice;
	cin >> choice;
	// 按编号查找职工
	if (choice == 1)
	{
		cout << "输入职工编号" << endl;
		int id;
		cin >> id;
		for (int i = 0; i < this->staff_num; i++)
		{
			if (this->staff_list[i]->m_id == id)
			{
				cout << "当前职工信息如下:" << endl;
				staff_list[i]->show_staff();
				return;
			}
		}
		cout << "*********没有找到该职工*********" << endl;
		return;
	}
	// 按姓名查找职工
	else if (choice == 2)
	{
		cout << "输入职工姓名" << endl;
		string name;
		cin >> name;
		for (int i = 0; i < this->staff_num; i++)
		{
			if (this->staff_list[i]->m_name == name)
			{
				cout << "职工信息如下:" << endl;
				staff_list[i]->show_staff();
				// 找到职工了,改为true
				flag = true;
			}
		}

		// 判断是否按姓名找到职工
		if (flag)
		{
			cout << "----------已显示所有该姓名职工信息----------" << endl;
			return;
		}
		else if (!flag)
		{
			cout << "*********没有找到该职工*********" << endl;
			return;
		}
	}
}

// 排序职工
void Administrator::sort_staff() {
	// 判断文件是否存在或者为空
	if (this->is_file_null)
	{
		cout << "当前没有职工数据,无法排序" << endl;
		return;
	}

	cout << "1、升序排列" << endl;
	cout << "2、降序排列" << endl;
	cout << "选择要进行排列的方式" << endl;
	// 获取用户选择的排序方式
	int choice;
	cin >> choice;

	// 当用户的选择既不是1也不是2时退出程序
	if (choice != 1 && choice != 2)
	{
		cout << "输入正确的编号" << endl;
		return;
	}

	// 选择排序
	// 循序数组中的每一个值,都对其进行一次比较
	for (int i = 0; i < this->staff_num; i++)
	{

		// 假设当前的最大值或者最小值为索引i的元素
		int min_or_max = i;

		// 把当前要排序的值与后面所有的值进行比较,第一次循环把最大或者最小值放在索引0的位置
		// 第二次循环把第二大或第二小的值放在索引1的位置,以此类推
		for (int j = i + 1; j < this->staff_num;j++)
		{

			// 用户选择1,升序排列
			if (choice == 1)
			{

				// 当前认定的最小值比另一个值要大时,交换在数组中的位置
				if (this->staff_list[min_or_max]->m_id > this->staff_list[j]->m_id)
				{
					// 改变假设最小值的索引为j元素
					min_or_max = j;
				}
			}
			else if (choice == 2)
			{

				// 当前认定的最大值比另一个值要小时,交换在数组中的位置
				if (this->staff_list[min_or_max]->m_id < this->staff_list[j]->m_id)
				{
					// 改变假设最大值的索引为j元素
					min_or_max = j;
				}
			}

			// 当前的索引与之前假设的最大或者最小值的索引不一样,说明程序找到了比之前假设的最大值或者最小值更大或者更小的值
			if (min_or_max != i)
			{
				// 交换元素位置
				Worker* worker = NULL;
				worker = this->staff_list[min_or_max];
				this->staff_list[min_or_max] = this->staff_list[i];
				this->staff_list[i] = worker;
			}
		}
	}
	cout << "排序成功" << endl;
	this->save();
}

// 清空数据
void Administrator::empty_data() {
	// 判断文件是否存在或是否为空
	if (this->is_file_null)
	{
		cout << "当前没有职工数据,无需清空" << endl;
		return;
	}
	cout << "确定清空?" << endl;
	cout << "1、确定" << endl;
	cout << "2、取消" << endl;
	int choice;
	cin >> choice;

	// 确定清空
	if (choice == 1)
	{
		ofstream ofs;
		// iOS::trunc  当若文件存在则删除在创建
		ofs.open(FILENAME, ios::trunc);
		ofs.close();

		// 清空堆区职工数组
		if (this->staff_list != NULL)
		{
			// 把数组中的每个元素都置空
			for (int i = 0; i < this->staff_num; i++)
			{
				if (this->staff_list[i] != NULL)
				{
					delete this->staff_list[i];
					// 数组置空
					this->staff_list[i] = NULL;
				}
			}
			// 修改未文件转态为空或文件不存在
			this->is_file_null = true;
			// 职工人数归零
			this->staff_num = 0;
			cout << "清空成功" << endl;
			return;
		}
	}
	else if(choice == 2)
	{
		cout << "取消成功" << endl;
		return;
	}
	else
	{
		cout << "输入正确的编号" << endl;
		return;
	}
}

// 退出系统
void Administrator::exit_system() {
	// 直接退出当前程序
	cout << "感谢使用" << endl;
	exit(1);
}

// 析构函数
Administrator::~Administrator()
{
	// 清空堆区职工数组
	if (this->staff_list != NULL)
	{
		// 把数组中的每个元素都置空
		for (int i = 0; i < this->staff_num; i++)
		{
			if (this->staff_list[i] != NULL)
			{
				delete this->staff_list[i];
				// 数组置空
				this->staff_list[i] = NULL;
			}
		}
	}
}
market.cpp
#include "market.h"

Market::Market(int id, string name, int did)
{
	this->m_id = id;
	this->m_name = name;
	this->m_did = did;
}

void Market::show_staff()
{
	cout << "职工编号:" << this->m_id
		<< "\t职工姓名:" << this->m_name
		<< "\t\t职工部门:" << this->get_dep() << endl;
}

string Market::get_dep()
{
	return string("销售部门");
}
production.cpp
#include "production.h"

Production::Production(int id, string name, int did)
{
	this->m_id = id;
	this->m_name = name;
	this->m_did = did;
}

void Production::show_staff()
{
	cout << "职工编号:" << this->m_id
		<< "\t职工姓名:" << this->m_name
		<< "\t\t职工部门:" << this->get_dep() << endl;
}

string Production::get_dep()
{
	return string("生产部门");
}
study.cpp
#include "study.h"

Study::Study(int id, string name, int did)
{
	this->m_id = id;
	this->m_name = name;
	this->m_did = did;
}

void Study::show_staff()
{
	cout << "职工编号:" << this->m_id
		<< "\t职工姓名:" << this->m_name
		<< "\t\t职工部门:" << this->get_dep() << endl;
}

string Study::get_dep()
{
	return string("研发部门");
}
main.cpp
#include <iostream>
#include "administrator.h"
#include "market.h"
#include "production.h"
#include "study.h"
#include "worker.h"
using namespace std;

int main()
{
	// 创建管理者对象
	Administrator admin;
	while (true)
	{
		// 调用展示菜单功能
		admin.menu();
		cout << "输入要操作的内容" << endl;

		// 获取用户输入的内容
		int choice;
		cin >> choice;

		// 根据用户的选择执行不同的功能
		switch (choice)
		{
		case 1:  // 添加职工
			admin.add_staff();
			break;
		case 2:  // 展示职工
			admin.show_staffs();
			break;
		case 3:  // 删除职工
			admin.delete_staff();
			break;
		case 4:  // 修改职工
			admin.date_staff();
			break;
		case 5:  // 查找职工
			admin.find_staff();
			break;
		case 6:  // 职工排序
			admin.sort_staff();
			break;
		case 7:  // 清空数据
			admin.empty_data();
			break;
		case 8:  // 退出系统
			admin.exit_system();
			break;
		default:
			cout << "输入正确的序号" << endl;
			system("pause");
			break;
		}
		system("pause");
		system("cls");
	}
	return 0;
}

 浙公网安备 33010602011771号