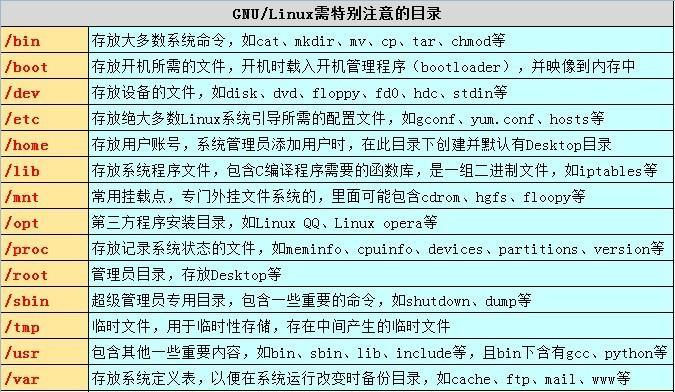
linux 基础命令
防火墙:
1 systemctl stop firewalld
2 systemctl disable firewalld
服务的启动,停止,重启
1 启动:service rabbitmq-server start
2         systemctl start rabbitmq-server
3
4 停止:service rabbitmq-server stop
5         systemctl stop rabbitmq-server
6
7 重启:service rabbitmq-server restart
8         systemctl restart rabbitmq-server
常用基础命令:


 1 使用命令退出虚拟终端2上登录的用户
 2
 3  Ctrl + Alt + F2
 4
 5 使用命令退出虚拟终端5上登录的用户
 6
 7 exit
 8
 9 查看哪些用户在系统上工作
10
11 who
12
13 修改当前时间为2018年8月26号11:28
14
15 date 082611282018
16
17 查看2015年10月份日历
18
19 cal 10 2015
20
21 使用两种方法查看ls命令的使用说明
22
23 ls --help
24  man ls
25
26 清除屏幕
27
28 clear
29
30 使用“useradd tom”命令新建tom用户,为tom用户设置密码“123”
31
32 useradd tom
33
34 echo "123" | passwd --stdin tom
35
36 切换当前用户为tom
37
38 su - tom
39
40 查看当前登陆Linux系统所使用的用户名
41
42 whoami
43
44 创建目录wg
45
46 mkdir /wg
47
48 使用绝对路径的方法在wg目录下新建文件a.txt
49
50 touch /wg/a.txt
51
52 进入wg目录
53
54 cd wg
55
56 使用相对路径的方法在当前目录下新建wg01目录和b.txt文件
57
58 mkdir wg01 && touch b.txt
59
60 以长列表格式列出当前目录下的内容
61
62 ls  -l
63
64 删除空目录wg01
65
66 rm -rf wg01
67
68 进入上一级工作目录
69
70 cd ..
71
72 强制删除非空目录wg
73
74 rm -rf wg
75
76 复制/etc/passwd到当前目录,名为file1
77
78 cp /etc/passwd file1
79
80 不停的以只读的方式查看file1文件的内容
81
82 tail -f file1
83
84 查看file1文件的前3行内容
85
86 head -n 3 file1
87
88 查看file1文件的后2行内容
89
90 tail -2 file1
91
92 以百分比的方式分页查看file1文件的内容
93
94 more file1
95
96 以上下翻页的方法分页查看file1文件的内容
97
98  less file1
查看进程相关信息
1 ps aux   查看全部进程信息
2 ps aux | grep firefox
3
4 kill -9  3434      根据进程id杀死进程
5 pkill -9 firefox    根据进程名杀死进程
6
7 jobs  查看工作号
8 pstree     以树的方式查看进程
查看内存相关信息
free       静态使用情况
top        动态  查看系统中各个进程的资源占用情况
查看磁盘信息
df -h  查看空间
df -T   查看挂载
查看网络信息
netstat -tunalp
t   tcp
u  udp
n   ip地址端口号
a    all
l    监听
p   pid
查看虚拟机内存等信息
1 vmstat
设置主机名解析
vim /etc/hosts
添加行
192.168.6.7 oldboy
ssh 密码登录
[root@centos ~]# ssh -p 22 root@oldboy
root@oldboy's password:
Last login: Thu Aug 10 17:57:56 2017 from 192.168.6.6
ssh 免密登录
公钥用来加密,私钥用来解密,服务端发送密钥给客户端,以后服务端要远程登录客户端,发送的命令经过加密,客户端就可以解密执行了
设置oldboy免密登录centos
[root@oldboy ~]# ssh-keygen     服务端创建公钥密钥
Generating public/private rsa key pair.
Enter file in which to save the key (/root/.ssh/id_rsa):
/root/.ssh/id_rsa already exists.
Overwrite (y/n)? y
Enter passphrase (empty for no passphrase):
Enter same passphrase again:
Your identification has been saved in /root/.ssh/id_rsa.
Your public key has been saved in /root/.ssh/id_rsa.pub.
The key fingerprint is:
d0:cb:e9:af:ed:95:56:e1:fb:e4:50:d3:76:41:33:5f root@oldboy
The key's randomart image is:
+--[ RSA 2048]----+
|               +E|
|       .      . =|
|      . .     ...|
|       o o   . .o|
|        S     o.=|
|       .     o +o|
|        .   + o .|
|         o o   = |
|        .o+     o|
+-----------------+
[root@oldboy ~]# ssh-copy-id -i centos    服务端将密钥发送给客户端   主机名也可以写成IP地址
/usr/bin/ssh-copy-id: INFO: attempting to log in with the new key(s), to filter out any that are already installed
/usr/bin/ssh-copy-id: INFO: 1 key(s) remain to be installed -- if you are prompted now it is to install the new keys
root@centos's password:   第一次需要输入密码
etc/.bashrc
/etc/bashrc

Number of key(s) added: 1

Now try logging into the machine, with:   "ssh 'centos'"
and check to make sure that only the key(s) you wanted were added.

[root@oldboy ~]# ssh centos    尝试连接   主机名也可以写成IP地址
Last login: Thu Aug 10 18:04:57 2017 from 192.168.6.7
/etc/profile
/etc/profile.d/a.sh
/root/.bashrc_profile
etc/.bashrc
/etc/bashrc
[root@centos ~]# logout     退出连接
Connection to centos closed.

 浙公网安备 33010602011771号