Vue 快速入门(三)

前面已经介绍了Vue的基本应用,这篇开始介绍Vue常用指令的使用。
01 - 模板语法
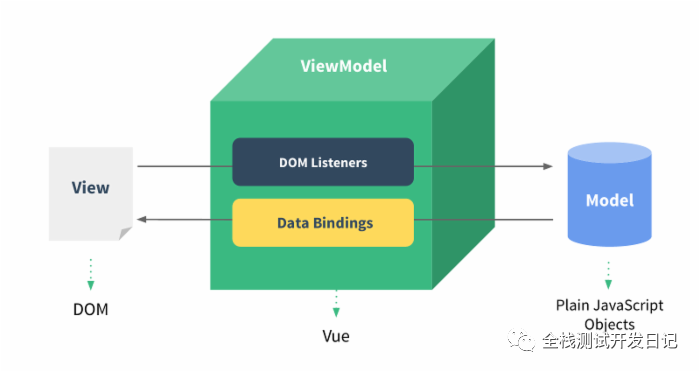
Vue.js使用了基于HTML的模板语法,允许开发者声明式地将DOM绑定至底层Vue实例的数据。
Vue.js 的核心是一个允许你采用简洁的模板语法来声明式的将数据渲染进 DOM 的系统。
结合响应系统,在应用状态改变时, Vue 能够智能地计算出重新渲染组件的最小代价并应用到 DOM 操作上。(响应式-双向数据绑定)
-
文本
数据绑定最常见的形式就是使用 {{...}}(双大括号)的文本插值:
<!DOCTYPE html>
<html lang="en">
<head>
    <meta charset="UTF-8">
    <meta http-equiv="X-UA-Compatible" content="IE=edge">
    <meta name="viewport" content="width=device-width, initial-scale=1.0">
    <title>Document</title>
</head>
<body>

    <div id="app">
        <h1>{{name}},欢迎你</h1>
    </div>

    <script src="./node_modules/vue/dist/vue.js"></script>
    <script>
     new Vue({
        el:"#app",
        data:{
            name: "测试开发同学"
        }
     })

    </script>

</body>
</html>
运行效果:

这里是没有使用到指令,如果要使用指令要怎么写呢?
如果不使用模板语言,可以使用vue指令v-text来使用数据绑定和输出,代码如下:
<!DOCTYPE html>
<html lang="en">
<head>
    <meta charset="UTF-8">
    <meta http-equiv="X-UA-Compatible" content="IE=edge">
    <meta name="viewport" content="width=device-width, initial-scale=1.0">
    <title>Document</title>
</head>
<body>

    <div id="app">
        <h1 v-text="name"></h1>
    </div>

    <script src="./node_modules/vue/dist/vue.js"></script>
    <script>
     new Vue({
        el:"#app",
        data:{
            name: "测试开发同学,欢迎你"
        }
     })

    </script>

</body>
</html>
这样是不是看起来简洁点。
-
表达式
模板语言是支持表达式写法的,如:
<!DOCTYPE html>
<html lang="en">
<head>
    <meta charset="UTF-8">
    <meta http-equiv="X-UA-Compatible" content="IE=edge">
    <meta name="viewport" content="width=device-width, initial-scale=1.0">
    <title>Document</title>
</head>
<body>

    <div id="app">
        <h1 v-text="name"></h1>
        <!-- 条件判断 -->
        <div>{{age > 18 ? '成年': '未成年'}}</div>
        <!-- 布尔型 -->
        <div>{{age  ? '男': '女'}}</div>
        <!-- 表达式 -->
        <div>{{email.split('.')[0].toUpperCase()}}</div>
        <div>{{email.split('.')[1].toUpperCase()}}</div>
    </div>

    <script src="./node_modules/vue/dist/vue.js"></script>
    <script>
     new Vue({
        el:"#app",
        data:{
            name: "测试开发同学" + " ,欢迎你",
            age: 20,
            sex: true,
            email: "222@qq.com"
        }
     })

    </script>

</body>
</html>
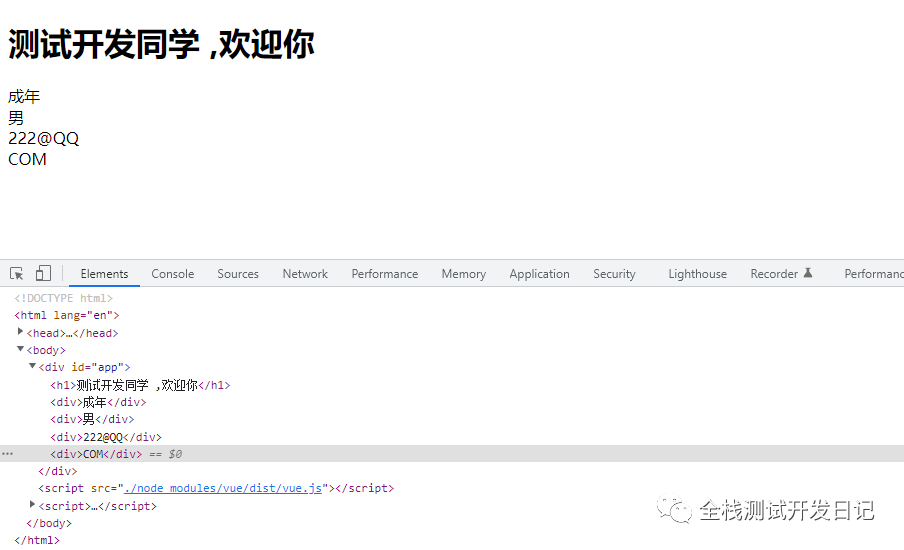
效果如下:
-
过滤器
Vue.js 允许你自定义过滤器,被用作一些常见的文本格式化。由"管道符"指示, 格式如下:
格式如下:
<!-- 在两个大括号中 -->
{{ message | capitalize }}
这种一般是用在需要修改的文本场景下使用,比如下面这种:
<!DOCTYPE html>
<html lang="en">
<head>
    <meta charset="UTF-8">
    <meta http-equiv="X-UA-Compatible" content="IE=edge">
    <meta name="viewport" content="width=device-width, initial-scale=1.0">
    <title>Document</title>
</head>
<body>

    <div id="app">
        <h1 v-text="name"></h1>
        <!-- 条件判断 -->
        <div>{{age > 18 ? '成年': '未成年'}}</div>
        <!-- 布尔型 -->
        <div>{{age  ? '男': '女'}}</div>
        <!-- 表达式 -->
        <div>{{email.split('.')[0].toUpperCase()}}</div>
        <div>{{email.split('.')[1].toUpperCase()}}</div>
        <div >{{msg | change}}</div>
    </div>

    <script src="./node_modules/vue/dist/vue.js"></script>
    <script>
     new Vue({
        el:"#app",
        data:{
            name: "测试开发同学" + " ,欢迎你",
            age: 20,
            sex: true,
            email: "222@qq.com",
            msg: '这个样式需要单独改'
        },
        filters: {
            change: function (value){
                let textct = value
                return textct + '???'
            }
        }
     })

    </script>

</body>
</html>
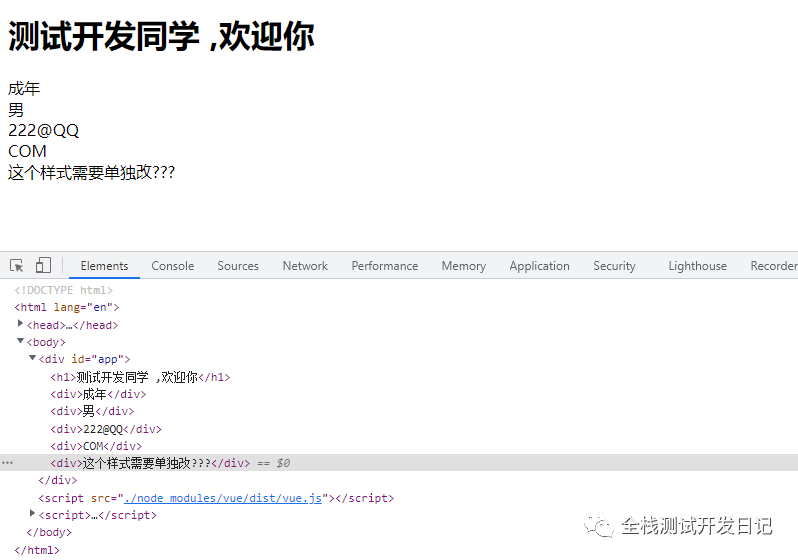
输出结果:
02 - Vue指令简述
指令基本思想:
-
双向绑定
模型变化,视图也会随之变化
视图变化,模型也会随之变化
-
方法
method
03 - 指令分类
常用指令分类:
-
内容渲染指令:
v-html
v-text
v-pre
-
属性绑定指令:
v-bind:href
-
样式绑定指令:
v-bind:class
v-bind:style
-
事件监听指令:
v-on:click
-
条件渲染指令:
v-if
v-else-if
v-else
v-show
-
列表渲染指令
v-for
-
双向绑定
v-model
这些指令是日常经常使用的。
04 - 内容渲染指令
v-text : 当作纯文本
v-text是元素的 InnerText 属性,它的作用和之前我们使用的 {{}} 一样,用于数据
绑定:
<!DOCTYPE html>
<html lang="en">
<head>
    <meta charset="UTF-8">
    <meta http-equiv="X-UA-Compatible" content="IE=edge">
    <meta name="viewport" content="width=device-width, initial-scale=1.0">
    <title>Document</title>
</head>
<body>
    <script src="./node_modules/vue/dist/vue.js"></script>
    <div id="app">
        <h1 v-text="name"></h1>
    </div>

    <script>
        new Vue({
            el: "#app",
            data: {
                name: "测试开发,你好!",
            }
        })
    </script>
</body>
</html>
v-html : 将value作为html标签来解析
v-html是元素的 innerHTML,它用于绑定一段 html 标签:
<!DOCTYPE html>
<html lang="en">
<head>
    <meta charset="UTF-8">
    <meta http-equiv="X-UA-Compatible" content="IE=edge">
    <meta name="viewport" content="width=device-width, initial-scale=1.0">
    <title>Document</title>
</head>
<body>
    <script src="./node_modules/vue/dist/vue.js"></script>
    <div id="app">
        <div v-html="html"></div>
    </div>

    <script>
        new Vue({
            el: "#app",
            data: {
                html: '<span style="color:red;background:yellow;font-size:50px">测试</span>'
            }
        })
    </script>
</body>
</html>
05 - 属性&样式绑定指令
v-bind : 属性绑定
v-bind用于给元素的属性赋值。v-bind后面是 :属性名=[变量名]。例如:v-bind:title="message":
很多属性值是不支持表达式的, 就可以使用vbind。
代码解释:
在 HTML 代码第 2 行,我们使用了 vbind 指令给 div 标签的 title 属性赋值。
在 HTML 代码第 6 行,我们使用了 vbind 指令给 a 标签的 href 属性赋值。
在 HTML 代码第 9 行,我们使用了 vbind 指令给 img 标签的 src 属性赋值。
在 HTML 代码第 12 行,我们使用了 vbind 指令给 bitton 标签的 disabled 属性赋值。
<!DOCTYPE html>
<html lang="en">

<head>
    <meta charset="UTF-8">
    <meta http-equiv="X-UA-Compatible" content="IE=edge">
    <meta name="viewport" content="width=device-width, initial-scale=1.0">
    <title>Document</title>
</head>

<body>
    <script src="./node_modules/vue/dist/vue.js"></script>
    <div id="app">
        <h1 v-text="name"></h1>
        <div v-html="html"></div>
        <div v-bind:title="title" :class="{red:isred}" :style="{fontSize: bigFont}">
            鼠标悬停查看消息!
        </div>
        <a v-bind:href="href">测试属性链接</a>
        <img v-bind:src="src" style="width: 80px;height:80px;" />
        <div>
            <button v-bind:disabled="disabled">禁用按钮</button>
        </div>
    </div>
    <script>
        new Vue({
            el: "#app",
            data: {
                name: "测试开发,你好!",
                html: '<span style="color:red;background:yellow;font-size:50px">测试</span>',
                title: "您好,测试开发",
                href: "www.baidu.com",
                src: 'https://picnew9.photophoto.cn/20150614/keaixiaohuangyatupian-07832041_1.jpg',
                disabled: true,
                isred: true,
                bigFont: "50px"

            }
        })
    </script>
</body>

</html>
输出结果:

细心的同学可以看到,vue 还提供了指令 vbind 的简写方式,可以直接通过:属性名的方式。
vbind:src="src" = :src="src"
从上面可以看到,我们可以为 v-bind:class 设置一个对象,从而动态的切换 class:
<div v-bind:title="title" :class="{red:isred}" :style="{fontSize: bigFont}">鼠标悬停查看消息!</div>
这里还用到style(内联样式), 我们可以在 v-bind:style 直接设置样式:
 <div v-bind:style="{ color: activeColor, fontSize: fontSize + 'px' }">测试style</div>
 data: {

    activeColor: "red",
    fontSize: "50px"

   }
v-bind总结用法:
 // 绑定元素属性 --   v-bind
    /*
      语法:   v-bind:元素属性="vue的属性"

      简写:  v-bind:title 简写成  :title

      针对样式的特殊用法
        动态控制class是否添加  :class="{red:isred}"
          语法  {red:isred}  : {需要动态控制的class样式:vue的属性(需要是bool类型)}

        动态设置style的样式::style="{fontSize: bigFont}"
          语法{fontSize: bigFont}   :  {css样式的驼峰命名方式:vue的属性}: font-size=fontSize
    */
06 - 事件绑定指令
有时候,我们需要给元素绑定事件,vue 中提供了指令 v-on 来进行事件的绑定。用法:
v-on:事件名="方法",例如:von:click=“alert”。
v-on:事件名, 可以缩写为: @事件名
方法1:直接绑定到一个方法,也可以用内联 JavaScript 语句,如下:
<!DOCTYPE html>
<html lang="en">
<head>
    <meta charset="UTF-8">
    <meta http-equiv="X-UA-Compatible" content="IE=edge">
    <meta name="viewport" content="width=device-width, initial-scale=1.0">
    <title>Document</title>
</head>
<body>

    <script src="./node_modules/vue/dist/vue.js"></script>

    <div id="app">
        <button v-on:click="hello">单击事件</button>
    </div>
    <script>
        new Vue({
            el: "#app",
            data:{
            },
            methods: {
                hello(){
                    alert('hello')
                }
            },
        })
    </script>
</body>
</html>
方法2:我们可以使用一个方法来调用 JavaScript 方法,v-on 可以接收一个定义的方法来调用。
<!DOCTYPE html>
<html lang="en">
<head>
    <meta charset="UTF-8">
    <meta http-equiv="X-UA-Compatible" content="IE=edge">
    <meta name="viewport" content="width=device-width, initial-scale=1.0">
    <title>Document</title>
</head>
<body>

    <script src="./node_modules/vue/dist/vue.js"></script>

    <div id="app">
        <button v-on:click="hello">单击事件</button>
    </div>
    <script>
       var app =  new Vue({
            el: "#app",
            data:{
                name: "这是变量"
            },
              // 在 `methods` 对象中定义方法

            methods: {
                hello: function(event){
                    // `this` 在方法里指当前 Vue 实例
                    alert('hello' + this.name + '!')
                          // `event` 是原生 DOM 事件

                    if (event){
                    alert(event.target.tagName)
                }
                }

            },
        })
        app.hello()  // 也可以用 JavaScript 直接调用方法, 必须先将vue实例赋值给变量var app
    </script>
</body>
</html>
07 - 条件绑定指令
Vue提供了v-if和v-show两个指令来控制页面元素的显示和隐藏。我们先通过一段代码来
看一下使用两个指令各有什么效果:
v-if :如果vlaue为true, 当前标签会输出在页面中
v-show:就会在标签中添加display样式, 如果vlaue为true, display=block, 否则是none
v-else:与v-if一起使用, 如果value为false, 将当前标签输出到页面中
如下:
<!DOCTYPE html>
<html lang="en">

<head>
    <meta charset="UTF-8">
    <meta http-equiv="X-UA-Compatible" content="IE=edge">
    <meta name="viewport" content="width=device-width, initial-scale=1.0">
    <title>Document</title>
</head>

<body>
    <div id="app">
        <!-- 通过单击改变vif的值 -->
        <button @click="vif=!vif">切换显示隐藏</button>
        <div v-if="vif" style="red; width: 200px; height: 200px;">
            v-if
        </div>
        <button @click="vshow=!vshow">切换显示隐藏</button>
        <div v-show="vshow" style="red; width: 200px; height: 200px;">
            v-show
        </div>
    </div>

    <script src="./node_modules/vue/dist/vue.js"></script>
    <script>
        new Vue({
            el: "#app",
            data: {
                vif: true,
                vshow: true
            }
        })


        /*
        v-if 和v-show  用于控制元素显示隐藏  ,
        语法 v-if ="指定bool值"  v-show一样

        v-if 控制元素是否生成
        v-show 控制元素是否显示隐藏

        */


    </script>

</body>

</html>
上面我们已经了解了v-if的使用方法。事实上,v-if的条件渲染和JavaScript条件判断语
句中的if、else、else if非常类似。
v-else、v-else-if : 与v-if一起使用, 如果value为false, 将当前标签输出到页面中:
<!DOCTYPE html>
<html lang="en">
<head>
    <meta charset="UTF-8">
    <meta http-equiv="X-UA-Compatible" content="IE=edge">
    <meta name="viewport" content="width=device-width, initial-scale=1.0">
    <title>Document</title>
</head>
<body>
    <div id="app">
        <div v-if="num == 1">显示1</div>
        <div v-else-if="num == 2">显示2</div>
        <div v-else="num == 3">显示3</div>
    </div>
    <script src="./node_modules/vue/dist/vue.js"></script>
    <script>
        new Vue({
            el: "#app",
            data() {
                return {
                    num: 1
                }
            },
        })
    </script>
</body>
</html>
08 - 列表渲染指令
v-for 用于列表的循环渲染。基本语法:v-for="item in data",data 可以是数组或者对
象,接下来我们介绍对两种数据类型的循环。
遍历数组 : v-for="person in persons" $index
<!DOCTYPE html>
<html lang="en">
<head>
    <meta charset="UTF-8">
    <meta http-equiv="X-UA-Compatible" content="IE=edge">
    <meta name="viewport" content="width=device-width, initial-scale=1.0">
    <title>Document</title>
</head>
<body>

    <div id="app">
        <ul>
            <li v-for="(item, index) in music" >{{item}}</li>
        </ul>
    </div>

    <script src="./node_modules/vue/dist/vue.js"></script>
    <script>

        new Vue({
            el: '#app',
            data:{
                music: [
                    {name:'测试'},
                    {name:'开发'},
                    {name:'产品'}
                ],
            }
        })
    </script>
</body>
</html>
遍历对象 : v-for="value in person" $key,如:
<!DOCTYPE html>
<html lang="en">
<head>
    <meta charset="UTF-8">
    <meta http-equiv="X-UA-Compatible" content="IE=edge">
    <meta name="viewport" content="width=device-width, initial-scale=1.0">
    <title>Document</title>
</head>
<body>

    <div id="app">
        <ul>
            <li v-for="(item, index) in obj" >{{item}}</li>
        </ul>

    </div>

    <script src="./node_modules/vue/dist/vue.js"></script>
    <script>

        new Vue({
            el: '#app',
            data:{
                obj:{
                name: '句号',
                age: 15,
                sex: '男'
                }

            }
        })
    </script>
</body>
</html>
09 - 双向绑定指令
你可以用 v-model 指令在表单控件元素上创建双向数据绑定。
v-model 会根据控件类型自动选取正确的方法来更新元素。
<!DOCTYPE html>
<html lang="en">
<head>
  <meta charset="UTF-8">
  <meta name="viewport" content="width=device-width, initial-scale=1.0">
  <meta http-equiv="X-UA-Compatible" content="ie=edge">
  <title>Document</title>
</head>
<script src="./node_modules/vue/dist/vue.js"></script>
<!-- <script src="./node_modules/vue/dist/vue.min.js"></script> -->
<body>
  <div id="app">

<hr>

  <!-- 输入框 -->
  <p>input 元素 </p>
  <input v-model="message" placeholder="编辑我……">
  <p>消息是: {{ message }}</p>

  <p>textarea 元素:</p>
  <p style="white-space: pre">{{ message2 }}</p>
  <textarea v-model="message2" placeholder="多行文本输入……"></textarea>


<!-- 复选项 -->
  <p>单个复选框:</p>
  <input type="checkbox" id="checkbox" v-model="checked">
  <label for="checkbox">{{ checked }}</label>

  <p>多个复选框:</p>
  <input type="checkbox" id="python" value="Python" v-model="checkedNames">
  <label for="python">Python</label>
  <input type="checkbox" id="java" value="Java" v-model="checkedNames">
  <label for="java">Java</label>
  <input type="checkbox" id="go" value="Go" v-model="checkedNames">
  <label for="go">Go</label>
  <br>
  <span>选择的值为: {{ checkedNames }}</span>


  <!-- 下拉框选项 -->
  <label>开发语言:</label>
  <select v-model="course">
    <option value="java">java</option>
    <option value="html">html</option>
    <option value="csss">css</option>
  </select>
  <div>
    <input v-model="course" type="radio" name="course" value="java">java
    <input v-model="course" type="radio" name="course" value="html">html
    <input v-model="course" type="radio" name="course" value="csss">csss
</div>
  <div>当前是:{{course}}</div>


<!-- 单选项 -->
  <input type="radio" id="Testapp" value="Testapp" v-model="picked">
  <label for="Testapp">Testapp</label>
  <br>
  <input type="radio" id="Testweb" value="Testweb" v-model="picked">
  <label for="Testweb">Testweb</label>
  <br>
  <span>选中值为: {{ picked }}</span>
  </div>

<script >
 new Vue({
    el: '#app',
  data: {
    course:'html',
    picked : 'Testapp',
    message: 'python',
    message2: 'www.baidu.com',
    checked: false,
    checkedNames: []
  }

})


// v-model 用于实现双向绑定  一般用在表单元素
</script>

</body>


</html>
以上代码主要介绍v-model在输入框、单选框、复选框和下拉列表中的应用。
v-model主要使用在表单场景。
自此Vue的指令使用场景介绍完,这些是比较常用,如果感兴趣,还有更多指令请参考官方文档。
作者:全栈测试开发日记
出处:https://www.cnblogs.com/liudinglong/
csdn:https://blog.csdn.net/liudinglong1989/
微信公众号:全栈测试开发日记
本文版权归作者和博客园共有,欢迎转载,但未经作者同意必须保留此段声明,且在文章页面明显位置给出原文连接,否则保留追究法律责任的权利。

 浙公网安备 33010602011771号