搭建nginx
Nginx ("engine x") 是一个高性能的HTTP和反向代理服务器,也是一个IMAP/POP3/SMTP服务器。Nginx是由Igor Sysoev为俄罗斯访问量第二的Rambler.ru站点开发的,第一个公开版本0.1.0发布于2004年10月4日。其将源代码以类BSD许可证的形式发布,因它的稳定性、丰富的功能集、示例配置文件和低系统资源的消耗而闻名。关于Nginx的优点,我在这里就不讨论了,网上的资料多的是
通常nginx 有两种搭建方法一个是yum 源安装, 一个是编译安装 ,前者安装方便 ,后者更灵活,可以根据自己的需要安装一些模块
安装前先安装环境依赖
yum install gcc gcc-c++ automake pcre pcre-devel zlip zlib-devel openssl openssl-devel
yum 安装nginx
安装nginx源
yum localinstall http://nginx.org/packages/centos/7/noarch/RPMS/nginx-release-centos-7-0.el7.ngx.noarch.rpm
安装nginx
yum install nginx
启动nginx
service nginx start
别的命令 service nginx stop 停止 service nginx restart 重启
编译安装nginx
下载nginx 安装包: 官网地址:http://nginx.org/
wget http://nginx.org/download/nginx-1.8.1.tar.gz
然后解压安装包
[root@bob ~]# tar  xvf nginx-1.8.1.tar.gz
[root@bob ~]# cd nginx-1.8.1
[root@bob nginx-1.8.1]$ ls
auto  CHANGES  CHANGES.ru  conf  configure  contrib  html  LICENSE  man  README  src
编译nginx 配置好位置,模块 ,参数
./configure
 --prefix=/usr/local/nginx
 --sbin-path=/usr/local/nginx/sbin/nginx
 --conf-path=/usr/local/nginx/conf/nginx.conf
 --error-log-path=/var/log/nginx/error.log
 --http-log-path=/var/log/nginx/access.log
 --pid-path=/var/run/nginx/nginx.pid
 --lock-path=/var/lock/nginx.lock
 --user=nginx --group=nginx
 --with-http_ssl_module
 --with-http_stub_status_module
 --with-http_gzip_static_module
 --http-client-body-temp-path=/var/tmp/nginx/client/
 --http-proxy-temp-path=/var/tmp/nginx/proxy/
 --http-fastcgi-temp-path=/var/tmp/nginx/fcgi/
 --http-uwsgi-temp-path=/var/tmp/nginx/uwsgi
 --http-scgi-temp-path=/var/tmp/nginx/scgi
 --with-pcre
执行完毕后
make
make install
安装完成后 /usr/local/nginx 有对应的文件
conf:保存nginx所有的配置文件,其中nginx.conf是nginx服务器的最核心最主要的配置文件,其他的.conf则是用来配置nginx相关的功能的,例如fastcgi功能使用的是fastcgi.conf和fastcgi_params两个文件,配置文件一般都有个样板配置文件,是文件名.default结尾,使用的使用将其复制为并将default去掉即可。
html目录中保存了nginx服务器的web文件,但是可以更改为其他目录保存web文件,另外还有一个50x的web文件是默认的错误页面提示页面。
logs:用来保存nginx服务器的访问日志错误日志等日志,logs目录可以放在其他路径,比如/var/logs/nginx里面。
sbin:保存nginx二进制启动脚本,可以接受不同的参数以实现不同的功能。
启动,重启,关闭命令
/usr/local/nginx/sbin/nginx  #启动服务
/usr/local/nginx/sbin/nginx   -s  reload  #不停止服务重读配置文件
/usr/local/nginx/sbin/nginx   -s stop #停止服务  #停止服务
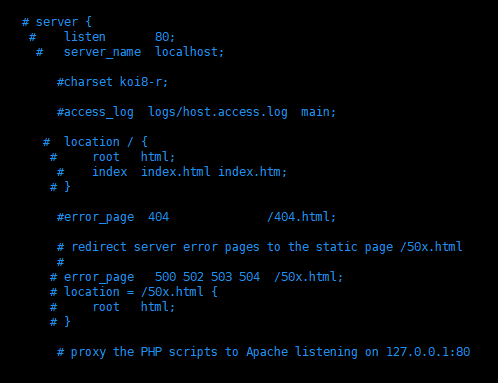
多域名设置,编辑nginx.conf文件 ,将server模块 注释掉
vim /usr/local/nginx/conf/nginx.conf

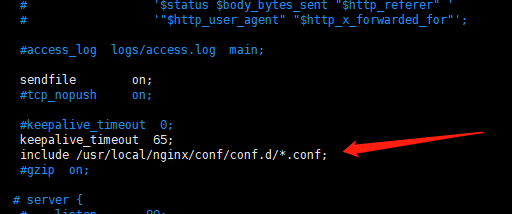
然后载入配置文件
include /usr/local/nginx/conf/conf.d/*.conf;

在conf目录下创建域名的配置目录,并且赋予权限
mkdir /usr/local/nginx/conf/conf.d
chmod -x /usr/local/nginx/conf/conf.d
编辑一个配置文件
vim /usr/local/nginx/conf/conf.d/default.conf
写入以下代码 ,server_name 换自己的域名或者ip
server {
        listen       80;
        server_name  192.168.3.44;

        #access_log  logs/host.access.log  main;

        location / {
            root   html;
            index  index.html index.htm;
        }

        #error_page  404              /404.html;

        # redirect server error pages to the static page /50x.html
        #
        error_page   500 502 503 504  /50x.html;
        location = /50x.html {
            root   html;
        }
}
然后wq 保存 重启nginx
/usr/local/nginx/sbin/nginx -s reload
重启成功 ,在浏览器输入ip 将会看见nginx 的欢迎页面

如果不能访问的话 ,设置防火墙允许80端口 ,或者关闭关闭防火墙
firewall-cmd --zone=public --add-port=80/tcp --permanent  允许80
systemctl stop firewalld  关闭防火墙
关闭selinux
临时关闭
[root@bob ~]# getenforce
Enforcing
[root@bob ~]# setenforce 0
[root@bob ~]# getenforce
Permissive
永久关闭
vim /etc/sysconfig/selinux
SELINUX=enforcing 改为 SELINUX=disabled
重启机器 reboot


