


java之并发编程(上)
回顾
1、线程与进程
进程:正在运行的程序,进程包含至少一个或多个线程
2、创建线程的方式
- 实现Runable接口
- 继承Thread类(不建议使用,java是单继承,可扩展性差),用start方法通知cpu创建一个线程
- 但在公司中一般都是用Callable接口,Runable接口的效率比Callable的相对较低
- 使用线程池ThreadPoolExecutor
3、java真的可以开启线程吗
实际上我们调用的start()方法本质上是调用了系统的C++程序,这个程序才是真正操作计算机硬件的,而我们的java程序不是直接运行在操作系统上而是运行在JVM上,所以java程序无法直接操作硬件。
4、并发(队列+锁)与并行
并发:多个线程操作同一资源,单核,模拟出多条线程,天下武功,唯快不破,快速交替
并行(一起行走):多个cup,多个线程同时进行,使用线程池
并发编程的本质:充分利用cpu的资源/时间
5、synchronized与lock锁
- synchronized 是java内置关键字,lock是一个java类。
- synchronized 会自动释放锁,lock需要手动加锁,会死锁。
- synchronized (线程1(获得锁,阻塞),线程2(傻傻的等待)),lock会尝试获取锁
- synchronized 适合锁少量代码,lock适合锁大量代码
- synchronized 不会判断锁定状态,lock会判断是否有锁
- synchronized 可重入锁,非公平,lock ,可重入锁,自己设置非公平或公平
6、wait()与sleep()
- wait()--->来自object类,sleep()---->来自Thread类
- wait()---->人醒着,在等待 ,会释放锁 ; sleep()---->人在睡觉,不会释放锁
预科
1、获取cpu核数
public class saleTicket {
    public static void main(String[] args) {
        //开启多个线程去买票
        Ticket ticket=new Ticket();
        //使用lambda表达式,简洁代码
        new Thread(()->{
            for (int i = 0; i < 30; i++) {
                ticket.sale();
            }
        }).start();

        new Thread(()->{
            for (int i = 0; i < 30; i++) {
                ticket.sale();
            }
        }).start();

        new Thread(()->{
            for (int i = 0; i < 30; i++) {
                ticket.sale();
            }
        }).start();
    }
}
//实际编程,高内聚,低耦合
//oop编程,代码干净,简洁
class Ticket{
    private int num=20;
    //卖票方法
    public synchronized void sale(){
        if(num>0) {
            System.out.println(Thread.currentThread().getName() + "买了第" + (num--) + "票===" + "剩余" + num);
        }
    }
}
3、lock锁:与synchronized实现同样的效果
import java.util.concurrent.locks.Lock;
import java.util.concurrent.locks.ReentrantLock;

public class saleTicket2 {
    public static void main(String[] args) {
        Ticket2 ticket=new Ticket2();
        //使用lambda表达式,简洁代码
        new Thread(()->{ for (int i = 0; i < 30; i++) ticket.sale();},"A").start();
        new Thread(()->{ for (int i = 0; i < 30; i++) ticket.sale();},"B").start();
        new Thread(()->{ for (int i = 0; i < 30; i++) ticket.sale();},"C").start();

    }

}
//使用lock锁
/*1、new ReentrantLock()一把锁
* 2、加锁 lock()
* 3、释放锁 unlock()
* */
class Ticket2{
    private int num=20;
    //卖票方法
    public synchronized void sale(){
        Lock lock=new ReentrantLock();
        lock.lock();
        try {//业务
            if(num>0) {
                System.out.println(Thread.currentThread().getName() + "买了第" + (num--) + "票===" + "剩余" + num);
            }
        } catch (Exception e) {
            e.printStackTrace();
        } finally {
            lock.unlock();
        }
    }
}
6、生产者消费者问题之lock的精准通知
新技术的出现不仅仅为了覆盖传统技术,还有对技术的补充和升级
lock锁与synchronized都能实现同样的效果,但是如何做到有序的使用资源即精准的通知,如:A线程昨晚去通知B线程,B->C->D,这样ABCD轮流,只有lock锁能实现
- 传统的synchronized解决
能够解决资源抢夺问题,但不能保证线程顺序
//使用传统的synchronized方法时
//超过两个线程对资源进行操作时,synchronized无法保证线程的安全了
//由此引发一个问题,”虚假唤醒“
/*虚假唤醒的问题在于,只进行了一次判断,但是虚假唤醒总是有可能发生,所以建议使用循环
if(number!=0){//等待
            this.wait();
        }
*
* */
public class oldPC {
    public static void main(String[] args) {
        Data data=new Data();
        new Thread(()->{ for (int i = 0; i <20 ; i++) {
            try {
                data.increment();
            } catch (InterruptedException e) {
                e.printStackTrace();
            }
        }
        },"A").start();

        new Thread(()->{ for (int i = 0; i <20 ; i++) {
            try {
                data.decrese();
            } catch (InterruptedException e) {
                e.printStackTrace();
            }
        }
        },"B").start();

        new Thread(()->{ for (int i = 0; i <20 ; i++) {
            try {
                data.decrese();
            } catch (InterruptedException e) {
                e.printStackTrace();
            }
        }
        },"C").start();

        new Thread(()->{ for (int i = 0; i <20 ; i++) {
            try {
                data.decrese();
            } catch (InterruptedException e) {
                e.printStackTrace();
            }
        }
        },"D").start();
    }
}
//oop编程
class Data{
    private int number=0;
    //+1操作
    public synchronized void increment() throws InterruptedException {
        while(number!=0){//等待
            this.wait();
        }
        //执行+1后唤醒其他线程
        number++;
        System.out.println(Thread.currentThread().getName()+"执行了==>"+number);
        this.notifyAll();
    }

    //-1操作
    public synchronized void decrese() throws InterruptedException {
        while(number==0){//等待
            this.wait();
        }
        //执行-1后唤醒其他线程
        number--;
        System.out.println(Thread.currentThread().getName()+"执行了==>"+number);
        this.notifyAll();
    }

}
-使用lock方式:
lock去newCondition,使用方法await(),signal()
public class NewPC {
    public static void main(String[] args) {
        Data2 data2=new Data2();
        new Thread(()->{for (int i = 0; i < 20; i++) data2.increse();},"A").start();
        new Thread(()->{for (int i = 0; i < 20; i++) data2.decrese();},"B").start();
        new Thread(()->{for (int i = 0; i < 20; i++) data2.increse();},"C").start();
       // new Thread(()->{for (int i = 0; i < 20; i++) data2.decrese();},"D").start();
    }
}
/*使用lock方式
* 通过lock去newCondition
* 使用await(),signal()
* */
class Data2{
    private int number=0;
    Lock lock=new ReentrantLock();
    Condition condition1=lock.newCondition();
    Condition condition2=lock.newCondition();
    //+1操作
    public void increse(){
        lock.lock();
        try {
            //判断是否等待
            while (number!=0){
                condition1.await();//等待
            }
            number++;
            System.out.println(Thread.currentThread().getName()+"执行了加===>😍"+number);
            condition2.signalAll();//唤醒
        } catch (Exception e) {
            e.printStackTrace();
        } finally {
            lock.unlock();
        }
    }
    //-1操作
    public void decrese(){
        lock.lock();
        try {
            //判断是否等待
            while(number==0){
                condition2.await();//等待
            }
            number--;
            System.out.println(Thread.currentThread().getName()+"执行了减===>😁"+number);
            condition1.signalAll();//唤醒
        } catch (Exception e) {
            e.printStackTrace();
        } finally {
            lock.unlock();
        }
    }
}
-lock锁实现精准通知
//有序唤醒,精准通知
public class NewPC2 {
    public static void main(String[] args) {
        Data3 data3=new Data3();
        new Thread(()->{ for (int i = 0; i < 20; i++) data3.printA(); },"A").start();
        new Thread(()->{ for (int i = 0; i < 20; i++) data3.printB(); },"B").start();
        new Thread(()->{ for (int i = 0; i < 20; i++) data3.printC(); },"C").start();
    }
}
class Data3{
    private int number=0;
    Lock lock=new ReentrantLock();//可重入锁
    //设置监视器
    Condition condition1 = lock.newCondition();
    Condition condition2 = lock.newCondition();
    Condition condition3 = lock.newCondition();
    public void printA(){
        lock.lock();
        try {
            while (number!=0){
                condition1.await();
            }
            number=1;
            System.out.println(Thread.currentThread().getName()+"执行了==》"+number);
            condition2.signal();//唤醒B线程
        } catch (InterruptedException e) {
            e.printStackTrace();
        } finally {
            lock.unlock();
        }

    }
    public void printB(){
        lock.lock();
        try {
            while(number!=1){
                condition2.await();
            }
            number=2;
            System.out.println(Thread.currentThread().getName()+"执行了==》"+number);
            condition3.signal();//唤醒C线程
        } catch (InterruptedException e) {
            e.printStackTrace();
        } finally {
            lock.unlock();
        }
    }
    public void printC(){
        lock.lock();
        try {
            while(number!=2){
                condition3.await();
            }
            number=0;
            System.out.println(Thread.currentThread().getName()+"执行了==》"+number);
            condition1.signal();//唤醒A线程
        } catch (Exception e) {
            e.printStackTrace();
        } finally {
            lock.unlock();
        }
    }
}
7、什么是锁
1、类的对象锁:使用synchronized方法锁住的是方法的调用者
2、Class对象锁:使用static synchronized方法锁住的是Class对象,只要是static修饰的都归Class对象所有,与类的实例无关。
public class test01 {
    public static void main(String[] args) throws InterruptedException {
        Phone phone=new Phone();
        new Thread(()-> {
            try {
                phone.send();
            } catch (InterruptedException e) {
                e.printStackTrace();
            }
        }).start();
        //TimeUnit.SECONDS.sleep(2);
        new Thread(()->phone.call()).start();//一定先发短信
        //new Thread(()->phone.p()).start();//先啥都不干
    }

}
class Phone{

    //synchronized 锁的是调用者
    public synchronized void send() throws InterruptedException {
        TimeUnit.SECONDS.sleep(1);//JUC下的延时
        System.out.println("发短信");
    }
    public synchronized void call(){
        System.out.println("打电话");
    }
    //普通方法与synchronized 没有关系
    public void p(){
        System.out.println("啥都不干");
    }
}
public class test02 {
    public static void main(String[] args) throws InterruptedException {
        //一定先打电话
        Phone1 phone1=new Phone1();
        Phone1 phone2=new Phone1();
        new Thread(()->{
            try {
                phone1.send();
            } catch (InterruptedException e) {
                e.printStackTrace();
            }
        }).start();
        //TimeUnit.SECONDS.sleep(2);
        new Thread(()->{phone2.call();}).start();
    }
}
class Phone1{
    //synchronized 锁的是调用者 锁phone1
    public synchronized void send() throws InterruptedException {
        TimeUnit.SECONDS.sleep(3);
        System.out.println("发短信");
    }
    //锁phone2
    public synchronized void call(){
        System.out.println("打电话");
    }
    public void p(){
        System.out.println("啥都不干");
    }
}
public class test03 {
    public static void main(String[] args) throws InterruptedException {
        Phone3 phone1=new Phone3();
        new Thread(()->{
            try {
                phone1.send();
            } catch (InterruptedException e) {
                e.printStackTrace();
            }
        }).start();
        new Thread(()->{phone1.call();}).start();//一定先打电话

    }
}
class Phone3 {
    //static 归Class对象,不属于类对象
    public static synchronized void send() throws InterruptedException {
        TimeUnit.SECONDS.sleep(1);
        System.out.println("发短信");
    }

    public  synchronized void call() {
        System.out.println("打电话");
    }

}
public class test04 {
    public static void main(String[] args) {
        Phone4 phone1=new Phone4();
        Phone4 phone4=new Phone4();
        new Thread(()->{
            try {
                phone1.send();
            } catch (InterruptedException e) {
                e.printStackTrace();
            }
        }).start();
        //new Thread(()->{phone1.call();}).start();//先发短信
        new Thread(()->{phone4.call();}).start();//先打电话
    }
}
class Phone4 {
    //static 归Class对象,不属于类对象
    //锁的是Class对象,与类对象无关
    public static synchronized void send() throws InterruptedException {
        TimeUnit.SECONDS.sleep(2);
        System.out.println("发短信");
    }
    public static synchronized void call() {
        System.out.println("打电话");
    }

}
8、线程不同步的集合
我们传统的学习的集合类型都是线程不安全的,当然除了Vector,他的添加元素的方法是synchronized方法
-List不安全
//并发问题:ConcurrentModificationException  并发修改异常
public class ListTest {
    public static void main(String[] args) {
        /*  ArrayList不是同步的,所以不安全
        * List<String> list = new ArrayList<String>();
        * 解决方法:
        * //Vector中的add()方法本身是synchronized,这就和synchronized(list)一样的效果
        * 1、List<String> list = new Vector<String>();
        * //Collections 集合的老大,官方文档提供的解决方案
        * 2、List<String> list =Collections.synchronizedList(new ArrayList<String>());
        * // CopyOnWriteArrayList使用lock锁
        * 3、List<String> list =new CopyOnWriteArrayList<String>()
        *          public boolean add(E e) {
                        synchronized (lock) {
                            Object[] es = getArray();
                            int len = es.length;
                            es = Arrays.copyOf(es, len + 1);
                            es[len] = e;
                            setArray(es);
                            return true;
        *   CopyOnWrite  写入时复制  COW 计算机程序设计的一种优化策略
        *    在写入前复制,将数据插入并重新设置数组,避免多线程写入时覆盖
        * */
        List<String> list =new CopyOnWriteArrayList<String>();
        for (int i=1;i<100;i++){
            new Thread(()->{
                list.add(UUID.randomUUID().toString().substring(0,5));
                System.out.println(list);
            },String.valueOf(i)).start();
        }
    }
}
-Set集合不安全
public class SetTest {
    public static void main(String[] args) {
        /* Set set=new HashSet();不安全
        * 解决方案:
        * 1、Set set=Collections.synchronizedSet(new HashSet<>());
        * 2、Set set= new CopyOnWriteArraySet();
        * */
        Set set=new HashSet();
        //Set set= new CopyOnWriteArraySet();
        for (int i = 0; i < 100; i++) {
            new Thread(()->{
                set.add(UUID.randomUUID().toString().substring(0,5));
                System.out.println(set);
            },String.valueOf(i)).start();
        }

}
-Map不安全
public class MapTest {
    public static void main(String[] args) {
        /*
        * 1、Map map=new HashMap()==new HashMap(16,0.75F); 参数的值是默认的
        *           new HashMap(初始化容量initialCapacity,加载因子loadFactor)
        *               初始化容量:默认值为16,必须是2的次方,并且最大为你30
        *               //The load factor used when none specified in constructor.
        *               当构造器中没有指定时使用加载因子
        *               加载因子:static final float DEFAULT_LOAD_FACTOR = 0.75f;
        *              public HashMap() {
        *               // all other fields defaulted所有字段都是默认的
                         this.loadFactor = DEFAULT_LOAD_FACTOR;
                        }
        * 2、Map map=Collections.synchronizedMap(new HashMap<>());
        * 3、Map map=new ConcurrentHashMap();//并发的hashmap
        *       ConcurrentHashMap(int initialCapacity,float loadFactor, int concurrencyLevel)
        *       initialCapacity:初始化容量,不能小于 concurrencyLevel
        *       concurrencyLevel:可并发的线程数,不给时默认为1
        * */
        Map map1=new HashMap(16,0.75F);
        Map map=new ConcurrentHashMap();
        new Thread(()->{
            for (int i = 0; i <100; i++) {
                map.put(i,UUID.randomUUID().toString().substring(0,5));
                System.out.println(map);
            }
        }).start();
    }
}
-总结:
我们过去学习的不同步集合:在java.util包
现在学习的同步的集合:在java.util.concrrent包------使用lock锁
并且他们是如下关系

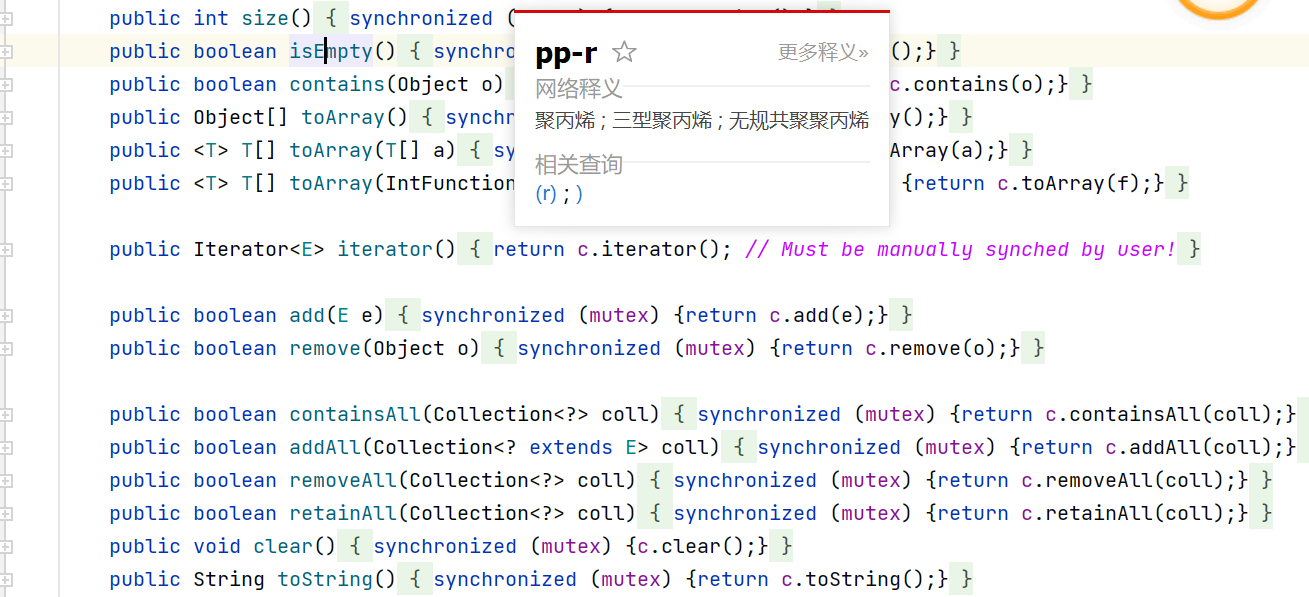
对于Collections.synchronizedList(list)
Collections.synchronizedSet(Set)
Collections.synchronizedMap(Map)
他们之所以可以实现同步,是因为他们的所有方法使用了synchronized()同步代码块


【推荐】国内首个AI IDE,深度理解中文开发场景,立即下载体验Trae
【推荐】编程新体验,更懂你的AI,立即体验豆包MarsCode编程助手
【推荐】抖音旗下AI助手豆包,你的智能百科全书,全免费不限次数
【推荐】轻量又高性能的 SSH 工具 IShell:AI 加持,快人一步
· 阿里最新开源QwQ-32B,效果媲美deepseek-r1满血版,部署成本又又又降低了!
· 开源Multi-agent AI智能体框架aevatar.ai,欢迎大家贡献代码
· Manus重磅发布:全球首款通用AI代理技术深度解析与实战指南
· 被坑几百块钱后,我竟然真的恢复了删除的微信聊天记录!
· 没有Manus邀请码?试试免邀请码的MGX或者开源的OpenManus吧