
Security对接 sso服务总结——代码篇
三阶段
- security web简单自定义认证:https://gitee.com/security-demo/web-login
- 简单自定义登录 + 自定义授权:https://gitee.com/security-demo/web-login-authorization
- 整合基于oauth2协议的sso服务:https://gitee.com/security-demo/oauth2-client-web-login
详解
第一二阶段
第一二阶段主要加深了解Security,添加自定义认证,登录校验,权限校验。
自定义登录过滤器
 @Override
    protected void doFilterInternal(HttpServletRequest request,
                                    HttpServletResponse response,
                                    FilterChain chain) throws ServletException, IOException {
    // LoginFilter 中间省略了代码,具体看项目demo
    // 自定义用户服务获取用户详情
    UserDetails userDetails = userDetailsService.loadUserByUsername(username);
    // 确认密码是否正确
    if (userDetails != null && PasswordEncoderFactories.createDelegatingPasswordEncoder().matches(password, userDetails.getPassword())) {
        // 构建Authentction对象
        UsernamePasswordAuthenticationToken authentication =
                new UsernamePasswordAuthenticationToken(userDetails, authToken,
                        userDetails.getAuthorities());
        // 将Authentction信息放入到security上下文对象中
        SecurityContextHolder.getContext().setAuthentication(authentication);
        // 将Authentction信息放入redis实现分布式共享登录状态
        redisTemplate.opsForValue().set(TOKEN_REDIS_KEY + authToken, authentication, TOKEN_TIMEOUT);
    }
}
自定义认证校验过滤器,当前后端分离的时候,我们会以token传输为认证标准,而不再是session。(尽管security很强大,他会自动以session方式做了绑定)
// AuthenticationFilter  中间省略了代码,具体看项目demo
@Override
protected void doFilterInternal(HttpServletRequest request,
                                HttpServletResponse response,
                                FilterChain chain) throws ServletException, IOException {
    if (antPathRequestMatcher.matches(request)) {
        if (log.isDebugEnabled()) {
            log.debug("自定义登录认证...");
        }
        String bearerToken = TokenUtil.getToken(request, response);
        // 登录成功校验逻辑
        if (StringUtils.hasText(bearerToken)) {
            String authToken = bearerToken.substring(6).trim();
            if (redisTemplate.hasKey(TOKEN_REDIS_KEY + authToken)) {
                redisTemplate.expire(TOKEN_REDIS_KEY + authToken, TOKEN_TIMEOUT);
                Object o = redisTemplate.opsForValue().get(TOKEN_REDIS_KEY + authToken);
                // 通过自定义token的第一次访问,security上下文中没有Authentication
                // 后面的访问都会通过SecurityContextPersistenceFilter从session获取到
                if (o instanceof SecurityContext && SecurityContextHolder.getContext().getAuthentication() == null) {
                    SecurityContextHolder.setContext((SecurityContext) o);
                }
                if (o instanceof Authentication && SecurityContextHolder.getContext().getAuthentication() == null) {
                    SecurityContextHolder.getContext().setAuthentication((Authentication) o);
                }
            } else {
                SecurityContextHolder.clearContext();
                throw new BadCredentialsException("自定义登录标识无效");
            }
        }
    }

    chain.doFilter(request, response);
}
第三阶段,对接sso服务
自定义Oauth2登录授权成功处理器
    // CustomOauth2AuthenticationSuccessHandler  中间省略了代码,具体看项目demo
    // 将oauth2认证成功得到的Authentication添加上本系统配置的权限进行入库,存redis
    private void customAuthentication(Authentication authentication) {
        // 保存Oauth2登录获得的用户
        Object principal = authentication.getPrincipal();
        if (principal instanceof DefaultOidcUser) {
            String name = ((DefaultOidcUser) principal).getName();

            // 重新构建权限集合
            Collection<? extends GrantedAuthority> authorities = ((DefaultOidcUser) principal).getAuthorities();
            Set<GrantedAuthority> au = new HashSet<>();
            for (GrantedAuthority authority : authorities) {
                au.add(authority);
            }

            // 构建本地用户准备入本地用户库
            User.UserBuilder builder = User.withDefaultPasswordEncoder()
                    .username(name)
                    .authorities(authorities)
                    .password(DEFAULT_PASSWORD);
            if (userDetailsService.userExists(name)) {
                UserDetails userDetails = userDetailsService.loadUserByUsername(name);
                for (GrantedAuthority authority : userDetails.getAuthorities()) {
                    au.add(authority);
                }
                userDetailsService.updateUser(builder.authorities(Collections.unmodifiableSet(au)).build());
            } else {
                UserDetails user = builder.authorities(Collections.unmodifiableSet(au)).build();
                userDetailsService.createUser(user);
            }

            // 构建本地token
            String authToken =
                    new String(Base64.getEncoder().encode((name + ":" + DEFAULT_PASSWORD).getBytes(StandardCharsets.UTF_8)));

            // 重构oauth2的authentication,添加本系统该用户已存在的权限。
            // 并将其信息放入到security上下文对象中
            if (authentication instanceof OAuth2AuthenticationToken) {
                authentication =
                        new OAuth2AuthenticationToken(((OAuth2AuthenticationToken) authentication).getPrincipal(),
                                Collections.unmodifiableSet(au),
                                ((OAuth2AuthenticationToken) authentication).getAuthorizedClientRegistrationId());
                SecurityContextHolder.getContext().setAuthentication(authentication);
                redisTemplate.opsForValue().set(TOKEN_REDIS_KEY + authToken, authentication,
                        TOKEN_TIMEOUT);

                if (log.isDebugEnabled()) {
                    log.debug("自定义oauth2登录成功处理器 : " + authentication.getName());
                }
            }
        }
    }
重要调试点
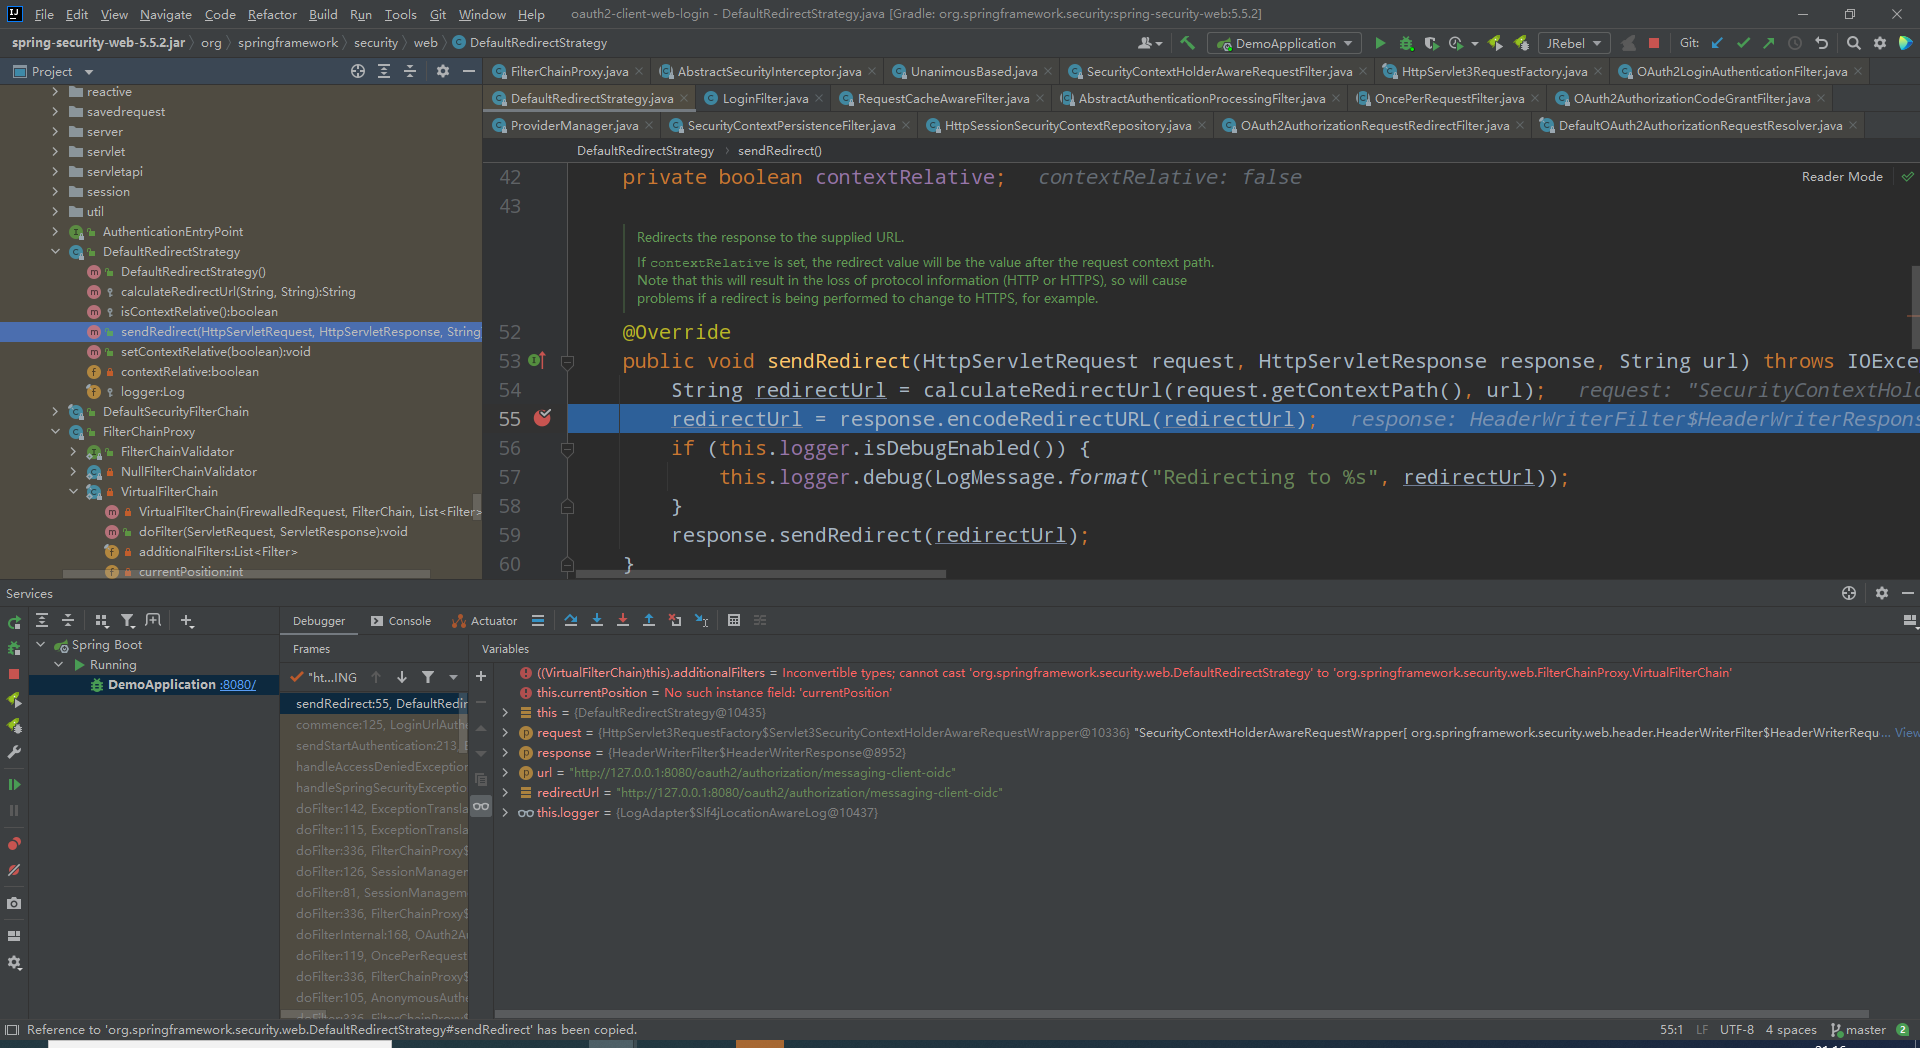
DefaultRedirectStrategy
org.springframework.security.web.DefaultRedirectStrategy#sendRedirect
所有的重定向都是以这个执行,这里打个断点监控很有必要
授权
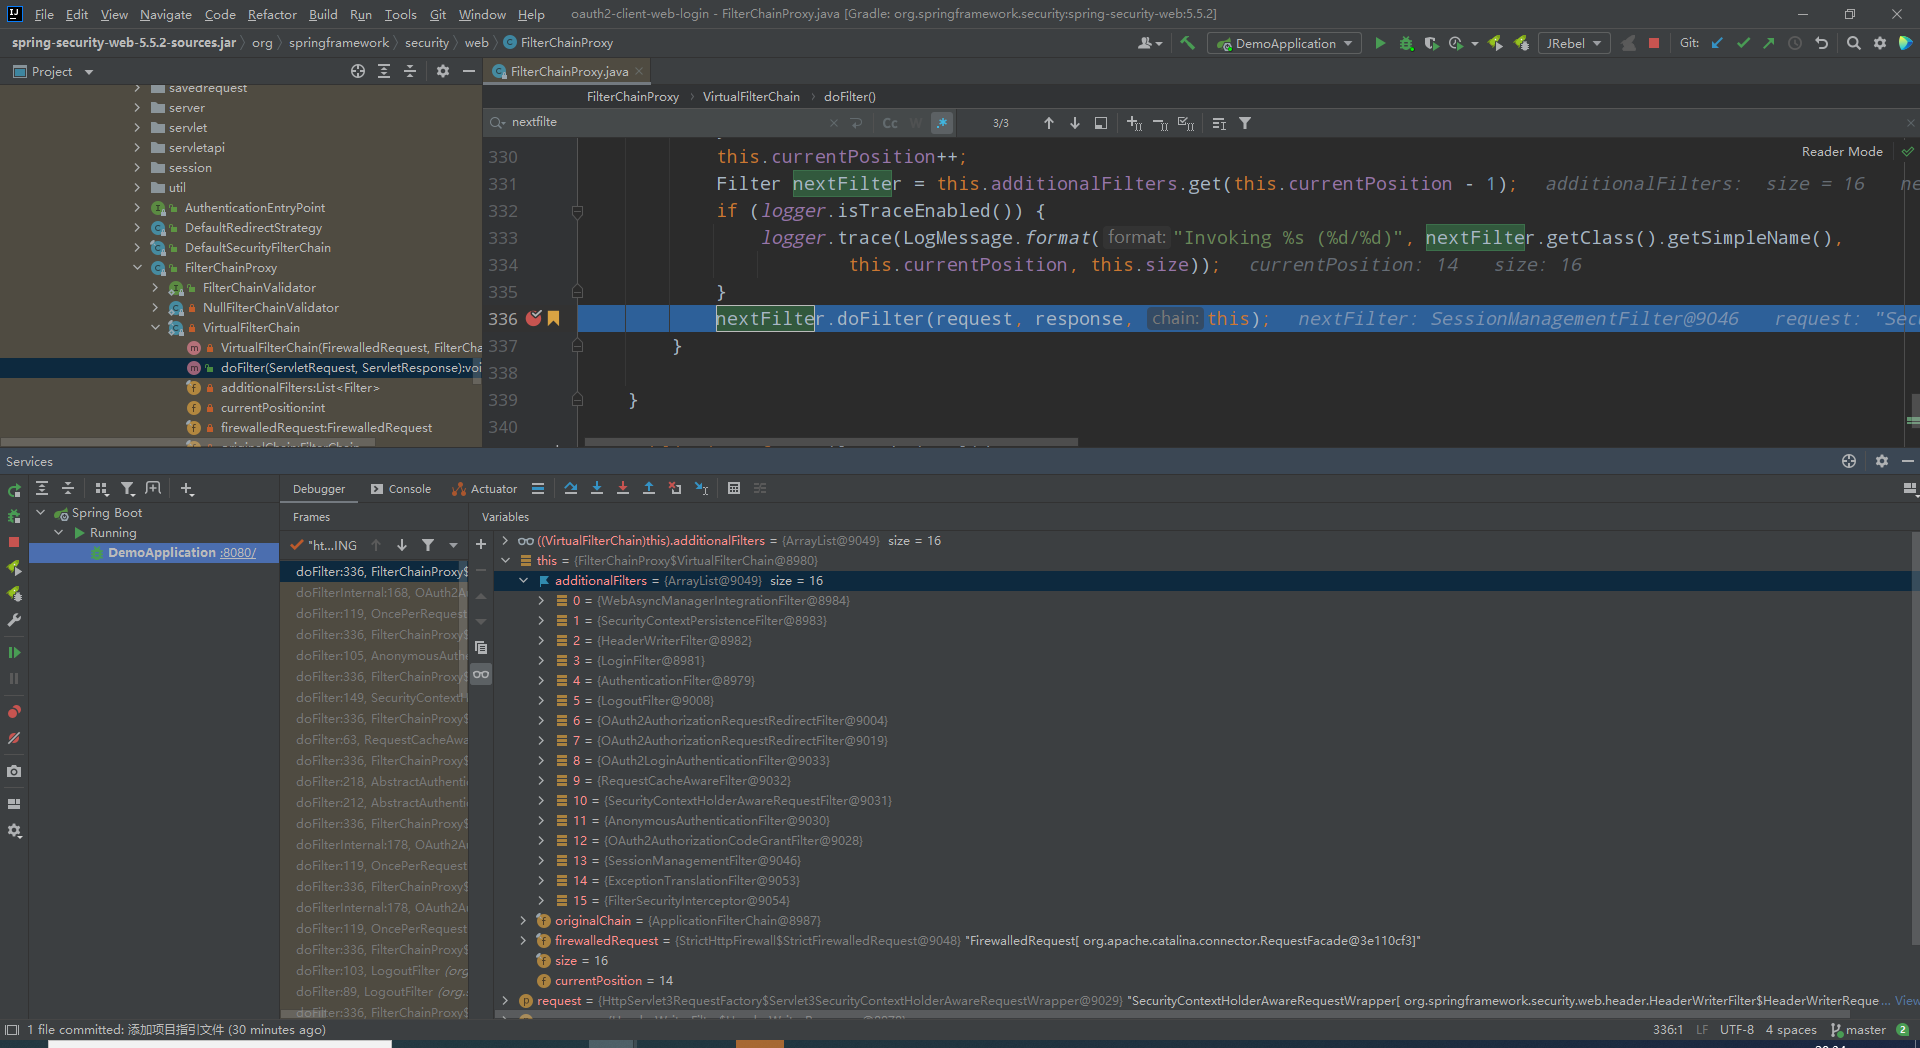
- FilterChainProxy
org.springframework.security.web.FilterChainProxy.VirtualFilterChain#doFilter
此处可以看到security整个过滤器执行链路。
![]()
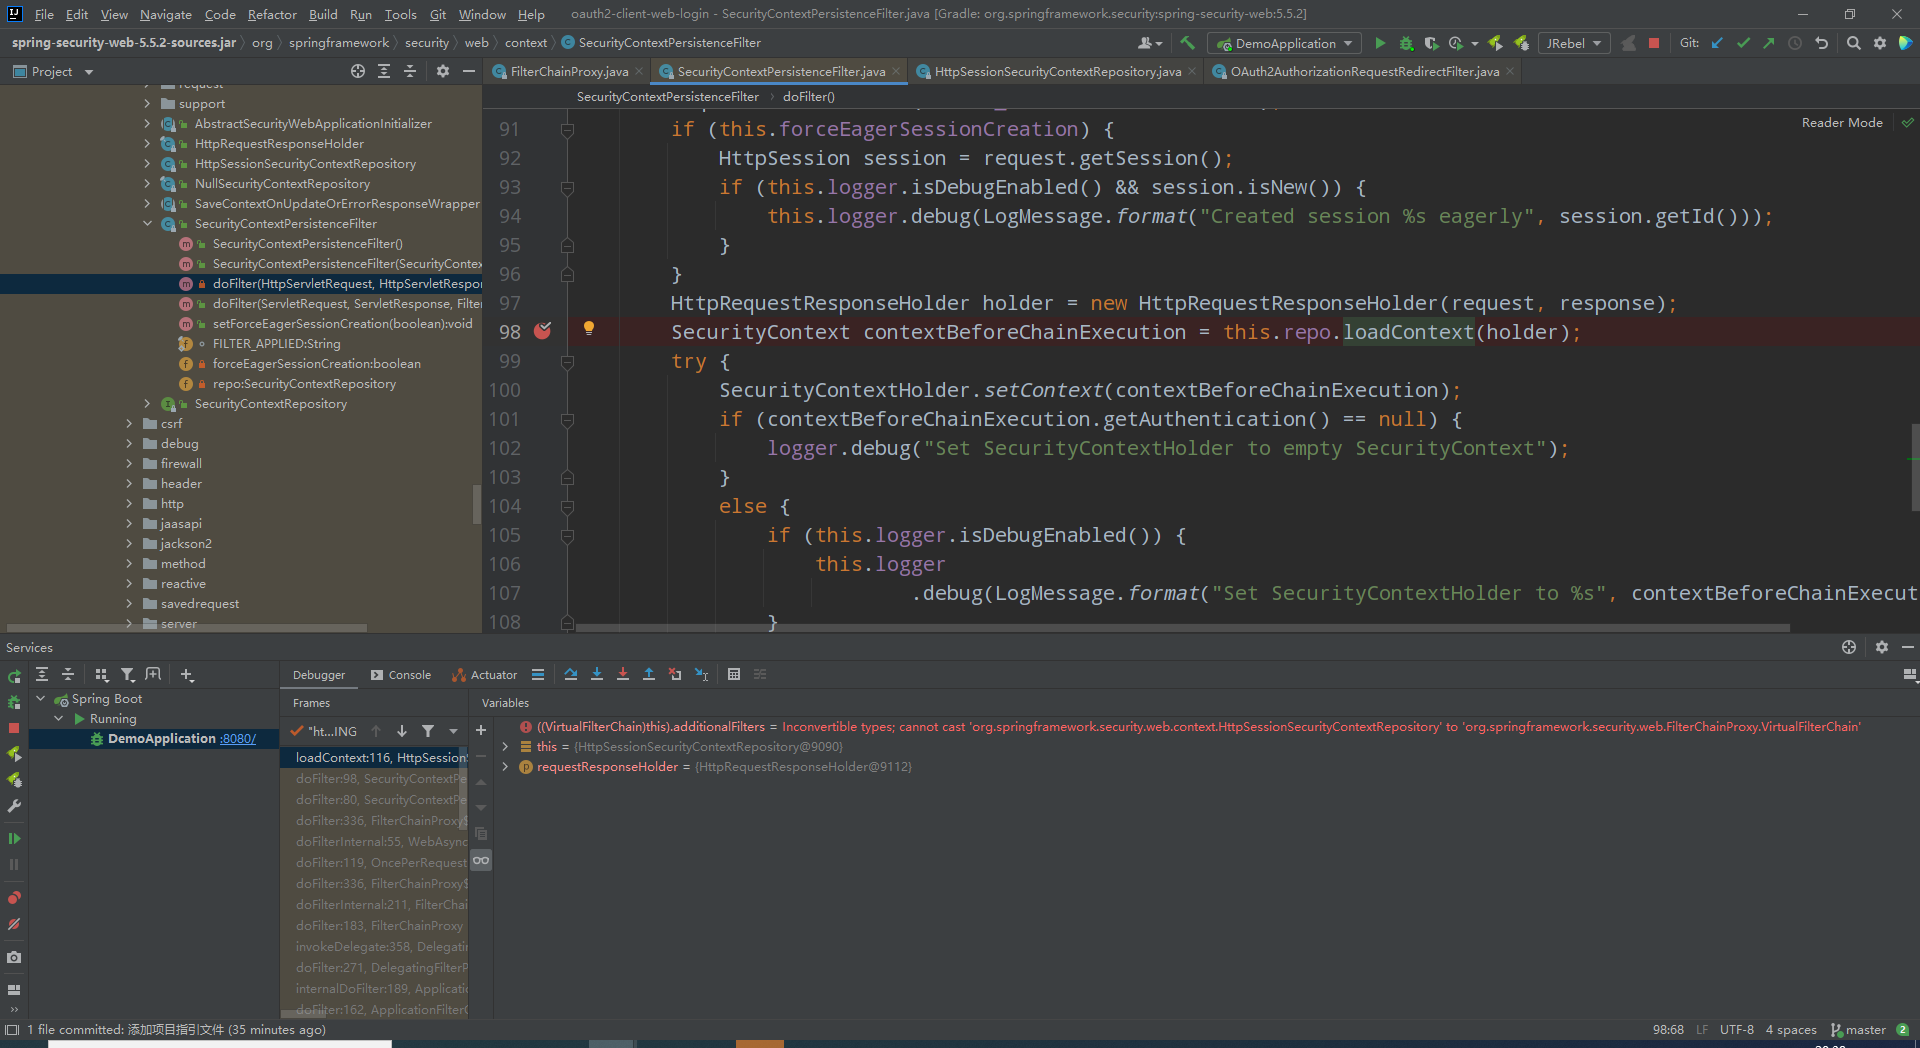
- SecurityContextPersistenceFilter
org.springframework.security.web.context.SecurityContextPersistenceFilter#doFilter(javax.servlet.http.HttpServletRequest, javax.servlet.http.HttpServletResponse, javax.servlet.FilterChain)
此处进去可以看到security会尝试从当前session获取SecurityContext
![]()
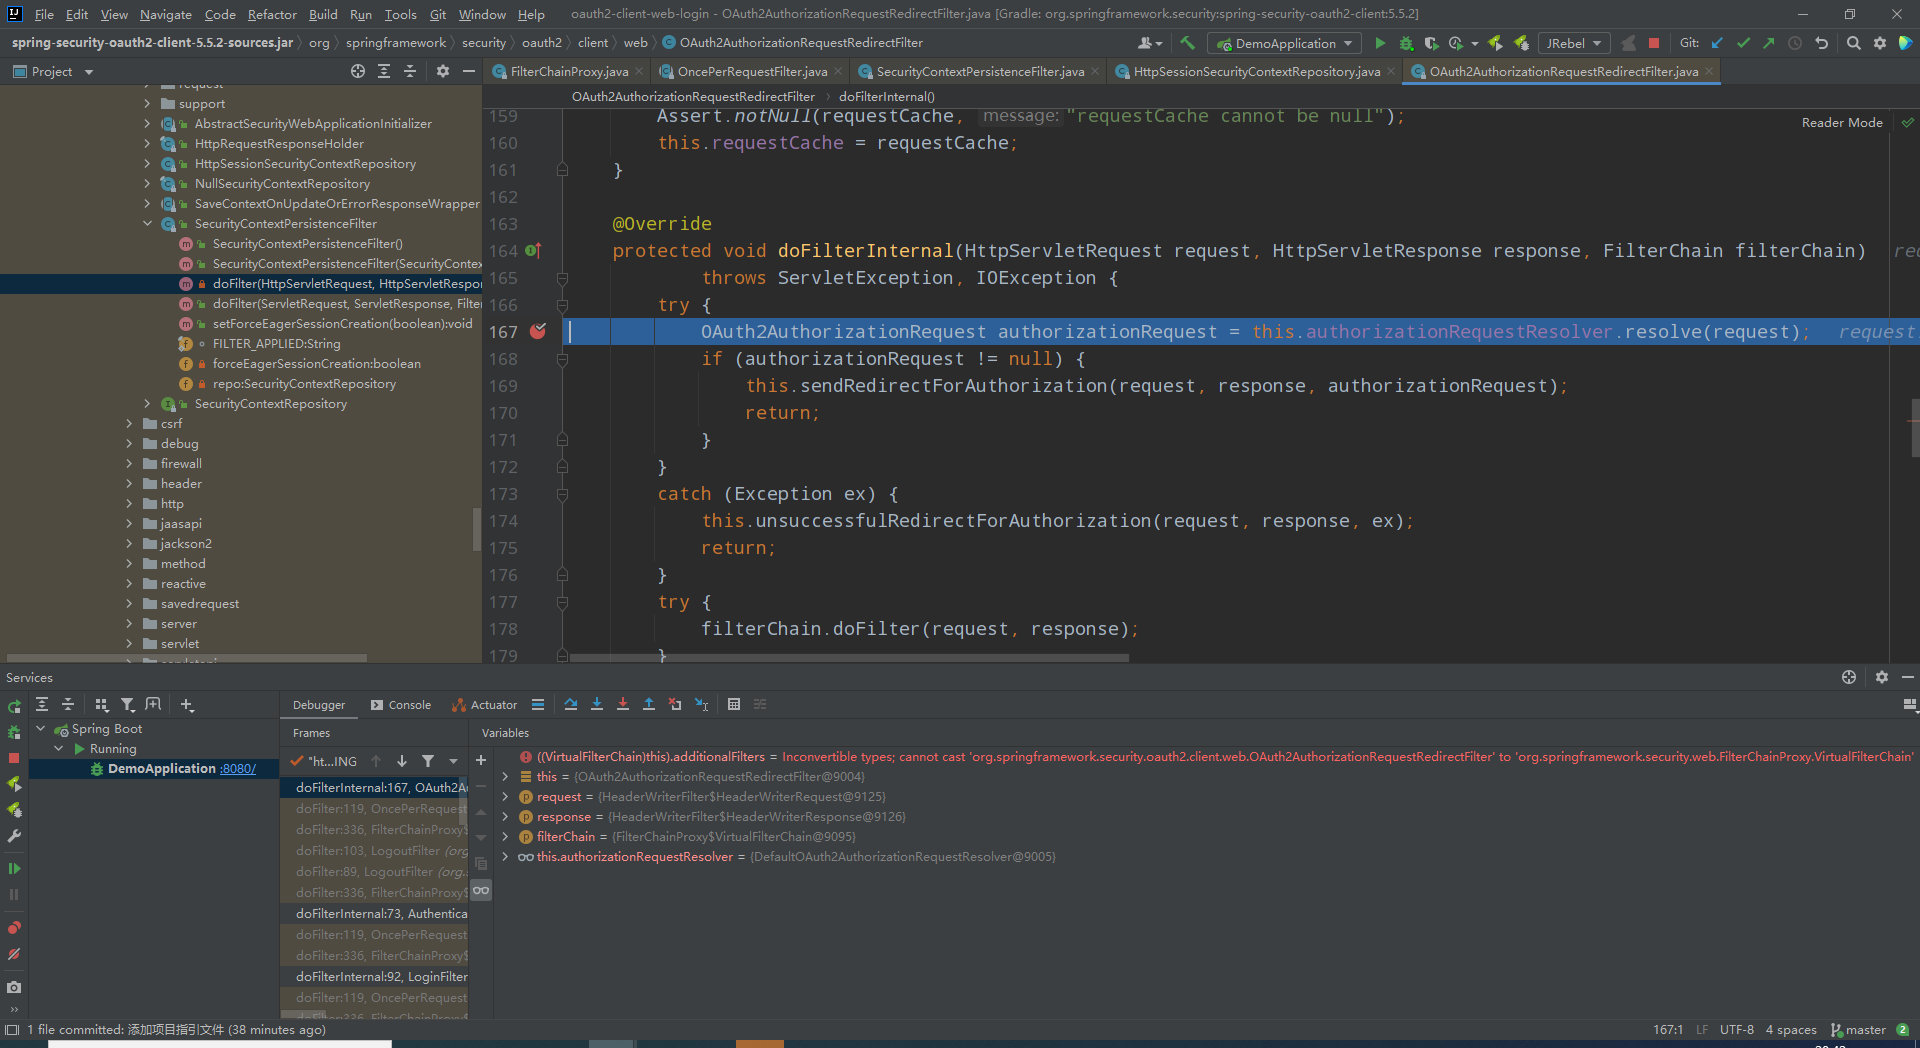
- OAuth2AuthorizationRequestRedirectFilter
org.springframework.security.oauth2.client.web.OAuth2AuthorizationRequestRedirectFilter#doFilterInternal
此处用来解析当前请求为oauth2认证请求,进去可以看到解析原理是拿当前过滤器的请求匹配器匹配请求,对上了再确认register-id。都确定了,就重定向到指定的oauth2登录地址,由于我们配置了两个授权码登录client,所以调试的时候会有两个过滤器
![]()
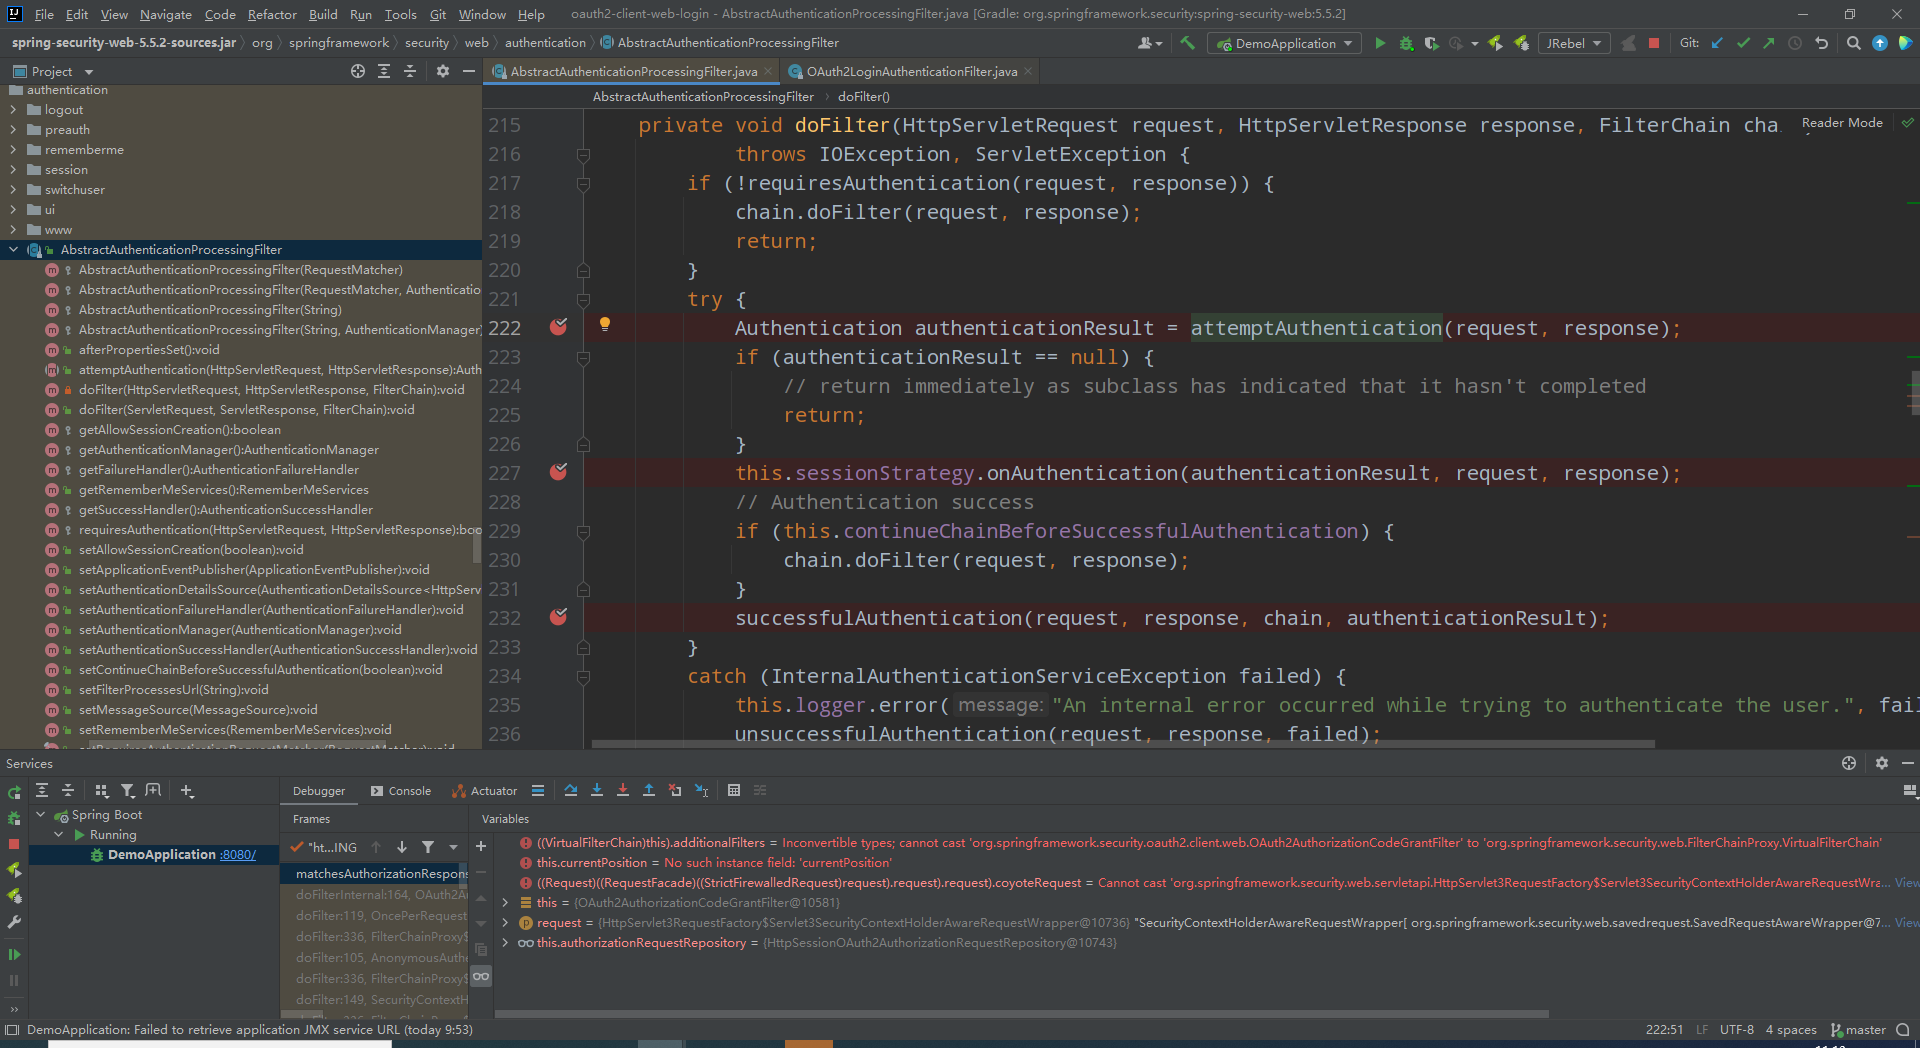
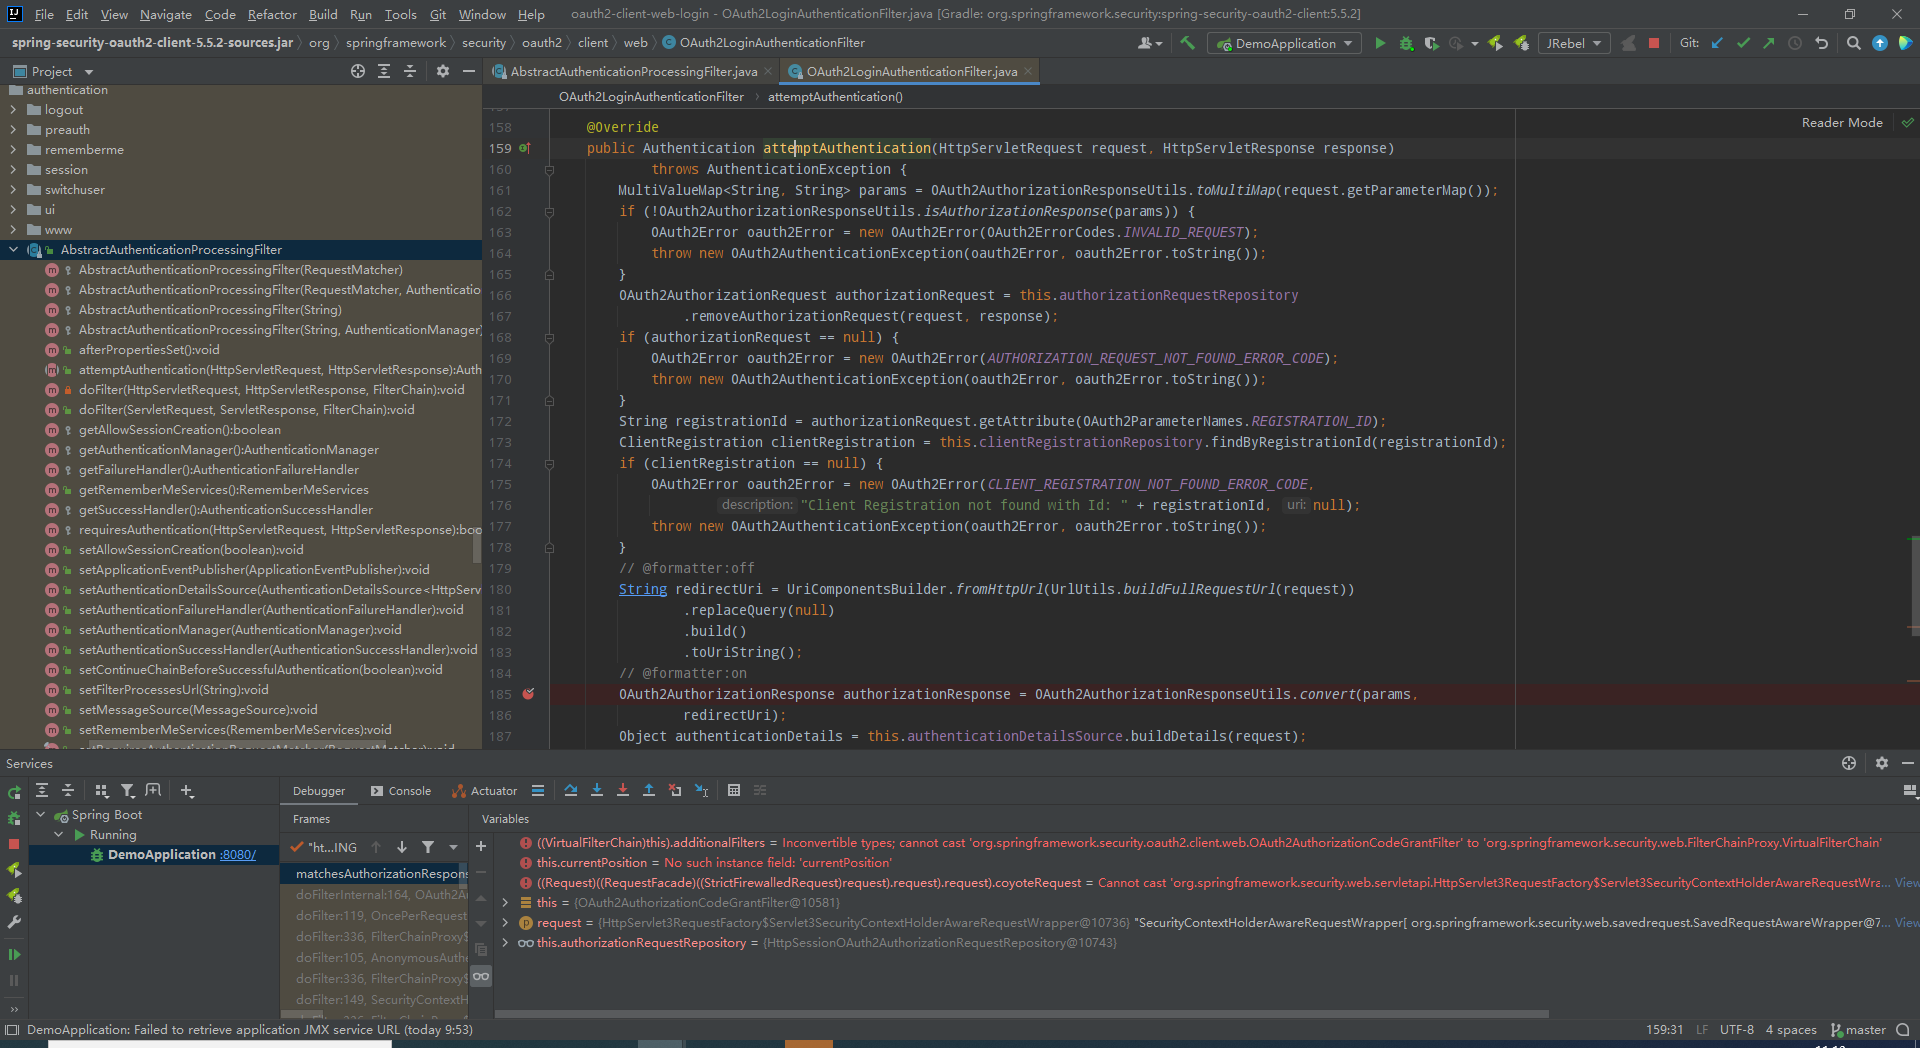
- OAuth2LoginAuthenticationFilter
org.springframework.security.oauth2.client.web.OAuth2LoginAuthenticationFilter
他继承了AbstractAuthenticationProcessingFilter,自己只做处理code获得Authentication。
oauth2认证过滤器,该过滤器接oauth2认证的对调请求。此处我在AbstractAuthenticationProcessingFilter打了三个断点,OAuth2LoginAuthenticationFilter打了一个
1)第一个断点,进行认证获得Authentication,认证成功的register会存至指定的认证成功客户端库,我们改成了以数据库存,实现持久化认证。避免系统重启oauth2认证状态丢失
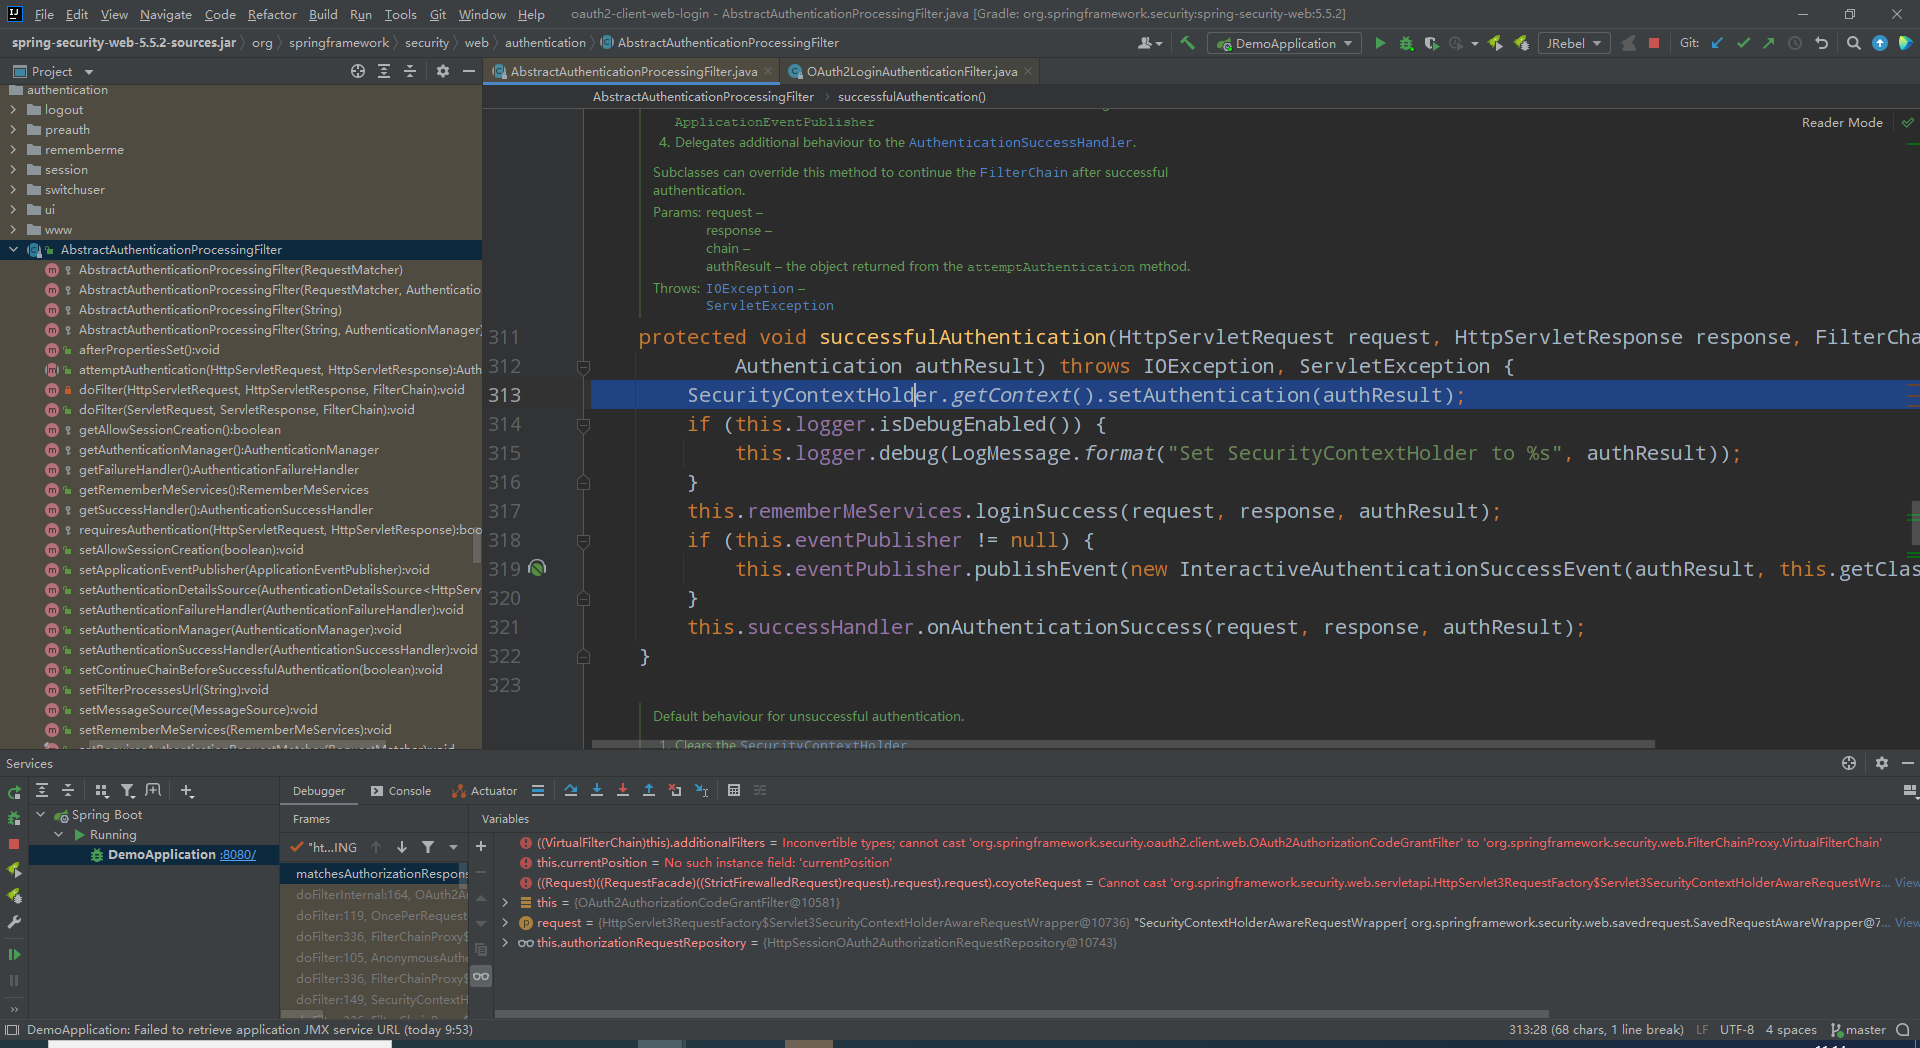
2)第二个断点,session保存认证状态,使得当前session拥有oauth2登录状态(效果:我们直接通过Cookie传sessionId的方法发起的请求是合法有效的)
3)第三个断点,认证成功处理,进去第一行就是向security上下文添加Authentication。然后发送认证成功消息,调用默认的认证成功处理器。
我们需要他oauth2登录能和自定义登录绑定到一起,所以我们重写一个认证成功处理器继承默认的认证成功处理器SavedRequestAwareAuthenticationSuccessHandler,然后再替换掉他就行。
![]()
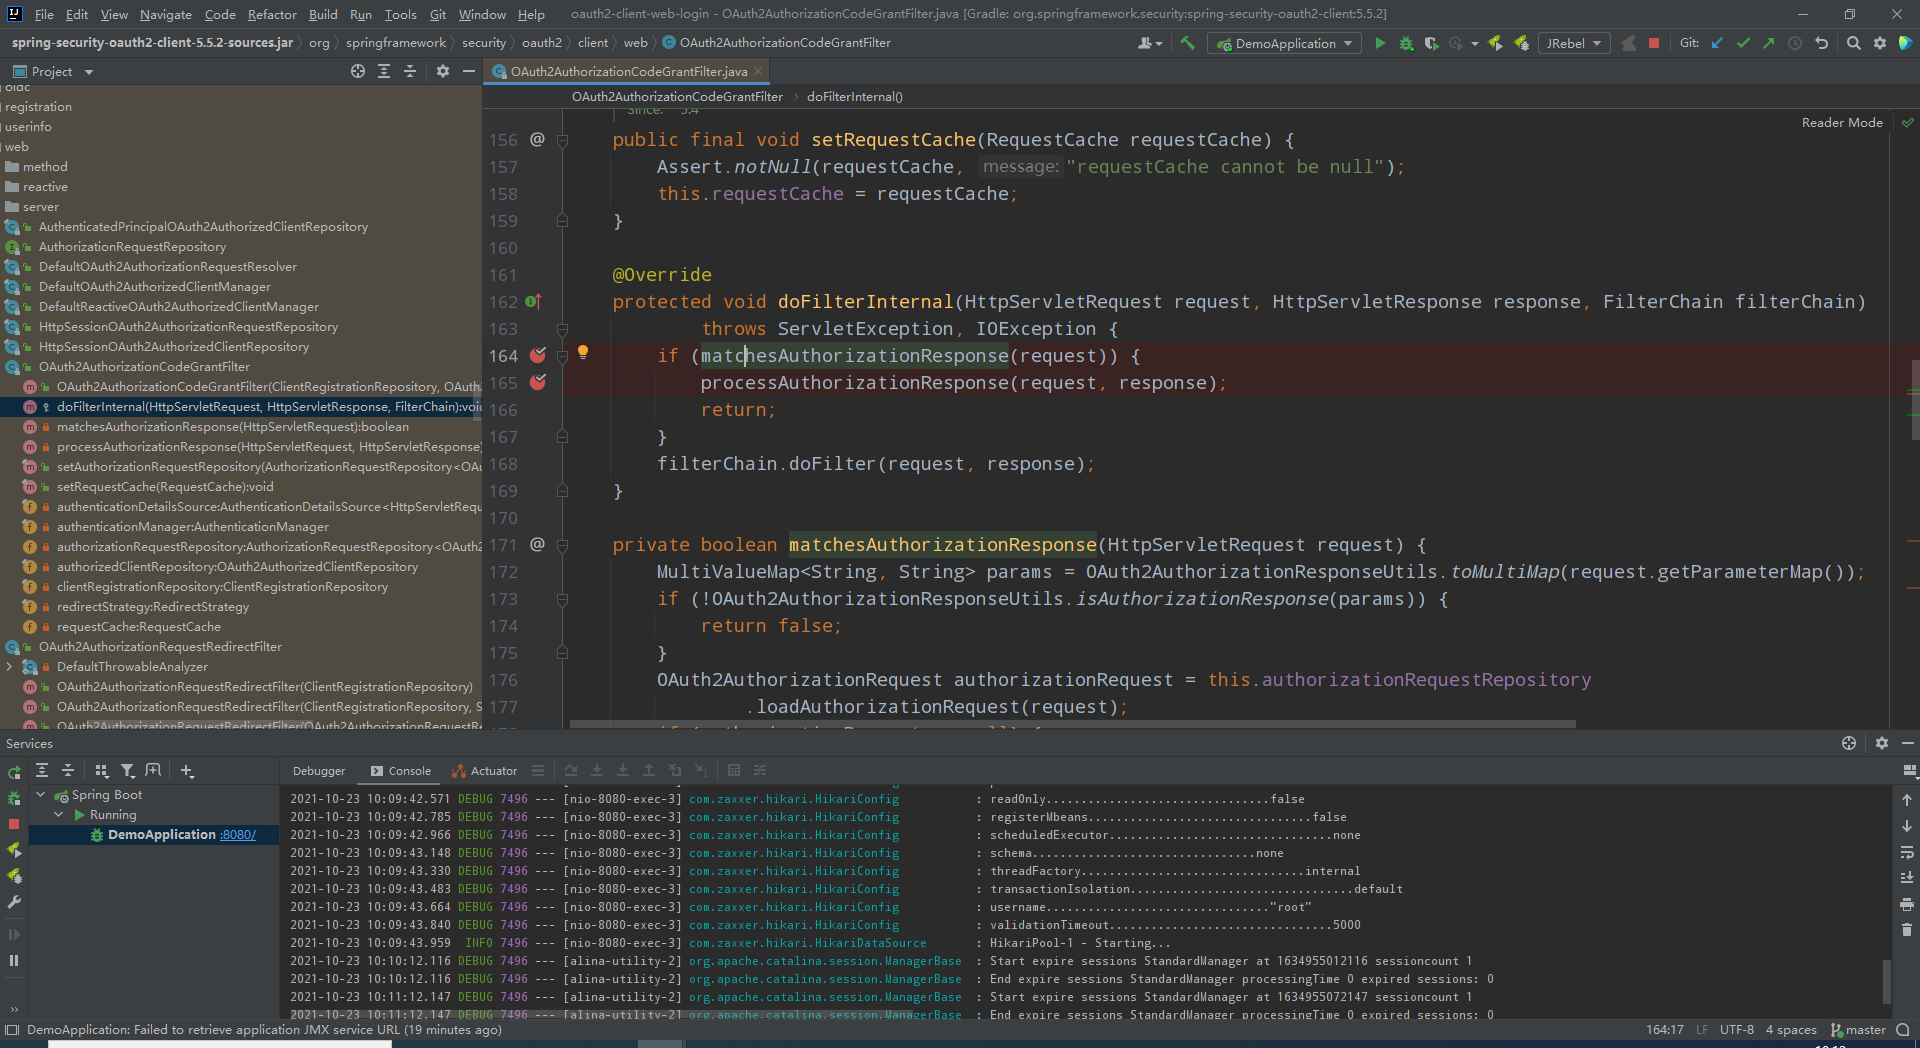
- OAuth2AuthorizationCodeGrantFilter
org.springframework.security.oauth2.client.web.OAuth2AuthorizationCodeGrantFilter#doFilterInternal
正常情况下不会进来,因为携带code的请求会由OAuth2LoginAuthenticationFilter优先处理,处理完就已经获得Authentication了
而session在AbstractAuthenticationProcessingFilter的第二个断点处也会进行认证成功处理
此处我打了两个断点
第一个断点做是否处理判断,里面有三种情形会返回匹配失败,一个失败则不继续
1)当前请求参数携带aouth2认证回调参数(code与state或error与state)
2)当前请求不是oauth2认证成功请求(session在认证成功库里没有)
3)重定向的scheme与当前请求的scheme相同
第二个断点真正处理请求进行授权,大致步骤为
1)确定当前oauth2对接使用的register,进行一系列乱七八糟的处理,最终回调到用户初始访问client服务的访问地址
![]()
认证
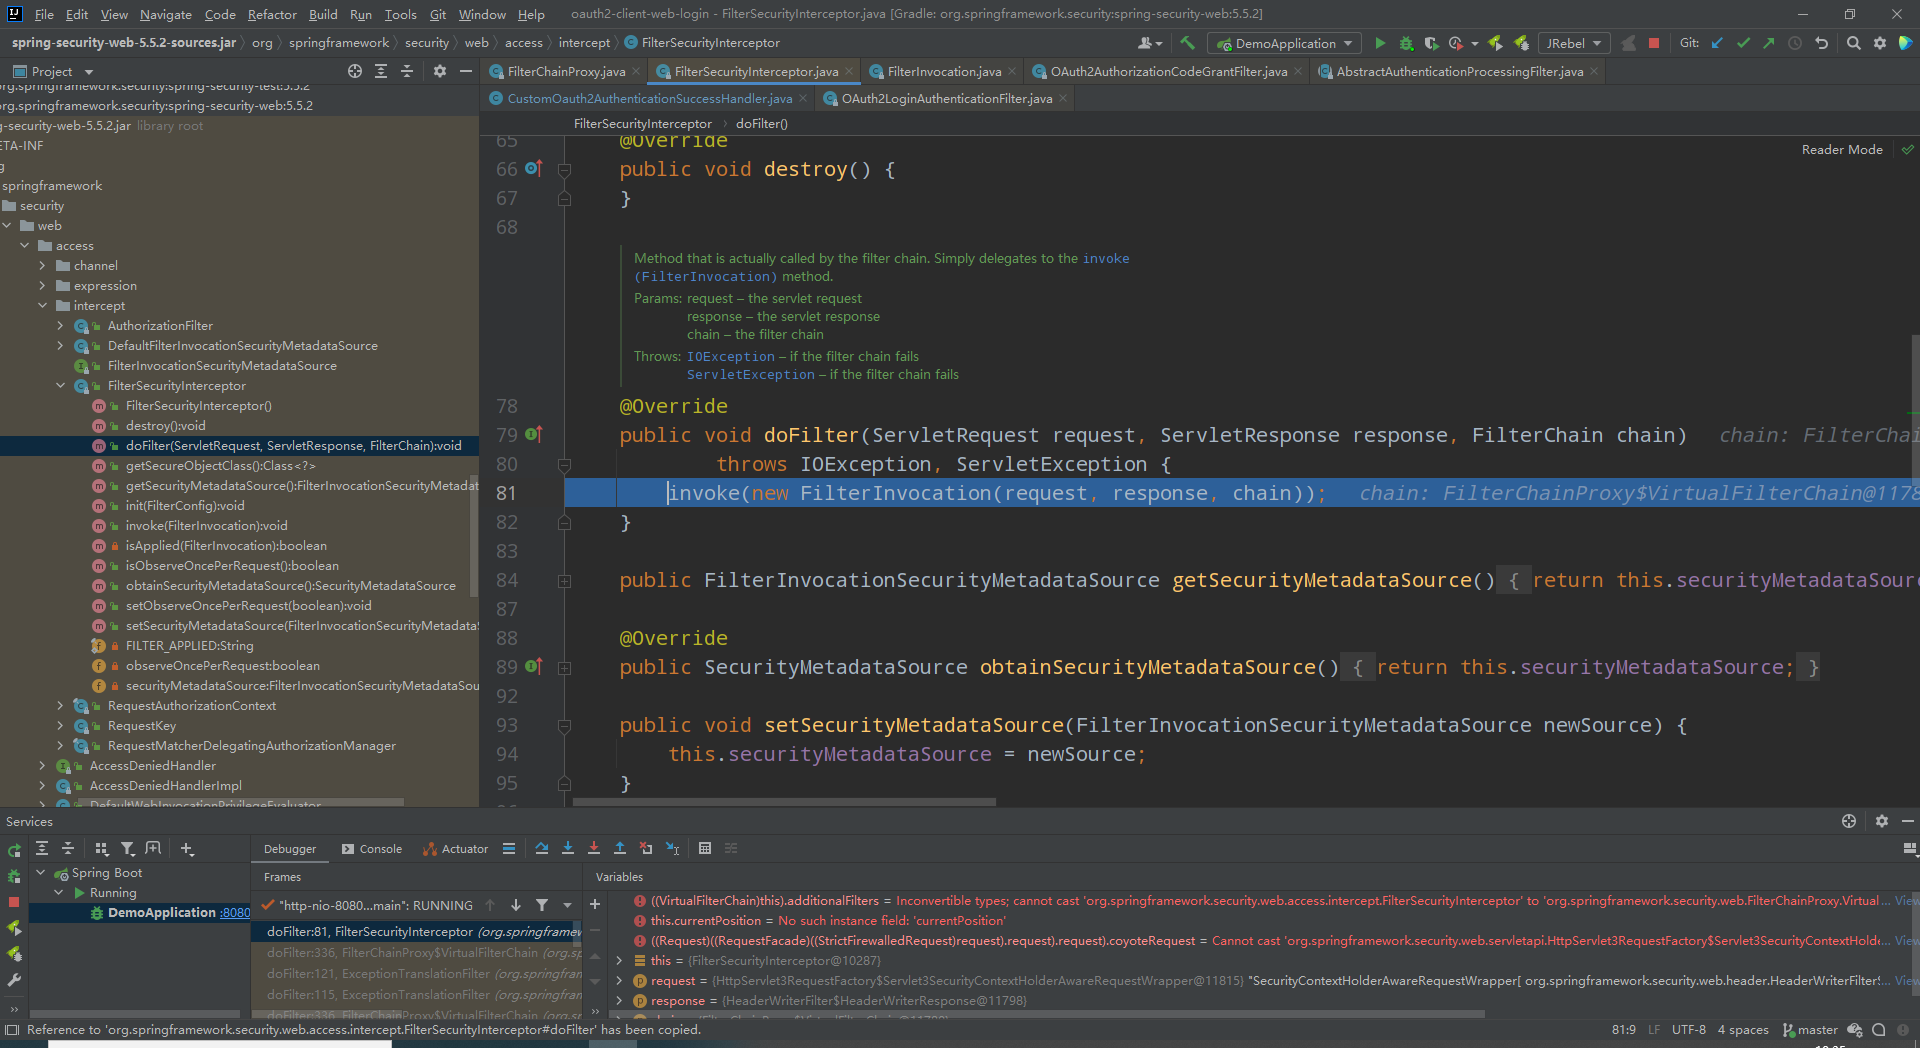
- FilterSecurityInterceptor
org.springframework.security.web.access.intercept.FilterSecurityInterceptor#doFilter
先说结论,该过滤器是用来做权限校验的。具体流程看下图
看下图:构建了一个FilterInvocation对象,然后交由本地invoke方法执行。构建对象是只是进行了简单的非空校验与赋值。重点在于调用了父类方法AbstractSecurityInterceptor#beforeInvocation获得拦截器状态token。我们一个一个看。
![]()
下代码即invoke方法实际执行
	public void invoke(FilterInvocation filterInvocation) throws IOException, ServletException {
		if (isApplied(filterInvocation) && this.observeOncePerRequest) {
			// filter already applied to this request and user wants us to observe
			// once-per-request handling, so don't re-do security checking
			// 过滤器已应用于此请求,用户希望我们观察
			// 每个请求处理一次,因此不要重新进行安全检查
			filterInvocation.getChain().doFilter(filterInvocation.getRequest(), filterInvocation.getResponse());
			return;
		}
		// first time this request being called, so perform security checking
		// 第一次调用此请求时,请执行安全检查
		if (filterInvocation.getRequest() != null && this.observeOncePerRequest) {
			filterInvocation.getRequest().setAttribute(FILTER_APPLIED, Boolean.TRUE);
		}
                // 重点,用父类生成一个拦截器状态token,这个token就表示了该请求的权限状态
		InterceptorStatusToken token = super.beforeInvocation(filterInvocation);
		try {
			filterInvocation.getChain().doFilter(filterInvocation.getRequest(), filterInvocation.getResponse());
		}
		finally {
			super.finallyInvocation(token);
		}
		super.afterInvocation(token, null);
	}
此处执行流程为:
1)调用AbstractSecurityInterceptor#beforeInvocation获取 InterceptorStatusToken
AbstractSecurityInterceptor#beforeInvocation里就三个重点方法
第一个:authenticateIfRequired(),当当前的authentication已经认证过了,并且没有设置成每次访问都要刷新authentication的话直接返回原authentication
否则调用绑定的AuthenticationManager#authenticate进行登录认证重新获得authenticate并刷新。
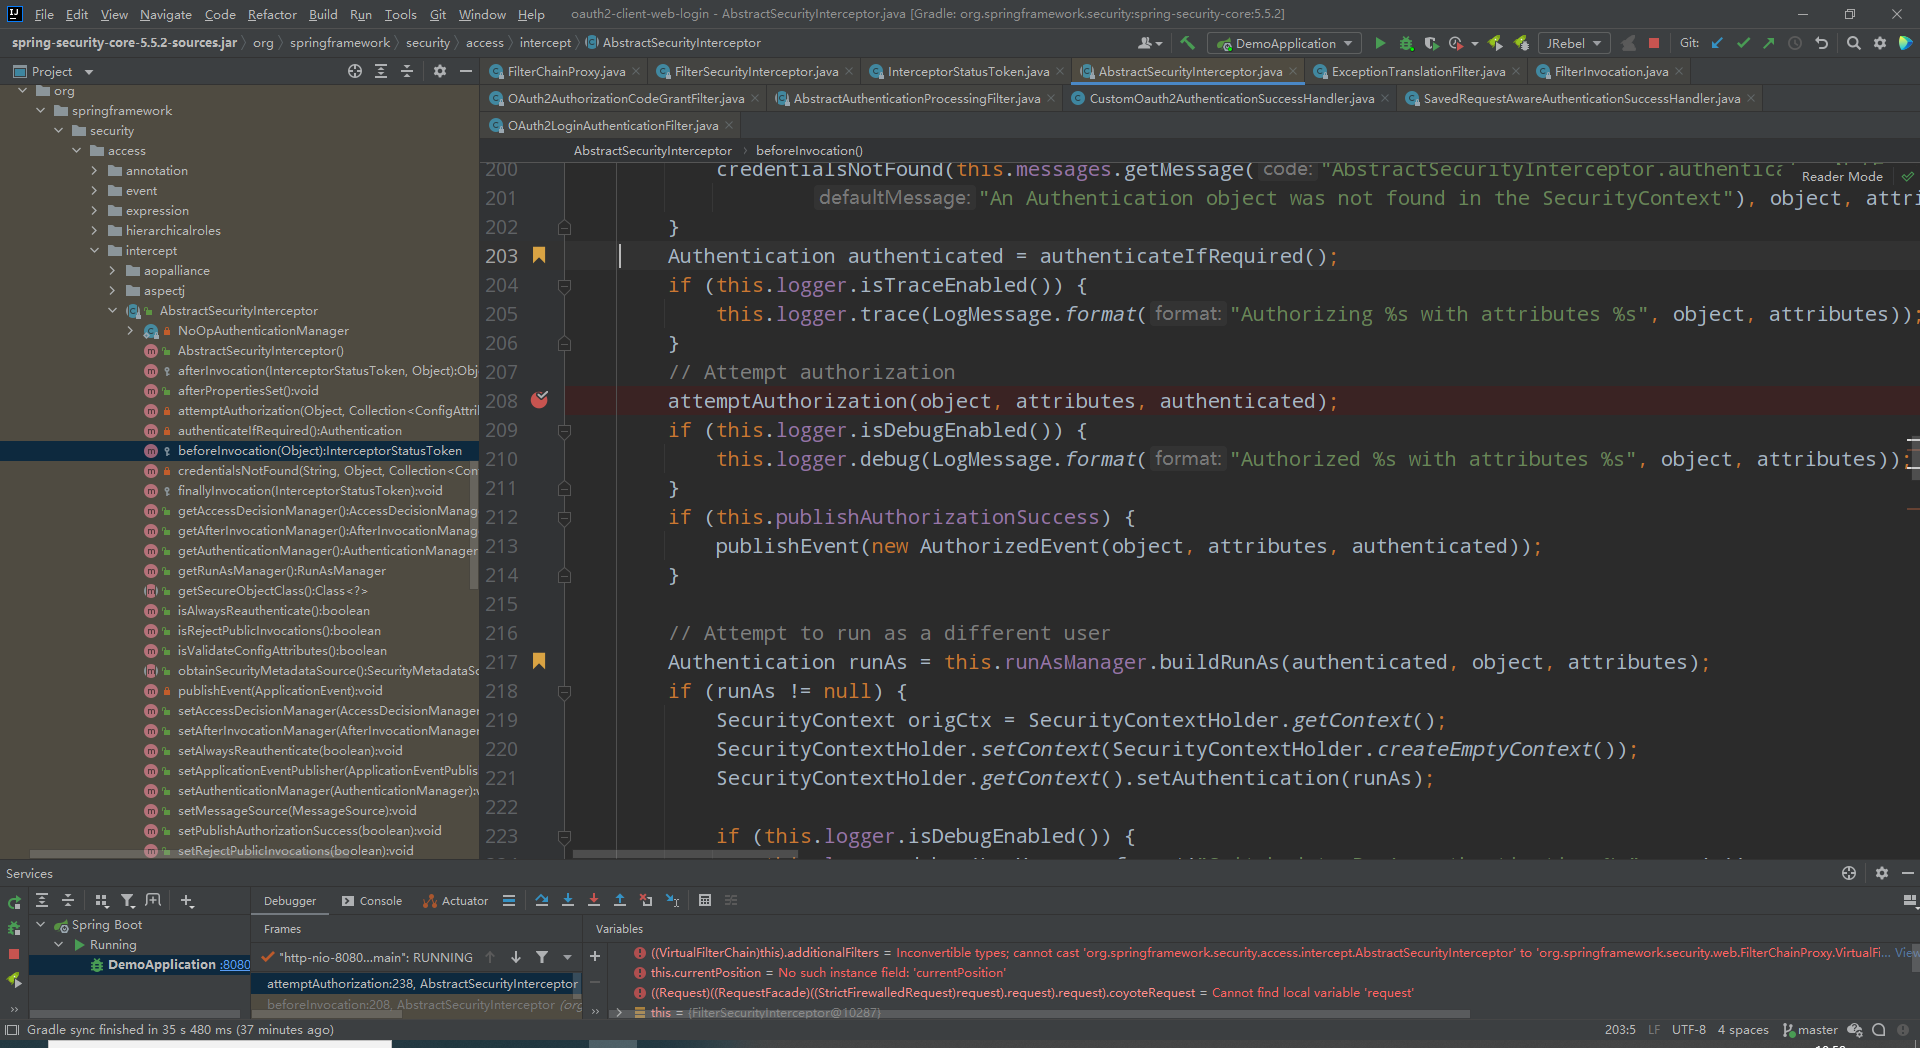
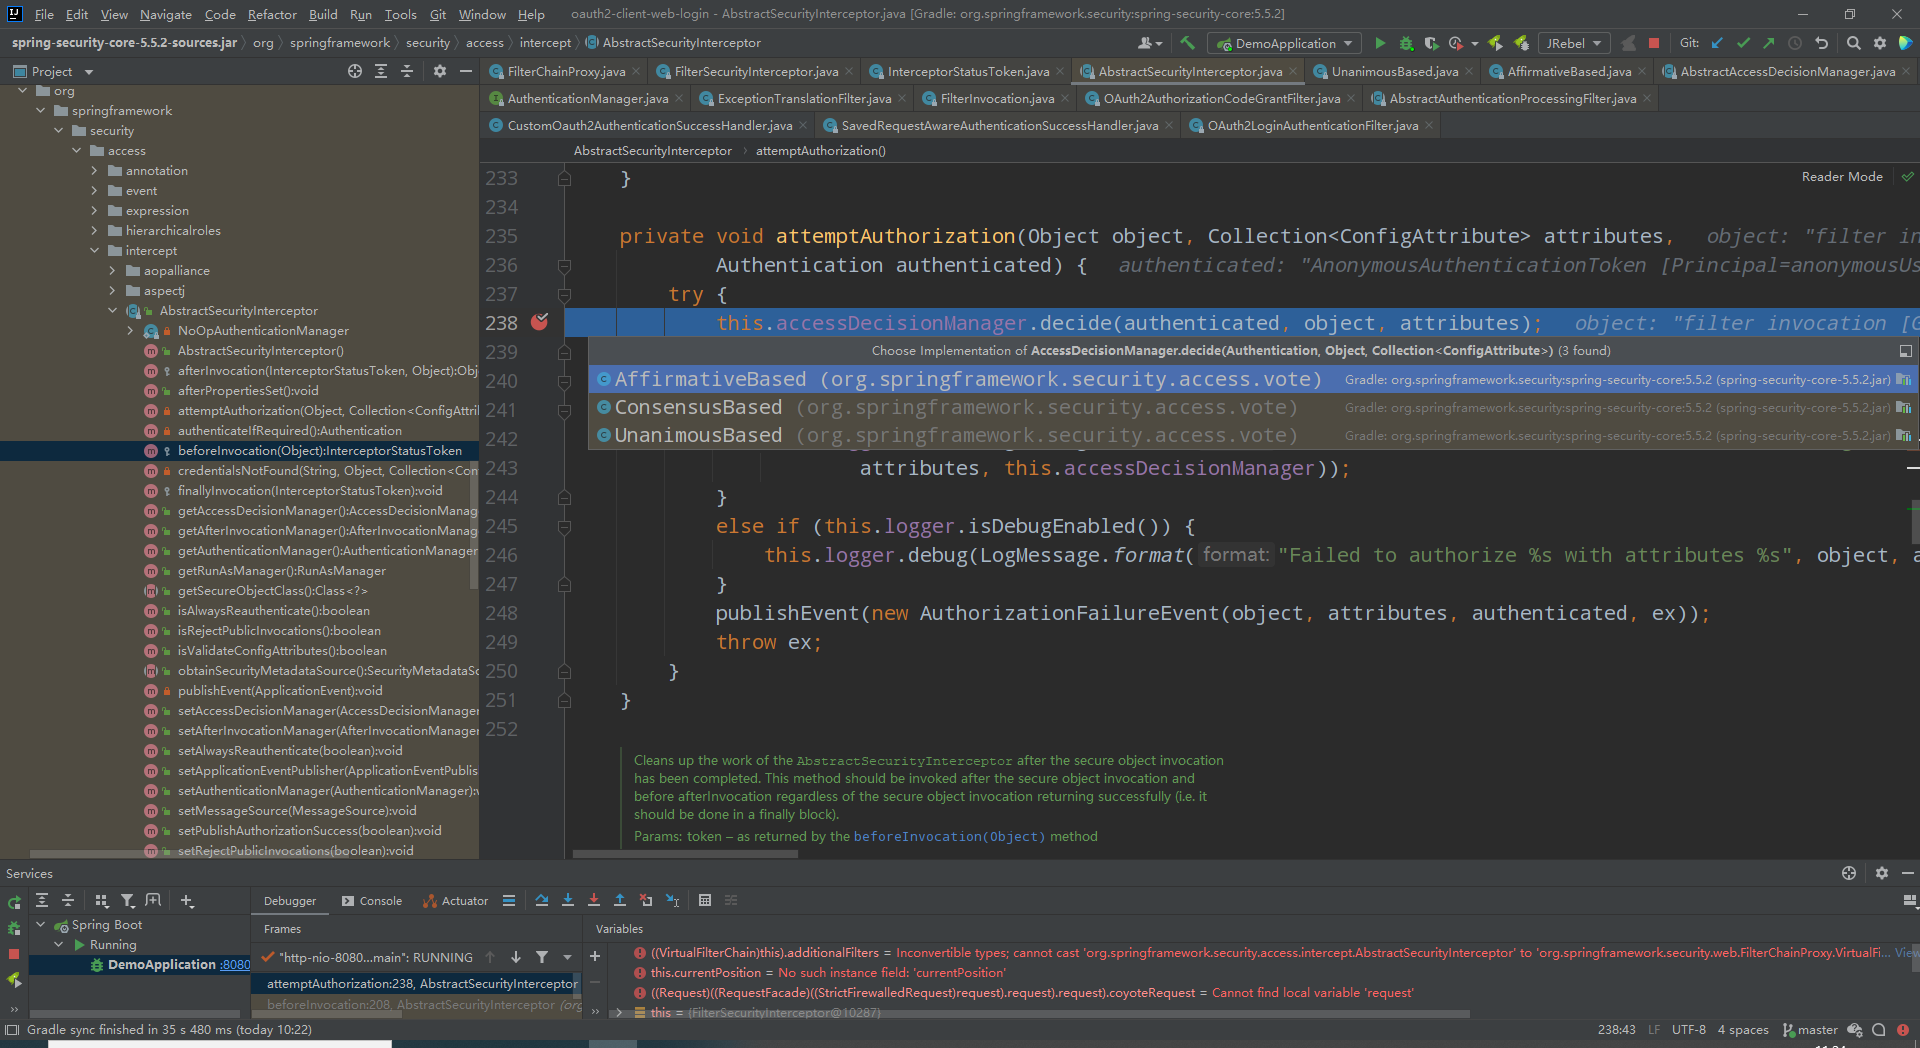
第二个:attemptAuthorization(object, attributes, authenticated),看名字是添加授权方法,名字不太好理解,看代码更方便。调用访问策略管理器进行访问决定。
他有三个实现类,就是有三种策略管理器,内部实现都是采用内部所有投票器的投票(1,同意。0,弃权;-1:反对)结果来判定是否可以访问。相同点是如果都是弃权的话,依然会抛出AccessDeniedException拒绝访问。
AffirmativeBased:有一个投票同意就允许访问
UnanimousBased:有一个投票反对就拒绝访问
ConsensusBased:统计所有投票结果,同意与反对的票数谁多谁说了算。如果一样多,并且允许的票数不为零,默认允许访问,如果手动设置allowIfEqualGrantedDeniedDecisions属性为false则不允许访问
第三个:this.runAsManager.buildRunAs(authenticated, object, attributes)
这个方法的含义是为当前Authentication添加权限,在这里其实也可以作为自定义的权限授予。只是他是维护请求匹配器与权限或者方法与权限的关系。请求匹配上了,这里就给你加上权限。
对于分布式动态权限不好管控,所以我们就没用这里实现自定义权限
2)过滤器链继续执行过滤器。
此时FilterChainProxy代理的过滤器已经执行完毕了,会转到ApplicationFilterChain继续执行他的内部过滤器,此处已超出security范围,感兴趣的自看...
3)调用AbstractSecurityInterceptor#finallyInvocation
不管上面的ApplicationFilterChain执行的怎么样,我们依然会继续来到此处进行SecurityContext刷新
4)调用AbstractSecurityInterceptor#afterInvocation
该方法最后一遍确认token,校验权限。
如果应用里面使用后置权限校验注解@PostAuthorize,那么afterInvocationManager的providers里面就会有一个PostInvocationAdviceProvider进行处理
结尾
spring security+oauth2 sso server+自定义登录,权限基于spring web的整合大致就算结束了。
整体来说,内置用tomcat的话就是在ApplicationFilterChain的filters里面加了一个security的FilterChainProxy。security的所有认证、授权、对接oauth2认证服务等一系列的操作都在FilterChainProxy里面。我们只需要慢慢理解这个FilterChainProxy调用了哪些过滤器,这些过滤器的初始话在哪里?慢慢看就行了。
security初始化反推。我们按照官方日志配置后,启动能确定
FilterChainProxy。
然后在Intellij Idea里面找FilterChainProxy的引用,找到了WebSecurityConfiguration,
他上面标注了@Configuration(proxyBeanMethods = false)注解。再找他的引用。找到了@EnableWebSecurity注解。
看到这里一眼就能看出来是明显的级联配置。只要spring boot启动时扫到了这个注解所标注的类。那么security环境就启动了

logging:
  #  file:
  #    name: oauth2-client.log
  level:
    # 根日志级别
    root: DEBUG
    # 基础web相关日志级别
    org.springframework.web: TRACE
    # security相关日志级别
    org.springframework.security: TRACE
    # oauth2相关日志界别
    org.springframework.security.oauth2: TRACE
    # spring-boot自动配置日志级别
    org.springframework.boot.autoconfigure: INFO

 浙公网安备 33010602011771号