01-Vue.js基础
一、Vue基础
1、介绍
Vue是一套用于构建用户界面的渐进式框架。Vue的核心库只关注视图层,不仅容易上手,还便于与第三方库或既有的项目整合。兼容性:Vue 不支持 IE8 及以下版本,因为 Vue 使用了 IE8 无法模拟的 ECMAScript 5 特性。但它支持所有兼容 ECMAScript 5 的浏览器。Vue.js 不支持 IE8 及其以下 IE 版本。
2、Vue.js安装
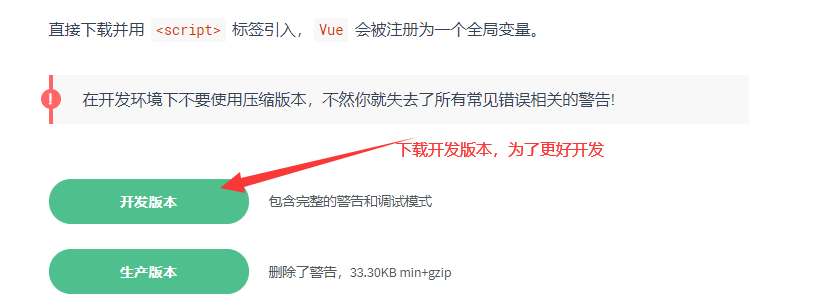
安装有三种方式,一种直接下载开发版本,第二种CDN链接,国外有比较稳定的两个CDN,第三种官方命令工具,可用于快速搭建大型单页应用。开发学习还是建议第一种,Vue.js 的官网上直接下载 vue.min.js 并用 <script> 标签引入。
unpkg:https://unpkg.com/vue/dist/vue.js, 会保持和 npm 发布的最新的版本一致。

cdnjs : https://cdnjs.cloudflare.com/ajax/libs/vue/2.1.8/vue.min.js
第三种安装就是利用淘宝npm(大于3.0)镜像下载:
升级淘宝镜像:
npm install cnpm -g #升级cnpm或者安装
cnpm install npm -g  #升级npm
npm -v  #查看版本
cnpm install vue #安装最新版本
第四种命令行工具,可以用于快速搭建大型单页应用
cnpm install --global vue-cli  # 全局安装 vue-cli

vue init webpack my-project    # 创建一个基于 webpack 模板的新项目  这里需要进行一些配置,默认回车即可
进入项目,安装依赖包并运行:
cd my-project
cnpm install
cnpm run dev
3、Vue.js目录结构
build    项目构建(webpack)相关代码
config   配置目录,包括端口号等。我们初学可以使用默认的
node_modules  npm 加载的项目依赖模块
src 我们要开发的目录,基本上要做的事情都在这个目录里。里面包含了几个目录及文件 assets: 放置一些图片,如logo等。components: 目录里面放了一个组件文件,可以不用。App.vue: 项目入口文件,我们也可以直接将组件写这里,而不使用 components 目录。main.js: 项目的核心文件
static  静态资源目录,如图片、字体等
test   初始测试目录,可删除
index.html  首页入口文件,你可以添加一些 meta 信息或统计代码啥的
package.json   项目配置文件
.xxxx文件    这些是一些配置文件,包括语法配置,git配置等
src/APP.vue:
<!-- 展示模板 -->
<template>
  <div id="app">
    <img alt="Vue logo" src="./assets/logo.png">
    <HelloWorld msg="Welcome to Your Vue.js App"/>
  </div>
</template>
//导入组件
<script>
import HelloWorld from './components/HelloWorld.vue'

export default {
  name: 'app',
  components: {
    HelloWorld
  }
}
</script>
//样式代码
<style>
#app {
  font-family: 'Avenir', Helvetica, Arial, sans-serif;
  -webkit-font-smoothing: antialiased;
  -moz-osx-font-smoothing: grayscale;
  text-align: center;
  color: #2c3e50;
  margin-top: 60px;
}
</style>
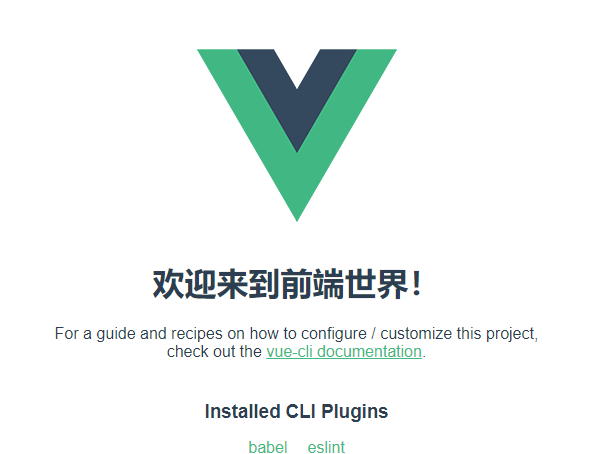
初始化项目,将src/components/HelloWorld.vue修改为以下代码:

<template>
  <div class="hello">
    <h1>{{ msg }}</h1>
    <p>
      For a guide and recipes on how to configure / customize this project,<br>
      check out the
      <a href="https://cli.vuejs.org" target="_blank" rel="noopener">vue-cli documentation</a>.
    </p>
    <h3>Installed CLI Plugins</h3>
    <ul>
      <li><a href="https://github.com/vuejs/vue-cli/tree/dev/packages/%40vue/cli-plugin-babel" target="_blank" rel="noopener">babel</a></li>
      <li><a href="https://github.com/vuejs/vue-cli/tree/dev/packages/%40vue/cli-plugin-eslint" target="_blank" rel="noopener">eslint</a></li>
    </ul>
    <h3>Essential Links</h3>
    <ul>
      <li><a href="https://vuejs.org" target="_blank" rel="noopener">Core Docs</a></li>
      <li><a href="https://forum.vuejs.org" target="_blank" rel="noopener">Forum</a></li>
      <li><a href="https://chat.vuejs.org" target="_blank" rel="noopener">Community Chat</a></li>
      <li><a href="https://twitter.com/vuejs" target="_blank" rel="noopener">Twitter</a></li>
      <li><a href="https://news.vuejs.org" target="_blank" rel="noopener">News</a></li>
    </ul>
    <h3>Ecosystem</h3>
    <ul>
      <li><a href="https://router.vuejs.org" target="_blank" rel="noopener">vue-router</a></li>
      <li><a href="https://vuex.vuejs.org" target="_blank" rel="noopener">vuex</a></li>
      <li><a href="https://github.com/vuejs/vue-devtools#vue-devtools" target="_blank" rel="noopener">vue-devtools</a></li>
      <li><a href="https://vue-loader.vuejs.org" target="_blank" rel="noopener">vue-loader</a></li>
      <li><a href="https://github.com/vuejs/awesome-vue" target="_blank" rel="noopener">awesome-vue</a></li>
    </ul>
  </div>
</template>

<script>
export default {
  name: 'HelloWorld',
  data() {
   return  {
      msg: '欢迎来到前端世界!'
    }
  }
}
</script>

<!-- Add "scoped" attribute to limit CSS to this component only -->
<style scoped>
h3 {
  margin: 40px 0 0;
}
ul {
  list-style-type: none;
  padding: 0;
}
li {
  display: inline-block;
  margin: 0 10px;
}
a {
  color: #42b983;
}
</style>
4、Vue.js起步
使用vue.js实现HelloWorld,在使用之前我们先用dom实现hello world:(index.html)
<!DOCTYPE html>
<html lang="en">
<head>
    <meta charset="UTF-8">
    <title>Hello World</title>
</head>
<body>
    <div id="app"></div>
    <script>
        var dom = document.getElementById("app");
        dom.innerHTML = "Hello World!"
    </script>
</body>
</html>

接下来用Vue.js实现同样的目标:index.html:
    <meta charset="UTF-8">
    <title>Hello World</title>
    <!-- 引入vue.js的库 -->
    <script src="./vue.js"></script>
</head>
<body>
    <div id="app">{{content}}</div>
    <script>
        // var dom = document.getElementById("app");
        // dom.innerHTML = "Hello World!"
        // 创建Vue实例,接受参数
        var app = new Vue({
            el: '#app',
            data: {
                content:'Hello World!!!'
            }
        })
    </script>
</body>
</html>

如果想要让它延时2秒在显示出来,那么我们用dom应该怎样操作呢?
<!DOCTYPE html>
<html lang="en">
<head>
    <meta charset="UTF-8">
    <title>Hello World</title>
    <!-- 引入vue.js的库 -->
    <script src="./vue.js"></script>
</head>
<body>
    <div id="app">{{content}}</div>
    <script>
        var dom = document.getElementById("app");
        dom.innerHTML = "Hello World!";
        setTimeout(function() {
            dom.innerHTML = "Bye Bye World!";
        },2000)
        // 创建Vue实例,接受参数
        // var app = new Vue({
        //     el: '#app',
        //     data: {
        //         content:'Hello World!!!'
        //     }
        // })
    </script>
</body>
</html>
用Vue实现:
<!DOCTYPE html>
<html lang="en">
<head>
    <meta charset="UTF-8">
    <title>Hello World</title>
    <!-- 引入vue.js的库 -->
    <script src="./vue.js"></script>
</head>
<body>
    <div id="app">{{content}}</div>
    <script>
        // 创建Vue实例,接受参数
        var app = new Vue({
            el: '#app',
            data: {
                content:'Hello World!!!'
            }
        });
        setTimeout(function() {
            app.$data.content = "Bye Bye World!"
        },2000)
    </script>
</body>
</html>
这样书写vue的代码不再关注dom操作对象啦,而是关注数据操作。
5、使用vue.js实现todoList
v-for实现遍历:

<!DOCTYPE html>
<html lang="en">
<head>
    <meta charset="UTF-8">
    <title>TodoList</title>
    <!-- 引入vue.js的库 -->
    <script src="./vue.js"></script>
</head>
<body>
    <div id="app">
        <input type="text"/>
        <button>提交</button>
        <!-- v_for遍历数组 -->
        <ul>
            <li v-for="item in list">{{item}}</li>
        </ul>
    </div>
    <script>
        var app = new Vue({
            el:'#app',
            data: {
                list: ['第一课的内容','第二课的内容','第三课的内容']
            }
        })
    </script>
</body>
</html>

现在将数组清空,变成空数组,这样来运行:

button绑定事件 :
数据都没有啦,现在我们的目的就是在输入框输入数据,然后数据在下面的li标签中显示,那么现在就来利用vue来实现代码(button绑定事件):

<!DOCTYPE html>
<html lang="en">
<head>
    <meta charset="UTF-8">
    <title>TodoList</title>
    <!-- 引入vue.js的库 -->
    <script src="./vue.js"></script>
</head>
<body>
    <div id="app">
        <input type="text"/>
        <!-- 在标签中绑定点击事件,有个方法,方法一定要写在vue实例中,有个叫methods的键值对里 -->
        <button v-on:click="handleBtnClick">提交</button>
        <!-- v_for遍历数组 -->
        <ul>
            <li v-for="item in list">{{item}}</li>
        </ul>
    </div>
    <script>
        var app = new Vue({
            el:'#app',
            data: {
                list: []
            },
            methods: {
                handleBtnClick: function() {
                    alert('click');
                }
            }
        })
    </script>
</body>
</html>

v-model数据的双向绑定:

<!DOCTYPE html>
<html lang="en">
<head>
    <meta charset="UTF-8">
    <title>TodoList</title>
    <!-- 引入vue.js的库 -->
    <script src="./vue.js"></script>
</head>
<body>
    <div id="app">
        <!-- v-model数据的双向绑定,在浏览器控制台对app.$data.inputValue进行赋值,然后浏览器的输入框也会显示一样的值 -->
        <input type="text" v-model="inputValue"/>
        <!-- 在标签中绑定点击事件,有个方法,方法一定要写在vue实例中,有个叫methods的键值对里 -->
        <button v-on:click="handleBtnClick">提交</button>
        <!-- v_for遍历数组 -->
        <ul>
            <li v-for="item in list">{{item}}</li>
        </ul>
    </div>
    <script>
        var app = new Vue({
            el:'#app',
            data: {
                list: [],
                inputValue: '',
            },
            methods: {
                handleBtnClick: function() {
                    // list中是空值,因此向list中添加值,添加的值是输入框的内容
                    this.list.push(this.inputValue)
                    // 提交将输入框的值弹出来
                    // alert(this.inputValue);
                    // 每次点击按钮,都将input框的值赋值为空
                    this.inputValue = ""
                }
            }
        })
    </script>
</body>
</html>

我们操作的都不是dom对象,都是对数据进行操作,这种操作被称为MVVM模式,
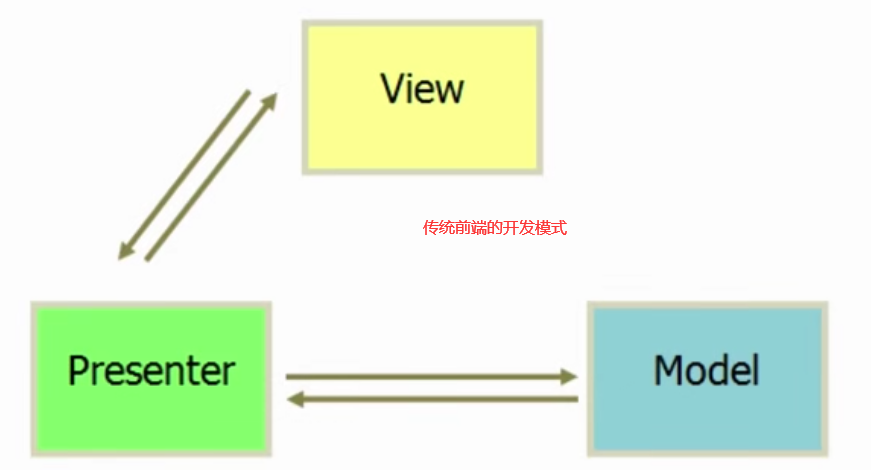
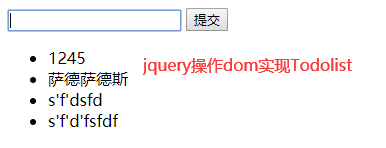
传统的开发模式MVP模式:Model层:数据层。Presenter层:呈现层,View层:视图层接下来利用Jquery实现MPV开发模式的TodoList。

<!DOCTYPE html>
<html lang="en">
<head>
    <meta charset="UTF-8">
    <title>TodoList Jquery</title>
    <script src="./jquery.js"></script>
</head>
<body>
    <!-- V层 视图 -->
    <div>
        <input type="text" id="input" />
        <button id="btn">提交</button>
        <ul id="list"></ul>
    </div>
    <script>
        // MPV模式
        // P层  控制器通过控制dom操作改变视图,控制ajax请求  M层这里没有,就是操作ajax数据层
        function Page() {

        }

        $.extend(Page.prototype, {
            init: function() {
                 this.bindEvents()
            },
            bindEvents: function() {
                var btn = $('#btn');
                btn.on('click', $.proxy(this.handleBtnClick,this))
            },
            handleBtnClick: function() {
                var inputElem =  $("#input");
                var inputValue =inputElem.val();
                var ulElem = $("#list");
                ulElem.append('<li>'+ inputValue +'</li>');
                inputElem.val("");
            }
        })
        var page = new Page();
        page.init();

    </script>
</body>
</html>
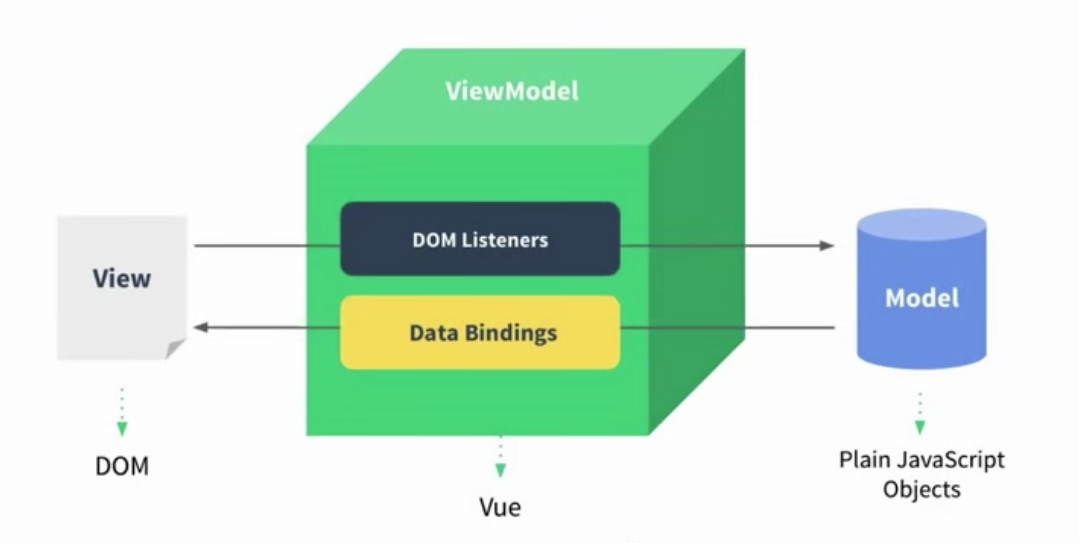
MVVM设计模式图:我们不用关心dom是如何实现的,我们只需要关注View层以及Model层。

<!DOCTYPE html>
<html lang="en">
<head>
    <meta charset="UTF-8">
    <title>TodoList</title>
    <!-- 引入vue.js的库 -->
    <script src="./vue.js"></script>
</head>
<body>
    <!-- V层 -->
    <div id="app">
        <!-- v-model数据的双向绑定,在浏览器控制台对app.$data.inputValue进行赋值,然后浏览器的输入框也会显示一样的值 -->
        <input type="text" v-model="inputValue"/>
        <!-- 在标签中绑定点击事件,有个方法,方法一定要写在vue实例中,有个叫methods的键值对里 -->
        <button v-on:click="handleBtnClick">提交</button>
        <!-- v_for遍历数组 -->
        <ul>
            <li v-for="item in list">{{item}}</li>
        </ul>
    </div>
    <script>
        // MVVM设计模式
        // VM层实现数据变化,标签的显示也发生变化,自动实现。
        // M层,对数据进行操作  我们基本需要关注M层  面向数据进行编程
        var app = new Vue({
            el:'#app',
            data: {
                list: [],
                inputValue: '',
            },
            methods: {
                handleBtnClick: function() {
                    // list中是空值,因此向list中添加值,添加的值是输入框的内容
                    this.list.push(this.inputValue)
                    // 提交将输入框的值弹出来
                    // alert(this.inputValue);
                    // 每次点击按钮,都将input框的值赋值为空
                    this.inputValue = ""
                }
            }
        })
    </script>
</body>
</html>
6、前端组件化
前端组件化,就是将整个部分是由每一个组件拼接起来的,这样的便于维护。有点像我们生活中拼积木一样,将一个一个的积木拼接起来,组件化就像我们的积木一样,拼接成一个大型项目。
7、使用组件化思想修改TodoList
全局组件:

<!DOCTYPE html>
<html lang="en">
<head>
    <meta charset="UTF-8">
    <title>TodoList</title>
    <script src="./vue.js"></script>
</head>
<body>
    <div id="app">
        <input type="text" v-model="inputValue"/>
        <button v-on:click="handleBtnClick">提交</button>
        <ul>
            <todo-item v-bind:content="item"
                       v-for="item in list">
            </todo-item>
        </ul>
    </div>
    <script>
        Vue.component("TodoItem", {   // 组件化
            props: ["content"],
            template: "<li>{{content}}</li>",
        });

        var app = new Vue({
            el:'#app',
            data: {
                list: [],
                inputValue: '',
            },
            methods: {
                handleBtnClick: function() {
                    this.list.push(this.inputValue);
                    this.inputValue = ""
                }
            }
        })
    </script>
</body>
</html>
组件化与绑定值,这是Vue提供的全局组件,将item与content绑定起来,然后必须将props绑定的值添加到列表中,最后用组件template模板键值对对应需要添加的值。
局部组件:
<!DOCTYPE html>
<html lang="en">
<head>
    <meta charset="UTF-8">
    <title>TodoList</title>
    <script src="./vue.js"></script>
</head>
<body>
    <div id="app">
        <input type="text" v-model="inputValue"/>
        <button v-on:click="handleBtnClick">提交</button>
        <ul>
            <todo-item v-bind:content="item"
                       v-for="item in list">
            </todo-item>
        </ul>
    </div>
    <script>
        // Vue.component("TodoItem", {
        //     props: ["content"],
        //     template: "<li>{{content}}</li>",
        // });
        var TodoItem = {
            props: ["content"],
            template: "<li>{{content}}</li>",
        }

        var app = new Vue({
            el:'#app',
            components: {
                TodoItem: TodoItem
            },
            data: {
                list: [],
                inputValue: '',
            },
            methods: {
                handleBtnClick: function() {
                    this.list.push(this.inputValue);
                    this.inputValue = ""
                }
            }
        })
    </script>
</body>
</html>
对比一下全局组件,局部组件需要将组件注册到Vue实例中去,这样也能实现全局组件的功能。

8、简单的组件间传值
<!DOCTYPE html>
<html lang="en">
<head>
    <meta charset="UTF-8">
    <title>TodoList</title>
    <script src="./vue.js"></script>
</head>
<body>
    <div id="app">
        <input type="text" v-model="inputValue"/>
        <button v-on:click="handleBtnClick">提交</button>
        <ul>
            <!-- 副组件 -->
            <todo-item :content="item"
                       v-bind:index="index"
                       v-for="(item,index) in list"
                       @delete="handleItemDelete">
            </todo-item>
        </ul>
    </div>
    <script>
        // Vue.component("TodoItem", {
        //     props: ["content"],
        //     template: "<li>{{content}}</li>",
        // });
        // 子组件
        var TodoItem = {
            props: ["content","index"],
            template: "<li @click='handleItemClick'>{{content}}</li>",
            methods: {
                handleItemClick: function() {
                    this.$emit("delete",this.index);
                }
            }
        }

        var app = new Vue({
            el:'#app',
            components: {
                TodoItem: TodoItem
            },
            data: {
                list: [],
                inputValue: '',
            },
            methods: {
                handleBtnClick: function() {
                    this.list.push(this.inputValue);
                    this.inputValue = ""
                },
                handleItemDelete: function(index) {
                    this.list.splice(index,1);

                },
            }
        })
    </script>
</body>
</html>
副组件传过来的index就会被子组件的props接受,子组件被点击的时候,触发delete事件,同时把this.index作为参数传给副组件,副组件正好监听delete事件,他就会去执行handleItemDelete这个方法,这个方法就会拿到子组件传递过来的值。


