ansible批量自动配置Juniper
一、需求
有几台新上线的Juniper,需要批量配置下syslog,ntp,snmp基础配置
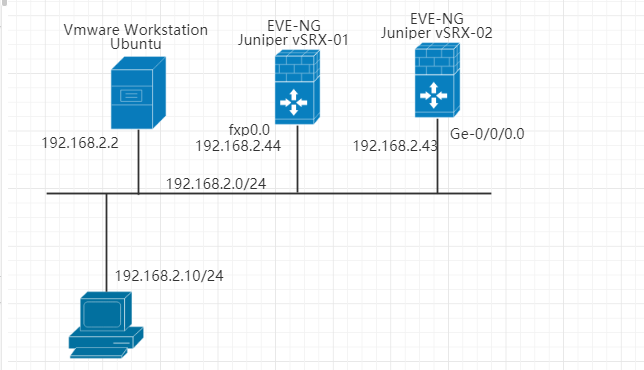
二、拓扑

三、实施步骤
1.读取配置并输出作为初步核查
2.把配置载入网络其中一台网络设备中,并做一个show | compare输出,然后做一个commit check核查,最后退出设备
3.输出一个提醒,要求输入yes 或者no。yes代表继续tasks,进入第4步;no代表退出playbook,终止程序
4.将配置输入到设备,并设定一个10分钟倒回时间
5.commit check 确认配置,停止倒回时间
四、脚本
1. 创建一个变量文件夹junos_config_vars
mkdir junos_config_vars
2.在变量文件夹里创建一个变量文件vsrx_vars.yml
nano junos_config_vars/vsrx_vars.yml
---
  vsrx_config:
  #系统基本参数配置
    - set system syslog host 1.1.1.1 any any
    - set system syslog source-address 192.168.62.44
    - set system ntp server 192.168.62.254
    - set system ntp source-address 192.168.62.44
    - set snmp location "Shanghai China"
    - set snmp contact "lisl"
    - set snmp community public authorization read-only
    - set snmp trap-group gingerdoc targets 192.168.62.253
3.编辑inventory文件
nano lisl_hosts
[junos]
junipervsrx02 junos_host=192.168.2.43
junipervsrx01 junos_host=192.168.2.44
4.编辑层次化变量组文件
nano group_vars/junos.yaml
---
ansible_connection: local
ansible_network_os: junos
ansible_user: admin
ansible_ssh_pass: juniper123
5.编辑剧本playbook:config.yml
---
- name: 配置SRX
  hosts: junipervsrx01
  gather_facts: no
  vars_files:
    - junos_config_vars/vsrx_vars.yml
  roles:
    - Juniper.junos

  tasks:
  - name: "配置如下:"
    debug:
      var: vsrx_config

  - name: 导入配置进入第一台vSRX,仅作核查之用
    juniper_junos_config:
      config_mode: 'exclusive'
      load: 'set'
      lines: "{{vsrx_config}}"
      commit: no
      check: yes
      diff: yes
      provider:
        host: "{{junos_host}}"
        timeout: 120
    register: check_result

  - name: "show | compare输出如下:"
    debug:
      msg: "{{check_result.diff_lines}}"
    when: check_result.diff_lines is defined

#第二个play
- name: 配置SRX
  hosts: junos
  gather_facts: no
  vars_files:
    - junos_config_vars/vsrx_vars.yml
  roles:
    - Juniper.junos
  vars_prompt:
    - name: "confirm_result"
      prompt: "请确认上述核查结果,满意输入:yes,不满意输入:no.\n\n请输入"
      private: no
  tasks:

  - name: 判断结果
    debug:
      msg: 谢谢确认,核查完毕,开始批量配置阶段!
    when: confirm_result == "yes"
    run_once: yes
    delegate_to: localhost
  - fail:
      msg: 谢谢确认,由于您不满意核查结果,playbook即将退出,谢谢!
    when: confirm_result != "yes"

  - name: 导入配置进入vSRX
    juniper_junos_config:
      config_mode: "exclusive"
      load: 'set'
      lines: "{{vsrx_config}}"
      commit: yes
      comment: "Ticket No.12345:configure system parameter"
      confirmed: 10
      diff: yes
      dest_dir: junos_diff/
      provider:
        host: "{{junos_host}}"
        timeout: 120
    notify: 配置完毕,开始确认配置

  handlers:
    - name: 配置完毕,开始确认配置
      juniper_junos_config:
        commit_empty_changes: yes
        comment: "Ticket No. 12345:Confirm the change"
        provider:
          host: "{{junos_host}}"
          timeout: 120
6.运行剧本
ansibel-playbook config.yml
五、脚本参数讲解
1.when: check_result.diff_lines is defined #存在值,就输出show | compare,因为不加when,当遇到重复配置的情况,diff_lines是不存在的,此时ansible会报错,然后中止playbook
2.yes或no #输入yes,代表认可上述配置;输入no,代表上述配置有问题,选择手工中止playbook
3.vars_prompt
prompt #prompt参数类似于python里的input
name #变量名,将用户输入信息赋值给变量名confirm_result
4.fail #失败模块,执行的话,就结束
msg #打印msg内容
5. run_once: yes #仅仅运行一次
6. delegate_to: localhost #任务委派功能,指在本地localhost执行操作
7. notify #通知,当你执行某个task以后,你在task的末尾做一个通知,并附上一个名称或者内容
8. handlers #与tasks平级的功能区,handlers下的name名称与notify的名称相同,则激活handlers,如果有多个task任务同时呼叫一个handler,此handler也只执行一次


